
:max_bytes(150000):strip_icc()/motorola-razr-40-ultra-Lifestyle-6-c1e1e14eeedd4b9da726d158e4d4633b.jpeg)
"2024 Approved Craft Compelling Narratives Through TikTok Voiceovers"
Craft Compelling Narratives Through TikTok Voiceovers
Edit TikTok Videos with Filmora
Wondershare Filmora is one of the best video editors to level up your TikTok video with stunning effects. Download and have a try.
TikTok is becoming increasingly popular among digital content creators. It has provided an opportunity to millions of content makers to produce captivating and creative digital stories. In addition, this app is also continuously upgrading its platform to help you create compelling content.
One such unique addition to its framework is the TikTok voice-over. Voiceovers are added to TikTok videos for narration purposes. So, if you are making a vlog, a voiceover is a must. Likewise, the TikTok voice-over also helps you add sounds and effects to the videos. If you want to know how to do voiceover on TikTok, the following article will explain everything in a step-by-step guide.
Part 1: How to Add Voiceover on TikTok When Recording Video?
TikTok helps you polish your content in a number of ways. Voiceover is one such method to add spice and life to your video content. TikTok allows in-app voiceover addition to the videos. This means you can directly add voiceover when recording video in TikTok. The process is pretty simple. Learn to add a voiceover in a step-by-step guide below.
Step 1: Open TikTok app, and add voice
Launch the TikTok application and click on the + button to open a new window. Tap the voiceover option at the top right corner of the screen.
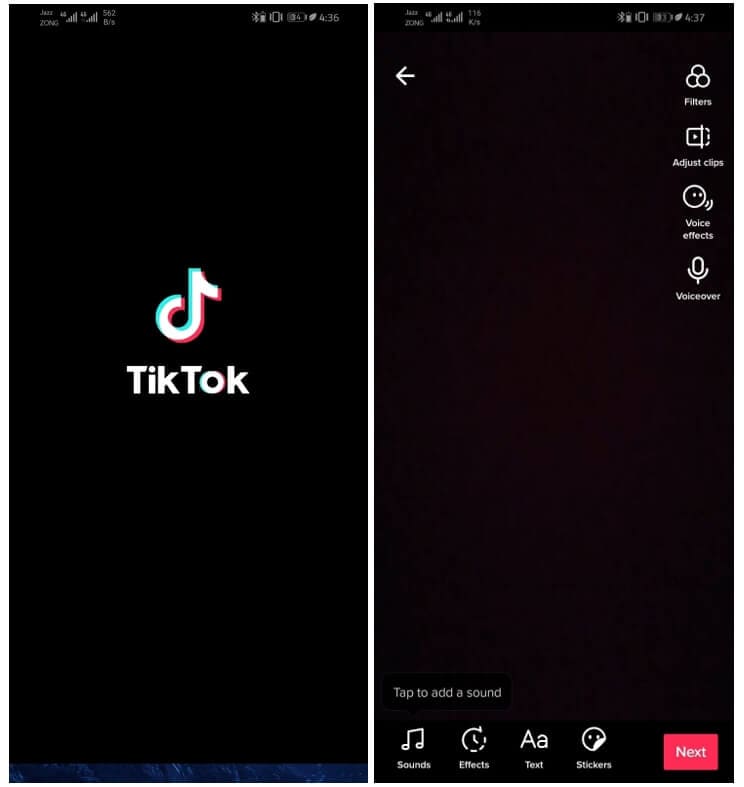
Step 2: Record video and Save
Long-press the record button to add the voice to the video. Click on the Save option at the top of the screen.
Note: The original sound of the video can also be removed when recording voiceover. However, if you want to keep the original video sound, tick the keep original sound box.
Part 2: How to Add Voiceover on TikTok After Video Recorded?
Videos can be imported to TikTok from your gallery or local files. This means you can use TikTok to edit the pre-recorded videos. Video content can be enhanced using filters, texts, and effects available in TikTok in-built library. Moreover, it also enables you to add voiceovers to videos already saved in your gallery. If you want to know how to do voiceover on TikTok, the process is summarized in the simple steps below.
Step 1: launch TikTok and upload a video
Open the application and click the upload button after pressing the + option.
Note: Performing the above step will direct you to your gallery. Select the videos that you want to import to TikTok for adding a voiceover.

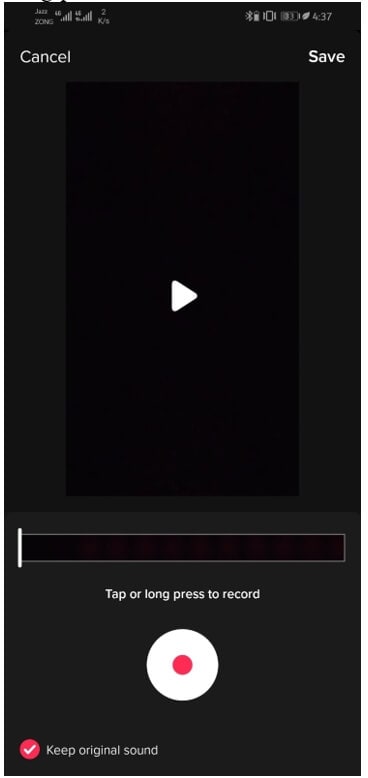
Step 2: Add Voiceover
Click on the voiceover option and keep the record button pressed. Select the save option after finishing the voiceover.
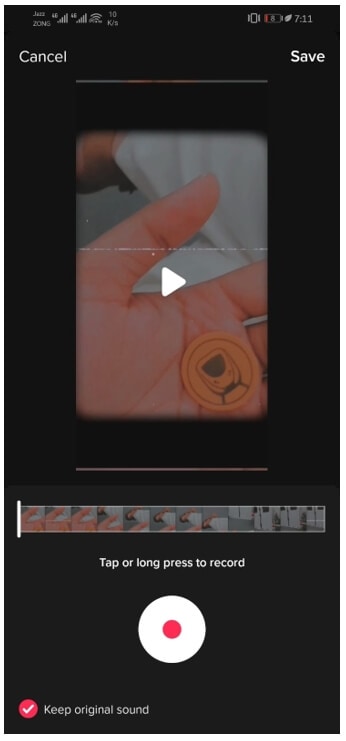
Note: The imported video can be trimmed before the voiceover is added. Trim the video to the desired size and click on the Next button.
Part 3: Why You Should Add a Voiceover to a TikTok Video
Using TikTok is fun. You can enjoy exciting features on TikTok, such as sharing your content, enhancing your videos using filters and effects, and much more. In addition to this, you may also create your own content using TikTok versatile tools. One of the state-of-the-art tools that TikTok has added to its toolkit is the voiceover facility. Voiceover plays an important role in making video content clear and compelling. TikTok videos are no exception. If you want to know about the benefits of TikTok voiceovers, we have got you covered in the following section. Let’s get started.
1. Connects content creators to their audience
Voiceover facilitates you to communicate with your audience. There are high chances that the idea you are trying to present in your video content might not be clear to the viewers. So, voiceovers are effective in adding clarity to your content.
2. Create impact
The primary objective of sharing video content is to influence your followers. However, sometimes visuals are not enough to create impact. Thus, you may need an explanation or narration to convey your message in TikTok videos. So, voiceover is the only way of translating your imagination.
3. Humor
In addition to instructional content and storytelling, TikTok is also known for adding humor. Humorous content can be enhanced further by adding a voiceover. So, the voiceover feature gives you a chance to show your humor skills in TikTok videos.
Part 4: How to Record Voiceover for TikTok on Desktop?
TikTok videos are commonly recorded using its smartphone application. However, this does not imply that you have to perform all the video editing on your phone. You can easily do it on your desktop too. But, what if you are in the middle of editing a TikTok video in some video editing tool on your desktop and want to add a voiceover to it? Don’t worry!! You can also record the voiceover for TikTok on the desktop as well.
Wondershare Filmora is one such advanced video editing tool that allows you to record a voiceover. Do you want to know how to do a voiceover on TikTok? If yes, follow the simple steps below.
Step 1: Make a video for TikTok with Filmora
Launch Filmora, and then import the TikTok video to the timeline by dragging and dropping.
Note: Filmora also has the camera recording feature , if your computer has a camera, you can also record a video in Filmora.
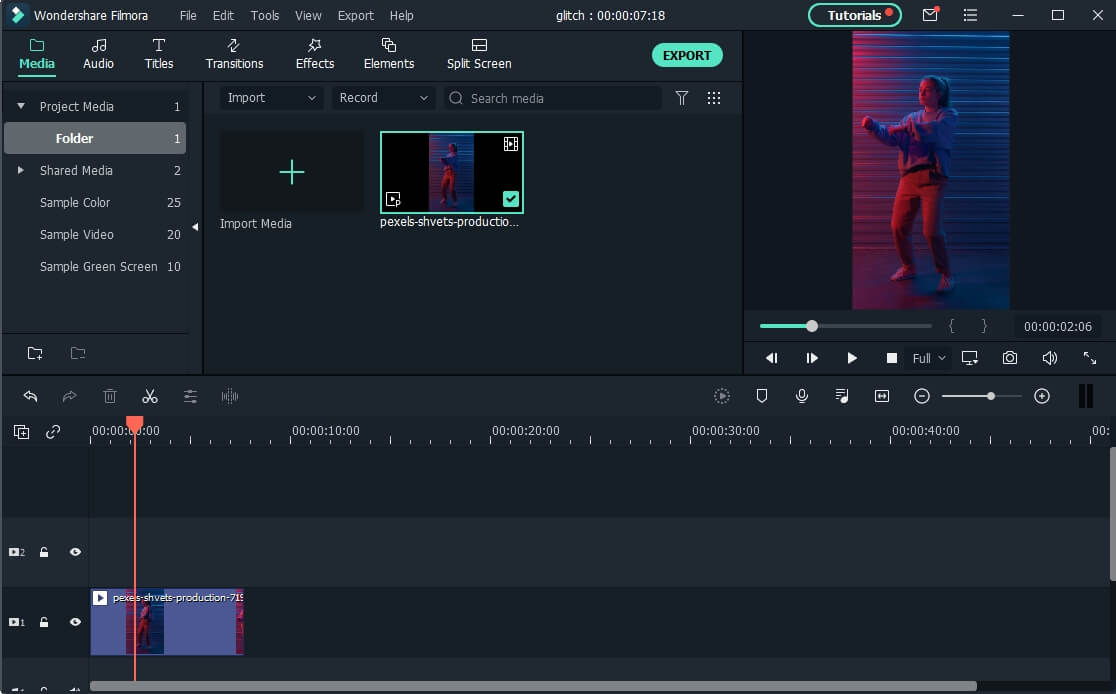
Step 2: Record a voiceover
Open the Record tab and click on the record a voiceover from the list of options. Or click the microphone icon on the screen to start the voiceover recording.
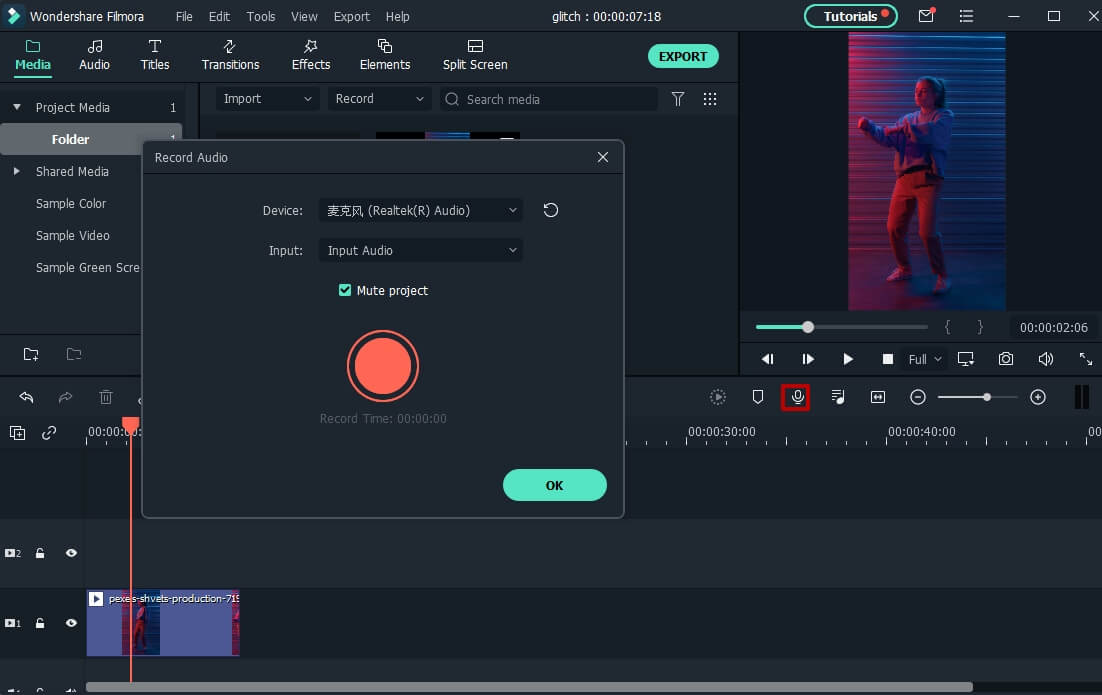
After recording, you can try the audio editing features to change the voice from a female to male, or adjust the speed of voiceover.
Step 3: Export the video
Sync the voiceover to the video and select the export button to save and share the video file.

Now, you can upload the edited video to your TikTok account on a desktop computer.
Step 1: Log in to your TikTok on desktop
Go to the official TikTok website and press the red Login button.
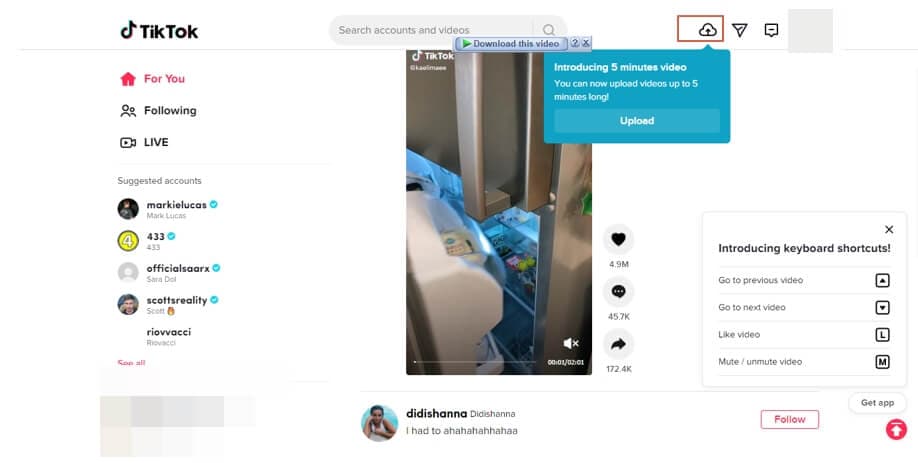
Step 2: Click on Upload video
Click on the cloud button at the top left corner to upload your edited video.
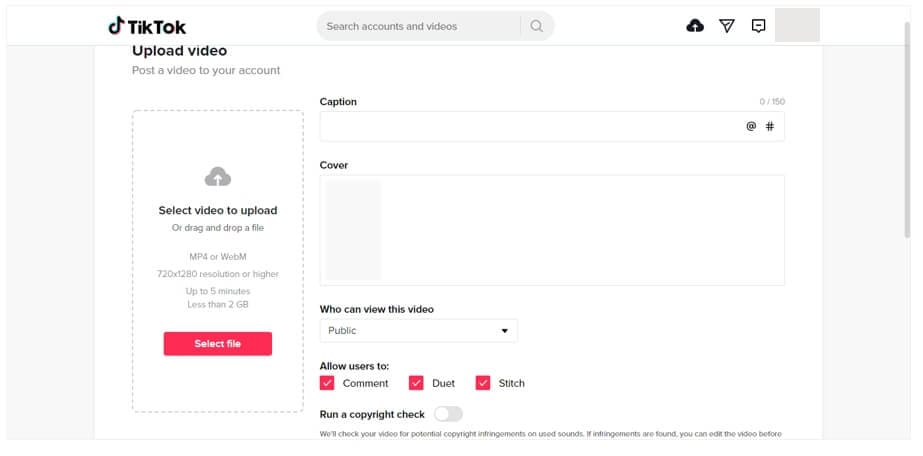
Step 3: Upload video
Select the video from your PC, add the caption and fill in other information before you upload the video.
FAQs about TikTok Voiceover
1. Where can I find the Voiceover Tool on TikTok?
The voiceover tool is incorporated in the TikTok video editing toolkit. The tool can be accessed by clicking the drop-down menu appearing on the right side of the editing window.
2. How to make voiceover louder on TikTok?
Volume can be enhanced using the volume tool in the same drop-down menu where voiceover is found. This allows you to make the voiceover louder on TikTok. So, you can adjust the volume as per your requirements.
Conclusion
TikTok has several features to make your content exciting. Voiceover is one of such features that can polish your video content and make storytelling easy for you. So, we have summarized all the relevant information to give you a detailed insight into how to do a voiceover on TikTok. Hopefully, all concerns will be addressed after reading this article.
TikTok is becoming increasingly popular among digital content creators. It has provided an opportunity to millions of content makers to produce captivating and creative digital stories. In addition, this app is also continuously upgrading its platform to help you create compelling content.
One such unique addition to its framework is the TikTok voice-over. Voiceovers are added to TikTok videos for narration purposes. So, if you are making a vlog, a voiceover is a must. Likewise, the TikTok voice-over also helps you add sounds and effects to the videos. If you want to know how to do voiceover on TikTok, the following article will explain everything in a step-by-step guide.
Part 1: How to Add Voiceover on TikTok When Recording Video?
TikTok helps you polish your content in a number of ways. Voiceover is one such method to add spice and life to your video content. TikTok allows in-app voiceover addition to the videos. This means you can directly add voiceover when recording video in TikTok. The process is pretty simple. Learn to add a voiceover in a step-by-step guide below.
Step 1: Open TikTok app, and add voice
Launch the TikTok application and click on the + button to open a new window. Tap the voiceover option at the top right corner of the screen.
Step 2: Record video and Save
Long-press the record button to add the voice to the video. Click on the Save option at the top of the screen.
Note: The original sound of the video can also be removed when recording voiceover. However, if you want to keep the original video sound, tick the keep original sound box.
Part 2: How to Add Voiceover on TikTok After Video Recorded?
Videos can be imported to TikTok from your gallery or local files. This means you can use TikTok to edit the pre-recorded videos. Video content can be enhanced using filters, texts, and effects available in TikTok in-built library. Moreover, it also enables you to add voiceovers to videos already saved in your gallery. If you want to know how to do voiceover on TikTok, the process is summarized in the simple steps below.
Step 1: launch TikTok and upload a video
Open the application and click the upload button after pressing the + option.
Note: Performing the above step will direct you to your gallery. Select the videos that you want to import to TikTok for adding a voiceover.
Step 2: Add Voiceover
Click on the voiceover option and keep the record button pressed. Select the save option after finishing the voiceover.
Note: The imported video can be trimmed before the voiceover is added. Trim the video to the desired size and click on the Next button.
Part 3: Why You Should Add a Voiceover to a TikTok Video
Using TikTok is fun. You can enjoy exciting features on TikTok, such as sharing your content, enhancing your videos using filters and effects, and much more. In addition to this, you may also create your own content using TikTok versatile tools. One of the state-of-the-art tools that TikTok has added to its toolkit is the voiceover facility. Voiceover plays an important role in making video content clear and compelling. TikTok videos are no exception. If you want to know about the benefits of TikTok voiceovers, we have got you covered in the following section. Let’s get started.
1. Connects content creators to their audience
Voiceover facilitates you to communicate with your audience. There are high chances that the idea you are trying to present in your video content might not be clear to the viewers. So, voiceovers are effective in adding clarity to your content.
2. Create impact
The primary objective of sharing video content is to influence your followers. However, sometimes visuals are not enough to create impact. Thus, you may need an explanation or narration to convey your message in TikTok videos. So, voiceover is the only way of translating your imagination.
3. Humor
In addition to instructional content and storytelling, TikTok is also known for adding humor. Humorous content can be enhanced further by adding a voiceover. So, the voiceover feature gives you a chance to show your humor skills in TikTok videos.
Part 4: How to Record Voiceover for TikTok on Desktop?
TikTok videos are commonly recorded using its smartphone application. However, this does not imply that you have to perform all the video editing on your phone. You can easily do it on your desktop too. But, what if you are in the middle of editing a TikTok video in some video editing tool on your desktop and want to add a voiceover to it? Don’t worry!! You can also record the voiceover for TikTok on the desktop as well.
Wondershare Filmora is one such advanced video editing tool that allows you to record a voiceover. Do you want to know how to do a voiceover on TikTok? If yes, follow the simple steps below.
Step 1: Make a video for TikTok with Filmora
Launch Filmora, and then import the TikTok video to the timeline by dragging and dropping.
Note: Filmora also has the camera recording feature , if your computer has a camera, you can also record a video in Filmora.
Step 2: Record a voiceover
Open the Record tab and click on the record a voiceover from the list of options. Or click the microphone icon on the screen to start the voiceover recording.
After recording, you can try the audio editing features to change the voice from a female to male, or adjust the speed of voiceover.
Step 3: Export the video
Sync the voiceover to the video and select the export button to save and share the video file.
Now, you can upload the edited video to your TikTok account on a desktop computer.
Step 1: Log in to your TikTok on desktop
Go to the official TikTok website and press the red Login button.
Step 2: Click on Upload video
Click on the cloud button at the top left corner to upload your edited video.
Step 3: Upload video
Select the video from your PC, add the caption and fill in other information before you upload the video.
FAQs about TikTok Voiceover
1. Where can I find the Voiceover Tool on TikTok?
The voiceover tool is incorporated in the TikTok video editing toolkit. The tool can be accessed by clicking the drop-down menu appearing on the right side of the editing window.
2. How to make voiceover louder on TikTok?
Volume can be enhanced using the volume tool in the same drop-down menu where voiceover is found. This allows you to make the voiceover louder on TikTok. So, you can adjust the volume as per your requirements.
Conclusion
TikTok has several features to make your content exciting. Voiceover is one of such features that can polish your video content and make storytelling easy for you. So, we have summarized all the relevant information to give you a detailed insight into how to do a voiceover on TikTok. Hopefully, all concerns will be addressed after reading this article.
Audacity Guide: Cutting Out Unwanted Sounds
The most frequent request you’ll get from video makers is to eliminate irritating noises like rumbling or humming from an original clip. Almost all of the time, capturing high-quality audio during filming is challenging since the conversation is often hard to hear or is made unclear due to surrounding noises, such as the dreadful air conditioners or fans.
To get rid of all these awful noises, this Audacity Noise Reduction feature will serve you a significant purpose in removing unwanted background noise for your future videos. Without further ado, let’s get started!
In this article
01 Things You Need to Prepare for Background Noise Reduction
02 How to Remove Background Noise in Audacity?
03 Why is Audacity Noise Reduction Not Working?
04 How to Prevent Background Noise in Audio Recording?
05 How to Remove Background Noise in Filmora?
Part 1: Things You Need to Prepare for Background Noise Reduction
Here are few things that you need to consider before you apply the noise reduction to your clips:
1. Noise Sample
A decent sample of the noise you wish to eliminate is perhaps the most crucial aspect of the Audacity remove noise procedure.
This will be used by Audacity to understand the noise and build a noise profile. The noise recording should last for a fair amount of time and be devoid of any other noises.
2. Avoid Copy Pasting Tiny Noise Section in Your Spoken Phrases
When you have a tiny part of noise between your stated words on your audio, please don’t copy/paste it to make a more significant piece of sound for Audacity to examine.
You would not be supplying Audacity with any more information that will help it generate a decent noise profile. The noise profile is what enables Audacity to tell the difference between speech and noise.
3. Minimum 2048 Data Samples Required
To build a noise profile, the Noise Reduction function requires a minimum of 2048 sample data. An audio file with a sampling frequency of 44.1kHz is roughly five hundredths of a second.
Note that this is the minor sound level that Audacity needs to generate a noise profile; however, should you supply a larger sample of the noise, Audacity can typically perform a great job of producing a suitable noise profile. As a result, attempt to capture a few seconds of background noises wherever possible.
4. Establish Recording Level and Record “Silence”
Setting your audio volume and capturing some “quiet” prior to speaking is the best way to achieve this. Instead, when you’ve finished talking, keep your camera/recorder going for a few moments.
Don’t move or create any sounds while capturing the background noises, and keep an ear open for any other noises. You only need to capture the ambient noise for a few moments; two to five seconds will suffice.
Part 2: How to Remove Background Noise in Audacity on Windows and Mac?
Whether you are using Windows or macOS, we will show you a step-by-step process to achieve your results using both software in this part of Audacity remove background music guide.
Remove background noise in Audacity on Windows
Step 1: On your recording, select a few moments of sound. Any segment of noise that incorporates other noises should be avoided.

Step 2: From the Effect menu, select Noise Reduction.

Step 3: Select the Get Noise Profile option whenever the Noise Reduction effect screen appears.

Note: Choose whether to implement the noise removal to the entire waveforms or only a portion of it.
Step 4: To access the Noise Reduction effects window, go to Effects > Noise Reduction. Raise the level of noise reduction progressively while previewing the result.

Step 5: Head over to the File section to Export and Save the result. Audacity does not save sound clips when you select Save Project; instead, you must choose Export. Select the file type you want to store and the place wherever you can save it. Select Save after giving the File Name.

Remove background noise in Audacity on Mac
Step 1: Create a room tone-containing audio file. When you don’t have a separate track for room tone, use a recording with a few moments of quiet in it. Click-and-drag to select a segment with a few minutes of silence using the Selection Tool.

Step 2: Select Noise Reduction from the Effects tab. Select the Get Noise Profile tab in the new tab under Step 1. The screen will shut, and Audacity will take noise profile samples of the indicated area.

Step 3: Click-and-drag to select the whole file, which requires noise reduction with the Selection Tool. To re-open the function, go to the Effect tab and pick Noise Reduction. Make modifications to the following parameters under Step 2:
- Reduce and Residue
- Frequency Smoothing (bands)
- Sensitivity
- Noise Reduction

Step 4: To listen to how the chosen file will look with the selected parameters, select Preview. Re-adjust until you have a sound noise reduction with no interference. When you’re finished, select Reduce and click OK.
Part 3: Why is Audacity Noise Reduction Not Working?
It’s possible that the Noise Reduction function isn’t letting you mop up your recording since your audio isn’t appropriate for it. The disturbance must be continuous, not random or fluctuating, to work for Audacity’s Noise Reduction function.
For example, the Noise Reduction function will not assist if your audio was made in a busy environment with unique noises such as background chatter, random traffic noises, or in an exhibition space or museum. The Noise Reduction feature in Audacity isn’t meant to cope with that kind of distortion. You’ll need to alter your recording approach if you’re capturing voice in either of those situations.
Under the following situations, the Audacity Noise Reduction function might underperform.
- Particular noise in the background, including traffic or people.
- When the harmonics of the sound and voice are comparable.
- There is sound variance where there is fluctuation in the noise.
- The volume of the voice is comparable to or lower than that of the background noise.
- When the noise is irregular or changeable rather than continuous.
- The loudness is deafening.
- The sound is a single click or pop.
Part 4: How to Prevent Background Noise in Audio Recording?
Although Audacity allows eliminating noise very simply, it is still an additional level that takes time to refine your podcast production. These pointers can help you avoid the necessity for noise reduction and cut down on the amount of time you spend processing.
1. Reduce the Computer Fan Noise
Whenever computers become too heated, they can produce a lot of noise. You may limit the amount of software that runs and position your mic away from the keyboard to help lessen this impact and avoid the fan from coming on.
However, even if you observe all of these guidelines, undesired recording sounds may still appear in your program. Fortunately, contemporary software makes this problem quite simple to resolve.
2. Reduce the Gain and Get Close to the Mic
Reduce the gain (sensitivity of the microphone) and go nearer to it. Talking straight into the microphone won’t distort your audio if you reduce the gain, and that would assist your microphone in concentrating on scooping up your voice’s tone.
Bonus Tip: Set your recorder’s (or DAW’s) sensitivity such that your speech peaks between -12 and -10db.
3. Utilize a Versatile Microphone
Condenser and dynamic microphones are the two most common types of podcast microphones. Condenser microphones are significantly more sensitive instruments meant to take up average atmospheric noise, whereas dynamic microphones have a narrower frequency range, picking up fewer ambient noises.
4. Optimize Your Recording Environment
The most significant and most crucial aspect of your podcasts’ sound quality is where you capture it. To optimize your personal podcasting space, we recommend choosing a peaceful, compact area away from HVAC systems, vehicles, external hard drives, background sound, motors, and other distractions. You may also increase the tone of your room by using natural sound absorbents such as curtains, rugs, carpets, and sofas.
Part 5: How to Remove Background Noise in Filmora?
Although there is a lot of software available to eliminate ambient noise, we highly suggest Wondershare Filmora Video Editor to edit audio and video in one place.
In addition to the standard audio editing capabilities, the recently redesigned Filmora currently includes enhanced waveforms, volume Keyframing , peak metering, and audio transitions, giving you a better audio editing interface.
For Win 7 or later (64-bit)
For macOS 10.12 or later
Filmora Video Editor will quickly remove ambient sound from both sound/video. You may also remove the sound from the video with this simple video editor, use the Audio Equalizer or Audio Mixer functions to modify the audio further, and then Export and save the audio in an Mp3 file. Here are the detailed steps:
Step 1: In the Wondershare Filmora Timeline menu, Import your footage. Trim the footage after previewing it and deleting the sections you don’t want to retain.

Step 2: To eliminate the ambient noise immediately, double-click on the video file, and go to the Audio panel to select the Remove Background Noise option. You will find that the background noise is removed automatically.

Step 3: After checking the results, select Export to download the noise-reduced clip to your desktop or upload it immediately to YouTube or Vimeo.
Conclusion
Well, there you have it. In this Audacity Remove Background Noise guide, we have reviewed every possible method you can adopt to get rid of the unnecessary background noise in the Audacity. And if the desired results are still not achieved, we highly recommend using the Wondershare Filmora editing software. Not only will it help you remove the unwanted ambient noise, but it will also allow you to customize your audio or video file further.
02 How to Remove Background Noise in Audacity?
03 Why is Audacity Noise Reduction Not Working?
04 How to Prevent Background Noise in Audio Recording?
05 How to Remove Background Noise in Filmora?
Part 1: Things You Need to Prepare for Background Noise Reduction
Here are few things that you need to consider before you apply the noise reduction to your clips:
1. Noise Sample
A decent sample of the noise you wish to eliminate is perhaps the most crucial aspect of the Audacity remove noise procedure.
This will be used by Audacity to understand the noise and build a noise profile. The noise recording should last for a fair amount of time and be devoid of any other noises.
2. Avoid Copy Pasting Tiny Noise Section in Your Spoken Phrases
When you have a tiny part of noise between your stated words on your audio, please don’t copy/paste it to make a more significant piece of sound for Audacity to examine.
You would not be supplying Audacity with any more information that will help it generate a decent noise profile. The noise profile is what enables Audacity to tell the difference between speech and noise.
3. Minimum 2048 Data Samples Required
To build a noise profile, the Noise Reduction function requires a minimum of 2048 sample data. An audio file with a sampling frequency of 44.1kHz is roughly five hundredths of a second.
Note that this is the minor sound level that Audacity needs to generate a noise profile; however, should you supply a larger sample of the noise, Audacity can typically perform a great job of producing a suitable noise profile. As a result, attempt to capture a few seconds of background noises wherever possible.
4. Establish Recording Level and Record “Silence”
Setting your audio volume and capturing some “quiet” prior to speaking is the best way to achieve this. Instead, when you’ve finished talking, keep your camera/recorder going for a few moments.
Don’t move or create any sounds while capturing the background noises, and keep an ear open for any other noises. You only need to capture the ambient noise for a few moments; two to five seconds will suffice.
Part 2: How to Remove Background Noise in Audacity on Windows and Mac?
Whether you are using Windows or macOS, we will show you a step-by-step process to achieve your results using both software in this part of Audacity remove background music guide.
Remove background noise in Audacity on Windows
Step 1: On your recording, select a few moments of sound. Any segment of noise that incorporates other noises should be avoided.
Step 2: From the Effect menu, select Noise Reduction.
Step 3: Select the Get Noise Profile option whenever the Noise Reduction effect screen appears.
Note: Choose whether to implement the noise removal to the entire waveforms or only a portion of it.
Step 4: To access the Noise Reduction effects window, go to Effects > Noise Reduction. Raise the level of noise reduction progressively while previewing the result.
Step 5: Head over to the File section to Export and Save the result. Audacity does not save sound clips when you select Save Project; instead, you must choose Export. Select the file type you want to store and the place wherever you can save it. Select Save after giving the File Name.
Remove background noise in Audacity on Mac
Step 1: Create a room tone-containing audio file. When you don’t have a separate track for room tone, use a recording with a few moments of quiet in it. Click-and-drag to select a segment with a few minutes of silence using the Selection Tool.
Step 2: Select Noise Reduction from the Effects tab. Select the Get Noise Profile tab in the new tab under Step 1. The screen will shut, and Audacity will take noise profile samples of the indicated area.
Step 3: Click-and-drag to select the whole file, which requires noise reduction with the Selection Tool. To re-open the function, go to the Effect tab and pick Noise Reduction. Make modifications to the following parameters under Step 2:
- Reduce and Residue
- Frequency Smoothing (bands)
- Sensitivity
- Noise Reduction
Step 4: To listen to how the chosen file will look with the selected parameters, select Preview. Re-adjust until you have a sound noise reduction with no interference. When you’re finished, select Reduce and click OK.
Part 3: Why is Audacity Noise Reduction Not Working?
It’s possible that the Noise Reduction function isn’t letting you mop up your recording since your audio isn’t appropriate for it. The disturbance must be continuous, not random or fluctuating, to work for Audacity’s Noise Reduction function.
For example, the Noise Reduction function will not assist if your audio was made in a busy environment with unique noises such as background chatter, random traffic noises, or in an exhibition space or museum. The Noise Reduction feature in Audacity isn’t meant to cope with that kind of distortion. You’ll need to alter your recording approach if you’re capturing voice in either of those situations.
Under the following situations, the Audacity Noise Reduction function might underperform.
- Particular noise in the background, including traffic or people.
- When the harmonics of the sound and voice are comparable.
- There is sound variance where there is fluctuation in the noise.
- The volume of the voice is comparable to or lower than that of the background noise.
- When the noise is irregular or changeable rather than continuous.
- The loudness is deafening.
- The sound is a single click or pop.
Part 4: How to Prevent Background Noise in Audio Recording?
Although Audacity allows eliminating noise very simply, it is still an additional level that takes time to refine your podcast production. These pointers can help you avoid the necessity for noise reduction and cut down on the amount of time you spend processing.
1. Reduce the Computer Fan Noise
Whenever computers become too heated, they can produce a lot of noise. You may limit the amount of software that runs and position your mic away from the keyboard to help lessen this impact and avoid the fan from coming on.
However, even if you observe all of these guidelines, undesired recording sounds may still appear in your program. Fortunately, contemporary software makes this problem quite simple to resolve.
2. Reduce the Gain and Get Close to the Mic
Reduce the gain (sensitivity of the microphone) and go nearer to it. Talking straight into the microphone won’t distort your audio if you reduce the gain, and that would assist your microphone in concentrating on scooping up your voice’s tone.
Bonus Tip: Set your recorder’s (or DAW’s) sensitivity such that your speech peaks between -12 and -10db.
3. Utilize a Versatile Microphone
Condenser and dynamic microphones are the two most common types of podcast microphones. Condenser microphones are significantly more sensitive instruments meant to take up average atmospheric noise, whereas dynamic microphones have a narrower frequency range, picking up fewer ambient noises.
4. Optimize Your Recording Environment
The most significant and most crucial aspect of your podcasts’ sound quality is where you capture it. To optimize your personal podcasting space, we recommend choosing a peaceful, compact area away from HVAC systems, vehicles, external hard drives, background sound, motors, and other distractions. You may also increase the tone of your room by using natural sound absorbents such as curtains, rugs, carpets, and sofas.
Part 5: How to Remove Background Noise in Filmora?
Although there is a lot of software available to eliminate ambient noise, we highly suggest Wondershare Filmora Video Editor to edit audio and video in one place.
In addition to the standard audio editing capabilities, the recently redesigned Filmora currently includes enhanced waveforms, volume Keyframing , peak metering, and audio transitions, giving you a better audio editing interface.
For Win 7 or later (64-bit)
For macOS 10.12 or later
Filmora Video Editor will quickly remove ambient sound from both sound/video. You may also remove the sound from the video with this simple video editor, use the Audio Equalizer or Audio Mixer functions to modify the audio further, and then Export and save the audio in an Mp3 file. Here are the detailed steps:
Step 1: In the Wondershare Filmora Timeline menu, Import your footage. Trim the footage after previewing it and deleting the sections you don’t want to retain.
Step 2: To eliminate the ambient noise immediately, double-click on the video file, and go to the Audio panel to select the Remove Background Noise option. You will find that the background noise is removed automatically.
Step 3: After checking the results, select Export to download the noise-reduced clip to your desktop or upload it immediately to YouTube or Vimeo.
Conclusion
Well, there you have it. In this Audacity Remove Background Noise guide, we have reviewed every possible method you can adopt to get rid of the unnecessary background noise in the Audacity. And if the desired results are still not achieved, we highly recommend using the Wondershare Filmora editing software. Not only will it help you remove the unwanted ambient noise, but it will also allow you to customize your audio or video file further.
Also read:
- [New] 2024 Approved Learn to Record Exceptional Videos in Minutes on TikTok
- [Updated] 2024 Approved Lost Footage on TikTok Repeat Video History
- [Updated] 2024 Approved Crafting Engaging Content with Added Vocal Dimensions in TikTok Videos
- Wacky World of TikTok Gaming - Top 10 Picks for 2024
- [Updated] Navigating the Virality Vortex Top Tips for TikTokers
- [Updated] The Art of Scaling on Screen Giant Heads for TikToks for 2024
- From Online Sensations to Graphic Gems Top Converters at Your Fingertits for 2024
- [New] 2024 Approved Top 10 Melodies TikTok's Enduring Tracks for the Year (2 Folk-Inspired)
- [New] Best 10 Filter Combos To Make Your TikTok Unique for 2024
- [Updated] Beginner's Handbook for PC Users - Initiating a TikTok Broadcast for 2024
- In 2024, Prime Marker Extraction Software for Phones & Tablets
- [Updated] In 2024, The Ultimate Guide to Favorite TikTok Emoji Use & Hidden Symbols
- In 2024, Best of Country Top 20 Tunes for Dancing, Stress-Free Vibes (TikTok)
- 2024 Approved Pioneering TikTok Ads Trends & Proven Effective Examples
- [New] Expert Tips for Flawless Voice Alteration on TikTok for 2024
- [Updated] In 2024, The Quest for Your Own Distinctive Stream Tagline
- Unintended TikTok Rewind – What Now for 2024
- [Updated] Navigate to Connect with a TikTok Life Stream for 2024
- [New] How To Achieve Impactful Big Head Aesthetics in Your TikToks (3 Ways) for 2024
- [Updated] Strategies to Circumvent the Hidden Shadowban on TikTok
- Exploring The Most Popular Global TikTok Creators
- [Updated] Discovering the Essentials of Exceptional TikTok Campaigns
- [Updated] Instantly and Indefinitely Remove Yourself From TikTok Landscape for 2024
- [New] 2024 Approved The Art of Adding Texts on TikTok A Detailed Walkthrough
- 2024 Approved The Updated Best Bets for Social Media, Not Just TikTok
- [New] Charting Course Through TikTok's Anime Wonderland Rhythmic Choreographies & Iconic Memes
- [New] 2024 Approved Audio Transformation for TikTok Posts Explained
- [Updated] The Art of Adding Texts on TikTok A Detailed Walkthrough
- How to Charm Your Way Into a Friend’s TikTok Show
- [Updated] Creating Popular Jujutsu Kaisen TikTok Content
- Quirky Quests Top 10 Offbeat TikTok Game Choices
- In 2024, Mirthful Mayhem A Top 20 List of Hilarious TikTok Jokes & Riddles
- [Updated] How to Make TikTok Reaction Videos Easily in 2 Ways for 2024
- [Updated] Culinary Quests TikTok's Best Food Content
- Building a Fanbase Key Strategies for Desktop TikTok Videos
- [New] In 2024, Ultimate List of TikTok Edits Software (W Indos)
- 2024 Approved Perfecting Pitches Removing Ambient Rustling
- [New] The Insider's Guide to TikTok Wealth - Filmora Edition for 2024
- [New] 2024 Approved Efface Markings IOS/Android Apps for Clear Videos
- Echoes of Collaboration TikTok Duet Hits for 2024
- Discover the Hottest TikTok Products at Amazon for 2024
- [Updated] 2024 Approved Celebrating TikTok's Premier Gaming Creators
- In 2024, Striking FP Designs for a Memorable TikTok Identity
- [Updated] In 2024, Dance, Cook, and Eat The Hottest Food Trends on TikTok
- The Key Ingredients for a Profitable Social Media Career - TikTok Edition
- [New] 2024 Approved Adapt to the Digital Age Mastering Computer-Based Live Feeds on TikTok
- [Updated] Become an Elite Joiner Tips for TikTok Lives
- [Updated] The Ultimate Guide to Boosting TikTok Traction
- [Updated] 2024 Approved Audacity's Silence Secret Eliminating Rests of Noise
- [New] In 2024, Finest TikTok Creation Software for Windows Desktop
- [New] 2024 Approved Mastering Video Recording CamStudio's Total Package
- Top 5 Vivo T2x 5G Bypass FRP Tools for PC That Actually Work
- How to Detect and Remove Spyware on Lava Blaze Pro 5G? | Dr.fone
- [Updated] In 2024, Tales of Trial by Fire Vs. Innovative Challenges
- In 2024, How to Hide/Fake Snapchat Location on Your Motorola Moto G13 | Dr.fone
- [Updated] In 2024, Initiating Instant Conversation Rooms on WhatsApp
- Complete guide for recovering call logs on Sony Xperia 10 V
- How to Change Netflix Location to Get More Country Version On Tecno Spark 10 5G | Dr.fone
- In 2024, Mac Users Rejoice The Ultimate MP3 Conversion Software Roundup
- Capture Your Screen in a Flash - Free, No Hassle, In 2024
- Things You Dont Know About Oppo A78 Reset Code | Dr.fone
- Video Fixer Software for all Corrupt Videos of Xiaomi Redmi K70 Pro
- Mastering the Art of Capturing Sims 4 – Essential Techniques Unveiled
- 2024 Approved Quickly Snag and Store GIFs From Your Favorite Social Networks
- New 8 Blender 3D Animation Tutorials for Beginners for 2024
- In 2024, How to Change your Vivo Y78 5G Location on Twitter | Dr.fone
- [Updated] In 2024, Television Archive Advanced Techniques for Online Streams
- Updated In 2024, The Elite Selection of 8 Dictation Technologies for Desktop Operations on Various OS and Online Platforms
- Hard Reset Oppo A38 in 3 Efficient Ways | Dr.fone
- Elevating Your Sound Experience The Top 10 Alternatives to Audacity Across Computers and Tablets
- [New] 2024 Approved Laptop & Mobile Guide for Initiating Google Meet
- New Multiple Ways How To Remove iCloud Activation Lock From your iPhone 8 Plus
- In 2024, Sim Unlock Nokia C12 Plus Phones without Code 2 Ways to Remove Android Sim Lock
- New 2024 Approved Windows 8 FLV Editor A User-Friendly Video Editing Solution
- In 2024, How to Transfer Data from HTC U23 to Other Android Devices? | Dr.fone
- In 2024, Easy Ways to Manage Your Vivo Y28 5G Location Settings | Dr.fone
- [Updated] Top 6 Minecraft Oriental House Ideas for 2024
- Xiaomi Data Retrieval tool – restore lost data from Xiaomi Redmi Note 12 Pro 4G
- A Compreayer's Pathway to Efficient Screen Recording via ZD Software
- Best Motorola Razr 40 Ultra Pattern Lock Removal Tools Remove Android Pattern Lock Without Losing Data
- New 2024 Approved Best Websites for Turning a Photo Into a Cartoon
- [Updated] In 2024, Pioneering Techniques to Improve Your FB Video Ad Effectiveness
- How do I reset my Huawei Nova Y71 Phone without technical knowledge? | Dr.fone
- How to Fake Snapchat Location without Jailbreak On Realme GT 5 Pro | Dr.fone
- In 2024, How To Create an Apple Developer Account From Apple iPhone XS
- [Updated] In 2024, Essential Android Tools 5 Leading PS2 Emulator Apps
- [New] In 2024, Optimize Your PlayStation 10 Best SSDs, HDDs
- [New] 2024 Approved Supercharged Strategies to Locate Online ID's
- Top 12 Prominent Vivo Y36 Fingerprint Not Working Solutions
- [New] 2024 Approved Unleashing Creativity with Aiseesoft's Screencast Innovations
- Updated 2024 Approved Say Goodbye to Shaky Cam Video Stabilization Tips for Premiere Pro Users
- [New] In 2024, PixelPlay Review System
- How to Unlock Itel A05s Phone with Broken Screen
- In 2024, Easiest Guide How to Clone Vivo X Fold 2 Phone? | Dr.fone
- Easily Unlock Your Realme 10T 5G Device SIM
- [New] In 2024, Achieving Professional Quality with Instagram's Virtual Screens
- How to Screen Mirroring Honor Magic 5? | Dr.fone
- Title: "2024 Approved Craft Compelling Narratives Through TikTok Voiceovers"
- Author: Stephen
- Created at : 2024-05-23 02:42:02
- Updated at : 2024-05-24 02:42:02
- Link: https://tiktok-video-recordings.techidaily.com/2024-approved-craft-compelling-narratives-through-tiktok-voiceovers/
- License: This work is licensed under CC BY-NC-SA 4.0.
