
:max_bytes(150000):strip_icc()/GettyImages-1212937831-e325a23541f44dbcacab2ea0a3a13ca8.jpg)
"2024 Approved Revealing Hidden Features Altering Your TikTok Voice Effectively"
Revealing Hidden Features: Altering Your TikTok Voice Effectively
Edit TikTok Videos with Filmora
Wondershare Filmora is one of the best video editors to level up your TikTok video with stunning effects. Download and have a try.
If you’ve been using TikTok for a while, you’ve probably seen excellent videos with unique voice-overs and sound effects. You might have imagined that you would also be famous and feature on some popular platform if you possessed these abilities.
We are going to talk about these audio effects on TikTok videos today. We’ll show you How to Change Voice on TikTok and apply voice modifications there, as well as on a popular and widely used third-party software. So, let’s get the ball rolling.
In this article
02 Record and Add Voice TikTok
03 Available Voice Effects in TikTok
04 Change Voice for TikTok Videos in Capcut
05 Change Voice from Female to Male in Filmora for TikTok Video
Part 1: What is Voice Effect?
Picture filters are widely used on Instagram and Snapchat, and we are all acquainted with them. Such filters enable us to add a subtle color change or any other type of modification to our filters. However, because TikTok is all about audio and video, you may utilize voice filters in your videos.
Speech filters are sound effects that enable us to alter our voices. It’s worth noting that users can only use the application to apply speech filters to their recorded voice. When you’re not using or uploading any recordings, you won’t utilize any voice effects.
Built-in voice effects in TikTok include chipmunk, baritone, mike, megaphone, robot, battery drain, shaking, electronic, echo, synth, elf, huge, and acoustic signals.
Part 2: How to Record and Add Voice TikTok?
Your video must feature your voice to apply Voice Effects. You can’t utilize Voice Effects in films created with built-in themes, including audio, for example.
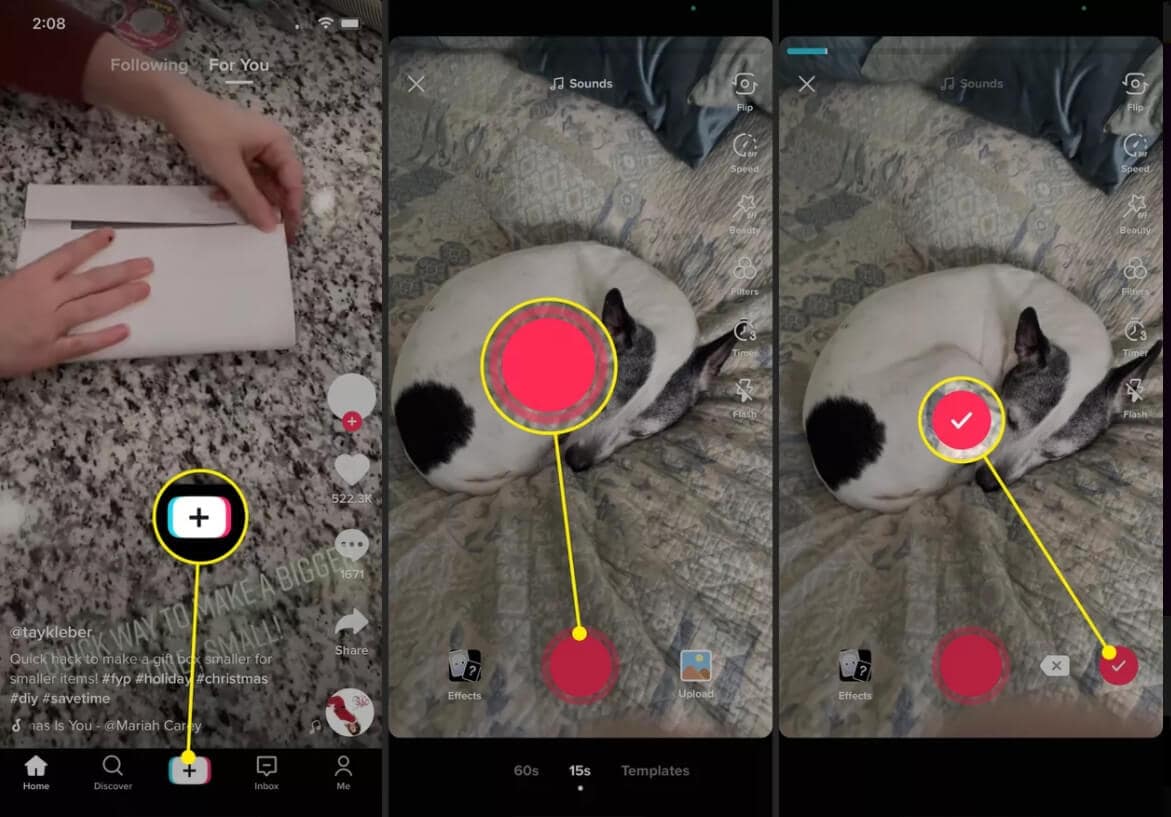
Step 1: To begin recording your clip, launch TikTok and hit the + (plus symbol) at the base.
Step 2: Press the Record button, record your video as usual, and tap it again to stop or end the recording. Once you’re done recording, tick the Checkmark.
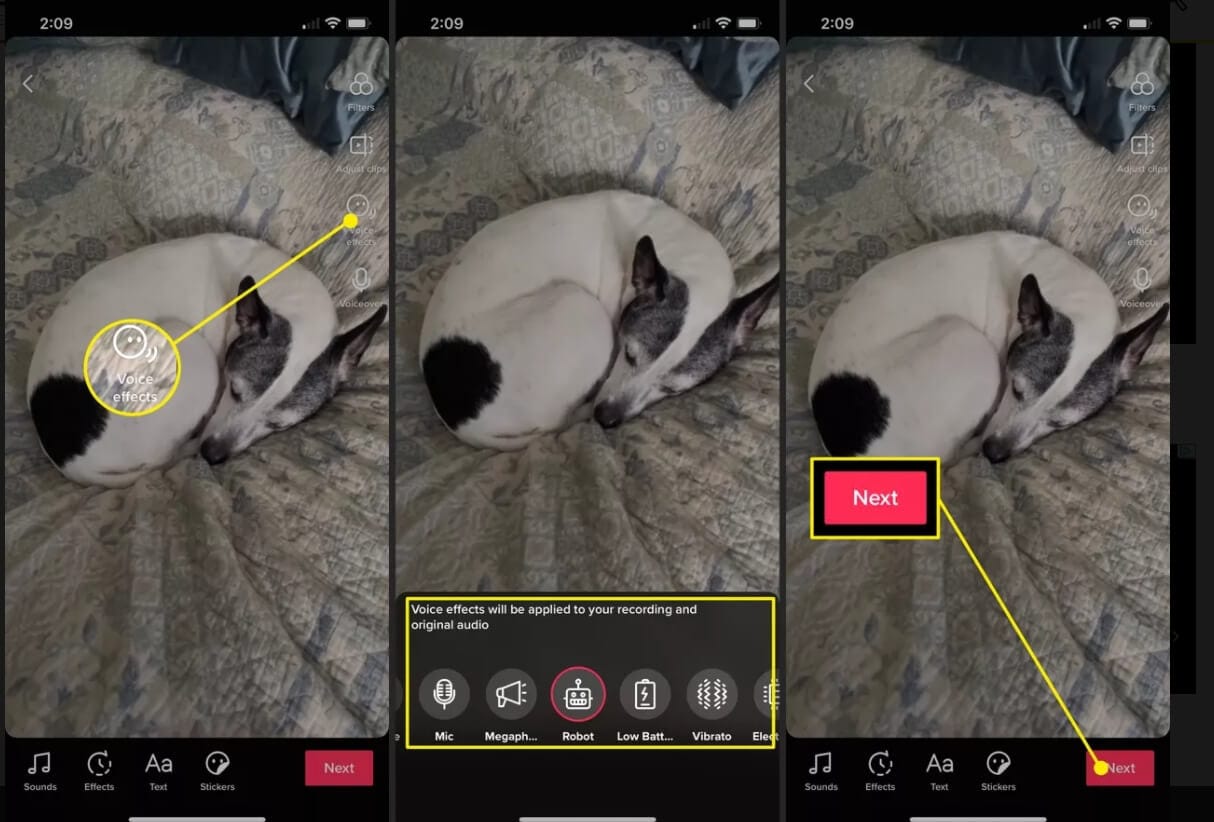
Step 3: Select Voice Effects from the drop-down menu on the upper right.
Step 4: Tap to hear every one of the effects as the window opens up from the bottom. When you wish to utilize one, pick it and move your finger away from the screen. Tap None on the far left when you don’t want to employ an voice effect.
Step 5: After that, you may add any extra effects to your movie, such as text stickers. When you’re finished, tap Next. Proceed to choose your Post choices, save the video, or touch Post as you would with any other video you’ve made.
Part 3: Available Voice Effects List in TikTok
TikTok has several Voice Effects that allow you to change your voice. You may explore something entertaining because you can listen to each one before deciding to utilize it.
- Sound waves: Synth-like in tone, but with a more digital edge.
- Giant: Like a large, joyful monster, heavier than baritone.
- Helium: Chipmunk’s voice is louder pitched.
- Synth: Imagine 80s music with a synthesizer added to your voice.
- Echo: There is an echo in every word or statement.
- Electronic: Your comments were accompanied by a smattering of electronic noises.
- Vibrato: A vibrating tone, as if your voice were trembling.
- Low Battery: Slow and deliberate, as though your battery is running low.
- Robot: You seem just like a robot, as you could expect.
- Megaphone: You sound as though you’re whispering into a megaphone.
- Mic: How you would appear if you were speaking into a real microphone.
- Baritone: Masculine and profound.
- Chipmunk: Like another one of Alvin’s Chipmunks, it’s high-pitched.
Check some popular and interesting TikTok voice effects compilation.
Part 4: How to Change Voice for TikTok Videos in Capcut?
The editing capabilities in TikTok are adequate yet rudimentary. You may upload and modify existing movies and photographs or record yourself for up to three minutes. Turn to CapCut’s ShortCut option if you want a simpler TikTok or Dubsmash-style editing experience.
CapCut will question you about the movies and photographs in your photo library that you’d want to import into the composition when you’re in this mode. After that, the program analyzes your video and recommends a variety of designs, which each alters the music, timing, and changes.
For instance, you may add a pop rhythm, disco groove, or urban funk flavor to your film. CapCut allows you to select from a licensed library of songs or import sounds you’ve recorded.
Here’s how to change the voice on TikTok using Capcut:
Step 1: Open the Capcut application on your phone and Import a video/audio file or record a short sample.
Step 2: Now tap on Add Audio to record a Voiceover.
Step 3: After recording, now press on the Checkmark to save the sample.
Step 4: Now tap on the recorded area on the Timeline to enable the Voice Effects.
Step 5: Select the Voice Effects according to your liking from the given options and press on the Checkmark to save the video.
Part 5: How to Change Voice from Female to Male in Filmora for TikTok Video?
Filmora is among the finest video editing software for the novice as well as professional editors since it has powerful and effective video and audio production features. There would be no watermark or limits when exporting audio from Wondershare Filmora for trial version customers.
As a result, you may download it for free and try out the audio editing tools. Let’s look at how to add and adjust the voice in Filmora with this step-by-step guide.
Step 1: For starters, Import the video/audio files. Then, drag the imported video to the Timeline.
Step 2: Double-click on the audio in the timeline. Use the Pitch option to alter the voice of the video or recorded voice-over. By increasing the pitch, you can make it sound like a female’s voice and vice versa. You can further customize the recording using Fade in, Volume, Speed, Fade out, etc.

Step 3: When done with the modifications, click on Export and select Format to save the audio/video in the desired format.

Click to find out more voice changer and how to change voice in video with Filmora :
Frequently Asked Questions About Changing Voice in TikTok
1. Why Don’t I Have Voice Effects on TikTok?
There can be several reasons behind why you don’t have voice effects on TikTok presently. One of the foremost is that you have old software in either your iPhone or Android. Other reasons include giving the modification permission to TikTok, not clearing cache, updating TikTok, etc.
2. How Many Voice Effects in TikTok?
There are 13 voice effects that you can try in TikTok. These include a chipmunk, baritone, mike, megaphone, robot, battery drain, shaking, electronic, echo, synth, elf, huge, and acoustic signals. Hence, TikTok offers an endless and diverse range of effects
Conclusion
Overall, how to Change on TikTok is a simple process. For the required minor modifications, we believe the app’s built-in editor is sufficient. Filmora, on the other hand, is ideal if you would like to go professional and do unique transitions and edits. We believe we’ve provided some necessary knowledge on the TikTok application’s voice change. We hope you can include fantastic audio effects into your next TikTok video to make it engaging.
Note: All screenshots are from the Internet. If there is any infringement, please contact us to delete it.
If you’ve been using TikTok for a while, you’ve probably seen excellent videos with unique voice-overs and sound effects. You might have imagined that you would also be famous and feature on some popular platform if you possessed these abilities.
We are going to talk about these audio effects on TikTok videos today. We’ll show you How to Change Voice on TikTok and apply voice modifications there, as well as on a popular and widely used third-party software. So, let’s get the ball rolling.
In this article
02 Record and Add Voice TikTok
03 Available Voice Effects in TikTok
04 Change Voice for TikTok Videos in Capcut
05 Change Voice from Female to Male in Filmora for TikTok Video
Part 1: What is Voice Effect?
Picture filters are widely used on Instagram and Snapchat, and we are all acquainted with them. Such filters enable us to add a subtle color change or any other type of modification to our filters. However, because TikTok is all about audio and video, you may utilize voice filters in your videos.
Speech filters are sound effects that enable us to alter our voices. It’s worth noting that users can only use the application to apply speech filters to their recorded voice. When you’re not using or uploading any recordings, you won’t utilize any voice effects.
Built-in voice effects in TikTok include chipmunk, baritone, mike, megaphone, robot, battery drain, shaking, electronic, echo, synth, elf, huge, and acoustic signals.
Part 2: How to Record and Add Voice TikTok?
Your video must feature your voice to apply Voice Effects. You can’t utilize Voice Effects in films created with built-in themes, including audio, for example.
Step 1: To begin recording your clip, launch TikTok and hit the + (plus symbol) at the base.
Step 2: Press the Record button, record your video as usual, and tap it again to stop or end the recording. Once you’re done recording, tick the Checkmark.
Step 3: Select Voice Effects from the drop-down menu on the upper right.
Step 4: Tap to hear every one of the effects as the window opens up from the bottom. When you wish to utilize one, pick it and move your finger away from the screen. Tap None on the far left when you don’t want to employ an voice effect.
Step 5: After that, you may add any extra effects to your movie, such as text stickers. When you’re finished, tap Next. Proceed to choose your Post choices, save the video, or touch Post as you would with any other video you’ve made.
Part 3: Available Voice Effects List in TikTok
TikTok has several Voice Effects that allow you to change your voice. You may explore something entertaining because you can listen to each one before deciding to utilize it.
- Sound waves: Synth-like in tone, but with a more digital edge.
- Giant: Like a large, joyful monster, heavier than baritone.
- Helium: Chipmunk’s voice is louder pitched.
- Synth: Imagine 80s music with a synthesizer added to your voice.
- Echo: There is an echo in every word or statement.
- Electronic: Your comments were accompanied by a smattering of electronic noises.
- Vibrato: A vibrating tone, as if your voice were trembling.
- Low Battery: Slow and deliberate, as though your battery is running low.
- Robot: You seem just like a robot, as you could expect.
- Megaphone: You sound as though you’re whispering into a megaphone.
- Mic: How you would appear if you were speaking into a real microphone.
- Baritone: Masculine and profound.
- Chipmunk: Like another one of Alvin’s Chipmunks, it’s high-pitched.
Check some popular and interesting TikTok voice effects compilation.
Part 4: How to Change Voice for TikTok Videos in Capcut?
The editing capabilities in TikTok are adequate yet rudimentary. You may upload and modify existing movies and photographs or record yourself for up to three minutes. Turn to CapCut’s ShortCut option if you want a simpler TikTok or Dubsmash-style editing experience.
CapCut will question you about the movies and photographs in your photo library that you’d want to import into the composition when you’re in this mode. After that, the program analyzes your video and recommends a variety of designs, which each alters the music, timing, and changes.
For instance, you may add a pop rhythm, disco groove, or urban funk flavor to your film. CapCut allows you to select from a licensed library of songs or import sounds you’ve recorded.
Here’s how to change the voice on TikTok using Capcut:
Step 1: Open the Capcut application on your phone and Import a video/audio file or record a short sample.
Step 2: Now tap on Add Audio to record a Voiceover.
Step 3: After recording, now press on the Checkmark to save the sample.
Step 4: Now tap on the recorded area on the Timeline to enable the Voice Effects.
Step 5: Select the Voice Effects according to your liking from the given options and press on the Checkmark to save the video.
Part 5: How to Change Voice from Female to Male in Filmora for TikTok Video?
Filmora is among the finest video editing software for the novice as well as professional editors since it has powerful and effective video and audio production features. There would be no watermark or limits when exporting audio from Wondershare Filmora for trial version customers.
As a result, you may download it for free and try out the audio editing tools. Let’s look at how to add and adjust the voice in Filmora with this step-by-step guide.
Step 1: For starters, Import the video/audio files. Then, drag the imported video to the Timeline.
Step 2: Double-click on the audio in the timeline. Use the Pitch option to alter the voice of the video or recorded voice-over. By increasing the pitch, you can make it sound like a female’s voice and vice versa. You can further customize the recording using Fade in, Volume, Speed, Fade out, etc.
Step 3: When done with the modifications, click on Export and select Format to save the audio/video in the desired format.
Click to find out more voice changer and how to change voice in video with Filmora :
Frequently Asked Questions About Changing Voice in TikTok
1. Why Don’t I Have Voice Effects on TikTok?
There can be several reasons behind why you don’t have voice effects on TikTok presently. One of the foremost is that you have old software in either your iPhone or Android. Other reasons include giving the modification permission to TikTok, not clearing cache, updating TikTok, etc.
2. How Many Voice Effects in TikTok?
There are 13 voice effects that you can try in TikTok. These include a chipmunk, baritone, mike, megaphone, robot, battery drain, shaking, electronic, echo, synth, elf, huge, and acoustic signals. Hence, TikTok offers an endless and diverse range of effects
Conclusion
Overall, how to Change on TikTok is a simple process. For the required minor modifications, we believe the app’s built-in editor is sufficient. Filmora, on the other hand, is ideal if you would like to go professional and do unique transitions and edits. We believe we’ve provided some necessary knowledge on the TikTok application’s voice change. We hope you can include fantastic audio effects into your next TikTok video to make it engaging.
Note: All screenshots are from the Internet. If there is any infringement, please contact us to delete it.
Unleash Your Potential: Strategies for Recreating Yourself on TikTok
How to Clone Yourself on TikTok

Shanoon Cox
Mar 27, 2024• Proven solutions
Every rising pop star needs music videos, but using professional video editing software may be too time-consuming if you want to quickly create a clone video you can share with your fans on TikTok.
Multiplying yourself in a video is a cool way of making sure that your video is going to get the kind of attention it deserves. The process of cloning yourself in a video is a simple one, but there are certain rules you have to follow while recording the footage that will help you avoid overlapping the figures you’re cloning. Here’s how you can make your first clone yourself video on TikTok.

Selecting the Song for your Clone Video
Before you start shooting the video you first need to select the song on TikTok you’re going to use in the video. Once you’ve found the perfect track simply record it and save it as a video to your camera roll. You can then import the video clip that contains the song into the Video Star app.
Here are 10 Popular TikTok Songs for you.

Using the Video Star App to Clone Yourself
1. Download Video Star App
Choosing a location, mounting your iPhone on a tripod, or picking the positions for each of your clones are all important steps you’ll need to take before you actually start recording. There are several apps that enable you to create clone videos easily, but in this article, we are going to show you how you can clone yourself with Video Star. The app can be downloaded from the App Store for free, but additional in-app purchases are necessary if you want to have access to all the power packs Video Star offers. You don’t have to record the video clips with this app since the iPhone’s native camera app is powerful enough to enable you to record high-quality footage.
2. Edit Multiple Video Clips
After you record all the positions for your next clone video with the iPhone’s native camera app, you should cut the video clips and keep only the parts where you are perfectly positioned, so your position in one clip doesn’t overlap with other positions. During the video recording process try to create as much separation between two positions in order to avoid any chance of overlapping. One of the best ways to achieve this is to shoot at a location that is spacious enough so you can make enough separation between two positions. Keep in mind that the maximum number of clips you can combine in the Video Star app is limited to just three, so if you want to have more than three clones in the shot you first have to piece together three clips, save them as a single file and then add more clips to the cloned video you created.
3. Level up Your Videos with Video Star
Video Star also enables you to shoot your videos from the app, and you can adjust the Countdown before the app starts recording or the Recording Speed. Make sure to enter the lowest Recording Speed value possible, because that way you’ll be recording like TikTok does on fast.
Tap the Record button, then select the Multiple options, and play the video that contains the song you previously selected. Once you reach the spot in the song where you want to introduce the clone simply tap Set, so the recording will stop at the designated point and you can move to another position. If at any point during recording you realize that your movements extend to your clone’s location, you can simply tap on the hamburger icon and select the Delete Last option.
To preview the video, you just have to tap on the Scissors icon, and the recorded video will automatically start playing. The Record New Clip in the Scissors menu lets you start from the beginning in case you’re not happy with the results or you can use this option to start recording the video with the second position of your clone.
When done, head back to the Scissors menu, and tap on the Multi-Layer Clip. This feature doesn’t come with the free version of the app, and you must purchase it in order to create a clone video. This action will enable you to select the back and front clips. After selecting the clips, the Mask Front menu will appear on the screen, choose the Shape option and use the hamburger icon on the right side of the screen to change the video’s shape to Rectangle. Drag the rectangle in the preview window so you can crop the first clip to match the demands of your video and press the Next icon to continue the video editing process.
Alternatively, you can use the Erase option to remove the unwanted parts of each video. You can find this option in the Mask Front or Mask Back menu, so just select it and use your finger to remove sections of the shot you don’t want to use.
The Add Effect menu will pop up on the screen so you can add different effects to your first video clip, and then repeat the entire process for the back clip. Once you’ve edited the second clip tap on the Create button to complete the process of making a multilayer clip. Tap Done to save the clip to your camera roll, and upload it to TikTok.
Conclusion
Cloning yourself in a video using the Video Star app is a simple process that can be mastered in a short period of time. The Video Star app lets you create as many clones of yourself as you want, so you just have to make sure that your video clips can be easily combined to feature two or more of your clones and have fun exploring the effects that can make your videos look even cooler. If you want to be a success on the TikTok platform, learning how to make clone videos is one of the best ways to do it, so choose your favorite songs and start producing clone yourself videos.
You can also use Wondershare Filmora to make a split-screen with ease. Check the tutorial below to figure out how to make a split-screen video to clone.


Shanoon Cox
Shanoon Cox is a writer and a lover of all things video.
Follow @Shanoon Cox
Shanoon Cox
Mar 27, 2024• Proven solutions
Every rising pop star needs music videos, but using professional video editing software may be too time-consuming if you want to quickly create a clone video you can share with your fans on TikTok.
Multiplying yourself in a video is a cool way of making sure that your video is going to get the kind of attention it deserves. The process of cloning yourself in a video is a simple one, but there are certain rules you have to follow while recording the footage that will help you avoid overlapping the figures you’re cloning. Here’s how you can make your first clone yourself video on TikTok.
Selecting the Song for your Clone Video
Before you start shooting the video you first need to select the song on TikTok you’re going to use in the video. Once you’ve found the perfect track simply record it and save it as a video to your camera roll. You can then import the video clip that contains the song into the Video Star app.
Here are 10 Popular TikTok Songs for you.
Using the Video Star App to Clone Yourself
1. Download Video Star App
Choosing a location, mounting your iPhone on a tripod, or picking the positions for each of your clones are all important steps you’ll need to take before you actually start recording. There are several apps that enable you to create clone videos easily, but in this article, we are going to show you how you can clone yourself with Video Star. The app can be downloaded from the App Store for free, but additional in-app purchases are necessary if you want to have access to all the power packs Video Star offers. You don’t have to record the video clips with this app since the iPhone’s native camera app is powerful enough to enable you to record high-quality footage.
2. Edit Multiple Video Clips
After you record all the positions for your next clone video with the iPhone’s native camera app, you should cut the video clips and keep only the parts where you are perfectly positioned, so your position in one clip doesn’t overlap with other positions. During the video recording process try to create as much separation between two positions in order to avoid any chance of overlapping. One of the best ways to achieve this is to shoot at a location that is spacious enough so you can make enough separation between two positions. Keep in mind that the maximum number of clips you can combine in the Video Star app is limited to just three, so if you want to have more than three clones in the shot you first have to piece together three clips, save them as a single file and then add more clips to the cloned video you created.
3. Level up Your Videos with Video Star
Video Star also enables you to shoot your videos from the app, and you can adjust the Countdown before the app starts recording or the Recording Speed. Make sure to enter the lowest Recording Speed value possible, because that way you’ll be recording like TikTok does on fast.
Tap the Record button, then select the Multiple options, and play the video that contains the song you previously selected. Once you reach the spot in the song where you want to introduce the clone simply tap Set, so the recording will stop at the designated point and you can move to another position. If at any point during recording you realize that your movements extend to your clone’s location, you can simply tap on the hamburger icon and select the Delete Last option.
To preview the video, you just have to tap on the Scissors icon, and the recorded video will automatically start playing. The Record New Clip in the Scissors menu lets you start from the beginning in case you’re not happy with the results or you can use this option to start recording the video with the second position of your clone.
When done, head back to the Scissors menu, and tap on the Multi-Layer Clip. This feature doesn’t come with the free version of the app, and you must purchase it in order to create a clone video. This action will enable you to select the back and front clips. After selecting the clips, the Mask Front menu will appear on the screen, choose the Shape option and use the hamburger icon on the right side of the screen to change the video’s shape to Rectangle. Drag the rectangle in the preview window so you can crop the first clip to match the demands of your video and press the Next icon to continue the video editing process.
Alternatively, you can use the Erase option to remove the unwanted parts of each video. You can find this option in the Mask Front or Mask Back menu, so just select it and use your finger to remove sections of the shot you don’t want to use.
The Add Effect menu will pop up on the screen so you can add different effects to your first video clip, and then repeat the entire process for the back clip. Once you’ve edited the second clip tap on the Create button to complete the process of making a multilayer clip. Tap Done to save the clip to your camera roll, and upload it to TikTok.
Conclusion
Cloning yourself in a video using the Video Star app is a simple process that can be mastered in a short period of time. The Video Star app lets you create as many clones of yourself as you want, so you just have to make sure that your video clips can be easily combined to feature two or more of your clones and have fun exploring the effects that can make your videos look even cooler. If you want to be a success on the TikTok platform, learning how to make clone videos is one of the best ways to do it, so choose your favorite songs and start producing clone yourself videos.
You can also use Wondershare Filmora to make a split-screen with ease. Check the tutorial below to figure out how to make a split-screen video to clone.
Shanoon Cox
Shanoon Cox is a writer and a lover of all things video.
Follow @Shanoon Cox
Also read:
- [Updated] Uniting Voices in a TikTok Duo
- [New] Elevating Your TikTok Presence Harness the Power of Siri Speech
- 2024 Approved A Dash of Creativity Top 30 Innovative TikTok PFPs
- In 2024, Crafting a Unique Identity with Creative TikTok PFPs
- [Updated] Tiktok Bugs What If My Tiktok Not Working for 2024
- [New] In 2024, Mastering the Art of Speech on TikTok
- [New] In 2024, Crafting Consumer Engagement The Art of Marketing on TikTok
- [New] In 2024, Mastering Your Craft on TikTok Camera Skills & Editing Made Simple
- [New] 2024 Approved Perfecting Your Soundtracks in Audacity by Cutting Out Noise
- Instant Guide to a One-Time Exit TikTok's Goodbye
- [New] The Modern Creator’s Ultimate TikTok Toolkit
- [New] 2024 Approved Cutting-Edge Design Inspirations for Distinctive TikTok Presence
- In 2024, Top TikTok Ad Techniques Engaging Audienrances & Showcasing Successes
- Humor Haven Identifying Rising Comedy Icons in TikTok
- [Updated] 2024 Approved Stream and Save Free, Unmarked TikTok Videos Online
- [New] 2024 Approved Global Culinary Delights on TikTok
- 33 Chuckle-Inducing TikTok Joke Series for 2024
- [Updated] Reimagining Your TikTok Visage Complete Profile Update Manual for 2024
- 2024 Approved Winning TikTok Desktop Strategies Unveiled
- How to Speed Up Video Streams on TikTok
- [Updated] 2024 Approved Crafting Memorable TikTok PFPs that Differentiate You
- [New] 2024 Approved Elevate Your TikTok Presence with Novel PFP Concepts
- [Updated] Unveiling the Secrets of Superior TikTok Captions (Top 5 Strategies)
- In 2024, Laugh Outloud A Curation of the Funniest TikTok Videos and Joke Threads
- [Updated] Joke Jungle TikTok's Cracking Content Creators
- [New] Amplify Views on TikTok with These Standout Username Concepts for 2024
- Updated In 2024, Unleash Your Creativity 35 Top Video Editors for Every Operating System
- 2024 Approved Pro-Level Tips for Expert Vimeo Recording
- How to Make Simple Slideshow Word for 2024
- Updated 2024 Approved Macs Hidden Gems Best Free Speech Recognition Software with No Download Required
- How to Downgrade iPhone 11 without iTunes? | Dr.fone
- In 2024, 5 Ways to Transfer Music from Realme C67 5G to Other Android Devices Easily | Dr.fone
- [Updated] Evaluating Cybernetic Screen Recorder Functionality for 2024
- IOS's Leading Edge The Top 5 Emulators for PSP Games for 2024
- [New] Insta Growth Hacks Today's Essential Hashtags Guide for 2024
- [Updated] In 2024, How to Optimize Your Instagram Post with Music Stickers
- Updated In 2024, Top 10 Free Video Editing Software for Rotating and Flipping Clips
- In 2024, How to Unlock Disabled Apple iPhone 8/iPad Without Computer | Dr.fone
- [Updated] 2024 Approved Haunting Horrors The Ultimate List of Engaging Zombie Games
- In 2024, Finding High-Quality Wolf Howl Noises for Projects
- [Updated] Preserve Animated GIFs Effortlessly with These Top 9 Apps for Windows
- 2024 Approved Unraveling Instagram's Policies on Sharing Songs
- Stream to Record Essential Know-How for TV Capture for 2024
- [Updated] In 2024, How to Bur Background in Google Meet
- In 2024, 4 solution to get rid of pokemon fail to detect location On Asus ROG Phone 8 | Dr.fone
- Title: "2024 Approved Revealing Hidden Features Altering Your TikTok Voice Effectively"
- Author: Stephen
- Created at : 2024-05-23 04:37:25
- Updated at : 2024-05-24 04:37:25
- Link: https://tiktok-video-recordings.techidaily.com/2024-approved-revealing-hidden-features-altering-your-tiktok-voice-effectively/
- License: This work is licensed under CC BY-NC-SA 4.0.
