
"Deactivating Your Discord Server A Device-Centric Approach"
Deactivating Your Discord Server: A Device-Centric Approach
How to Delete Discord Server?

Richard Bennett
Mar 27, 2024• Proven solutions
Discord servers are made and designed to help gamers – and now work colleagues – communicate and coordinate via private rooms.
As a communication app, it offers permanent servers for people who are working on the same project, playing the same game, or even if they’re part of the same family!
However, you may have to someday delete a server you own.
Today we will discuss how to delete Discord server or deleting the Discord server of someone who has passed away:
Part 1: How to Delete Discord Server Permanently on A Desktop?
If you’re familiar with Discord, you will know that there will come a time that you no longer need a server: it may be because you’ve resigned from your workplace or stopped playing a game.
If you are looking into how to delete your Discord server, you came to the right place. Even though Discord makes communication easier, you may need a break from around-the-clock connectivity for various reasons.
Discord works on desktop platforms and smartphones, with a blend of a VoIP chat system, a chat lobby, and a message board in a single app. Therefore, you can attempt to delete a server off on any device that you may have Discord downloaded and active on.
Most server owners choose to delete their Discord server when too many extra, strange, or ill-meaning visitors are visiting.
Servers are more like chat rooms inside the application. Deleting them is a relatively simple process – as you will learn from our how to delete server on Discord tips – however, their retrieval is impossible.
Once the server has been removed, you can not “undo the process” or recreate it. Therefore, be absolutely sure and proceed with caution.
It is also advised to skim through any essential files that you might have on the server. Back them up before letting it go forever.
And lastly, ensure that this is what you intend on doing because deleting a Discord server is permanent. Here are the simple steps to follow on how to delete a server on Discord:
- Open the Discord desktop app and click on the server you want to delete
- Once you select the server, there will be an options list under the server’s name
- Click the “server setting” button from the menu (This will be the second option on the list)

- At the end of the sidebar, you will find the option “delete the server on the left side.” Click it

Image: The image shows the screen that pops up after clicking “Server settings,” here, the delete button can be seen in red.
- After clicking, a pop-up window will appear, asking for confirmation
- Confirm by entering the server’s name and authentication code; this is only required when two-factor authentication is enabled
- Click on “delete server” to confirm
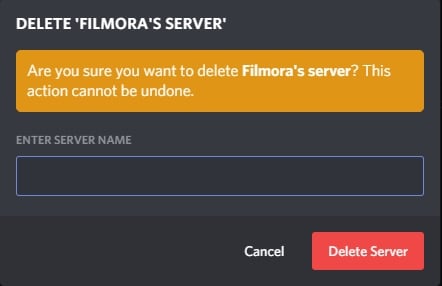
Image: As mentioned, you must be sure you want to permanently lose a server and all of its content before deleting it; this prompt serves the same purpose
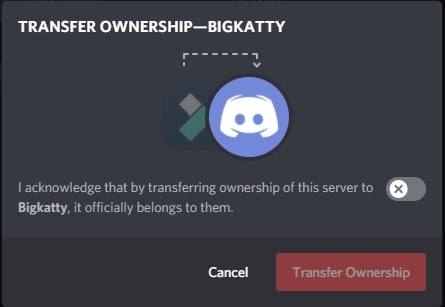
You can also transfer your server’s ownership to another individual if you do not want to delete it. To do this:
- Open server settings and then select “Members” in the left sidebar
- A list of every server member will open, hover over the person’s name that you want to transfer ownership to, and then click the three dots appearing on the right
transfer-ownership-on-discord-server.jpg
- Select “Transfer Ownership” and then confirm the transfer.
How to Delete A Server On Discord Via The Mobile App?
Suppose you do not want to go through the hassle of logging on to the desktop app. In that case, you have the option of deleting your Discord server via the mobile app quickly.
Here are some easy to follow steps on how to delete Discord server using the mobile app:
- Open the Discord app on your Android device or iPhone and then tap the hamburger settings icon on the top-left
- Search for the server you wish to delete, and then long-press the icon of the server you chose
- A mini option bar will pop up; here, you must click on “More Options” and then the server options will slide up on your screen; click on “Settings” to continue.
- This will take you to the control panel; here, click on the three-dotted settings on the top right
- Now you will be provided only one option: “Delete (server name).” Click on it
At this point, in the how to delete server on Discord process, Discord will ask you why you chose to delete the server as part of their customer experience surveys.
It is nothing but a formality; choosing to ignore it or answer it will not affect the process’s outcome.
You can choose from pre-decided answers as well, and to give you an example, one of the options is: “I couldn’t get people to join.”
How Do I Delete A Discord Server Without Ownership?
Previously you could delete your Discord server using a BOT. Anyone who had permission to use the command/action within BOT could also delete the server. However, now only the server owner and the Discord trust and safety team can delete a server.
Richard Bennett
Richard Bennett is a writer and a lover of all things video.
Follow @Richard Bennett
Richard Bennett
Mar 27, 2024• Proven solutions
Discord servers are made and designed to help gamers – and now work colleagues – communicate and coordinate via private rooms.
As a communication app, it offers permanent servers for people who are working on the same project, playing the same game, or even if they’re part of the same family!
However, you may have to someday delete a server you own.
Today we will discuss how to delete Discord server or deleting the Discord server of someone who has passed away:
Part 1: How to Delete Discord Server Permanently on A Desktop?
If you’re familiar with Discord, you will know that there will come a time that you no longer need a server: it may be because you’ve resigned from your workplace or stopped playing a game.
If you are looking into how to delete your Discord server, you came to the right place. Even though Discord makes communication easier, you may need a break from around-the-clock connectivity for various reasons.
Discord works on desktop platforms and smartphones, with a blend of a VoIP chat system, a chat lobby, and a message board in a single app. Therefore, you can attempt to delete a server off on any device that you may have Discord downloaded and active on.
Most server owners choose to delete their Discord server when too many extra, strange, or ill-meaning visitors are visiting.
Servers are more like chat rooms inside the application. Deleting them is a relatively simple process – as you will learn from our how to delete server on Discord tips – however, their retrieval is impossible.
Once the server has been removed, you can not “undo the process” or recreate it. Therefore, be absolutely sure and proceed with caution.
It is also advised to skim through any essential files that you might have on the server. Back them up before letting it go forever.
And lastly, ensure that this is what you intend on doing because deleting a Discord server is permanent. Here are the simple steps to follow on how to delete a server on Discord:
- Open the Discord desktop app and click on the server you want to delete
- Once you select the server, there will be an options list under the server’s name
- Click the “server setting” button from the menu (This will be the second option on the list)
- At the end of the sidebar, you will find the option “delete the server on the left side.” Click it
Image: The image shows the screen that pops up after clicking “Server settings,” here, the delete button can be seen in red.
- After clicking, a pop-up window will appear, asking for confirmation
- Confirm by entering the server’s name and authentication code; this is only required when two-factor authentication is enabled
- Click on “delete server” to confirm
Image: As mentioned, you must be sure you want to permanently lose a server and all of its content before deleting it; this prompt serves the same purpose
You can also transfer your server’s ownership to another individual if you do not want to delete it. To do this:
- Open server settings and then select “Members” in the left sidebar
- A list of every server member will open, hover over the person’s name that you want to transfer ownership to, and then click the three dots appearing on the right
transfer-ownership-on-discord-server.jpg
- Select “Transfer Ownership” and then confirm the transfer.
How to Delete A Server On Discord Via The Mobile App?
Suppose you do not want to go through the hassle of logging on to the desktop app. In that case, you have the option of deleting your Discord server via the mobile app quickly.
Here are some easy to follow steps on how to delete Discord server using the mobile app:
- Open the Discord app on your Android device or iPhone and then tap the hamburger settings icon on the top-left
- Search for the server you wish to delete, and then long-press the icon of the server you chose
- A mini option bar will pop up; here, you must click on “More Options” and then the server options will slide up on your screen; click on “Settings” to continue.
- This will take you to the control panel; here, click on the three-dotted settings on the top right
- Now you will be provided only one option: “Delete (server name).” Click on it
At this point, in the how to delete server on Discord process, Discord will ask you why you chose to delete the server as part of their customer experience surveys.
It is nothing but a formality; choosing to ignore it or answer it will not affect the process’s outcome.
You can choose from pre-decided answers as well, and to give you an example, one of the options is: “I couldn’t get people to join.”
How Do I Delete A Discord Server Without Ownership?
Previously you could delete your Discord server using a BOT. Anyone who had permission to use the command/action within BOT could also delete the server. However, now only the server owner and the Discord trust and safety team can delete a server.
Richard Bennett
Richard Bennett is a writer and a lover of all things video.
Follow @Richard Bennett
Enhance Your Discord Interaction: Mastering the Art of Pins
How to Pin A Message on Discord?
Richard Bennett
Mar 27, 2024• Proven solutions
Like TeamSpeak or Skype, Discord is a chat app aimed at easy mass communication. Although it was made for gamers, it is readily used for communicating in offices, during projects, or for professional collaboration.
Even though it’s straightforward to use, there are several Discord features that you may be unfamiliar with.
One such feature is called pinning messages. It is available to moderators, administrators, server owners, and other users who have permission to “Manage Messages” in various server channels.
This feature helps you find and share vital messages quickly, especially when new users join a specific channel.
It acts like a sticky note for Discord, making sure valuable information such as server rules do not get overshadowed by new messages even months after the pinned messages are first posted.
Today, we will go over how to pin a message on Discord for your desktop app on PC and Mac, as well as on your iPhone and Android mobile devices.
Part 1: How to Pin A Message on Discord Desktop?
If you want to learn how to pin messages on Discord desktop, follow these steps:
- Hover over any message which you wish to pin.
- On the right-hand side of it, there will be a button that would read as More; click it and you will see a screen like below

- Now, click on the “Pin Message” option
- After which, you will be presented with a prompt asking you to confirm that you want to pin this particular message. Click on “Oh yeah, pin it.”
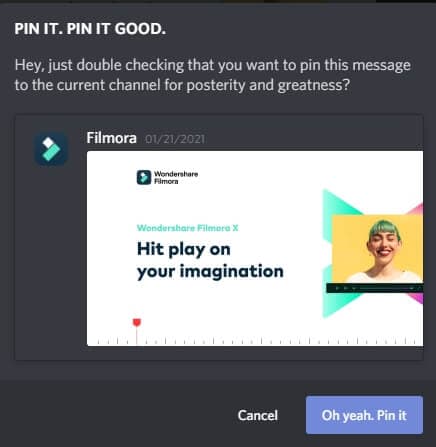
That’s it! You have now learned how to pin messages on Discord for the desktop application.
But make sure you don’t pin everything that might seem important at a glance — only pin messages that may have utility in the future.
Also, don’t pin messages that are just important for you. In larger channels, prioritize pinning messages that will benefit most participants.
Part 2: How to Pin Messages on Discord Mobile App?
Pinning messages in the mobile app is very similar to how it is done on the desktop application. Do it by:
- Just hold down your finger on the message you wish to pin
- A couple of seconds later, you will be presented with a list of options
- From here, click on “Pin Message”
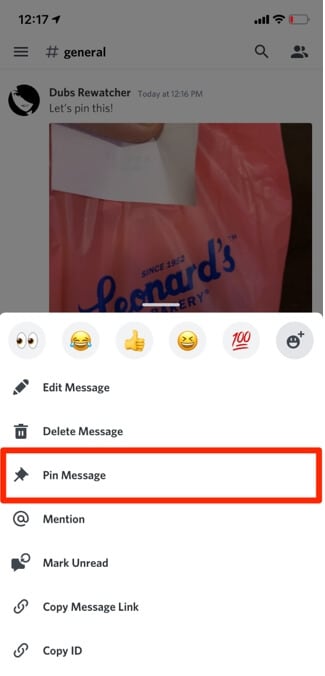
- A pop-up will appear confirming if you want to pin the message. If you are sure you want to pin a particular message, tap the “Yes” button and then your message is pinned
Part 3: How to View Pinned Messages on Discord
Accessing pinned messages is just as easy as pinning them. To access a pinned message on the app’s desktop version:
- Click on the pin icon appearing on the top right-hand side of your screen

- Doing this will present you with a drop-down list of pinned messages. Now, you can tap on the “Jump” button next to the “x” (cross) icon to go directly to the pinned message
- This will allow you to understand the context behind the pinned message. You can also access and share links in the pinned messages from here
Part 4: How to View Pinned Messages on Discord Mobile
View your pins on the mobile version of Discord by:
- Swiping from right to left, which will open up a side menu
- Then click on “Pins,” which is the second option from the left, as shown in the picture below
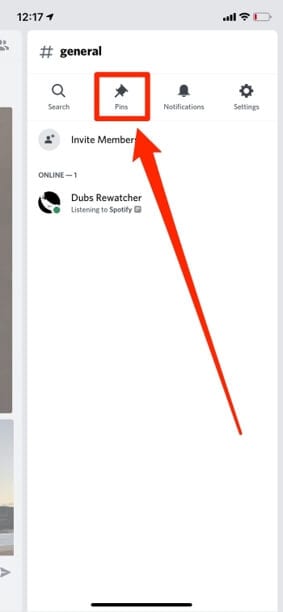
- Now you will be in the pinned messages window
- You can jump to a specific pinned message by clicking on it, allowing you to access any content or links in the message
Part 5: Limit on Pinned Messages
You can only pin 50 messages in the pin box in Discord, meaning if you want to pin new messages, you will have to delete older ones to make space.
This may feel like a disadvantage. However, it makes perfect sense. Pinning messages is only for important information that must be used in the future.
Removing this limit and giving people free rein on the number of messages they can pin will eventually lead to too many pinned messages, defeating the feature’s purpose.
Part 6: How to Delete Pinned Messages on Discord?
If something pinned in the past has become redundant over time, you can remove it from the pinned messages.
This will make sure your pinned messages do not stockpile over time, and there is space to add new messages important to the server.
To remove pinned messages on desktops:
- Go to the pin icon used to access pins
- Next, hover over the message you wish to unpin and click on the “x” (cross) button next to the jump button
- After this, click on the “yeah, remove it please kthx” button
- The message will now stop appearing in the list of pinned messages
To do the same for mobile devices:
- Swipe right to left to access the side menu
- Click on “Pins” to view all the messages pinned by you or other people on the server with permissions to pin
- Then hold down on the message, which will give you an option to unpin it
- Click on “Unpin” to remove the message from the list of pinned messages
Things to keep in mind:
- You can skip the pop-up shown above when trying to remove a pinned message. All you must do is hold shift when clicking on the “x” (cross) button allowing you to go on that spree of unpins
- Another thing to remember is that all these tips on how pin messages apply to both Direct Messages (DM) and Server group chats
All in All
Learning how to pin a message on Discord could be a little tricky at first, mostly if you haven’t done so in the past and someone spontaneously asks you to do so.
However, the feature is pretty intuitive and straightforward once you get the hang of it.
The usefulness of pinning makes it very important for both old and new users as you can relay important information without having to go through tons of old messages.
Richard Bennett
Richard Bennett is a writer and a lover of all things video.
Follow @Richard Bennett
Richard Bennett
Mar 27, 2024• Proven solutions
Like TeamSpeak or Skype, Discord is a chat app aimed at easy mass communication. Although it was made for gamers, it is readily used for communicating in offices, during projects, or for professional collaboration.
Even though it’s straightforward to use, there are several Discord features that you may be unfamiliar with.
One such feature is called pinning messages. It is available to moderators, administrators, server owners, and other users who have permission to “Manage Messages” in various server channels.
This feature helps you find and share vital messages quickly, especially when new users join a specific channel.
It acts like a sticky note for Discord, making sure valuable information such as server rules do not get overshadowed by new messages even months after the pinned messages are first posted.
Today, we will go over how to pin a message on Discord for your desktop app on PC and Mac, as well as on your iPhone and Android mobile devices.
Part 1: How to Pin A Message on Discord Desktop?
If you want to learn how to pin messages on Discord desktop, follow these steps:
- Hover over any message which you wish to pin.
- On the right-hand side of it, there will be a button that would read as More; click it and you will see a screen like below
- Now, click on the “Pin Message” option
- After which, you will be presented with a prompt asking you to confirm that you want to pin this particular message. Click on “Oh yeah, pin it.”
That’s it! You have now learned how to pin messages on Discord for the desktop application.
But make sure you don’t pin everything that might seem important at a glance — only pin messages that may have utility in the future.
Also, don’t pin messages that are just important for you. In larger channels, prioritize pinning messages that will benefit most participants.
Part 2: How to Pin Messages on Discord Mobile App?
Pinning messages in the mobile app is very similar to how it is done on the desktop application. Do it by:
- Just hold down your finger on the message you wish to pin
- A couple of seconds later, you will be presented with a list of options
- From here, click on “Pin Message”
- A pop-up will appear confirming if you want to pin the message. If you are sure you want to pin a particular message, tap the “Yes” button and then your message is pinned
Part 3: How to View Pinned Messages on Discord
Accessing pinned messages is just as easy as pinning them. To access a pinned message on the app’s desktop version:
- Click on the pin icon appearing on the top right-hand side of your screen
- Doing this will present you with a drop-down list of pinned messages. Now, you can tap on the “Jump” button next to the “x” (cross) icon to go directly to the pinned message
- This will allow you to understand the context behind the pinned message. You can also access and share links in the pinned messages from here
Part 4: How to View Pinned Messages on Discord Mobile
View your pins on the mobile version of Discord by:
- Swiping from right to left, which will open up a side menu
- Then click on “Pins,” which is the second option from the left, as shown in the picture below
- Now you will be in the pinned messages window
- You can jump to a specific pinned message by clicking on it, allowing you to access any content or links in the message
Part 5: Limit on Pinned Messages
You can only pin 50 messages in the pin box in Discord, meaning if you want to pin new messages, you will have to delete older ones to make space.
This may feel like a disadvantage. However, it makes perfect sense. Pinning messages is only for important information that must be used in the future.
Removing this limit and giving people free rein on the number of messages they can pin will eventually lead to too many pinned messages, defeating the feature’s purpose.
Part 6: How to Delete Pinned Messages on Discord?
If something pinned in the past has become redundant over time, you can remove it from the pinned messages.
This will make sure your pinned messages do not stockpile over time, and there is space to add new messages important to the server.
To remove pinned messages on desktops:
- Go to the pin icon used to access pins
- Next, hover over the message you wish to unpin and click on the “x” (cross) button next to the jump button
- After this, click on the “yeah, remove it please kthx” button
- The message will now stop appearing in the list of pinned messages
To do the same for mobile devices:
- Swipe right to left to access the side menu
- Click on “Pins” to view all the messages pinned by you or other people on the server with permissions to pin
- Then hold down on the message, which will give you an option to unpin it
- Click on “Unpin” to remove the message from the list of pinned messages
Things to keep in mind:
- You can skip the pop-up shown above when trying to remove a pinned message. All you must do is hold shift when clicking on the “x” (cross) button allowing you to go on that spree of unpins
- Another thing to remember is that all these tips on how pin messages apply to both Direct Messages (DM) and Server group chats
All in All
Learning how to pin a message on Discord could be a little tricky at first, mostly if you haven’t done so in the past and someone spontaneously asks you to do so.
However, the feature is pretty intuitive and straightforward once you get the hang of it.
The usefulness of pinning makes it very important for both old and new users as you can relay important information without having to go through tons of old messages.
Richard Bennett
Richard Bennett is a writer and a lover of all things video.
Follow @Richard Bennett
Also read:
- [New] Command Your Cloud Data Leading Providers to Watch
- [New] In 2024, Turning Tape Backwards Instagram's Video Trickery
- [Updated] 2024 Approved Effortless Energy Top 20 Calming Country Songs to Boogie Down and Release Stress (TikTok)
- [Updated] Joining Live Shows A TikTok Perspective for 2024
- [Updated] The Power of Tags Boost Traffic with Top Genres & Keywords
- 2024 Approved Expert Tag Analyzer Devices for Popular Platforms (FB/Twitter/Insta)
- 2024 Approved Extreme Playlist Best TikTok Crazy Games to Try
- Become a Savvy Social Media User: Mastering Privacy & Security
- Boosting Interactions on TikTok - Top 30 Creative Username Suggestions
- In 2024, Best Itel A05s Pattern Lock Removal Tools Remove Android Pattern Lock Without Losing Data
- Keep It Burning Ensuring an Everlasting Snapchat Connection
- Step-by-Step Guide: Resolving Phasmophobia's Virtual Reality Problems
- Title: Deactivating Your Discord Server A Device-Centric Approach
- Author: Stephen
- Created at : 2025-01-03 07:58:36
- Updated at : 2025-01-09 18:09:53
- Link: https://tiktok-video-recordings.techidaily.com/deactivating-your-discord-server-a-device-centric-approach/
- License: This work is licensed under CC BY-NC-SA 4.0.