
:max_bytes(150000):strip_icc()/how-to-watch-mission-impossible-movies-in-order-61da86fffee741fc89a1dbc52dddd4e4.jpg)
From Disparate Pieces to a Cohesive TikTok Story for 2024
From Disparate Pieces to a Cohesive TikTok Story
Best Video Editor for Beginners on Windows and Mac
Wondershare Filmora is one of the most popular video editing software among TikTokers , download and have a try.
TikTok’s collaborative nature is one of its most appealing features. Your video is not finished the moment you publish it. They can be responded to, remixed, and re-shared by anybody. TikTok is meant to allow users to construct on other’s films shared on the network, whether you’re utilizing audio from some other video or making a duet.
Thanks to the stitch tool, creators may remix, remake, and reply to videos with a couple of taps. This article will tell you what you need to know about stitching videos on TikTok. Continue reading to learn more about Stitching and how to stitch on TikTok. Let’s get started!
In this article
02 How to Turn Stitch On or Off?
04 How to Stitch Any TikTok Video withFilmora Video Editor ?
05 FAQs About TikTok Video Stitch
Part 1: What is Stitch on TikTok?
TikTok’s latest video editing tool ‘Stitch,’ lets people incorporate video snippets from other people into their own. Creators may use Stitch to provide a five-second snippet from a TikTok video out of their own. Unlike duets that play videos together, stitched videos play in the sequence they were stitched. Videos containing open-ended questions have gained in popularity with the advent of the stitch.
Whenever you Stitch a clip-on TikTok, you are essentially inserting your video after yet another video that has already been submitted. People frequently utilize this to remark on or reply to other videos. And, when done well, it can add a lot more context to your movies.
The one limitation of the Stitch tool is that you may only publish up to five seconds from some other video. So, if you’re focusing on a Stitch, you must select the five seconds which are most critical to highlight your message.
Part 2: How to Turn Stitch On or Off?
By enabling the Stitch feature, you make your material available to millions of prospective collaborators. Consider the possibilities – it might be a fantastic approach to enhance reach and virility.
If you aren’t comfortable exposing your films to the whole TikTok community, users can opt out of allowing others to Stitch their work. You may modify them under the Privacy Controls. Here’s how to do a Stitch on TikTok:
Step 1: Launch the TikTok app and then head to your profile by clicking on the Profile option at the bottom right. After that, select the three dots to open the settings.
Step 2: After entering the settings, select Privacy to proceed, and then tap on the Stitch option to open the Stitch settings.
Step 3: Now, you will see three options that are No-one, Everyone, and Friends. If you want to allow the Stitching, select either Everyone or Friends. However, to restrict the people from stitching your videos, choose No-one. After you are done selecting, click on the back arrow to save the applied changes.
Part 3: How to Stitch on TikTok?
TikTok keeps giving creators more reasons to continue producing, and fans like us are more committed to continuing to open it. Stitch, a new app functionality from the famous social networking platform, makes things more straightforward than ever for artists to interact with each other.
But, you might be wondering, how to do a stitch on TikTok? Don’t worry; you’ve come to the right place. Here’s how:
Step 1: Launch TikTok and then go to the video that you want to stitch. Select the Share icon, which resembles an arrow. Select the Stitch symbol from the menu that displays, and then wait a few seconds for the video to complete. The lengthier the video is, the more the loading time.

Step 2: When it’s finished, you’ll be sent to a screen where you may take five seconds of the film and use it on your own. To navigate through the movie, use the sliders and the red bars to choose the portion you want. When you’re finished, tap Next.

Step 3: You’ll be sent to TikTok’s normal recording screen. Record the remainder of your TikTok video with all of the features you’re accustomed to utilizing. You may use whatever effects, stickers, texts, voiceovers, or captions you desire. After that, press the Next button.

Step 4: Make a title and hashtags for your TikTok video. You could also choose whether or not these users may Stitch your movie here – hit the toggle switch beside Allow Stitch to turn it off. Following that, hit the Post option, and your stitched video will be uploaded.

Part 4: How to Stitch Any TikTok Video with Filmora Video Editor ?
Before getting started, understand why people opt for Filmora video editor for stitching videos on TikTok when this can be done through the official TikTok application. TikTok app only allows you to stitch a video for up to five seconds which is quite frustrating if you wish to stitch an entire video.
One more reason is that, with TikTok, you cannot stitch the already existing video from the camera roll, which restricts creators from adding the already edited content to the existing video. So, to avoid the above problems, Filmora is used for stitching TikTok videos.
For Win 7 or later (64-bit)
For macOS 10.12 or later
To begin, download the video that you wish to stitch with from TikTok. After, follow the below stepwise guide:
Step 1: Launch the Filmora software on your PC and import the video files by clicking on the File and then Import/Export Media. You can simply drag and drop the videos as well.
Step 2: Drag the clips from the media library to the Timeline’s video track. All video files will be stitched into a single video with no transitions.

Note: To add a transition to the video , go to the Transition tab and drop the desired transition to the junction of two clips.

Step 3: Now, preview the stitched video and, when finished, click the Export option to save numerous video segments to a single file. Choose any format from the Format tab’s list.
Part 5: FAQs About TikTok Video Stitch
1. Can you do a Stitch on TikTok with a video from your Camera Roll?
Unfortunately, you cannot utilize a video from your Camera Roll in a Stitch at the time of this writing. So, whatever your reaction to a Stitch is, you must record 100% unique footage shot with the TikTok camera. However, you may download the video first and then stitch it with some third-party software such as Filmora.
2. Can you stitch longer than 5 seconds?
No, it is not possible to stitch a video for longer than five seconds using the built-in Stitching feature of the TikTok app. But this can be done by stitching the videos using third-party applications and software.
3. How do I see TikTok stitches?
Users who want to view as many stitches as possible can do it by browsing for them on the app. You must first browse to Discover, and from there to the search box. Then type #Stitch @username, where the username is the name of the account from which you wish to view stitches.
4. TikTok Stitch option not showing. How to fix it?
Users may choose whether or not someone else can Stitch their work in their settings. The option may be found under the Settings and Privacy tab, where users can activate or uncheck Stitch for all videos. So, if the Stitch option is not showing, the user may have disabled the Stitch option.
Conclusion
The Stitch feature is an excellent way to continue the discussion with your videos. You may leave comments on popular content on the site. Most importantly, it may be a fun method to generate material different from what you usually publish. And since you know How to Stitch on TikTok after reading this article, stitch the videos today and create unique content!
TikTok’s collaborative nature is one of its most appealing features. Your video is not finished the moment you publish it. They can be responded to, remixed, and re-shared by anybody. TikTok is meant to allow users to construct on other’s films shared on the network, whether you’re utilizing audio from some other video or making a duet.
Thanks to the stitch tool, creators may remix, remake, and reply to videos with a couple of taps. This article will tell you what you need to know about stitching videos on TikTok. Continue reading to learn more about Stitching and how to stitch on TikTok. Let’s get started!
In this article
02 How to Turn Stitch On or Off?
04 How to Stitch Any TikTok Video withFilmora Video Editor ?
05 FAQs About TikTok Video Stitch
Part 1: What is Stitch on TikTok?
TikTok’s latest video editing tool ‘Stitch,’ lets people incorporate video snippets from other people into their own. Creators may use Stitch to provide a five-second snippet from a TikTok video out of their own. Unlike duets that play videos together, stitched videos play in the sequence they were stitched. Videos containing open-ended questions have gained in popularity with the advent of the stitch.
Whenever you Stitch a clip-on TikTok, you are essentially inserting your video after yet another video that has already been submitted. People frequently utilize this to remark on or reply to other videos. And, when done well, it can add a lot more context to your movies.
The one limitation of the Stitch tool is that you may only publish up to five seconds from some other video. So, if you’re focusing on a Stitch, you must select the five seconds which are most critical to highlight your message.
Part 2: How to Turn Stitch On or Off?
By enabling the Stitch feature, you make your material available to millions of prospective collaborators. Consider the possibilities – it might be a fantastic approach to enhance reach and virility.
If you aren’t comfortable exposing your films to the whole TikTok community, users can opt out of allowing others to Stitch their work. You may modify them under the Privacy Controls. Here’s how to do a Stitch on TikTok:
Step 1: Launch the TikTok app and then head to your profile by clicking on the Profile option at the bottom right. After that, select the three dots to open the settings.
Step 2: After entering the settings, select Privacy to proceed, and then tap on the Stitch option to open the Stitch settings.
Step 3: Now, you will see three options that are No-one, Everyone, and Friends. If you want to allow the Stitching, select either Everyone or Friends. However, to restrict the people from stitching your videos, choose No-one. After you are done selecting, click on the back arrow to save the applied changes.
Part 3: How to Stitch on TikTok?
TikTok keeps giving creators more reasons to continue producing, and fans like us are more committed to continuing to open it. Stitch, a new app functionality from the famous social networking platform, makes things more straightforward than ever for artists to interact with each other.
But, you might be wondering, how to do a stitch on TikTok? Don’t worry; you’ve come to the right place. Here’s how:
Step 1: Launch TikTok and then go to the video that you want to stitch. Select the Share icon, which resembles an arrow. Select the Stitch symbol from the menu that displays, and then wait a few seconds for the video to complete. The lengthier the video is, the more the loading time.
Step 2: When it’s finished, you’ll be sent to a screen where you may take five seconds of the film and use it on your own. To navigate through the movie, use the sliders and the red bars to choose the portion you want. When you’re finished, tap Next.
Step 3: You’ll be sent to TikTok’s normal recording screen. Record the remainder of your TikTok video with all of the features you’re accustomed to utilizing. You may use whatever effects, stickers, texts, voiceovers, or captions you desire. After that, press the Next button.
Step 4: Make a title and hashtags for your TikTok video. You could also choose whether or not these users may Stitch your movie here – hit the toggle switch beside Allow Stitch to turn it off. Following that, hit the Post option, and your stitched video will be uploaded.
Part 4: How to Stitch Any TikTok Video with Filmora Video Editor ?
Before getting started, understand why people opt for Filmora video editor for stitching videos on TikTok when this can be done through the official TikTok application. TikTok app only allows you to stitch a video for up to five seconds which is quite frustrating if you wish to stitch an entire video.
One more reason is that, with TikTok, you cannot stitch the already existing video from the camera roll, which restricts creators from adding the already edited content to the existing video. So, to avoid the above problems, Filmora is used for stitching TikTok videos.
For Win 7 or later (64-bit)
For macOS 10.12 or later
To begin, download the video that you wish to stitch with from TikTok. After, follow the below stepwise guide:
Step 1: Launch the Filmora software on your PC and import the video files by clicking on the File and then Import/Export Media. You can simply drag and drop the videos as well.
Step 2: Drag the clips from the media library to the Timeline’s video track. All video files will be stitched into a single video with no transitions.
Note: To add a transition to the video , go to the Transition tab and drop the desired transition to the junction of two clips.
Step 3: Now, preview the stitched video and, when finished, click the Export option to save numerous video segments to a single file. Choose any format from the Format tab’s list.
Part 5: FAQs About TikTok Video Stitch
1. Can you do a Stitch on TikTok with a video from your Camera Roll?
Unfortunately, you cannot utilize a video from your Camera Roll in a Stitch at the time of this writing. So, whatever your reaction to a Stitch is, you must record 100% unique footage shot with the TikTok camera. However, you may download the video first and then stitch it with some third-party software such as Filmora.
2. Can you stitch longer than 5 seconds?
No, it is not possible to stitch a video for longer than five seconds using the built-in Stitching feature of the TikTok app. But this can be done by stitching the videos using third-party applications and software.
3. How do I see TikTok stitches?
Users who want to view as many stitches as possible can do it by browsing for them on the app. You must first browse to Discover, and from there to the search box. Then type #Stitch @username, where the username is the name of the account from which you wish to view stitches.
4. TikTok Stitch option not showing. How to fix it?
Users may choose whether or not someone else can Stitch their work in their settings. The option may be found under the Settings and Privacy tab, where users can activate or uncheck Stitch for all videos. So, if the Stitch option is not showing, the user may have disabled the Stitch option.
Conclusion
The Stitch feature is an excellent way to continue the discussion with your videos. You may leave comments on popular content on the site. Most importantly, it may be a fun method to generate material different from what you usually publish. And since you know How to Stitch on TikTok after reading this article, stitch the videos today and create unique content!
Top 10 Effortless Yet Striking TikFilters for All
Versatile Video Editor - Wondershare Filmora
An easy yet powerful editor
Numerous effects to choose from
Detailed tutorials provided by official channel


TikTok is also known for its creative filters and effects. In fact, unlike Instagram, which offers a limited selection of filters and effects to test, TikTok has an extensive library of filters and effects to attempt.
TikTok filters alter the look and feel of your videos. You may, however, add stuff to your films using effects. You may entirely transform the look of your videos by applying TikTok filters. A green screen can transfer you to any location, change your hair color, transform yourself into an extraterrestrial, and much more.
Trending, New, Interactive, Editing, Beauty, Funny, and World are the best TikTok filter categories. Before you begin recording, you must first decide the effects you wish to utilize. So, this is the time if you haven’t tried either the G6 filter or the Dog Face effect yet. Continue reading to know more about the TikTok filter trend.
In this article
01 10 Best TikTok Filters You’d Love to Use
02 How to Make Use of Filters for TikTok by Filmora?
Part 1: 10 Best TikTok Filters You’d Love to Use
We will look at some of the top TikTok filters that make your video stand out from the crowd.
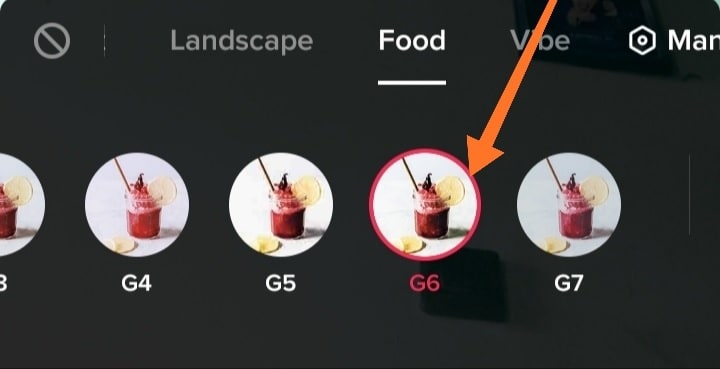
1.TikTok’s G6 filter
On TikTok, filters are identified by a single maker and number. While G6 is labeled a food-related filter, it’s become increasingly popular due to its bright, colorful, and slightly retro feel.
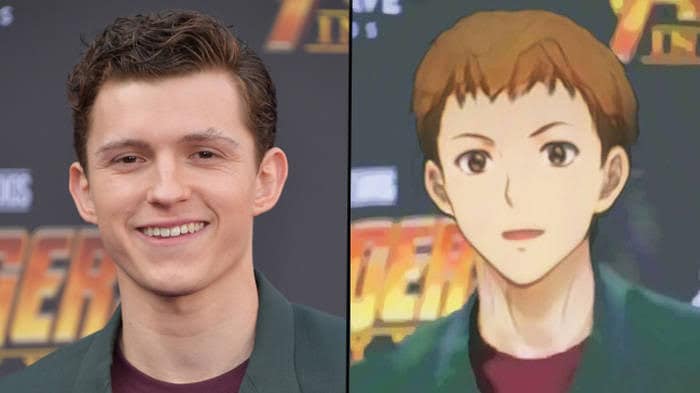
2.TikTok’s Anime Filter
When individuals uploaded their Snapchat videos to TikTok, the anime filter became quite popular. This filter transforms you into an animated character, but you’ll need to download Snapchat first and get an account if you don’t already have one.
3.TikTok’s Invisible filter
Another outcome of viral videos is TikTok’s Invisible filter. This one gives you the ability to become invisible, which is fantastic if you’ve ever wanted to try out that superpower.

4.TikTok’s Bling Effect
The Bling effect is another effect that is likely to appear on your For You page. This effect imitates the flash of a diamond being struck by the sun in different locations across the film.

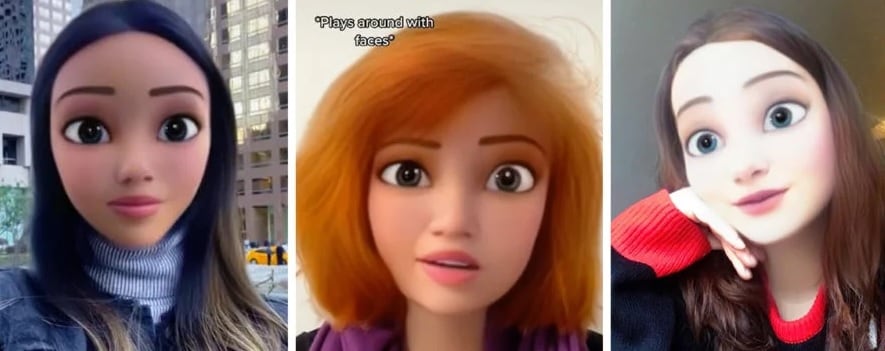
5.TikTok’s Disney Effect
The Disney TikTok filter gives you a chance to experience what it’s like to be a Disney princess or prince. This effect transforms your face into a Disney-inspired cartoon character.
This filter, like the anime filter, is available on Snapchat. So make sure you’ve downloaded that app first.
6.TikTok Dog Face
The Dog Face filter is another amusing face to experiment on. You get dog ears, a nose, and even a tongue with this one. However, you must record another filter in Snapchat before publishing it to TikTok.

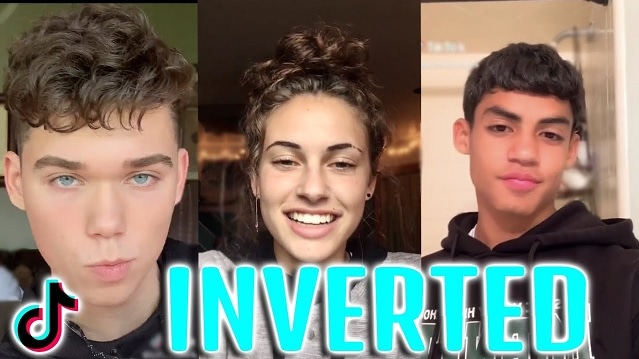
7.TikTok’s Inverted Filter
The Inverted filter is a little more divisive than the others. This filter flips any video you capture, and it’s famous for using the front-facing camera because it’s said to mimic how other people perceive you. So, what’s the big deal about it? On the other hand, the inverted filter has enraged some users, who don’t always appreciate their “true” reflection. However, the only way to see what all the fuss (or hysteria) is about is to give it a try.
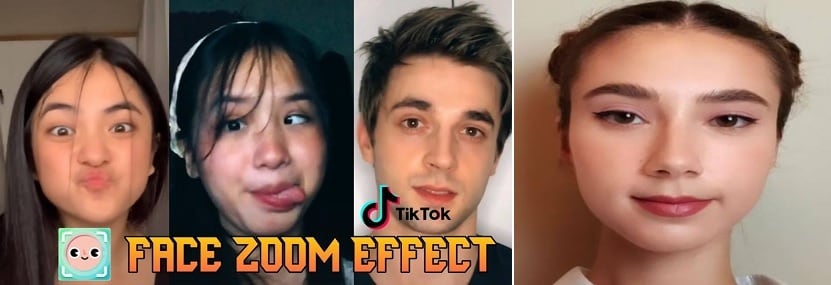
8.TikTok’s Face Zoom effect
As the name suggests, the Face Zoom effect zooms-in on your face. Some people use it in group videos to see which face the filter lands on, while others use the same to compare how you look up close versus how you look from a distance.
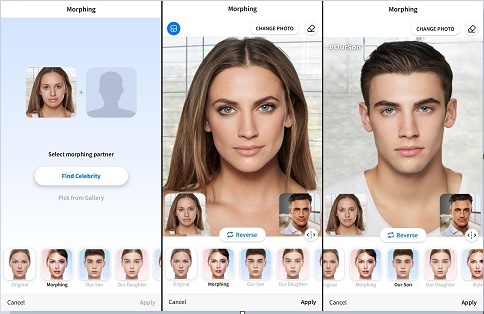
9.TikTok’s Face Morph
The Face Morph effect is another popular effect. This one lets you morph and transition between multiple images of someone else’s face. The effect may be under TikTok’s Templates area because it employs graphics rather than video.
10.TikTok’s Beauty Filter
For obvious reasons, the Beauty filter is popular on TikTok. It improves your appearance by evening out skin tone, adding color, and improving overall appearance. It’s commonly useful in conjunction with other filters and effects.
Part 2: How to Make Use of Filters for TikTok by Filmora?
Wondershare’s Filmora video editor features the standard overlays, transitions, editing, and effects that we’ve come to expect from enthusiast-level video editors. It has a clean, minimalistic, and black interface that is user-friendly. If that wasn’t enough, we’re confident you’ll be thrilled to learn that the Filmora application can be valuable in a variety of ways to make TikTok filters.
You may further personalize the celebrities look alike filter and other TikTok filter trends, with numerous Filmora effects using all of the features we’ve mentioned thus far. Here’s how to do it:
Wondershare Filmora
Get started easily with Filmora’s powerful performance, intuitive interface, and countless effects!
Try It Free Try It Free Learn More >

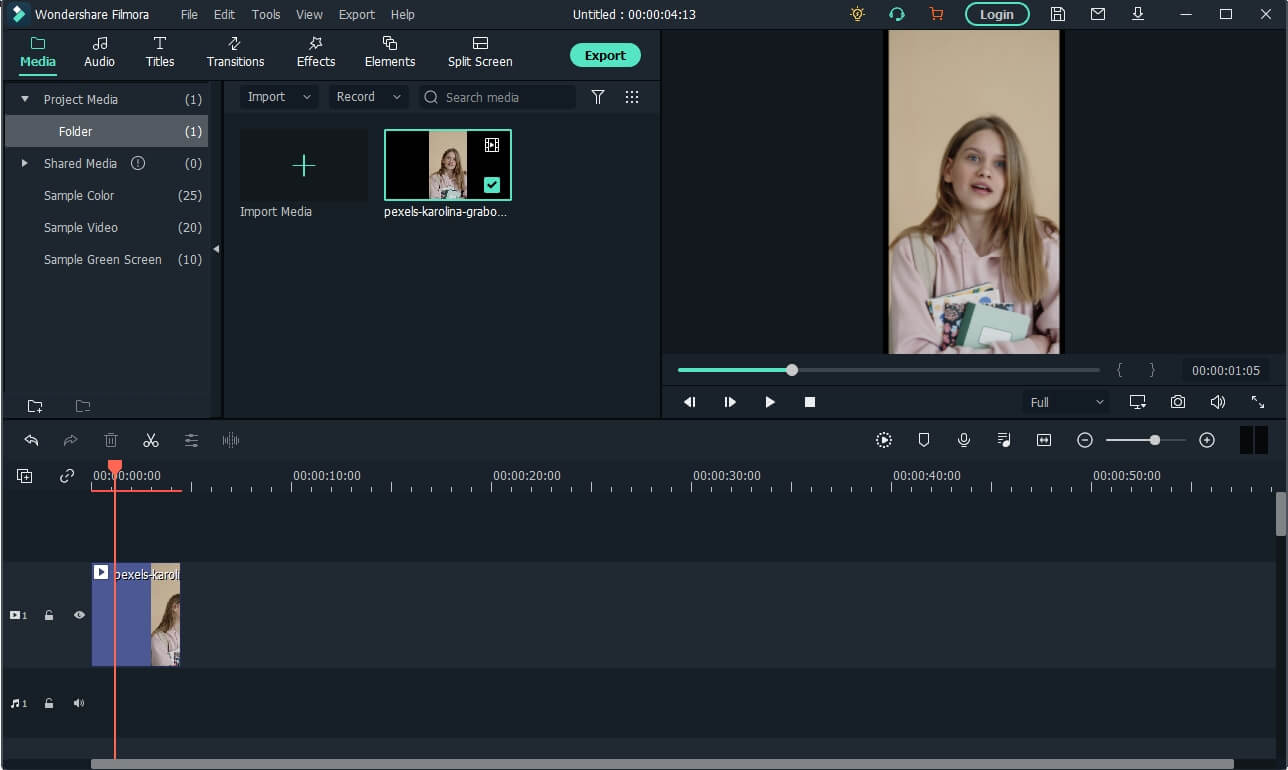
Step 1: Launch Filmora and select video
Launch Filmora and click on the Import option that will select the video file you want to edit. Now, drag and drop the imported media file to the timeline panel.
Step 2: Add effect on Filmora
Click on the effect options and select the AR sticker option to add effect. Type the TikTok filter you want on the search bar, then drag the effect to the portion of the video where you want it.
Step 3: Add effect with Filmora
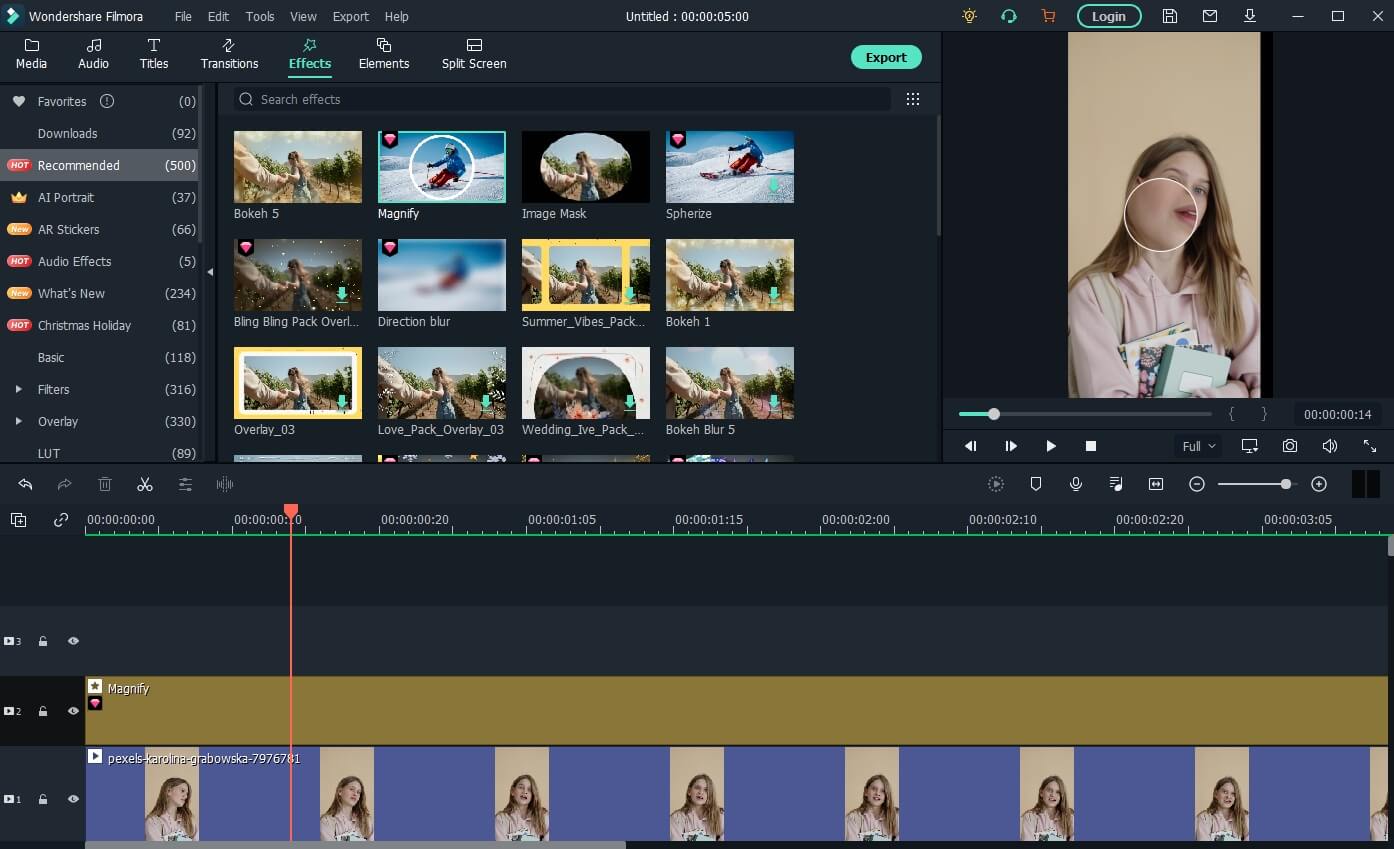
Drag and Drop the video to video tracks 1 and 2 on Filmora. Then go to the effect tab, scroll down to the utility category, and place the image mask effect.
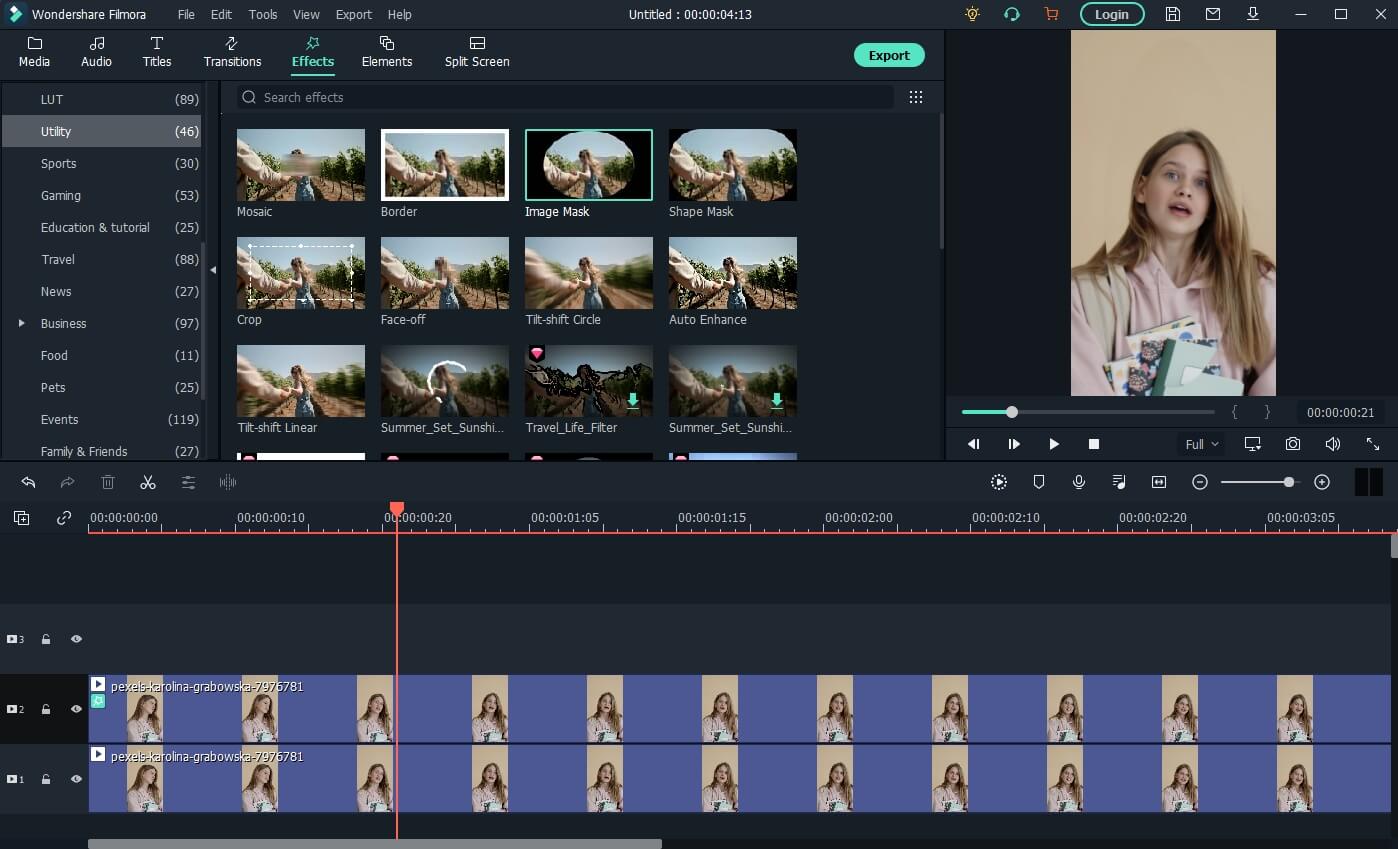
Step 4: Choose a Mask
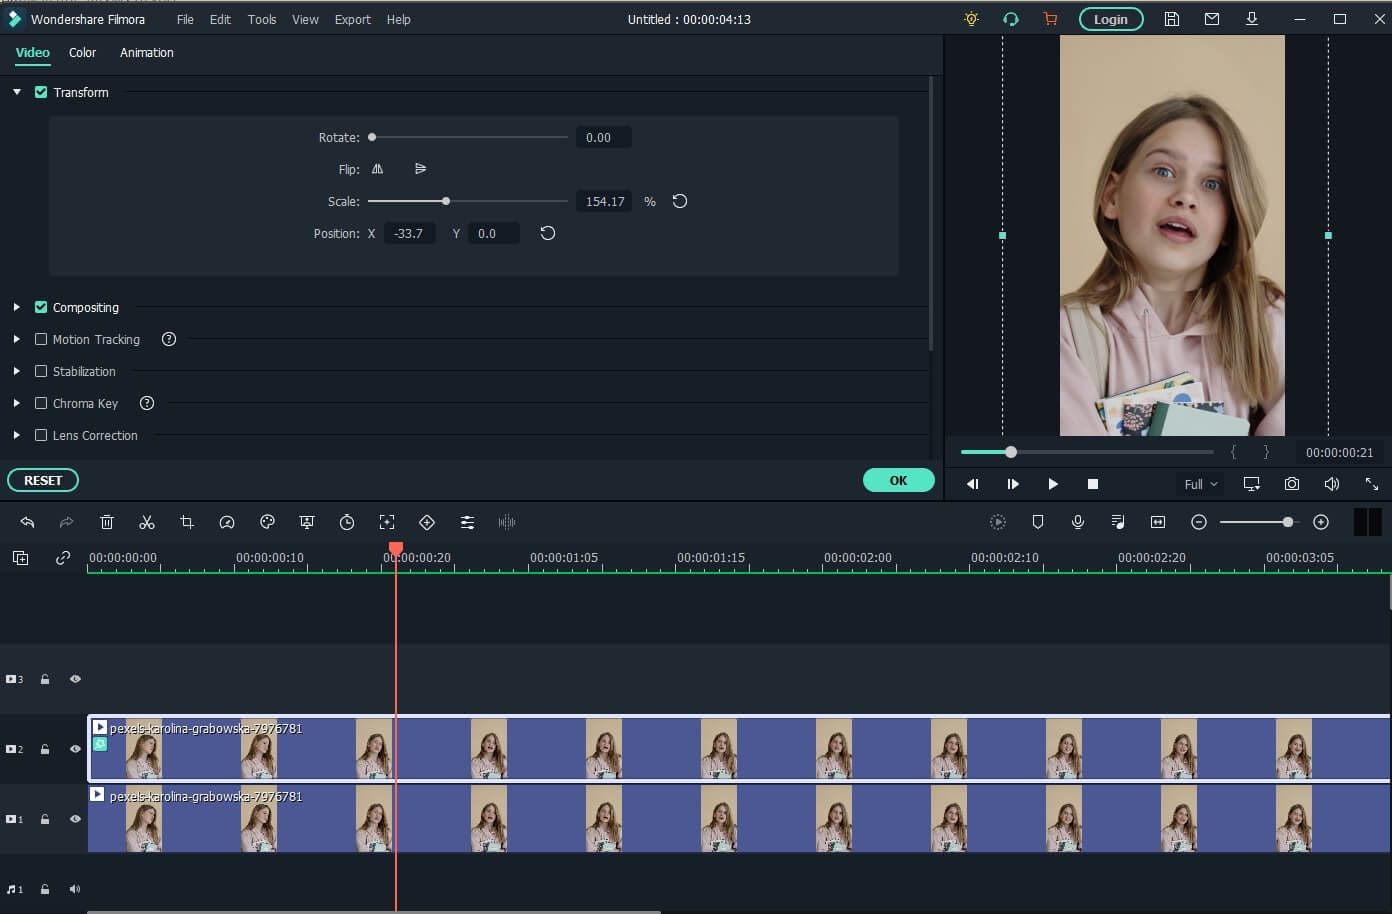
Double-click the video with the image mask. Then, please scroll down to the video effect field and choose a mask, adjusting its position and size to fit the video.
Now click on the video in track two and go to the “Transform” tab. Use the scaler slider to adjust the size of the video to fit the effect.
Conclusion
Filters and effects from TikTok can be applicable in a variety of ways. It’s all about enjoying a good time and putting your twist on TikTok videos that have gone viral. So, using our step-by-step tutorial, you may experiment with various filters on TikTok, such as the no beard filter TikTok. Now go ahead and experiment with these widespread effects and filters to see what kind of creative videos you can come up with.
TikTok is also known for its creative filters and effects. In fact, unlike Instagram, which offers a limited selection of filters and effects to test, TikTok has an extensive library of filters and effects to attempt.
TikTok filters alter the look and feel of your videos. You may, however, add stuff to your films using effects. You may entirely transform the look of your videos by applying TikTok filters. A green screen can transfer you to any location, change your hair color, transform yourself into an extraterrestrial, and much more.
Trending, New, Interactive, Editing, Beauty, Funny, and World are the best TikTok filter categories. Before you begin recording, you must first decide the effects you wish to utilize. So, this is the time if you haven’t tried either the G6 filter or the Dog Face effect yet. Continue reading to know more about the TikTok filter trend.
In this article
01 10 Best TikTok Filters You’d Love to Use
02 How to Make Use of Filters for TikTok by Filmora?
Part 1: 10 Best TikTok Filters You’d Love to Use
We will look at some of the top TikTok filters that make your video stand out from the crowd.
1.TikTok’s G6 filter
On TikTok, filters are identified by a single maker and number. While G6 is labeled a food-related filter, it’s become increasingly popular due to its bright, colorful, and slightly retro feel.
2.TikTok’s Anime Filter
When individuals uploaded their Snapchat videos to TikTok, the anime filter became quite popular. This filter transforms you into an animated character, but you’ll need to download Snapchat first and get an account if you don’t already have one.
3.TikTok’s Invisible filter
Another outcome of viral videos is TikTok’s Invisible filter. This one gives you the ability to become invisible, which is fantastic if you’ve ever wanted to try out that superpower.
4.TikTok’s Bling Effect
The Bling effect is another effect that is likely to appear on your For You page. This effect imitates the flash of a diamond being struck by the sun in different locations across the film.
5.TikTok’s Disney Effect
The Disney TikTok filter gives you a chance to experience what it’s like to be a Disney princess or prince. This effect transforms your face into a Disney-inspired cartoon character.
This filter, like the anime filter, is available on Snapchat. So make sure you’ve downloaded that app first.
6.TikTok Dog Face
The Dog Face filter is another amusing face to experiment on. You get dog ears, a nose, and even a tongue with this one. However, you must record another filter in Snapchat before publishing it to TikTok.
7.TikTok’s Inverted Filter
The Inverted filter is a little more divisive than the others. This filter flips any video you capture, and it’s famous for using the front-facing camera because it’s said to mimic how other people perceive you. So, what’s the big deal about it? On the other hand, the inverted filter has enraged some users, who don’t always appreciate their “true” reflection. However, the only way to see what all the fuss (or hysteria) is about is to give it a try.
8.TikTok’s Face Zoom effect
As the name suggests, the Face Zoom effect zooms-in on your face. Some people use it in group videos to see which face the filter lands on, while others use the same to compare how you look up close versus how you look from a distance.
9.TikTok’s Face Morph
The Face Morph effect is another popular effect. This one lets you morph and transition between multiple images of someone else’s face. The effect may be under TikTok’s Templates area because it employs graphics rather than video.
10.TikTok’s Beauty Filter
For obvious reasons, the Beauty filter is popular on TikTok. It improves your appearance by evening out skin tone, adding color, and improving overall appearance. It’s commonly useful in conjunction with other filters and effects.
Part 2: How to Make Use of Filters for TikTok by Filmora?
Wondershare’s Filmora video editor features the standard overlays, transitions, editing, and effects that we’ve come to expect from enthusiast-level video editors. It has a clean, minimalistic, and black interface that is user-friendly. If that wasn’t enough, we’re confident you’ll be thrilled to learn that the Filmora application can be valuable in a variety of ways to make TikTok filters.
You may further personalize the celebrities look alike filter and other TikTok filter trends, with numerous Filmora effects using all of the features we’ve mentioned thus far. Here’s how to do it:
Wondershare Filmora
Get started easily with Filmora’s powerful performance, intuitive interface, and countless effects!
Try It Free Try It Free Learn More >
Step 1: Launch Filmora and select video
Launch Filmora and click on the Import option that will select the video file you want to edit. Now, drag and drop the imported media file to the timeline panel.
Step 2: Add effect on Filmora
Click on the effect options and select the AR sticker option to add effect. Type the TikTok filter you want on the search bar, then drag the effect to the portion of the video where you want it.
Step 3: Add effect with Filmora
Drag and Drop the video to video tracks 1 and 2 on Filmora. Then go to the effect tab, scroll down to the utility category, and place the image mask effect.
Step 4: Choose a Mask
Double-click the video with the image mask. Then, please scroll down to the video effect field and choose a mask, adjusting its position and size to fit the video.
Now click on the video in track two and go to the “Transform” tab. Use the scaler slider to adjust the size of the video to fit the effect.
Conclusion
Filters and effects from TikTok can be applicable in a variety of ways. It’s all about enjoying a good time and putting your twist on TikTok videos that have gone viral. So, using our step-by-step tutorial, you may experiment with various filters on TikTok, such as the no beard filter TikTok. Now go ahead and experiment with these widespread effects and filters to see what kind of creative videos you can come up with.
Also read:
- [Updated] Step Into 2023 A Comprehensive Guide to TikTok Elements for 2024
- From Buzz to Sales Transforming Social Media Into Traffic for 2024
- [Updated] Join the Party Your Guide to Active TikTok Streaming
- [New] 2024 Approved Boosting Interactions on TikTok - Top 30 Creative Username Suggestions
- [Updated] Perfecting Your Soundtracks in Audacity by Cutting Out Noise
- 2024 Approved Get Unbranded TikTok Content Free, Full Quality Download
- 2024 Approved Discovering the Charm #7 Most Popular TikTok Emojis & Secret Symbols
- 2024 Approved Top Earnings Forecasting Software for TikTok Content Makers
- Unlocking TikTok Potential Desktop Video Guide
- Mastering TikTok'enas a Game Changer Top 30 Unique Username Suggestions
- Effortless TikTok Video Enhancement Replace Backdrop Techniques
- [Updated] 2024 Approved 100 Hysterical Moments on TikTok
- The Ultimate TikTok Recording Manual for 2024
- Establishing a Unique Code for Your TikTok Presence
- [Updated] Cross Into the World of Shared TikTok Experiences
- 2024 Approved Top 15 Inspirational Talents Transforming Lives Through TikTok
- Digital Domains Stitch-Based Content Creation
- [New] The Ultimate List of Legit, Safe Follower Sources for 2024
- [New] 2024 Approved Inspire & Engage Top 50+ TikTok Lyrics Guide
- [Updated] 2024 Approved Discover the Best TikTok to MP3 Online, Costless Convertors
- Viral Beats Top TikTok Hits for a Dance Off
- [Updated] Syncopation Spotlight Hits That Have Hit the High Note on TikTok
- [Updated] 2024 Approved Best 10 PC Apps for Professional TikTok Video Creation
- [Updated] 2024 Approved The Cutting Edge of Food on TikTok
- [Updated] In 2024, Unleashing Your Content's Potential on TikTok Through Hashtags
- [Updated] In 2024, Carving a Path Individuality in the Face of TikTok Influencers
- 2024 Approved Tik-Hop Waves Unveiling Today's Viral Rap Sounds
- [Updated] Thriving Through Themes 30+ Unique Biographical Techniques to Triple Your Views and Following on the TikTok-Filmora Platform for 2024
- [Updated] Sketching Your Signature TikTok End-Note
- [Updated] Time-Saving Strategies for TikTok Watchers for 2024
- [New] Best Free and Easy TikTok Edits on a Mac Computer for 2024
- [Updated] In 2024, Master the Art of Virality on TikTok with 50+ Powerful Lyrics
- [Updated] In 2024, The Power of Pop Culture Top TikTok Response Videos
- In 2024, From One to a Hundred A Guide to Creating Multiple TikToks of Youself
- In 2024, Detailed Review of doctorSIM Unlock Service For Apple iPhone 13 Pro Max | Dr.fone
- Updated In 2024, Get Splice Video Editing Software for Mac
- [Updated] 2024 Approved Technical Insights for Superior PPT Recording Quality
- Best Ways to Bypass iCloud Activation Lock from iPhone SE/iPad/iPod
- How to Change your Itel A70 Location on Twitter | Dr.fone
- 2024 Approved Pinpoint Deep Sigh Aural Representation
- How To Unbrick a Dead Samsung Galaxy A54 5G | Dr.fone
- Final Cut Pro Is a Video Editing Software Exclusive to Apple Devices. It Features Numerous Editing Tools and Video Effects, Enabling You to Produce Quality Creations Every Time. Keep Reading to Discover How to Apply the Final Cut Pro Camera Shake Effect
- In 2024, How to Unlock Apple iPhone SE (2022) Passcode Screen?
- Top 15 Apps To Hack WiFi Password On Oppo Reno 11 5G
- [New] In 2024, Perfecting Your Content A Comprehensive Guide to Instagram Video Enhancement
- How to Fake GPS on Android without Mock Location For your Xiaomi Redmi Note 12 5G | Dr.fone
- [New] In 2024, Expressive Mac Screenshot Recorder with Soundtrack
- Win10's 15 Go-To Recorder Choices for 2024
- Remove Device Supervision From your iPhone 13 Pro Max | Dr.fone
- In 2024, FPS Titans Ranking Gaming's Elite Shooters
- How To Recover Lost Data from Apple iPhone SE (2022)? | Dr.fone
- In 2024, Top 10 Password Cracking Tools For ZTE Nubia Flip 5G
- About Nokia XR21 FRP Bypass
- [Updated] 2024 Approved Next-Gen Online Meeting Apps Azoom No More
- Updated 2024 Approved FCP Aspect Ratio Conversion Made Easy A Quick Start Guide
- Updated Complementing Your Visual Storytelling with Cost-Free Melodies Techniques for PC/Mobile Devices
- [Updated] Optimal Techniques Recording Console Games via PC
- 3 Solutions to Hard Reset Honor X8b Phone Using PC | Dr.fone
- [Updated] In 2024, Decoding Inverse Visual Queries on Facebook Platforms
- How to Unlock Itel P55T Phone without Google Account?
- How to Remove a Previously Synced Google Account from Your Realme Note 50
- [New] Leveraging Board Features for Virtual Collaboration Android, iOS & Windows Guide for 2024
- Title: From Disparate Pieces to a Cohesive TikTok Story for 2024
- Author: Stephen
- Created at : 2024-05-23 02:52:57
- Updated at : 2024-05-24 02:52:57
- Link: https://tiktok-video-recordings.techidaily.com/from-disparate-pieces-to-a-cohesive-tiktok-story-for-2024/
- License: This work is licensed under CC BY-NC-SA 4.0.
