
"From Still Image to Live Feed Going Live on TikTok Via Computer for 2024"
From Still Image to Live Feed: Going Live on TikTok Via Computer
Content creators on TikTok adopt various creative ways to engage audiences. Many fashion influencers provide makeup tutorials by doing a live stream on TikTok. Moreover, game lovers like to live stream their gameplay on TikTok to attract a large number of people. Thus, live streams on TikTok are a new norm among content creators and game lovers to maximize their target audience.
If you don’t know how to go live on TikTok on PC, this article will guide you. Through this well-structured article, you can find four easy ways to go live on TikTok on your computer.
- Way 1: With OBS
- Way 2: With Streamlabs
- Way 3: With XSplit Broadcaster
- Way 4: With TikTok Live Studio Software
Part 1: Prerequisite for Live Stream on TikTok from PC
To start TikTok live streaming on your PC, there are some pre-requirements. These requirements are necessary to prevent the misuse of TikTok by any means. Once you have fulfilled these requirements, you can easily go for live streaming on TikTok without any restrictions.
- To enable the live stream feature on TikTok, you must have at least 1000 followers on your account.
- You should be above 16 years old to access this feature. Moreover, to increase your engagement during live streams by sending virtual gifts, you should be 18 years old or above.
- To begin live streaming on a PC using streaming software, you must have a streaming key and server URL.
How to Get your Streaming Key on TikTok?
A streaming key is a random combination of alphanumeric characters. It helps you to connect your TikTok account with a streaming platform to enable high-quality results. To get your streaming key in the easiest way, check the following steps:
Step1 Open your TikTok app to begin the process. Select the “Plus” icon and choose the “Live” button from the right side. Afterward, choose the “Cast/Connect to PC/Mac” option to proceed.
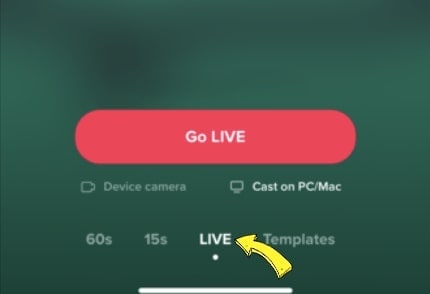
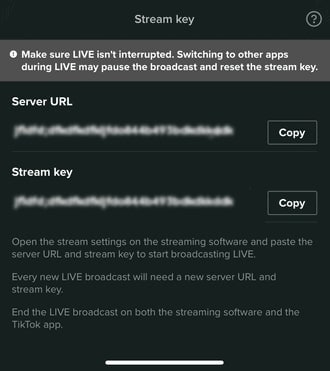
Step2 Now tap on the “Go Live” option that will open a new window. Now you can see your Stream Key and Server URL. Press the “Copy” option given next to these two options. Afterward, you can share your stream key and server URL with your PC, which will be used later.
Part 2: Benefits of Going Live on TikTok with Computer
There are various advantages of going live on TikTok with a PC. By doing so, you can ensure a better quality of your live streaming session. To learn more, let’s discuss the details.
1. Great Stability
Holding a mobile phone for live streams can be hectic and tiring. Moreover, it won’t offer camera stability, and the end result can be shaky. By using a computer, you don’t have to hold anything. With great stability and ease, you can conduct live streams for a longer run.
2. High Video/Audio Quality
iOS and Samsung devices provide high video quality. However, if you are using low-end smartphones, you won’t get high video and audio quality. In such a circumstance, you should use your computer to maintain better quality. By doing so, your audience can listen and view your live streams flawlessly.
3. Picture-in-Picture Display
Live streams on mobile phones restrict you from displaying a variety of content simultaneously. Through your PC, you can do live streaming on TikTok while playing your favorite games. You can easily open multiple windows on your PC during live streams. Moreover, you can have a picture-in-picture display to use a webcam while going for a live stream.
Part 3: 4 Ways to Go Live on TikTok On PC
Are you eager to know how to stream on TikTok on PC using different ways? Let’s shed light on some simple yet effective ways to go for live streaming on TikTok with a PC.
Way 1: With OBS
OBS is a highly compatible and free broadcasting software. It is available for mainstream platforms such as Windows, Mac, and Linux. It offers high-end results during streaming with an audio mixer. It also provides customized options to set hotkeys, choose sources, and adjust the properties. Besides being a great streaming software, OBS also functions as a screen recorder.
Therefore, OBS is a famous streaming tool that ensures great quality in live streaming on TikTok. To learn how to go live on TikTok on a computer using OBS, here are the easy steps:
Step1 Download and install OBS on your PC successfully. Once done, go to the “Controls” section and click on “Settings.” A new window will pop up from which click on the “Stream” option given on the left panel.
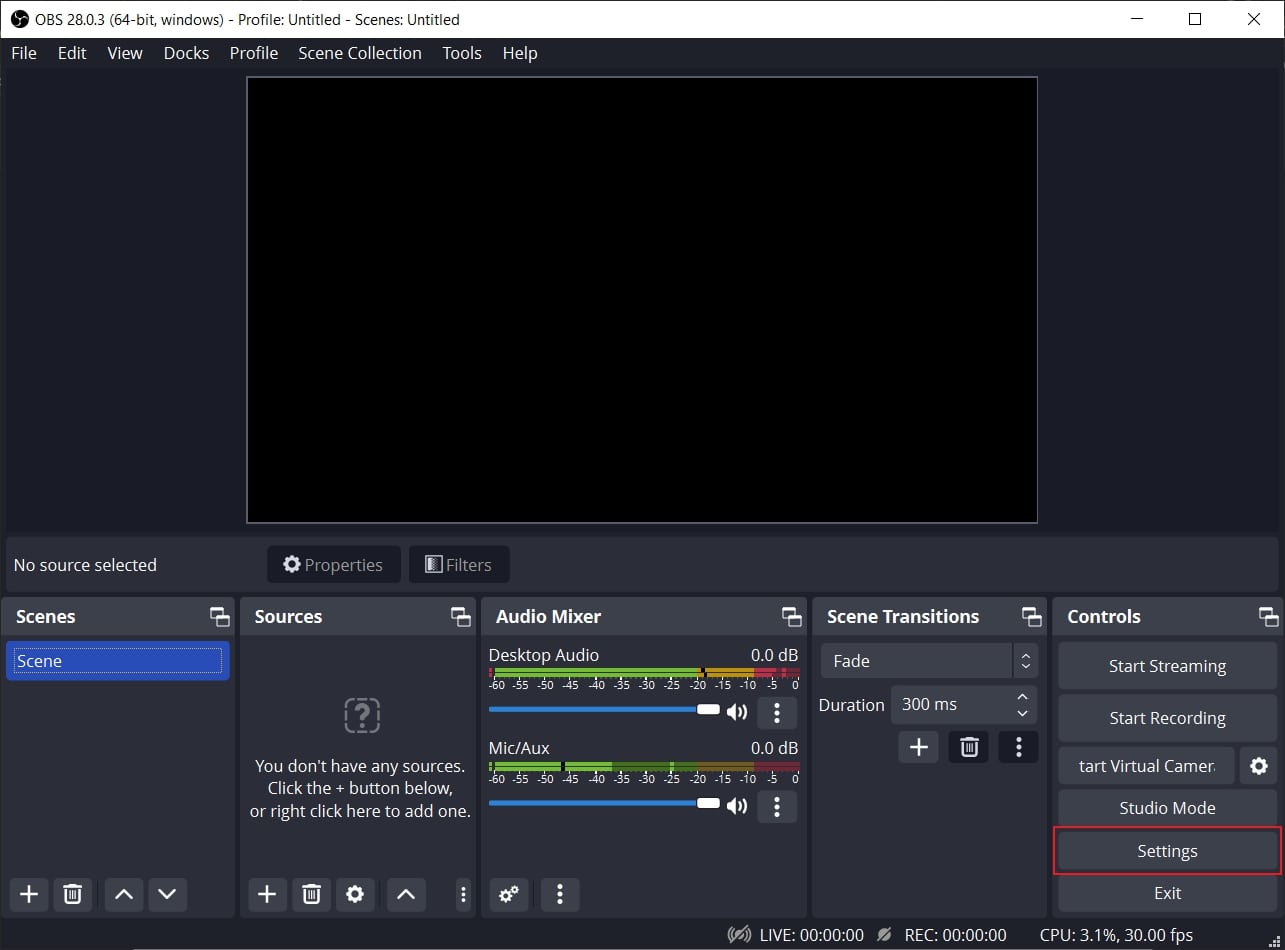
Step2 On the “Service” box, choose “Custom” to proceed. Now enter the stream key and server URL you have gotten before. Once done with all requirements, click on the “Apply” option.

Way 2: With Streamlabs
Streamlabs is a popular streaming tool comprising great capabilities for live streaming. Using this platform, you can broadcast your webcam, microphone’s audio, games, desktop screen, etc. If you want to invite a guest during your live stream, Streamlabs provide a collab camera. Furthermore, this software provides distinctive and attractive overlays. You can easily choose from hundreds of overlays and apply them to your live stream.
You can also set important alerts on this tool, preferably. In order to begin your live stream on TikTok using Streamlabs, check the below steps:
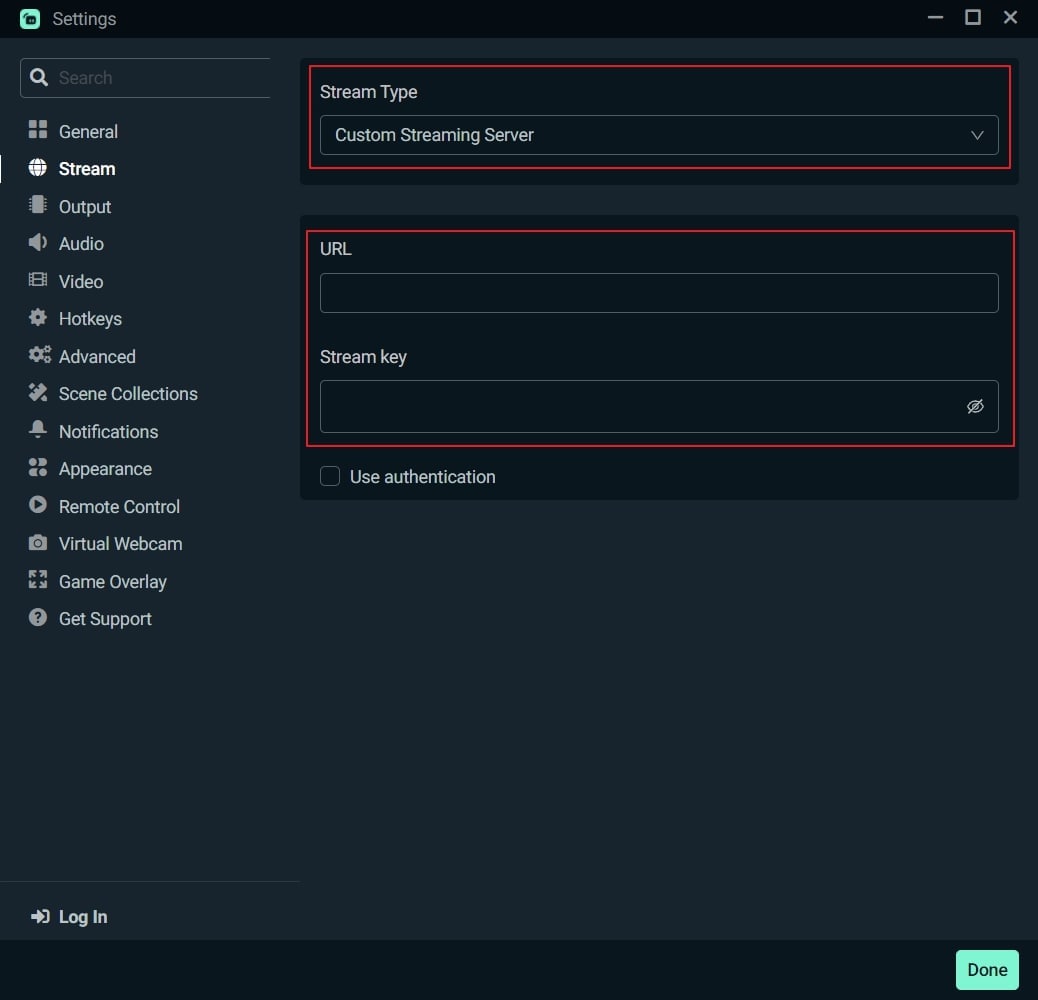
Step1 Once done with installing Streamlabs on your PC, open its main interface. Click on the “Gear” icon displayed in the left section. From the settings menu, click on the “Stream” option.
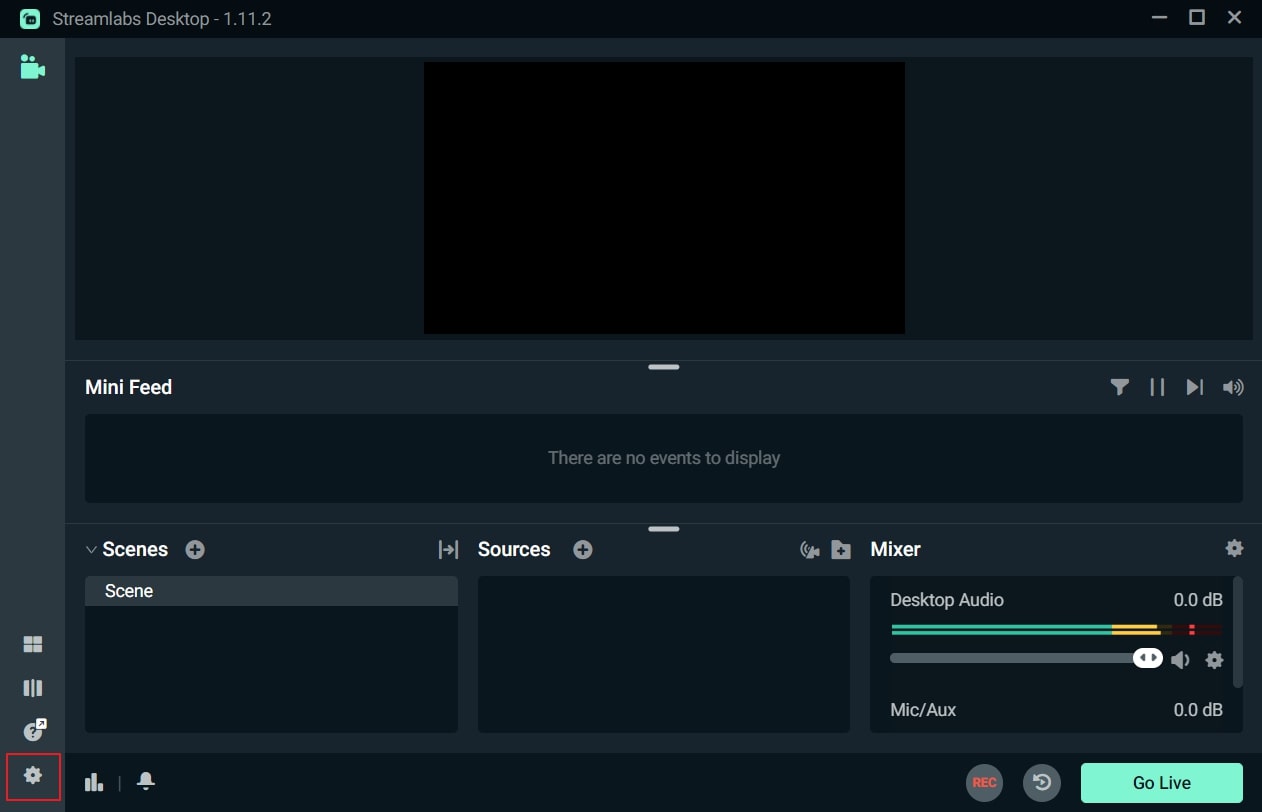
Step2 On the new menu, choose “Custom Streaming Service” as your Stream Type. Now add the required Stream Key and Server URL on the given boxes. Afterward, hit the “Done” button.
Way 3: With XSplit Broadcaster
Want to know how to stream on TikTok on PC efficiently? XSplit Broadcaster is a powerful streaming tool used by many professionals. It can be used to live stream gameplays, e-sports, and other videos in high resolution. This streaming software provides different layout wizards to display your live streaming screen efficiently.
Moreover, it also supports multi-streaming, through which you can go live on various platforms at the same time. To use XSplit Broadcaster to live stream on TikTok, here are the instructions:
Step1 Launch XSplit Broadcaster on your PC and navigate to the “Broadcast” button displayed on top. Afterward, click on “Set up a new output” to proceed with the TikTok live stream process.
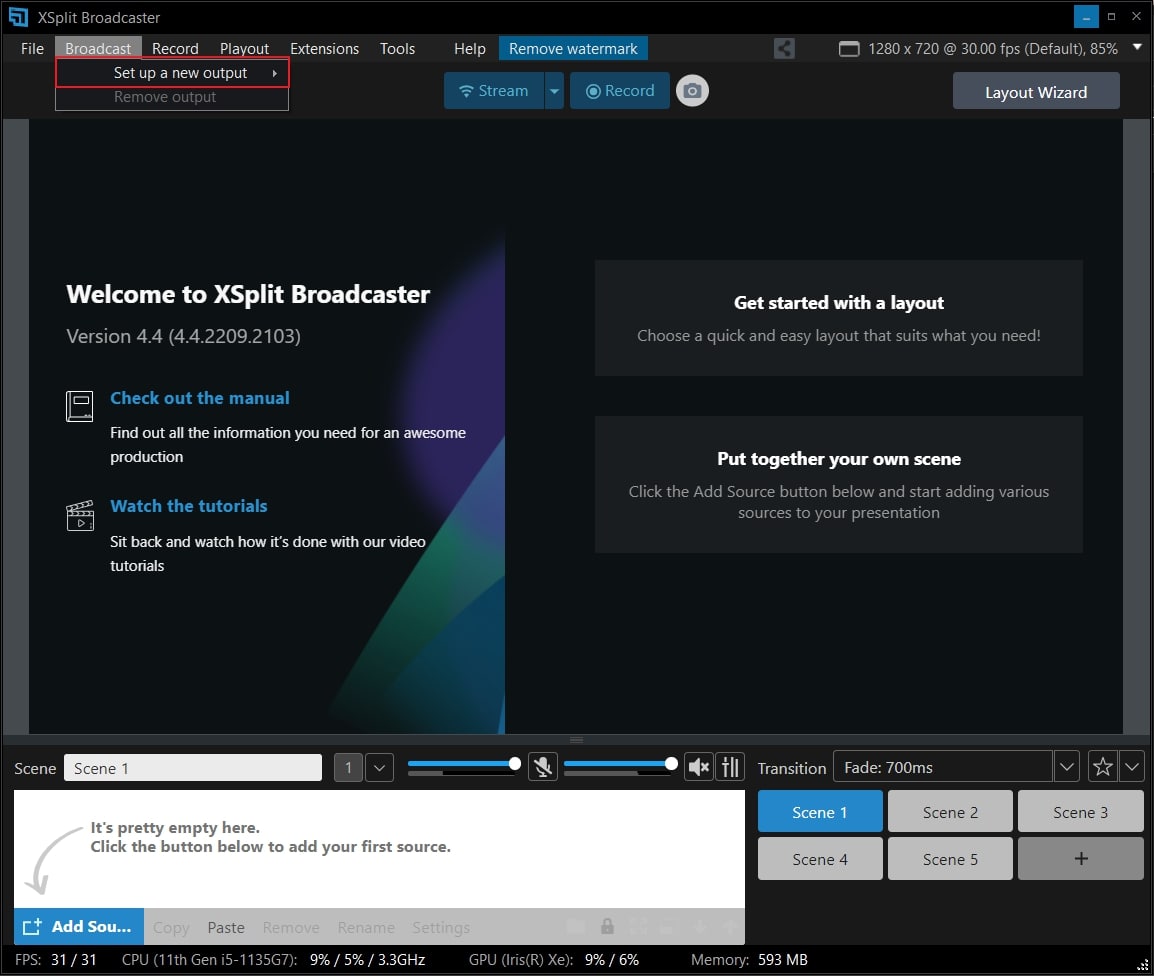
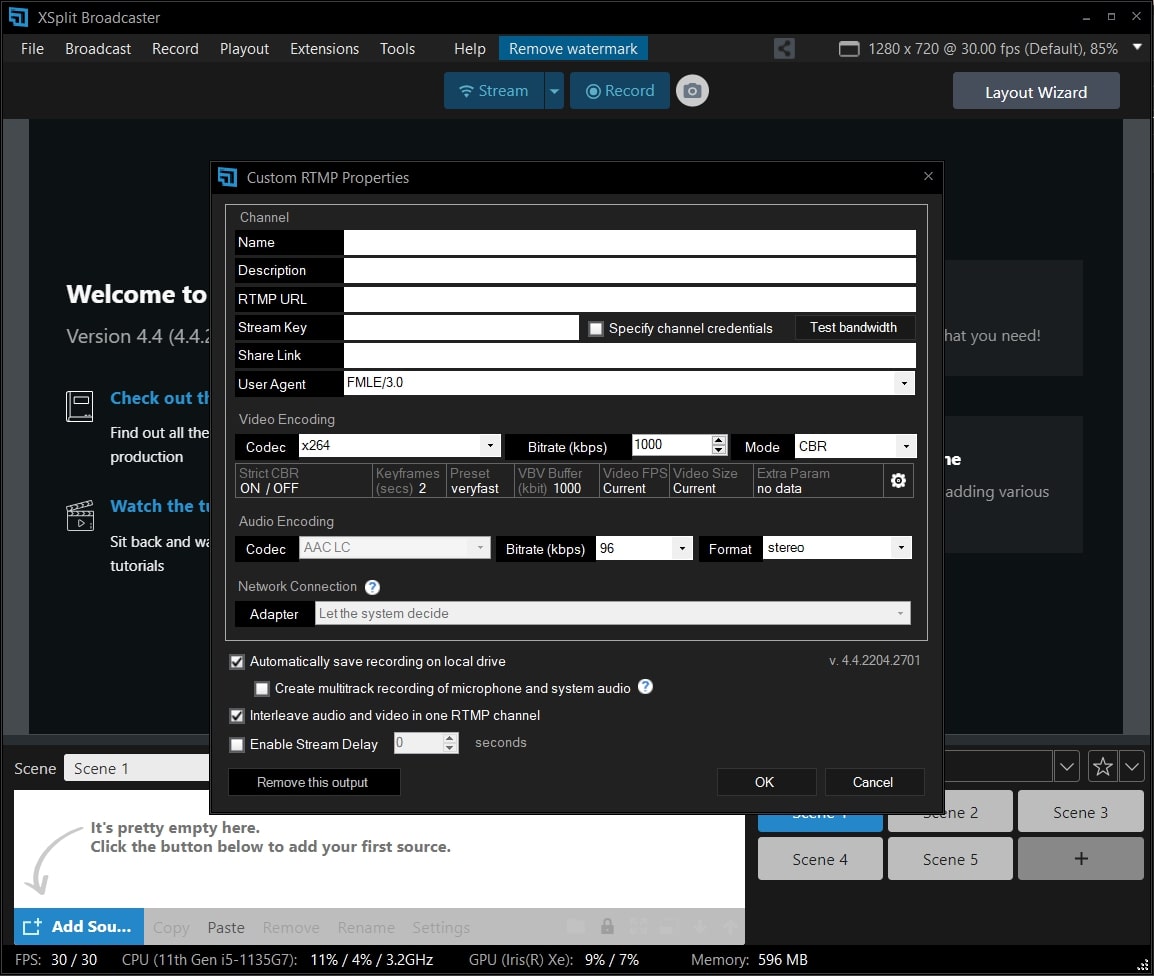
Step2 Now tap on “Custom RTMP,” which will redirect you to a new window. Here, you can add your streaming key and server URL to continue. You can also add information, such as name, channel, etc., to this window. Once done, press the “OK” button.
Way 4: With TikTok Live Studio Software
TikTok Live Studio software is the official software of TikTok for live streaming. This app is currently only available for Windows users. This software provides various customizable options that enable you to adjust your camera and microphone properties easily. It has an easy-to-use interface that allows beginners to conduct live streaming on TikTok in high quality.
As this software is directly linked to your TikTok account, you don’t have to add the stream key and server URL to initiate live streaming. Do you want to learn how to go live on TikTok on a PC using the TikTok software? You can check the following steps:
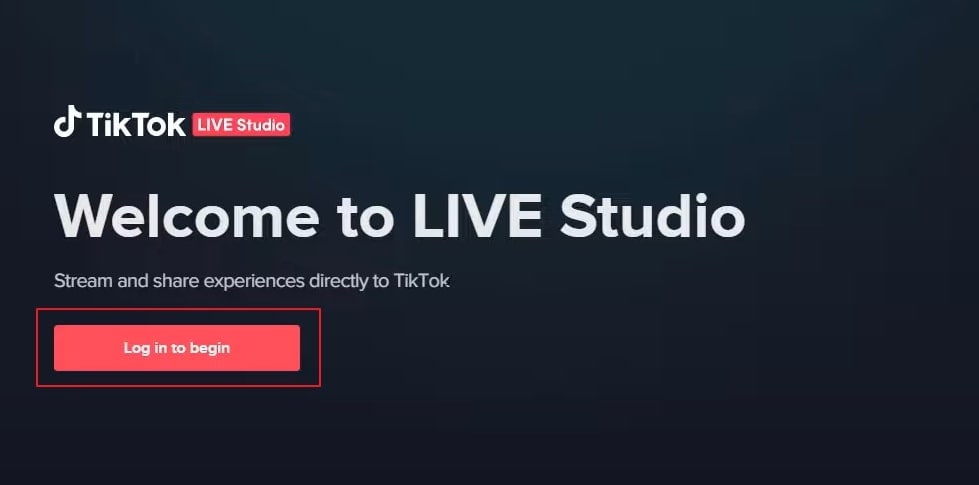
Step1 Launch TikTok Live Studio software on your PC and click on “Log in to begin.” Go to the login page and follow the on-screen instructions to set up this software successfully. On the Microphone window, choose your preferred microphone as your default device.
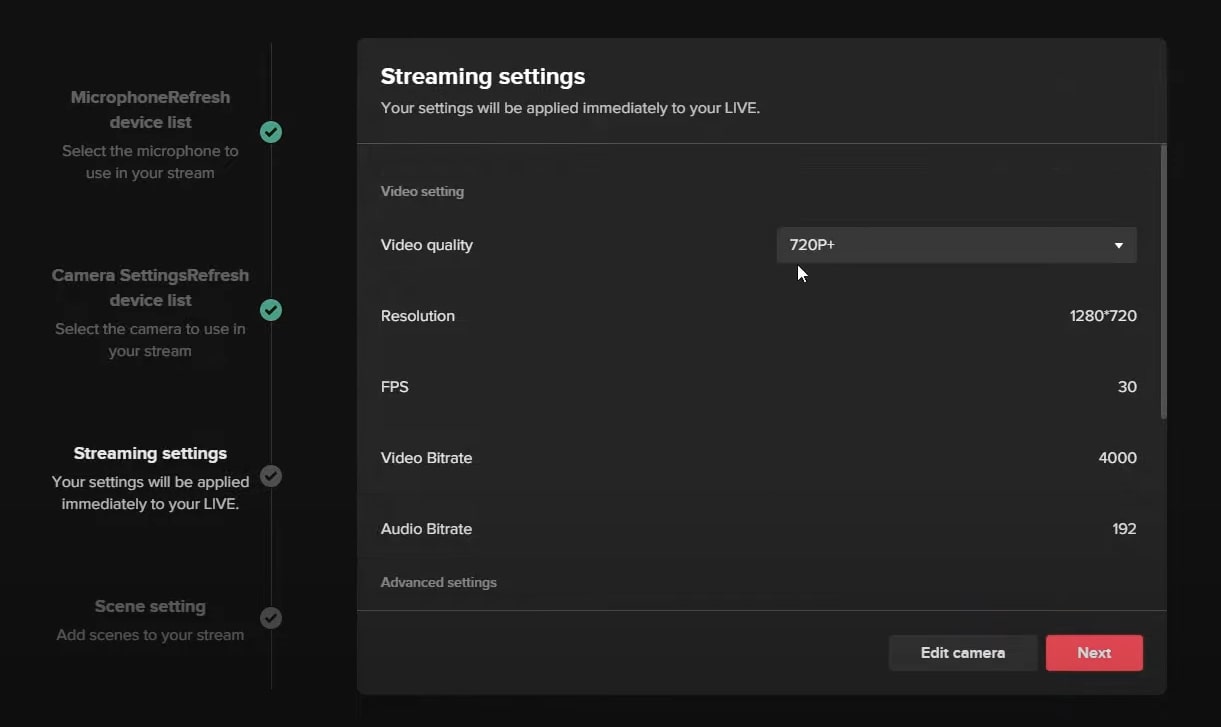
Step2 Afterward, adjust the camera settings and press the “Next” button. It will redirect you to streaming settings. You can choose the video and audio quality from this window. Click on the “Next” button to continue. Also, make sure to adjust the scene settings as well.
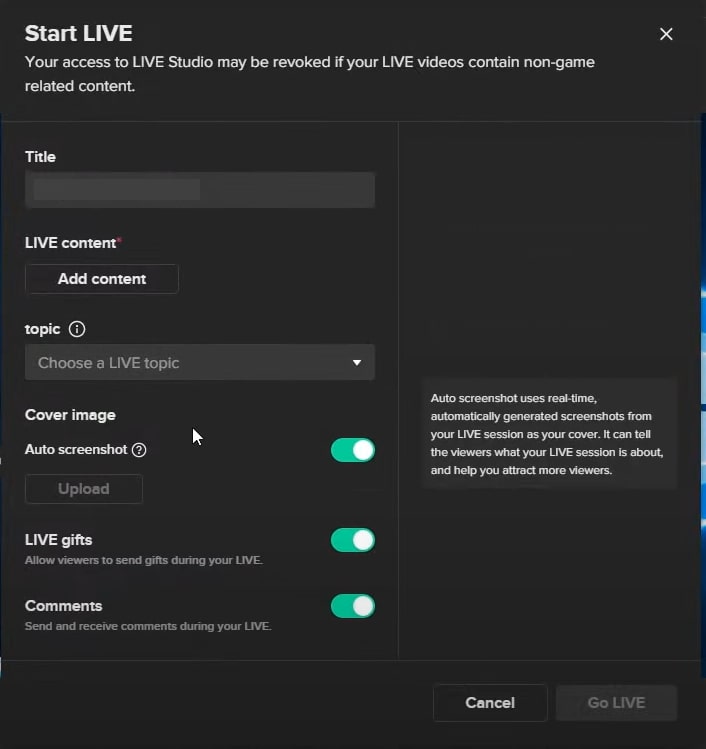
Step3 Now, you can see your PC screen along with your webcam. You can modify the screen size manually. You can also change the camera background and remove background noise from the settings. Once done with settings, press the “Start” button. Now give a title to your live streaming and choose your Live content. Next, click on the “Confirm” button and hit the “Go Live” button.
Bonus Tips: Easily Record and Edit Your Stream with Filmora
Have you ever used a screen recorder to capture your live streaming? Wondershare Filmora is the most compatible tool that offers a premium screen recorder and editor. The screen recorder in this platform can record a selected area with high audio and video quality. Along with capturing your live streaming session, you can use Pen to demonstrate in an enhanced way.
The video editor of Filmora offers professional visual effects and transitions. It supports high-quality video formats such as 4K and HD and enables intuitive editing. Moreover, you can also utilize its advanced features such as Auto Reframe, AI Portrait, Split Screen, Green Screen, etc. By availing of these features, you can execute professional editing on your recorded live streams. To understand more about Filmora’s new features, watch the video below.
Conclusion
Live streaming on TikTok is a new technique to target audiences effortlessly. There are various ways through which you can go for live streaming on TikTok. If you don’t know how to go live on TikTok PC properly, you can take help from this article. Also, to screen record and edit a live stream, you can use our recommended tool known as Wondershare Filmora.
Free Download For Win 7 or later(64-bit)
Free Download For macOS 10.14 or later
Part 1: Prerequisite for Live Stream on TikTok from PC
To start TikTok live streaming on your PC, there are some pre-requirements. These requirements are necessary to prevent the misuse of TikTok by any means. Once you have fulfilled these requirements, you can easily go for live streaming on TikTok without any restrictions.
- To enable the live stream feature on TikTok, you must have at least 1000 followers on your account.
- You should be above 16 years old to access this feature. Moreover, to increase your engagement during live streams by sending virtual gifts, you should be 18 years old or above.
- To begin live streaming on a PC using streaming software, you must have a streaming key and server URL.
How to Get your Streaming Key on TikTok?
A streaming key is a random combination of alphanumeric characters. It helps you to connect your TikTok account with a streaming platform to enable high-quality results. To get your streaming key in the easiest way, check the following steps:
Step1 Open your TikTok app to begin the process. Select the “Plus” icon and choose the “Live” button from the right side. Afterward, choose the “Cast/Connect to PC/Mac” option to proceed.
Step2 Now tap on the “Go Live” option that will open a new window. Now you can see your Stream Key and Server URL. Press the “Copy” option given next to these two options. Afterward, you can share your stream key and server URL with your PC, which will be used later.
Part 2: Benefits of Going Live on TikTok with Computer
There are various advantages of going live on TikTok with a PC. By doing so, you can ensure a better quality of your live streaming session. To learn more, let’s discuss the details.
1. Great Stability
Holding a mobile phone for live streams can be hectic and tiring. Moreover, it won’t offer camera stability, and the end result can be shaky. By using a computer, you don’t have to hold anything. With great stability and ease, you can conduct live streams for a longer run.
2. High Video/Audio Quality
iOS and Samsung devices provide high video quality. However, if you are using low-end smartphones, you won’t get high video and audio quality. In such a circumstance, you should use your computer to maintain better quality. By doing so, your audience can listen and view your live streams flawlessly.
3. Picture-in-Picture Display
Live streams on mobile phones restrict you from displaying a variety of content simultaneously. Through your PC, you can do live streaming on TikTok while playing your favorite games. You can easily open multiple windows on your PC during live streams. Moreover, you can have a picture-in-picture display to use a webcam while going for a live stream.
Part 3: 4 Ways to Go Live on TikTok On PC
Are you eager to know how to stream on TikTok on PC using different ways? Let’s shed light on some simple yet effective ways to go for live streaming on TikTok with a PC.
Way 1: With OBS
OBS is a highly compatible and free broadcasting software. It is available for mainstream platforms such as Windows, Mac, and Linux. It offers high-end results during streaming with an audio mixer. It also provides customized options to set hotkeys, choose sources, and adjust the properties. Besides being a great streaming software, OBS also functions as a screen recorder.
Therefore, OBS is a famous streaming tool that ensures great quality in live streaming on TikTok. To learn how to go live on TikTok on a computer using OBS, here are the easy steps:
Step1 Download and install OBS on your PC successfully. Once done, go to the “Controls” section and click on “Settings.” A new window will pop up from which click on the “Stream” option given on the left panel.
Step2 On the “Service” box, choose “Custom” to proceed. Now enter the stream key and server URL you have gotten before. Once done with all requirements, click on the “Apply” option.
Way 2: With Streamlabs
Streamlabs is a popular streaming tool comprising great capabilities for live streaming. Using this platform, you can broadcast your webcam, microphone’s audio, games, desktop screen, etc. If you want to invite a guest during your live stream, Streamlabs provide a collab camera. Furthermore, this software provides distinctive and attractive overlays. You can easily choose from hundreds of overlays and apply them to your live stream.
You can also set important alerts on this tool, preferably. In order to begin your live stream on TikTok using Streamlabs, check the below steps:
Step1 Once done with installing Streamlabs on your PC, open its main interface. Click on the “Gear” icon displayed in the left section. From the settings menu, click on the “Stream” option.
Step2 On the new menu, choose “Custom Streaming Service” as your Stream Type. Now add the required Stream Key and Server URL on the given boxes. Afterward, hit the “Done” button.
Way 3: With XSplit Broadcaster
Want to know how to stream on TikTok on PC efficiently? XSplit Broadcaster is a powerful streaming tool used by many professionals. It can be used to live stream gameplays, e-sports, and other videos in high resolution. This streaming software provides different layout wizards to display your live streaming screen efficiently.
Moreover, it also supports multi-streaming, through which you can go live on various platforms at the same time. To use XSplit Broadcaster to live stream on TikTok, here are the instructions:
Step1 Launch XSplit Broadcaster on your PC and navigate to the “Broadcast” button displayed on top. Afterward, click on “Set up a new output” to proceed with the TikTok live stream process.
Step2 Now tap on “Custom RTMP,” which will redirect you to a new window. Here, you can add your streaming key and server URL to continue. You can also add information, such as name, channel, etc., to this window. Once done, press the “OK” button.
Way 4: With TikTok Live Studio Software
TikTok Live Studio software is the official software of TikTok for live streaming. This app is currently only available for Windows users. This software provides various customizable options that enable you to adjust your camera and microphone properties easily. It has an easy-to-use interface that allows beginners to conduct live streaming on TikTok in high quality.
As this software is directly linked to your TikTok account, you don’t have to add the stream key and server URL to initiate live streaming. Do you want to learn how to go live on TikTok on a PC using the TikTok software? You can check the following steps:
Step1 Launch TikTok Live Studio software on your PC and click on “Log in to begin.” Go to the login page and follow the on-screen instructions to set up this software successfully. On the Microphone window, choose your preferred microphone as your default device.
Step2 Afterward, adjust the camera settings and press the “Next” button. It will redirect you to streaming settings. You can choose the video and audio quality from this window. Click on the “Next” button to continue. Also, make sure to adjust the scene settings as well.
Step3 Now, you can see your PC screen along with your webcam. You can modify the screen size manually. You can also change the camera background and remove background noise from the settings. Once done with settings, press the “Start” button. Now give a title to your live streaming and choose your Live content. Next, click on the “Confirm” button and hit the “Go Live” button.
Bonus Tips: Easily Record and Edit Your Stream with Filmora
Have you ever used a screen recorder to capture your live streaming? Wondershare Filmora is the most compatible tool that offers a premium screen recorder and editor. The screen recorder in this platform can record a selected area with high audio and video quality. Along with capturing your live streaming session, you can use Pen to demonstrate in an enhanced way.
The video editor of Filmora offers professional visual effects and transitions. It supports high-quality video formats such as 4K and HD and enables intuitive editing. Moreover, you can also utilize its advanced features such as Auto Reframe, AI Portrait, Split Screen, Green Screen, etc. By availing of these features, you can execute professional editing on your recorded live streams. To understand more about Filmora’s new features, watch the video below.
Conclusion
Live streaming on TikTok is a new technique to target audiences effortlessly. There are various ways through which you can go for live streaming on TikTok. If you don’t know how to go live on TikTok PC properly, you can take help from this article. Also, to screen record and edit a live stream, you can use our recommended tool known as Wondershare Filmora.
Free Download For Win 7 or later(64-bit)
Free Download For macOS 10.14 or later
The Ultimate Guide to Capturing Memorable Moments on TikTok with Filmmaker Tools
Whether sardonic, informative, or both, voiceovers can improve a TikTok video for humor and clarity.
What do sewing how-to videos, cooking tutorials, and daily vlogs have in common? They all probably are dependent on TikTok’s voiceover feature, which can be helpful in the inbuilt editing suite of the TikTok app.
Ever wished to record a TikTok and save it for later without letting the publisher know? Then, it is always the best idea to learn how to screen record on TikTok. This article will help you learn multiple ways of screen recording on TikTok without you having to worry about the other person knowing.
And, we’ll also look at how to do a voiceover on TikTok using the step-by-step guide mentioned below.
In this article
01 How to Screen Record on TikTok?
02 How to Add Voiceover to the TikTok Video?
03 Add Voiceover to TikTok Video with Extra Fusion: Wondershare Filmora
Part 1: How to Screen Record on TikTok?
Have you ever accidentally taken a screenshot of someone’s Instagram story or screen recorded it for future reference and got scared that the person may have got notified?
While Instagram had the feature of notifying users if their story or picture has been screen recorded, it has recently changed to restrict this notification to images and videos sent via private DMs.
However, TikTokers can rest assured as TikTok has never had a similar notification feature, and you can safely screen record TikTok without mentioning the publisher.
How to Record Computer Screens on Windows
PCs allow software products useful for various purposes. For example, if you would like to record your PC screen while using Windows-based software, you’ll be required a powerful screen recorder that lets you set up a new screencasting session in just a few simple steps.
Here are some of the steps you need to consider!
Step 1: Download Wondershare Filmora
Download Wondershare Filmora onto your computer and then launch the software.
Wondershare Filmora
Get started easily with Filmora’s powerful performance, intuitive interface, and countless effects!
Try It Free Try It Free Try It Free Learn More >

Just visit the browser and type the URL ‘tiktok.com’ in the search bar. Then, look for the TikTok video you would like to record.
Besides providing functions that activate you to control the screen recording procedure entirely, Wondershare Filmora is also a video editor program that lets you manipulate your videos in any way you want.
You must double-click on its desktop icon and open the Full Feature mode right after launching the software. Now, hit the Record tab and choose the Record PC screen option.
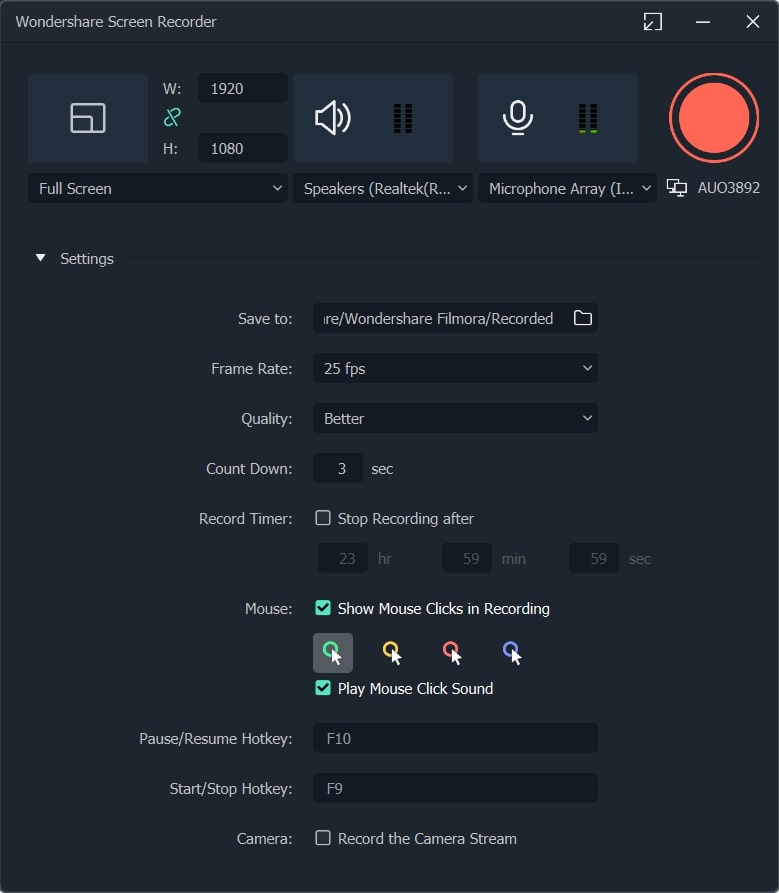
The Wondershare Screen Recorder window will appear on the screen so you can modify the settings for your upcoming screencasting session.

You’ll see the Settings icon in the window’s lower right corner and then click it. For example, you can select the computer’s hard drive destination where the recording will be saved, modify the frame rate or set the quality of the recording from the Quality drop-down menu.

Hit the Microphone icon to choose the mic you’ll be using to record narration, and you can select the Speakers icon if you want to disable or enable the computer’s speakers during the session of screen recording.
You’ll see the Settings icon in the window’s lower right corner and then click it. For example, you can select the computer’s hard drive destination where the recording will be saved, modify the frame rate or set the quality of the recording from the Quality drop-down menu.

Mark the Mouse checkbox if you wish the mouse clicks to display in the recording, and you can easily place the maximum duration of a recording session. It is done by inserting the preferred default screen recording duration into the Record Timer box.

Hit the Rec button to begin a new screencasting session, and the software will start recording after a three-second countdown.
Tap the F9 button on the keyboard to stop recording. It will automatically open the file in Filmora’s video editor so you can edit it before publishing online.
Part 2: How to Add Voiceover to the TikTok Video?
Steps to add a voiceover to your TikTok video.
Upload or record a new video by hitting the + at the menu’s center at the screen’s bottom area.
Hit the microphone icon on the screen’s upper right corner once you’re over with the recording and trimming clips to your desired edit. Beneath, the microphone icon must mention “Voiceover.”

Source: mashable.com
Now, you can record a voiceover timed to Video’s every frame here.
Hit the “Save“ button once you’re satisfied with the voiceover

Hitting the “Save“ button will offer you back to the video’s preview, where you can add filters, text, stickers, and various sounds.
It is needed to add effects to your voiceover by hitting the “voice effects”. Here, you can control the narrator’s volume as well.
Also, make sure to enable automatic captions to make sure your video is more accessible!
Tap the Next button once you’re over with your Video. Then, you can edit the Video’s privacy settings, add a caption, and select a cover.
Part 3: Add Voiceover to TikTok Video with Extra Fusion: Wondershare Filmora
Do you want to include your voice in a video, create a voiceover demo for sharing and uploading on social networking platforms, or frame a documentary for important content?
All you need is an ideal video editing program similar to the Wondershare Filmora Video Editor.
The Filmora’s voiceover feature allows you to record your voice or add voice-over files to Video easily. In addition, you can customize the pitch, speed, and volume of the recorded voiceover and apply fade-in and fade-out effects. I’ll share how to register and add voiceover to a video with Filmora on your computer in this post.
Firstly, you can edit your Video in Filmora and then record the voiceover afterward. Or, you can first record the voiceover and then edit the Video around.
Check the steps below on how to make TikTok videos with voiceover via Wondershare Filmora.
Wondershare Filmora
Get started easily with Filmora’s powerful performance, intuitive interface, and countless effects!
Try It Free Try It Free Try It Free Learn More >
Record Voiceover and Add it to Video
We suggest you record the voiceover first in most cases so the sound will become pretty natural.
Step 1: Connect Microphone to PC or laptop
Connect the microphone to your laptop/PC when you’re ready to begin. It’s advisable to use some professional external microphones to capture high-quality sound.
Step 2: Record voiceover
Tap the Wondershare Filmora icon to launch this software. Then, select the New Project option in the beginning interface to create a new one.
Enter the Record tab and choose the “Record a Voiceover” option to arouse the Record Audio windows.
Or hit the microphone icon, and you only need 3 seconds of countdown to begin speaking.
Click the microphone icon again after you finish the above. Then, a new Record file option will be automatically present on the audio track.
Step 3: Edit Recorded Voiceover to Video
To edit the recorded voiceover, you can adjust audio settings, such as changing the Speed, Pitch, Volume, etc.

You can cut and trim out unnecessary sound sections from the recorded voiceover or apply the fade effects to the voiceover for a smoother transition.
Step 4: Sync Voiceover to Video
Now, it’s time to synchronize the recorded voiceover to video to create a compelling video.
The Wondershare Filmora allows up to 100 audio tracks; you can also add some background music to the voiceover.
Then import and drag-n-drop the video content to the video track, drag and drop the soundtrack to the video’s right-side position. Keep the voice and video track in the exact video duration if required.
Here’s how to sync voiceover to video!
Now, sync the recorded voiceover to Video to create a video. Since Filmora is compatible with 100 plus audio tracks, you can add different background music to the voiceover.
Then import and drag-n-drop the video content to the video track, drag and drop the soundtrack to the Video’s right side position. You can keep the Video and audio track in the same video duration.

Note: If you’ve recorded the iPhone voiceover or other device already, you can import it in the Project Library if you wish to add it to the Video and then sync it to Video.
Here is the ultimate step-by-step guide about adding titles to videos after knowing how to do a voiceover on TikTok.
Step 5: Export and save the new file
Click the “Export“ tab to export your new video file after you complete the project. You can either save the Video to different formats or directly share it on other social media platforms.
Additionally, you can even burn a DVD in minutes to watch it on TV.
How to Record and Add Voice over File during Filmora’s Video Editing Process
If you’ve recorded the voice over on your iPhone or another device already, even via the Wondershare Filmora, and wish to add it to the Video, visit the steps mentioned below:
1. Upload the video to Filmora
After logging in to Filmora’s main editing interface, click “Import” or drag-drop your video and voiceover file to the project library.
Filmora video editing software is compatible with a vast range of formats, so there will be no need to convert the files before import.
Drag and drop the files or video content to the Video Timeline when all the files get imported.
2. Record Voiceover in Video Editing
3. Edit voiceover and Export
You can then edit the recorded voiceover for TikTok to perfectly fit the Video and export it to your laptop/PC or directly upload it to YouTube.
For improving the sound, Filmora features more audio editing tools.
Conclusion
This article offered you a step-by-step guide on how to record a TikTok. It also displays four different screen recording methods, along with how to do a voiceover on TikTok.
Now, don’t ever worry about losing out on your favorite TikTok without the original publisher knowing via screen record TikTok via Wondershare Filmora.
02 How to Add Voiceover to the TikTok Video?
03 Add Voiceover to TikTok Video with Extra Fusion: Wondershare Filmora
Part 1: How to Screen Record on TikTok?
Have you ever accidentally taken a screenshot of someone’s Instagram story or screen recorded it for future reference and got scared that the person may have got notified?
While Instagram had the feature of notifying users if their story or picture has been screen recorded, it has recently changed to restrict this notification to images and videos sent via private DMs.
However, TikTokers can rest assured as TikTok has never had a similar notification feature, and you can safely screen record TikTok without mentioning the publisher.
How to Record Computer Screens on Windows
PCs allow software products useful for various purposes. For example, if you would like to record your PC screen while using Windows-based software, you’ll be required a powerful screen recorder that lets you set up a new screencasting session in just a few simple steps.
Here are some of the steps you need to consider!
Step 1: Download Wondershare Filmora
Download Wondershare Filmora onto your computer and then launch the software.
Wondershare Filmora
Get started easily with Filmora’s powerful performance, intuitive interface, and countless effects!
Try It Free Try It Free Try It Free Learn More >
Just visit the browser and type the URL ‘tiktok.com’ in the search bar. Then, look for the TikTok video you would like to record.
Besides providing functions that activate you to control the screen recording procedure entirely, Wondershare Filmora is also a video editor program that lets you manipulate your videos in any way you want.
You must double-click on its desktop icon and open the Full Feature mode right after launching the software. Now, hit the Record tab and choose the Record PC screen option.
The Wondershare Screen Recorder window will appear on the screen so you can modify the settings for your upcoming screencasting session.
You’ll see the Settings icon in the window’s lower right corner and then click it. For example, you can select the computer’s hard drive destination where the recording will be saved, modify the frame rate or set the quality of the recording from the Quality drop-down menu.
Hit the Microphone icon to choose the mic you’ll be using to record narration, and you can select the Speakers icon if you want to disable or enable the computer’s speakers during the session of screen recording.
You’ll see the Settings icon in the window’s lower right corner and then click it. For example, you can select the computer’s hard drive destination where the recording will be saved, modify the frame rate or set the quality of the recording from the Quality drop-down menu.
Mark the Mouse checkbox if you wish the mouse clicks to display in the recording, and you can easily place the maximum duration of a recording session. It is done by inserting the preferred default screen recording duration into the Record Timer box.
Hit the Rec button to begin a new screencasting session, and the software will start recording after a three-second countdown.
Tap the F9 button on the keyboard to stop recording. It will automatically open the file in Filmora’s video editor so you can edit it before publishing online.
Part 2: How to Add Voiceover to the TikTok Video?
Steps to add a voiceover to your TikTok video.
Upload or record a new video by hitting the + at the menu’s center at the screen’s bottom area.
Hit the microphone icon on the screen’s upper right corner once you’re over with the recording and trimming clips to your desired edit. Beneath, the microphone icon must mention “Voiceover.”
Source: mashable.com
Now, you can record a voiceover timed to Video’s every frame here.
Hit the “Save“ button once you’re satisfied with the voiceover
Hitting the “Save“ button will offer you back to the video’s preview, where you can add filters, text, stickers, and various sounds.
It is needed to add effects to your voiceover by hitting the “voice effects”. Here, you can control the narrator’s volume as well.
Also, make sure to enable automatic captions to make sure your video is more accessible!
Tap the Next button once you’re over with your Video. Then, you can edit the Video’s privacy settings, add a caption, and select a cover.
Part 3: Add Voiceover to TikTok Video with Extra Fusion: Wondershare Filmora
Do you want to include your voice in a video, create a voiceover demo for sharing and uploading on social networking platforms, or frame a documentary for important content?
All you need is an ideal video editing program similar to the Wondershare Filmora Video Editor.
The Filmora’s voiceover feature allows you to record your voice or add voice-over files to Video easily. In addition, you can customize the pitch, speed, and volume of the recorded voiceover and apply fade-in and fade-out effects. I’ll share how to register and add voiceover to a video with Filmora on your computer in this post.
Firstly, you can edit your Video in Filmora and then record the voiceover afterward. Or, you can first record the voiceover and then edit the Video around.
Check the steps below on how to make TikTok videos with voiceover via Wondershare Filmora.
Wondershare Filmora
Get started easily with Filmora’s powerful performance, intuitive interface, and countless effects!
Try It Free Try It Free Try It Free Learn More >
Record Voiceover and Add it to Video
We suggest you record the voiceover first in most cases so the sound will become pretty natural.
Step 1: Connect Microphone to PC or laptop
Connect the microphone to your laptop/PC when you’re ready to begin. It’s advisable to use some professional external microphones to capture high-quality sound.
Step 2: Record voiceover
Tap the Wondershare Filmora icon to launch this software. Then, select the New Project option in the beginning interface to create a new one.
Enter the Record tab and choose the “Record a Voiceover” option to arouse the Record Audio windows.
Or hit the microphone icon, and you only need 3 seconds of countdown to begin speaking.
Click the microphone icon again after you finish the above. Then, a new Record file option will be automatically present on the audio track.
Step 3: Edit Recorded Voiceover to Video
To edit the recorded voiceover, you can adjust audio settings, such as changing the Speed, Pitch, Volume, etc.
You can cut and trim out unnecessary sound sections from the recorded voiceover or apply the fade effects to the voiceover for a smoother transition.
Step 4: Sync Voiceover to Video
Now, it’s time to synchronize the recorded voiceover to video to create a compelling video.
The Wondershare Filmora allows up to 100 audio tracks; you can also add some background music to the voiceover.
Then import and drag-n-drop the video content to the video track, drag and drop the soundtrack to the video’s right-side position. Keep the voice and video track in the exact video duration if required.
Here’s how to sync voiceover to video!
Now, sync the recorded voiceover to Video to create a video. Since Filmora is compatible with 100 plus audio tracks, you can add different background music to the voiceover.
Then import and drag-n-drop the video content to the video track, drag and drop the soundtrack to the Video’s right side position. You can keep the Video and audio track in the same video duration.
Note: If you’ve recorded the iPhone voiceover or other device already, you can import it in the Project Library if you wish to add it to the Video and then sync it to Video.
Here is the ultimate step-by-step guide about adding titles to videos after knowing how to do a voiceover on TikTok.
Step 5: Export and save the new file
Click the “Export“ tab to export your new video file after you complete the project. You can either save the Video to different formats or directly share it on other social media platforms.
Additionally, you can even burn a DVD in minutes to watch it on TV.
How to Record and Add Voice over File during Filmora’s Video Editing Process
If you’ve recorded the voice over on your iPhone or another device already, even via the Wondershare Filmora, and wish to add it to the Video, visit the steps mentioned below:
1. Upload the video to Filmora
After logging in to Filmora’s main editing interface, click “Import” or drag-drop your video and voiceover file to the project library.
Filmora video editing software is compatible with a vast range of formats, so there will be no need to convert the files before import.
Drag and drop the files or video content to the Video Timeline when all the files get imported.
2. Record Voiceover in Video Editing
3. Edit voiceover and Export
You can then edit the recorded voiceover for TikTok to perfectly fit the Video and export it to your laptop/PC or directly upload it to YouTube.
For improving the sound, Filmora features more audio editing tools.
Conclusion
This article offered you a step-by-step guide on how to record a TikTok. It also displays four different screen recording methods, along with how to do a voiceover on TikTok.
Now, don’t ever worry about losing out on your favorite TikTok without the original publisher knowing via screen record TikTok via Wondershare Filmora.
Also read:
- [New] Best-Liked TikTok Grooves for Beginners
- [New] 2024 Approved The Roadmap to Effective TikTok Ads Techniques & Case Studies
- [New] Country Rhythms for Peaceful Evenings Top 20 TikTok Tracks
- [New] 2024 Approved Elevate Your Exposure Top Biographical Strategies to Triple Your Following Power in the TikTok-Filmora Realm
- [Updated] In 2024, Vocalizing Video Content on TikTok
- Navigate the Transfer of Quick Images From Popular Chat App
- [New] Effortless TikTok Integration on Your MacBook Wonderland
- [New] Secure & Ethical Paths to Increasing Your TikTok Following for 2024
- [New] 2024 Approved Hottest 10 TikTok Filter Trends to Captivate Viewers
- [New] 2024 Approved Become a Pro Voiceovers on TikTok
- [Updated] The Most Exciting TikTok Content to Date
- 2024 Approved Voiceover Techniques for TikTok Video Amplification
- In 2024, Step Into the Limelight Creating an Authentic Self-Replica on TikTok
- [New] From Your Computer's Vision Mastering TikTok Video Uploads for 2024
- [Updated] 2024 Approved User Engagement & Content Creation A Comparison of Triller and TikTok's Approach (Max 156 Chars)
- In 2024, Pinpointing Your Unique TikTok Tagline
- Carving a Path Individuality in the Face of TikTok Influencers
- [Updated] Unblocked The Ultimate Guide to TikTok Video Downloads for iPhone
- In 2024, Step-by-Step Guide to Creating Viral TikTok Videos at Home
- [New] In 2024, Voice-in-Unison for the Digital Stage
- 2024 Approved Ignite Interest Top 20 Creative and Viral TikTok Caption Strategies
- Innovative Ways to React on TikTok Videos for 2024
- Quick Gain Your Guide to Snagging TikToks Swiftly
- [New] 2024 Approved Essential TikTok Raps Must-Hear Modern Beats
- [Updated] In 2024, Laugh Ledger The Most Viral Humorous Content on TikTok
- [New] Noise Reduction How to Remove Background Noise in Audacity for 2024
- 2024 Approved Join the Fun Hot TikTok Challenges Await
- [Updated] Tailored Approach to Capturing Every FaceTime Interaction Flawlessly
- In 2024, TweetTurnstile How Video Trends Surge Online
- Will iSpoofer update On Vivo Y100i | Dr.fone
- [Updated] Iconic Quests & Thrills A Curated List of Classics for 2024
- 2024 Approved Larger-than-Life Instagram Videos Tips to Break the Barrier
- How to Fix It Xiaomi Civi 3 Wont Turn On | Dr.fone
- Unleash Your Creativity Best Free and Open-Source Video Editors for 2024
- In 2024, Top 5 iOS Platforms for Experiencing Classic PSP Games
- New The Best of Both Worlds Free and Paid Time-Lapse Video Editors
- New Minitool Movie Maker In-Depth Review, Tips, and Alternative Tools
- How to Cast Vivo Y100 5G to Computer for iPhone and Android? | Dr.fone
- New In 2024, Make Em Laugh Best Video Dubbing Tools for Humorous Edits
- How to Mirror Your Honor Play 8T Screen to PC with Chromecast | Dr.fone
- New Mastering MP3 Conversion Essential Techniques for Podcasts for 2024
- 2024 Approved Essential Steps for iPhone Screen Shotting
- [Updated] In 2024, Compiled List of Top 3iP iPad Voice Recorders
- In 2024, Full Guide to Catch 100 IV Pokémon Using a Map On Vivo Y200e 5G | Dr.fone
- In 2024, Getting the Pokemon Go GPS Signal Not Found 11 Error in Itel A60s | Dr.fone
- In 2024, Capturing PPT Slides via Webcam 2023 Techniques
- How to get the dragon scale and evolution-enabled pokemon On Oppo Find X7 Ultra? | Dr.fone
- [New] Efficient Facebook Post Planning - 2023'S Free Strategies for 2024
- Title: "From Still Image to Live Feed Going Live on TikTok Via Computer for 2024"
- Author: Stephen
- Created at : 2024-05-23 02:53:30
- Updated at : 2024-05-24 02:53:30
- Link: https://tiktok-video-recordings.techidaily.com/from-still-image-to-live-feed-going-live-on-tiktok-via-computer-for-2024/
- License: This work is licensed under CC BY-NC-SA 4.0.
