
:max_bytes(150000):strip_icc()/keyboard-message-green-earth-183257413-58dbd3023df78c5162129409.jpg)
"In 2024, Elevate Your TikTok with Bigger-Head VFX (3 Effective Ways)"
Elevate Your TikTok with Bigger-Head VFX (3 Effective Ways)
On TikTok, the Big head effect is commonly employed by content producers to generate humorous videos. In particular, the Big head filter may be utilized for various creative production projects, including caricature films, memes, and teaching.
How to get that TikTok Big Head effect? Would you like to make your head look larger than your body in TikTok videos or photos? It’s effortless to do on your Android smartphone. The best part is that we will show you how to use a Big head filter on different applications in this article and how to edit it. Aside from TikTok, there’s another software you can use to enlarge your head in videos or images. Let’s show you!
In this article
01 How to Get the Big Head Filter on TikTok?
02 How to Make a Big Head Effect in CapCut?
03 How to Add Big Head Effect in Filmora Video Editor? [3 Ways]
Part 1: How to Get the Big Head Filter on TikTok?
The TikTok Big Head effect is an extremely entertaining filter. TikTok is a social media platform that specializes in sharing short video content. Its consumer subscription has surpassed Facebook, Instagram, Twitter, and even Snapchat, and its download percentages are much greater than those of the above said social networking sites.
The TikTok Big Head effect on TikTok, on the other hand, was so widespread that it began to be used by more prominent ‘TikTokers.’ Afterward, in a single glance, all users of the social networking in concern began to use it on TikTok live broadcasts. This is how you can use the TikTok Big Head effect:
Step 1: Go to TikTok’s Discover menu to access the Big Head effects.
Step 2: Type “Big Head“ or #bighead into the search bar and choose the top hashtag**_, #bighead_**. Each TikTok video that employs a Big Head filter would then be displayed.
Step 3: To test out a filter, choose one of the numerous videos available and look for the filter’s name in the lower-left corner.
Step 4: Try pressing on the filter’s title, then touch on the Camera icon at the bottom of the display to make a TikTok video employing the Big Head filter in concern.
Here is a detailed video tutorial about how to make a big head effect in TikTok directly.
Part 2: How to Make a Big Head Effect in CapCut?
CapCut is a content creation application that lets users apply various stickers, filters , and effects to their videos. It also has an essential green screen function, a zooming capability that acts like a Ken Burns effect , and many more features.
With the CapCut software, you can quickly enlarge your head in videos. With a single click of the big head effect, your head would instantly become larger than your body. Here’s how to do it step by step:
Step 1: In the CapCut software, create a New Project and then upload a video in which you will enlarge your head.
Step 2: Click the Effects option at the bottom of the display, and then tap the Facial or Body Effects option.
Step 3: Locate and choose the Big Head effect from the Emotions effect section.
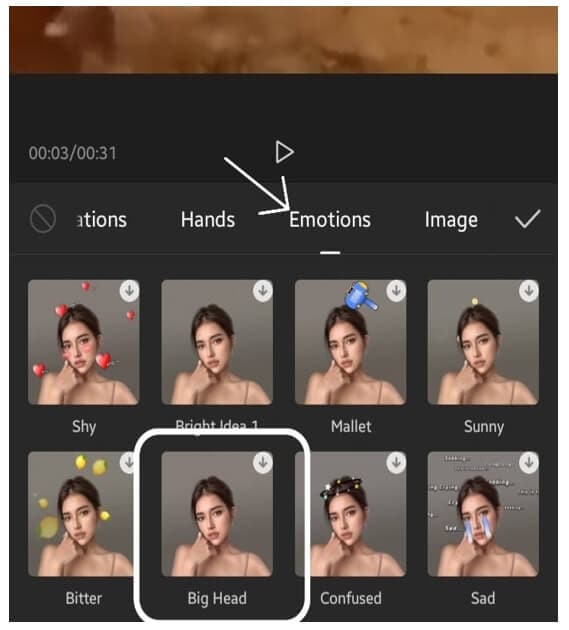
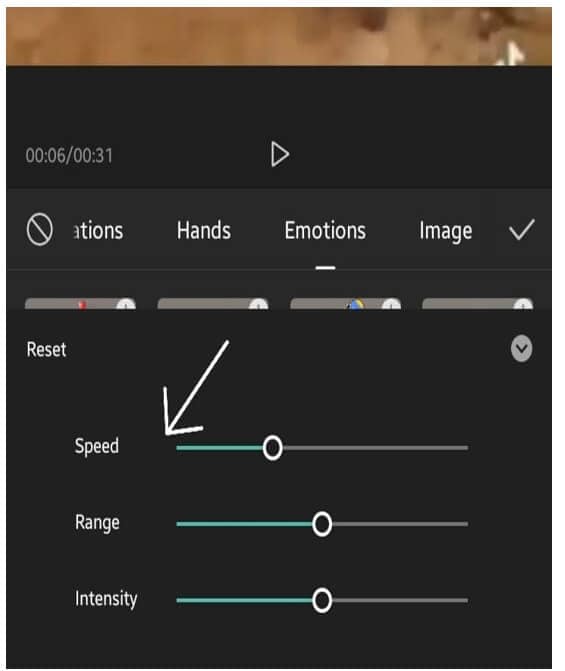
Step 4: The big head effect may be modified in speed, range, and intensity. Finally, adjust the duration of the Big head effect to match the video’s length.
You can check the video tutorial below to find out more details in creating big head and small body effect on video with CapCut.
Part 3: How to Add Big Head Effect in Filmora Video Editor? [3 Ways]
Filmora video editor by Wondershare includes the typical overlays, transitions, trimming, as well as the effects that we’ve grown to expect from the enthusiast-level video editor. It features a user-friendly interface that is clean, minimalistic, and dark. If that wasn’t enough, we’re sure you’ll be pleased to learn that the Filmora program can be used to create the TikTok big head effect in several ways.
With all of the characteristics we’ve discussed so far, you may further customize the Big Head effect with various Filmora effects. Let’s show you how:
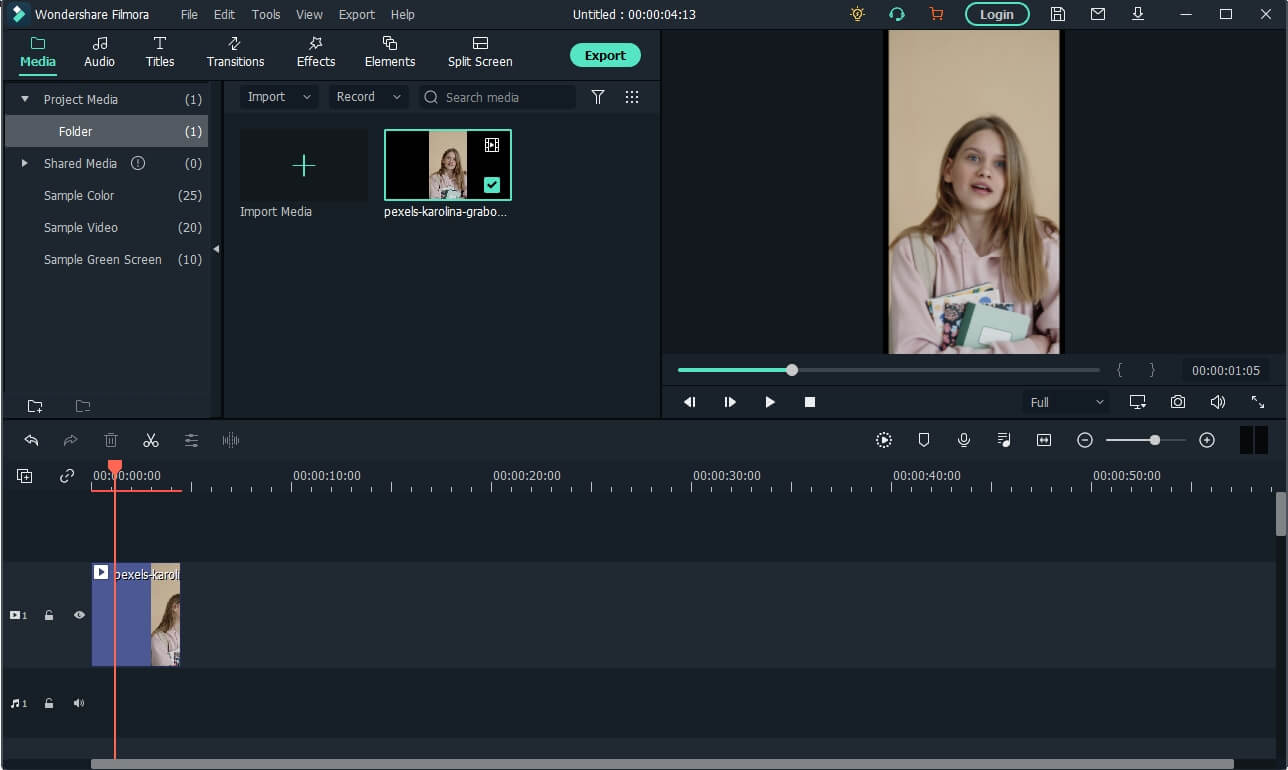
Launch Filmora and click on the Import tab to select the video file you want to use. And then drag and drop the imported media file onto the timeline panel.
For Win 7 or later (64-bit)
For macOS 10.12 or later
Method 1: Create Big Head with AR Stick Bubble Head Effect in Filmora Video Editor
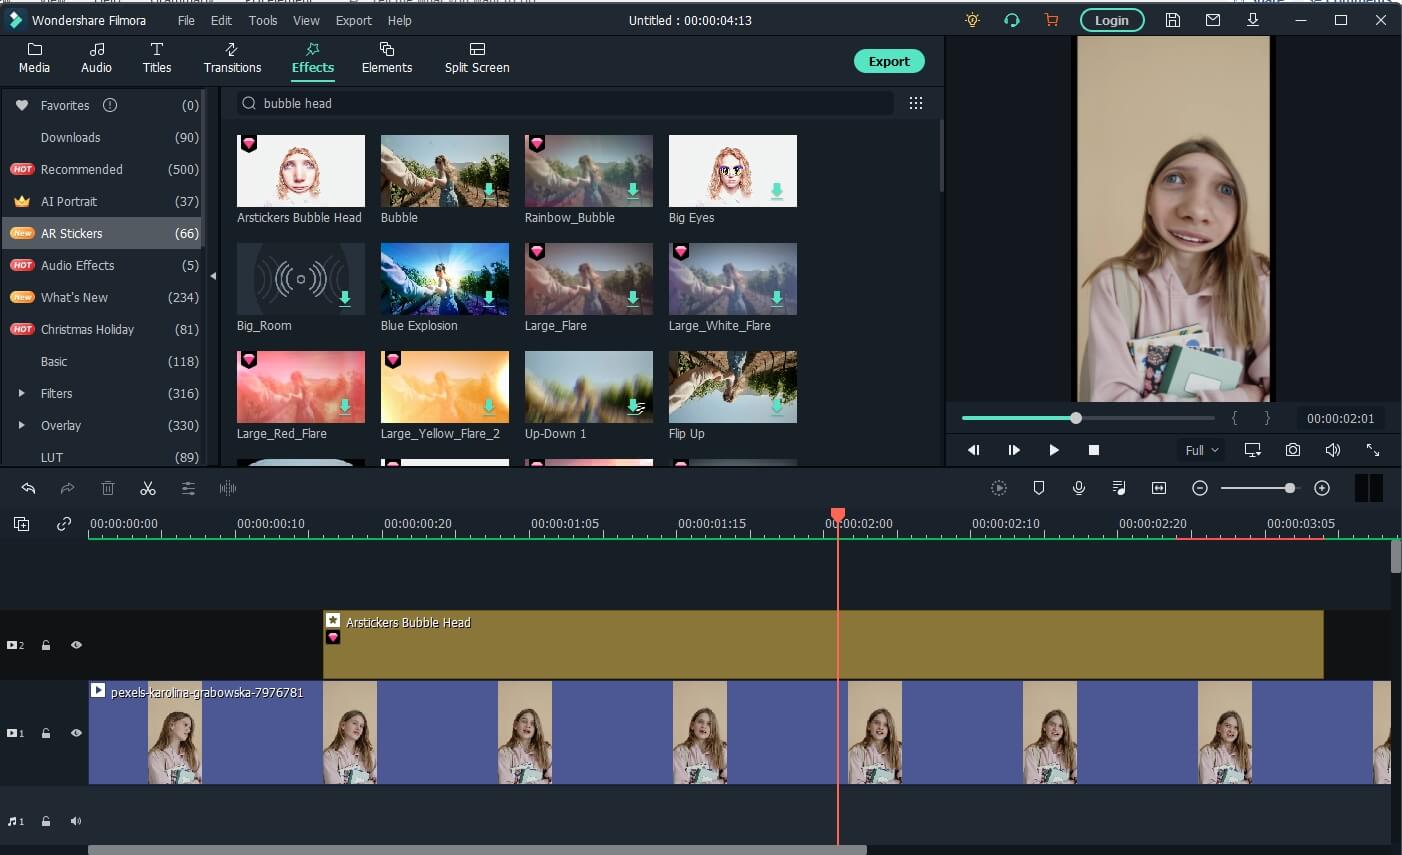
To add the Big Head effect on Filmora, click on the Effects option and select the AR Stickers option. Type bubble head in the search bar and then you will see it in the screen. Then, drag and drop the AR Stickers Bubble Head effect onto the timeline**,** specifically to the portion of the video where you want to add the Big Head filter on the person. As you do that, you will see a Bubble present on the video.
Besides the bubble head effect, there are many more AR stickers available, such as heart eyes, censor bar, emojis, and big eyes. Download the Filmora video editor now and check it yourself.
For Win 7 or later (64-bit)
For macOS 10.12 or later
Method 2: Add Magnify Effect to Video
In the Effects tab, go to the Recommended category, and then you will see the magnify effect. Drag and drop it to the timeline above the video track, and you will see part of the video has been magnified accordingly.
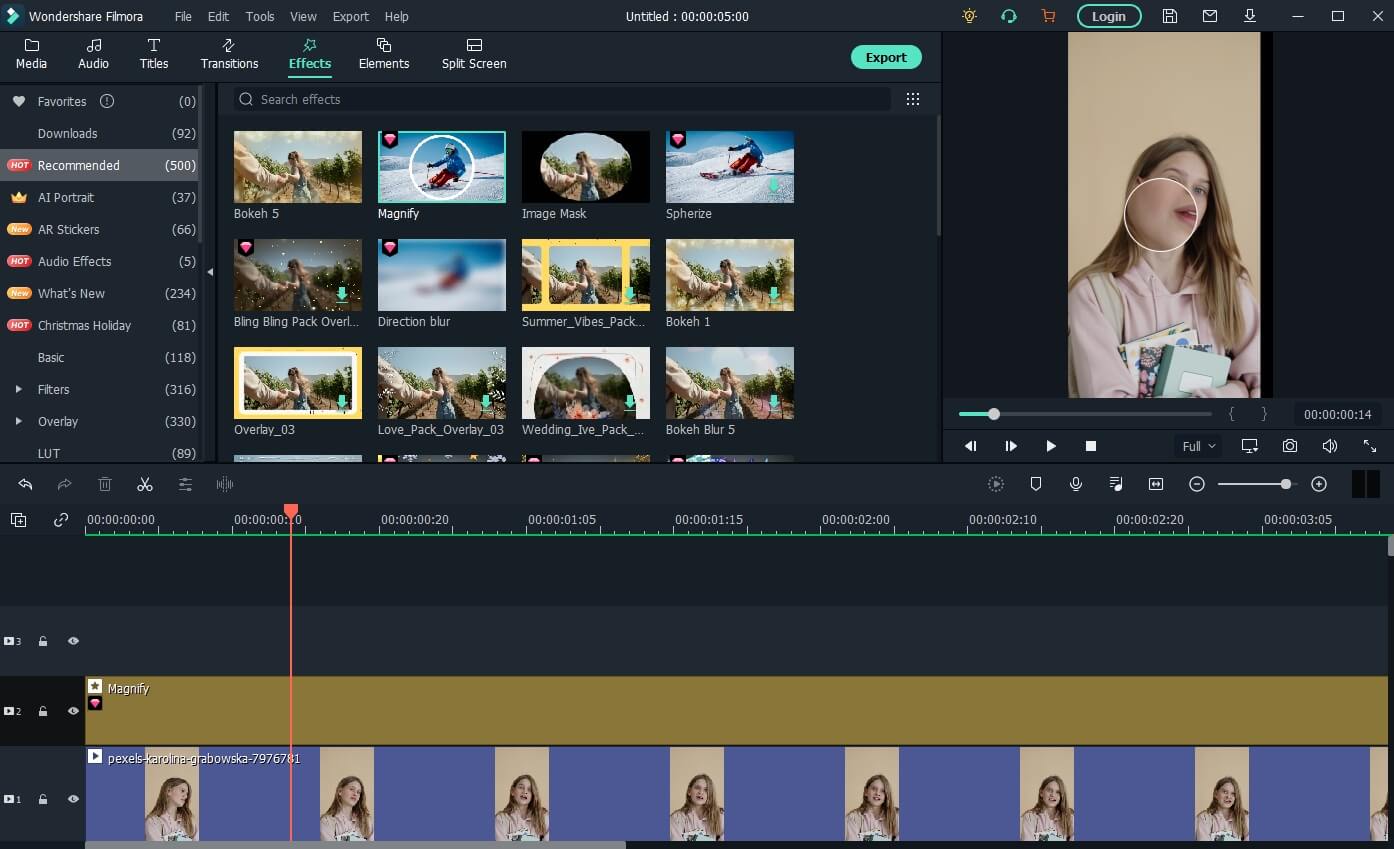
Now, double click on the effect in the timeline and open the Properties of the magnify effect. From the Properties section, you can adjust the size of the bubble using functions such as the Radius, CenterY, CenterX, Alpha, Zoom rate, etc to get a better video with big head effects.
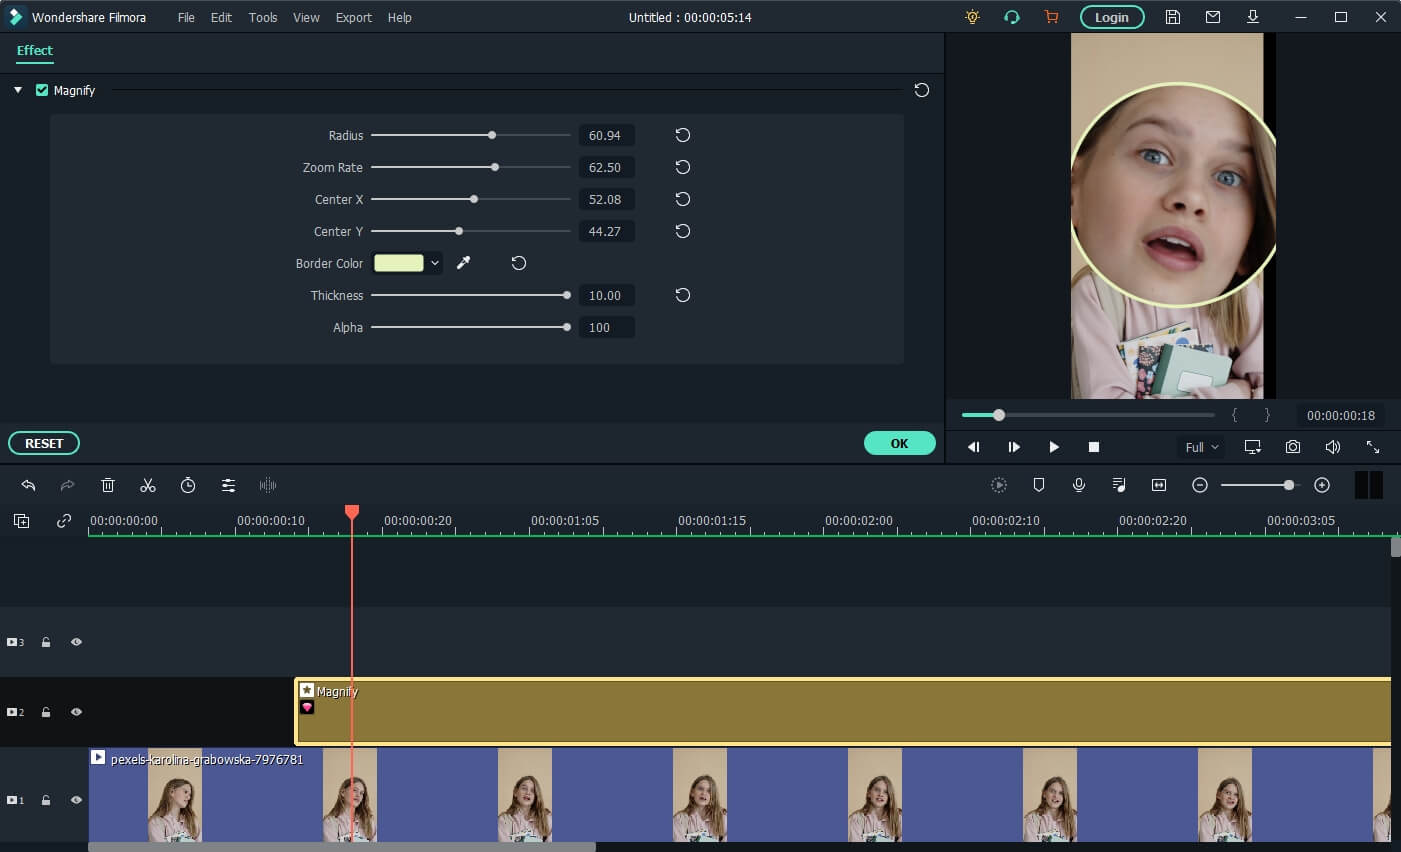
Note: If you’re unable to locate the Magnify option in the Effects tab, please download and install the latest version of Filmora, and then type “Magnify” in the search bar, and the system will directly take you to where the option is present.
Method 3: Use Mask and Scale to Make a Video with Big Head Effect
Besides adding magnify effects and bubblehead effects, you can also use the mask preset to create a big head effect in Filmora.
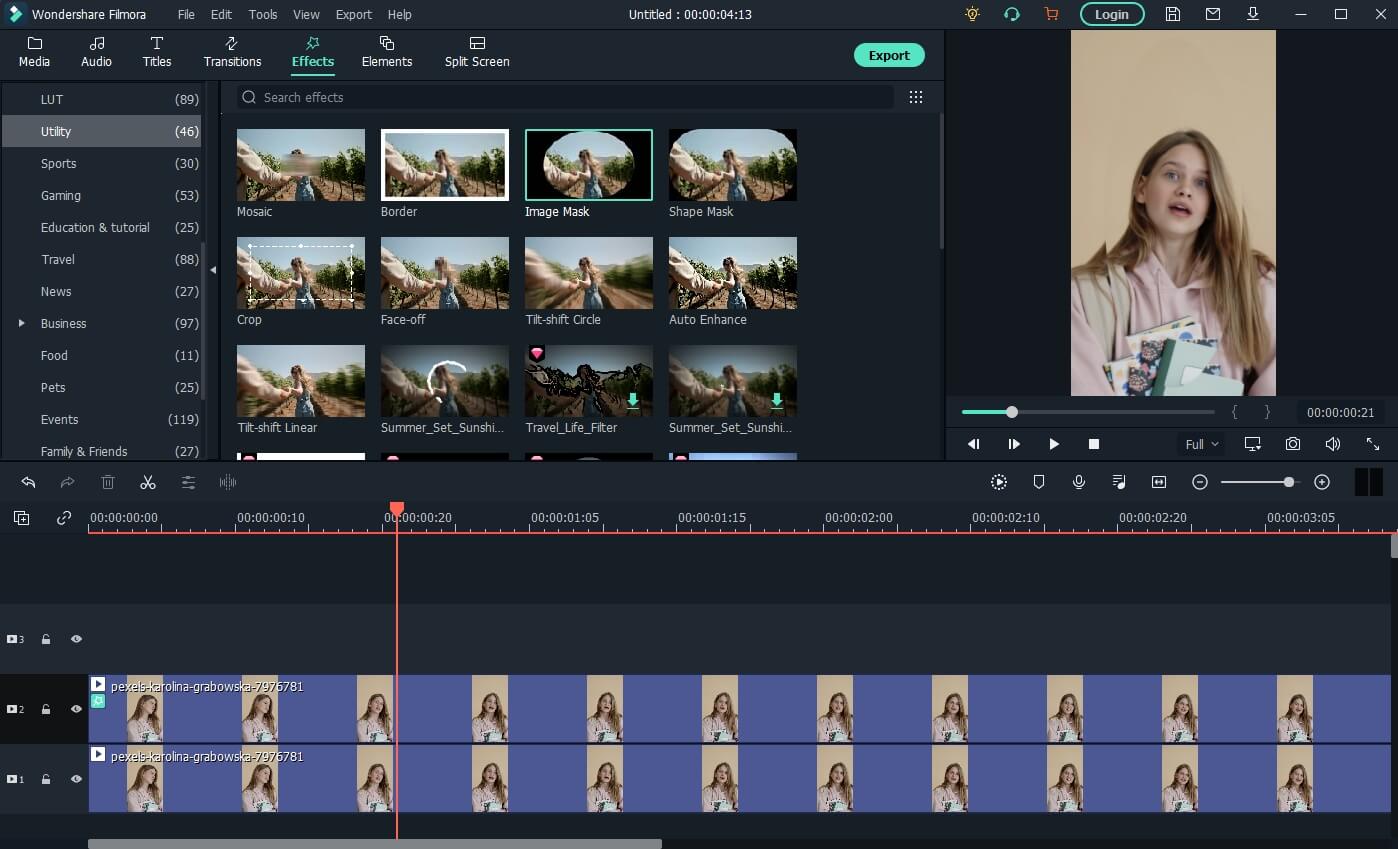
Drag and drop the video to video track 1 and video track 2 respectively in Filmora. Then go to the Effect tab, and scroll down to the Utility category, and place the Image Mask effect to the video above. Or, you can type image mask in the search bar to locate it quickly.
Now, double-click the video with the image mask to adjust the properties. Scroll down to the Video Effects field, and you will see the Image Mask. Click the arrow icon to choose a mask preset, adjust its position and size settings to fit the video.
Tips: You can hide the video in track 1 by clicking the eye icon so you can adjust the video with the image mask conveniently. Click it again then you will see the video.
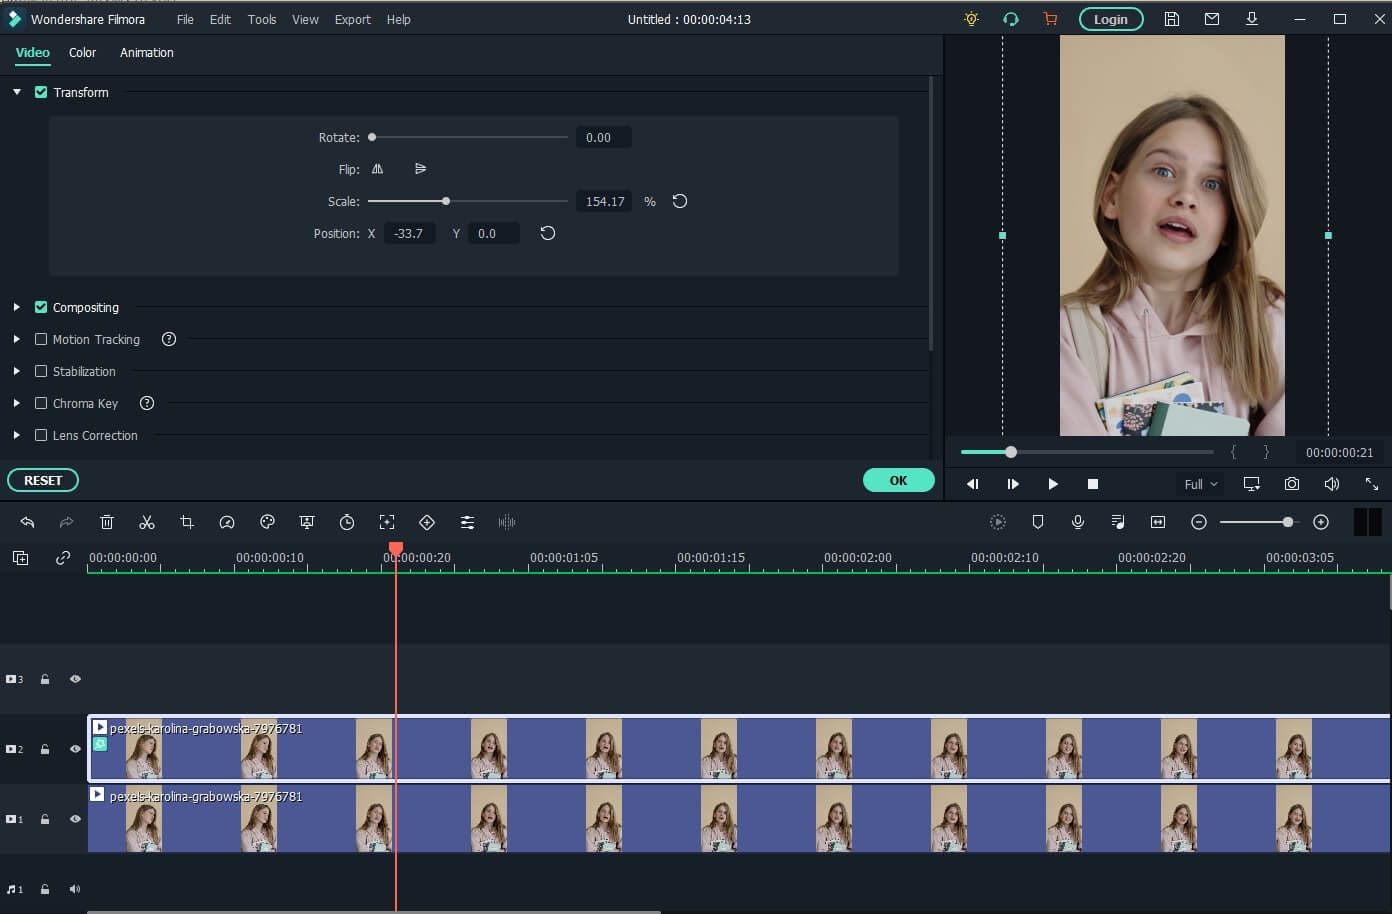
Next, click the video in track 2 again, and then go to the Transform tab, use the Scale slider to adjust the video size to make a big head effect.
Watch the video tutorial below to find out how to use the Image Mask effect to create a video with a big head effect in Filmora.
For Win 7 or later (64-bit)
For macOS 10.12 or later
After creating the video with a big head effect, click the Export button on the screen to save the video on the computer, and then upload it to TikTok from your computer directly.
Conclusion
This article demonstrates the steps you need to take to add the TikTok Big Head filter to your videos. Remember, the Big Head filter is used to make videos more amusing for entertainment purposes.
Not only TikTok, but different apps such as CapCut on Android and Wondershare Filmora on PC can be of great use to you. Especially in Filmora, you get tons of video editing features that unlock your way into the editing world!
02 How to Make a Big Head Effect in CapCut?
03 How to Add Big Head Effect in Filmora Video Editor? [3 Ways]
Part 1: How to Get the Big Head Filter on TikTok?
The TikTok Big Head effect is an extremely entertaining filter. TikTok is a social media platform that specializes in sharing short video content. Its consumer subscription has surpassed Facebook, Instagram, Twitter, and even Snapchat, and its download percentages are much greater than those of the above said social networking sites.
The TikTok Big Head effect on TikTok, on the other hand, was so widespread that it began to be used by more prominent ‘TikTokers.’ Afterward, in a single glance, all users of the social networking in concern began to use it on TikTok live broadcasts. This is how you can use the TikTok Big Head effect:
Step 1: Go to TikTok’s Discover menu to access the Big Head effects.
Step 2: Type “Big Head“ or #bighead into the search bar and choose the top hashtag**_, #bighead_**. Each TikTok video that employs a Big Head filter would then be displayed.
Step 3: To test out a filter, choose one of the numerous videos available and look for the filter’s name in the lower-left corner.
Step 4: Try pressing on the filter’s title, then touch on the Camera icon at the bottom of the display to make a TikTok video employing the Big Head filter in concern.
Here is a detailed video tutorial about how to make a big head effect in TikTok directly.
Part 2: How to Make a Big Head Effect in CapCut?
CapCut is a content creation application that lets users apply various stickers, filters , and effects to their videos. It also has an essential green screen function, a zooming capability that acts like a Ken Burns effect , and many more features.
With the CapCut software, you can quickly enlarge your head in videos. With a single click of the big head effect, your head would instantly become larger than your body. Here’s how to do it step by step:
Step 1: In the CapCut software, create a New Project and then upload a video in which you will enlarge your head.
Step 2: Click the Effects option at the bottom of the display, and then tap the Facial or Body Effects option.
Step 3: Locate and choose the Big Head effect from the Emotions effect section.
Step 4: The big head effect may be modified in speed, range, and intensity. Finally, adjust the duration of the Big head effect to match the video’s length.
You can check the video tutorial below to find out more details in creating big head and small body effect on video with CapCut.
Part 3: How to Add Big Head Effect in Filmora Video Editor? [3 Ways]
Filmora video editor by Wondershare includes the typical overlays, transitions, trimming, as well as the effects that we’ve grown to expect from the enthusiast-level video editor. It features a user-friendly interface that is clean, minimalistic, and dark. If that wasn’t enough, we’re sure you’ll be pleased to learn that the Filmora program can be used to create the TikTok big head effect in several ways.
With all of the characteristics we’ve discussed so far, you may further customize the Big Head effect with various Filmora effects. Let’s show you how:
Launch Filmora and click on the Import tab to select the video file you want to use. And then drag and drop the imported media file onto the timeline panel.
For Win 7 or later (64-bit)
For macOS 10.12 or later
Method 1: Create Big Head with AR Stick Bubble Head Effect in Filmora Video Editor
To add the Big Head effect on Filmora, click on the Effects option and select the AR Stickers option. Type bubble head in the search bar and then you will see it in the screen. Then, drag and drop the AR Stickers Bubble Head effect onto the timeline**,** specifically to the portion of the video where you want to add the Big Head filter on the person. As you do that, you will see a Bubble present on the video.
Besides the bubble head effect, there are many more AR stickers available, such as heart eyes, censor bar, emojis, and big eyes. Download the Filmora video editor now and check it yourself.
For Win 7 or later (64-bit)
For macOS 10.12 or later
Method 2: Add Magnify Effect to Video
In the Effects tab, go to the Recommended category, and then you will see the magnify effect. Drag and drop it to the timeline above the video track, and you will see part of the video has been magnified accordingly.
Now, double click on the effect in the timeline and open the Properties of the magnify effect. From the Properties section, you can adjust the size of the bubble using functions such as the Radius, CenterY, CenterX, Alpha, Zoom rate, etc to get a better video with big head effects.
Note: If you’re unable to locate the Magnify option in the Effects tab, please download and install the latest version of Filmora, and then type “Magnify” in the search bar, and the system will directly take you to where the option is present.
Method 3: Use Mask and Scale to Make a Video with Big Head Effect
Besides adding magnify effects and bubblehead effects, you can also use the mask preset to create a big head effect in Filmora.
Drag and drop the video to video track 1 and video track 2 respectively in Filmora. Then go to the Effect tab, and scroll down to the Utility category, and place the Image Mask effect to the video above. Or, you can type image mask in the search bar to locate it quickly.
Now, double-click the video with the image mask to adjust the properties. Scroll down to the Video Effects field, and you will see the Image Mask. Click the arrow icon to choose a mask preset, adjust its position and size settings to fit the video.
Tips: You can hide the video in track 1 by clicking the eye icon so you can adjust the video with the image mask conveniently. Click it again then you will see the video.
Next, click the video in track 2 again, and then go to the Transform tab, use the Scale slider to adjust the video size to make a big head effect.
Watch the video tutorial below to find out how to use the Image Mask effect to create a video with a big head effect in Filmora.
For Win 7 or later (64-bit)
For macOS 10.12 or later
After creating the video with a big head effect, click the Export button on the screen to save the video on the computer, and then upload it to TikTok from your computer directly.
Conclusion
This article demonstrates the steps you need to take to add the TikTok Big Head filter to your videos. Remember, the Big Head filter is used to make videos more amusing for entertainment purposes.
Not only TikTok, but different apps such as CapCut on Android and Wondershare Filmora on PC can be of great use to you. Especially in Filmora, you get tons of video editing features that unlock your way into the editing world!
The 2-Step Strategy for Stunning TikTok Reaction Videos Using Filmora
How to Make TikTok Reaction Videos Easily in 2 Ways

Shanoon Cox
Mar 27, 2024• Proven solutions
With all the videos of different moods and categories available on the platform, TikTok’s reaction is something that makes the footage more engaging. Available for both iOS and Android platforms, TikTok allows you to record, edit , and compile a video of up to 60 seconds, and apply a plethora of filters and animation effects to them along with adding relevant music to awe your audience.
Considering this, here you will learn how to make TikTok reaction videos with ease from within the app itself, and if that’s not enough, using one of the best and most efficient programs available in the market that can even allow you to add unique effects to the reactions you create.
- Part 1: How to Make React Videos on TikTok
- Part 2: How to Use Snap Filmora to Make TikTok Reaction Videos
Bonus: Create A More Attractive Video with Human Segmentation Effect
The human segmentation effect under AI Portrait allows you to isolate people from video background even without a green screen, and then you can composite it to make a reaction video easily. Watch the video tutorial below to find out more details.


Want to read the texts instead of watching videos? Check the complete guide to making a reaction video in 3 ways .
Part 1: How to React to a TikTok Video
After being equipped with all the worldly knowledge about TikTok reaction videos, you can follow the steps given below to learn how to react to the footage created by other people:
1. Tap Share and Record Your Reaction
Start TikTok, play the video you want to react on, tap the Share icon from the lower-right area, and tap the React option from the Share to menu. Tap Flip from the top-right corner of the Camera screen to switch between the front and rear camera as needed, optionally tap the Mic icon to disable or enable voice and system audio capture, drag and reposition React window according to the source footage, and tap the Record button from the bottom to start shooting your TikTok reaction. Wait while the source clip and your recording process are complete successfully before moving forward to the next step.

2. Apply Filters
Tap the Filters icon from the top-right corner, tap to pick a filter from those available at the bottom, and tap anywhere on the screen to accept the one you selected and to get back to the previous window.

3. Manage Audio
Tap the Mixer icon from the upper-right corner of the screen, drag the My Voice and Soundtrack Volume sliders to manage your voice recording and the internal audio respectively, and tap Done to save the changes once you’re through with the modifications. Back on the previous window, tap Next from the bottom-right corner.

4. Publish the Video
Tap the Who can view this video option to manage your reaction’s visibility settings (optional). Tap the Save to device toggle switch to prevent TikTok reaction from being stored on your mobile’s storage (optional). Next, tap the Post button from the bottom-right corner to publish the video to TikTok.

More creative tricks about TikTok video: Clone Yourself in TikTok
Part 2: How to Make Reaction Videos with Filmora
Even though you can make TikTok reaction videos using its own filters and audio mixing tools that work pretty well under ideal conditions, if you are a perfectionist and like precision in anything you do or create, you need a dedicated program that has been designed specifically for the purpose.
Although several such tools are available in the market and can be easily downloaded and used, the best among them is Filmora by Wondershare. Wondershare Filmora is an industry-standard production and post-production tool for both Mac and Windows PCs that the majority of users prefer over its competitors such as Adobe Premiere Pro, Final Cut Pro X, etc. This is because Filmora offers simple UI, is less resource-intensive, and is able to render the outputs significantly faster.
You can learn how to make TikTok reaction videos using Wondershare Filmora by following the steps given below:
Note: Before proceeding, make sure that you have already copied the source (and the reaction) video(s) from your smartphone to your computer.
1. Create New Project and Set Preferences
Start Wondershare Filmora on your Windows or Mac PC, go to File > New Project and click 9:16 (Portrait) from the submenu that appears.
Click Split Screen from the standard toolbar at the top, hover mouse to the screen type preset you want to use, click the + ( Add to Project ) icon that appears at the bottom-right corner of the thumbnail, and click OK from the bottom-right corner once the preset is added to the Timeline.

2. Import and Add Video(s) Preview/Timeline
Click the Media button from the standard toolbar, click anywhere inside the Media window at the upper-left corner, and when the Open box comes up, select and import the video file(s) you want to participate in the TikTok reaction. Alternatively, you can also click Record from below the standard toolbar, and choose any of the options to record your own video or voice right from within Wondershare Filmora itself.
Next, click and drag each of the imported videos to their corresponding screen sections in the Preview window in the upper-right area. Notice how the files are automatically added to the Timeline at the bottom.
3. Add Elements and Titles
Click Elements from the standard toolbar, hover mouse to the element you want to add to the reaction, click the + icon that appears at the center of the thumbnail, and reposition the element in the Timeline to match the duration with that of the reaction you are creating.

4. Export the Reaction

Click EXPORT from the top-middle section of the interface, go to the Local tab from the top of the Export box that appears next, select your preferred format from the left bar, optionally choose a destination folder from the right window, optionally click SETTINGS to fine-tune the output preferences as needed, and click EXPORT from the bottom-right corner to export the TikTok reaction. Or, you can save it in the settings perfect for iPhone or another device.
Below is a sample reaction video made with Filmora, you can do much better than that for your TikTok account:
Besides using Filmora to edit reaction videos with the split-screen presets, you can also use some other video editing software to create a reaction video . Filmora can empower your video creation with more creativity, watch the video below and download Filmora to try.
Conclusion
A TikTok reaction enables you to make the source videos more fun and entertaining. Luckily the app itself has a “React” button that helps you create TikTok reaction videos with merely a few simple taps. However, if you feel that the built-in options are not as robust as they should be, a third-party program like Wondershare Filmora is something you would definitely love to try your hands on as the software is not only easy to use, it is also lightweight, and doesn’t put any overhead on your computer hardware.
Shanoon Cox
Shanoon Cox is a writer and a lover of all things video.
Follow @Shanoon Cox
Shanoon Cox
Mar 27, 2024• Proven solutions
With all the videos of different moods and categories available on the platform, TikTok’s reaction is something that makes the footage more engaging. Available for both iOS and Android platforms, TikTok allows you to record, edit , and compile a video of up to 60 seconds, and apply a plethora of filters and animation effects to them along with adding relevant music to awe your audience.
Considering this, here you will learn how to make TikTok reaction videos with ease from within the app itself, and if that’s not enough, using one of the best and most efficient programs available in the market that can even allow you to add unique effects to the reactions you create.
- Part 1: How to Make React Videos on TikTok
- Part 2: How to Use Snap Filmora to Make TikTok Reaction Videos
Bonus: Create A More Attractive Video with Human Segmentation Effect
The human segmentation effect under AI Portrait allows you to isolate people from video background even without a green screen, and then you can composite it to make a reaction video easily. Watch the video tutorial below to find out more details.
Want to read the texts instead of watching videos? Check the complete guide to making a reaction video in 3 ways .
Part 1: How to React to a TikTok Video
After being equipped with all the worldly knowledge about TikTok reaction videos, you can follow the steps given below to learn how to react to the footage created by other people:
1. Tap Share and Record Your Reaction
Start TikTok, play the video you want to react on, tap the Share icon from the lower-right area, and tap the React option from the Share to menu. Tap Flip from the top-right corner of the Camera screen to switch between the front and rear camera as needed, optionally tap the Mic icon to disable or enable voice and system audio capture, drag and reposition React window according to the source footage, and tap the Record button from the bottom to start shooting your TikTok reaction. Wait while the source clip and your recording process are complete successfully before moving forward to the next step.
2. Apply Filters
Tap the Filters icon from the top-right corner, tap to pick a filter from those available at the bottom, and tap anywhere on the screen to accept the one you selected and to get back to the previous window.
3. Manage Audio
Tap the Mixer icon from the upper-right corner of the screen, drag the My Voice and Soundtrack Volume sliders to manage your voice recording and the internal audio respectively, and tap Done to save the changes once you’re through with the modifications. Back on the previous window, tap Next from the bottom-right corner.
4. Publish the Video
Tap the Who can view this video option to manage your reaction’s visibility settings (optional). Tap the Save to device toggle switch to prevent TikTok reaction from being stored on your mobile’s storage (optional). Next, tap the Post button from the bottom-right corner to publish the video to TikTok.
More creative tricks about TikTok video: Clone Yourself in TikTok
Part 2: How to Make Reaction Videos with Filmora
Even though you can make TikTok reaction videos using its own filters and audio mixing tools that work pretty well under ideal conditions, if you are a perfectionist and like precision in anything you do or create, you need a dedicated program that has been designed specifically for the purpose.
Although several such tools are available in the market and can be easily downloaded and used, the best among them is Filmora by Wondershare. Wondershare Filmora is an industry-standard production and post-production tool for both Mac and Windows PCs that the majority of users prefer over its competitors such as Adobe Premiere Pro, Final Cut Pro X, etc. This is because Filmora offers simple UI, is less resource-intensive, and is able to render the outputs significantly faster.
You can learn how to make TikTok reaction videos using Wondershare Filmora by following the steps given below:
Note: Before proceeding, make sure that you have already copied the source (and the reaction) video(s) from your smartphone to your computer.
1. Create New Project and Set Preferences
Start Wondershare Filmora on your Windows or Mac PC, go to File > New Project and click 9:16 (Portrait) from the submenu that appears.
Click Split Screen from the standard toolbar at the top, hover mouse to the screen type preset you want to use, click the + ( Add to Project ) icon that appears at the bottom-right corner of the thumbnail, and click OK from the bottom-right corner once the preset is added to the Timeline.
2. Import and Add Video(s) Preview/Timeline
Click the Media button from the standard toolbar, click anywhere inside the Media window at the upper-left corner, and when the Open box comes up, select and import the video file(s) you want to participate in the TikTok reaction. Alternatively, you can also click Record from below the standard toolbar, and choose any of the options to record your own video or voice right from within Wondershare Filmora itself.
Next, click and drag each of the imported videos to their corresponding screen sections in the Preview window in the upper-right area. Notice how the files are automatically added to the Timeline at the bottom.
3. Add Elements and Titles
Click Elements from the standard toolbar, hover mouse to the element you want to add to the reaction, click the + icon that appears at the center of the thumbnail, and reposition the element in the Timeline to match the duration with that of the reaction you are creating.
4. Export the Reaction
Click EXPORT from the top-middle section of the interface, go to the Local tab from the top of the Export box that appears next, select your preferred format from the left bar, optionally choose a destination folder from the right window, optionally click SETTINGS to fine-tune the output preferences as needed, and click EXPORT from the bottom-right corner to export the TikTok reaction. Or, you can save it in the settings perfect for iPhone or another device.
Below is a sample reaction video made with Filmora, you can do much better than that for your TikTok account:
Besides using Filmora to edit reaction videos with the split-screen presets, you can also use some other video editing software to create a reaction video . Filmora can empower your video creation with more creativity, watch the video below and download Filmora to try.
Conclusion
A TikTok reaction enables you to make the source videos more fun and entertaining. Luckily the app itself has a “React” button that helps you create TikTok reaction videos with merely a few simple taps. However, if you feel that the built-in options are not as robust as they should be, a third-party program like Wondershare Filmora is something you would definitely love to try your hands on as the software is not only easy to use, it is also lightweight, and doesn’t put any overhead on your computer hardware.
Shanoon Cox
Shanoon Cox is a writer and a lover of all things video.
Follow @Shanoon Cox
Also read:
- [Updated] Mastering Fast Forward on TikTok App
- [Updated] 2024 Approved Streamline Your Content with Optimal TikTok Intro Strategies (Mac)
- [New] Best GIF Tools for Transforming TikToks
- In 2024, Harnessing the Potential of Social Media Marketing on TikTok
- [New] Erase Background Noises with Ease Using Audacity Tools
- [New] 2024 Approved Unearth TikTok's Best & Hidden Emoji Treasures
- 2024 Approved The Epic List 10 Must-See TikTok Reactions
- [New] 2024 Approved The Ease of Skipping Through TikTok Media
- Essential Tips for Storing Snapchat Videos on Devices
- [Updated] Mastering Growth on TikTok Top 7 Must-Have Tools and Techniques for 2024
- 2024 Approved Unlock New Creative Potential on TikTok with Easy Background Swaps
- [Updated] 2024 Approved Reaching Audiences with Powerful Social Media Tags
- [Updated] Prime Selection The Ultimate Guide to the Best TikTok-to-GIF Software for 2024
- Enhance Your Online Presence 4 Streaming Methods for Desktop Users for 2024
- [New] Decoding High-Impact TikTok Campaign Techniques
- In 2024, Unleashing Your Content's Potential on TikTok Through Hashtags
- Cook-Up Clashes Top 10 TikTok Food Faceoffs for 2024
- [New] In 2024, 2023 | 30 Hot TikTok Amazon Finds You Must Know
- [Updated] 2024 Approved Unleashing Instant Growth on TikTok Key Strategies Revealed
- In 2024, A Beginner's Guide to Using Siri for Easy TikTok Filming
- [New] Mastering TikTok Livestreams on Your Home Office Desktop
- Top 10 Flawless, Unmarked Video Access for TikTok for 2024
- [Updated] 2024 Approved Boost Visual Appeal Top-Rated TikTok Filters for Creators
- [New] Exploring the Top 15 Influential Figures in International TikTok
- [New] Rapid TikTok Video Loading A Guide
- Perfect the Art of TeamSnap Photos for Business Success
- [Updated] Gourmet Goals on TikTok Culinary Challenges Worth Pursuing
- [Updated] Crafting a Distinctive TikTok Stream Hashcode
- 2024 Approved Explore the Best TikTok Data Analysis Instruments for Growth
- Discover the Secrets of Tailoring Your Voice on TikTok
- [New] In 2024, Accelerate TikTok Video Playback
- [New] 2024 Approved Perfecting the Sync Siri Voice Control for TikTok Users
- 2024 Approved Unlocking the Art of Guesting on Social TikTok Lives
- [New] 2024 Approved Gastronomic Globe-Trotting Iconic Recipes Worldwide
- New Best Free M4A Audio Editing Software for Beginners
- ScreenCapture Pro Tips – Your Guide to FREE Recording Options
- [New] In 2024, Streamlining Video Conferences with Snap Camera Functions
- [New] 2024 Approved Bloodthirsty Horror Your Go-To 8 Zombie Titles
- The Magnificent Art of Pokemon Go Streaming On Apple iPhone 14 Pro? | Dr.fone
- In 2024, The Best Android SIM Unlock Code Generators Unlock Your OnePlus Nord CE 3 Lite 5G Phone Hassle-Free
- Facebook Streaming Made Simple Your Guide, 2023 Edition
- How to Fix Error 495 While Download/Updating Android Apps On Nokia C300 | Dr.fone
- New 2024 Approved Simplify Video Editing on Mac with MKVtoolnix
- New Besides the Video Production Equipment, You Also Need a Great Video Editing Software to Make Attention-Grabbing Videos on a Constant Basis. This Article Gives Recommendations of Different Video Editing Software for 2024
- How to Stop Life360 from Tracking You On Vivo S18 Pro? | Dr.fone
- Expert- The Best 4K/8K Video Editing Programs for 2024
- How To Check if Your Vivo V30 Is Unlocked
- New Everything That You Need to Know About Video Montages- Ideas, Techniqu for 2024
- Title: "In 2024, Elevate Your TikTok with Bigger-Head VFX (3 Effective Ways)"
- Author: Stephen
- Created at : 2024-05-23 02:47:38
- Updated at : 2024-05-24 02:47:38
- Link: https://tiktok-video-recordings.techidaily.com/in-2024-elevate-your-tiktok-with-bigger-head-vfx-3-effective-ways/
- License: This work is licensed under CC BY-NC-SA 4.0.
