
:max_bytes(150000):strip_icc()/IMG_5800iPhoneXmockup-d101ba5d46e44d2b8180911426f30d21.jpg)
In 2024, The Definitive Guide to Capturing Great TikTok Content
The Definitive Guide to Capturing Great TikTok Content
Whether sardonic, informative, or both, voiceovers can improve a TikTok video for humor and clarity.
What do sewing how-to videos, cooking tutorials, and daily vlogs have in common? They all probably are dependent on TikTok’s voiceover feature, which can be helpful in the inbuilt editing suite of the TikTok app.
Ever wished to record a TikTok and save it for later without letting the publisher know? Then, it is always the best idea to learn how to screen record on TikTok. This article will help you learn multiple ways of screen recording on TikTok without you having to worry about the other person knowing.
And, we’ll also look at how to do a voiceover on TikTok using the step-by-step guide mentioned below.
In this article
01 How to Screen Record on TikTok?
02 How to Add Voiceover to the TikTok Video?
03 Add Voiceover to TikTok Video with Extra Fusion: Wondershare Filmora
Part 1: How to Screen Record on TikTok?
Have you ever accidentally taken a screenshot of someone’s Instagram story or screen recorded it for future reference and got scared that the person may have got notified?
While Instagram had the feature of notifying users if their story or picture has been screen recorded, it has recently changed to restrict this notification to images and videos sent via private DMs.
However, TikTokers can rest assured as TikTok has never had a similar notification feature, and you can safely screen record TikTok without mentioning the publisher.
How to Record Computer Screens on Windows
PCs allow software products useful for various purposes. For example, if you would like to record your PC screen while using Windows-based software, you’ll be required a powerful screen recorder that lets you set up a new screencasting session in just a few simple steps.
Here are some of the steps you need to consider!
Step 1: Download Wondershare Filmora
Download Wondershare Filmora onto your computer and then launch the software.
Wondershare Filmora
Get started easily with Filmora’s powerful performance, intuitive interface, and countless effects!
Try It Free Try It Free Try It Free Learn More >

Just visit the browser and type the URL ‘tiktok.com’ in the search bar. Then, look for the TikTok video you would like to record.
Besides providing functions that activate you to control the screen recording procedure entirely, Wondershare Filmora is also a video editor program that lets you manipulate your videos in any way you want.
You must double-click on its desktop icon and open the Full Feature mode right after launching the software. Now, hit the Record tab and choose the Record PC screen option.
The Wondershare Screen Recorder window will appear on the screen so you can modify the settings for your upcoming screencasting session.

You’ll see the Settings icon in the window’s lower right corner and then click it. For example, you can select the computer’s hard drive destination where the recording will be saved, modify the frame rate or set the quality of the recording from the Quality drop-down menu.

Hit the Microphone icon to choose the mic you’ll be using to record narration, and you can select the Speakers icon if you want to disable or enable the computer’s speakers during the session of screen recording.
You’ll see the Settings icon in the window’s lower right corner and then click it. For example, you can select the computer’s hard drive destination where the recording will be saved, modify the frame rate or set the quality of the recording from the Quality drop-down menu.

Mark the Mouse checkbox if you wish the mouse clicks to display in the recording, and you can easily place the maximum duration of a recording session. It is done by inserting the preferred default screen recording duration into the Record Timer box.

Hit the Rec button to begin a new screencasting session, and the software will start recording after a three-second countdown.
Tap the F9 button on the keyboard to stop recording. It will automatically open the file in Filmora’s video editor so you can edit it before publishing online.
Part 2: How to Add Voiceover to the TikTok Video?
Steps to add a voiceover to your TikTok video.
Upload or record a new video by hitting the + at the menu’s center at the screen’s bottom area.
Hit the microphone icon on the screen’s upper right corner once you’re over with the recording and trimming clips to your desired edit. Beneath, the microphone icon must mention “Voiceover.”

Source: mashable.com
Now, you can record a voiceover timed to Video’s every frame here.
Hit the “Save“ button once you’re satisfied with the voiceover

Hitting the “Save“ button will offer you back to the video’s preview, where you can add filters, text, stickers, and various sounds.
It is needed to add effects to your voiceover by hitting the “voice effects”. Here, you can control the narrator’s volume as well.
Also, make sure to enable automatic captions to make sure your video is more accessible!
Tap the Next button once you’re over with your Video. Then, you can edit the Video’s privacy settings, add a caption, and select a cover.
Part 3: Add Voiceover to TikTok Video with Extra Fusion: Wondershare Filmora
Do you want to include your voice in a video, create a voiceover demo for sharing and uploading on social networking platforms, or frame a documentary for important content?
All you need is an ideal video editing program similar to the Wondershare Filmora Video Editor.
The Filmora’s voiceover feature allows you to record your voice or add voice-over files to Video easily. In addition, you can customize the pitch, speed, and volume of the recorded voiceover and apply fade-in and fade-out effects. I’ll share how to register and add voiceover to a video with Filmora on your computer in this post.
Firstly, you can edit your Video in Filmora and then record the voiceover afterward. Or, you can first record the voiceover and then edit the Video around.
Check the steps below on how to make TikTok videos with voiceover via Wondershare Filmora.
Wondershare Filmora
Get started easily with Filmora’s powerful performance, intuitive interface, and countless effects!
Try It Free Try It Free Try It Free Learn More >
Record Voiceover and Add it to Video
We suggest you record the voiceover first in most cases so the sound will become pretty natural.
Step 1: Connect Microphone to PC or laptop
Connect the microphone to your laptop/PC when you’re ready to begin. It’s advisable to use some professional external microphones to capture high-quality sound.
Step 2: Record voiceover
Tap the Wondershare Filmora icon to launch this software. Then, select the New Project option in the beginning interface to create a new one.
Enter the Record tab and choose the “Record a Voiceover” option to arouse the Record Audio windows.
Or hit the microphone icon, and you only need 3 seconds of countdown to begin speaking.
Click the microphone icon again after you finish the above. Then, a new Record file option will be automatically present on the audio track.
Step 3: Edit Recorded Voiceover to Video
To edit the recorded voiceover, you can adjust audio settings, such as changing the Speed, Pitch, Volume, etc.

You can cut and trim out unnecessary sound sections from the recorded voiceover or apply the fade effects to the voiceover for a smoother transition.
Step 4: Sync Voiceover to Video
Now, it’s time to synchronize the recorded voiceover to video to create a compelling video.
The Wondershare Filmora allows up to 100 audio tracks; you can also add some background music to the voiceover.
Then import and drag-n-drop the video content to the video track, drag and drop the soundtrack to the video’s right-side position. Keep the voice and video track in the exact video duration if required.
Here’s how to sync voiceover to video!
Now, sync the recorded voiceover to Video to create a video. Since Filmora is compatible with 100 plus audio tracks, you can add different background music to the voiceover.
Then import and drag-n-drop the video content to the video track, drag and drop the soundtrack to the Video’s right side position. You can keep the Video and audio track in the same video duration.

Note: If you’ve recorded the iPhone voiceover or other device already, you can import it in the Project Library if you wish to add it to the Video and then sync it to Video.
Here is the ultimate step-by-step guide about adding titles to videos after knowing how to do a voiceover on TikTok.
Step 5: Export and save the new file
Click the “Export“ tab to export your new video file after you complete the project. You can either save the Video to different formats or directly share it on other social media platforms.
Additionally, you can even burn a DVD in minutes to watch it on TV.
How to Record and Add Voice over File during Filmora’s Video Editing Process
If you’ve recorded the voice over on your iPhone or another device already, even via the Wondershare Filmora, and wish to add it to the Video, visit the steps mentioned below:
1. Upload the video to Filmora
After logging in to Filmora’s main editing interface, click “Import” or drag-drop your video and voiceover file to the project library.
Filmora video editing software is compatible with a vast range of formats, so there will be no need to convert the files before import.
Drag and drop the files or video content to the Video Timeline when all the files get imported.
2. Record Voiceover in Video Editing
3. Edit voiceover and Export
You can then edit the recorded voiceover for TikTok to perfectly fit the Video and export it to your laptop/PC or directly upload it to YouTube.
For improving the sound, Filmora features more audio editing tools.
Conclusion
This article offered you a step-by-step guide on how to record a TikTok. It also displays four different screen recording methods, along with how to do a voiceover on TikTok.
Now, don’t ever worry about losing out on your favorite TikTok without the original publisher knowing via screen record TikTok via Wondershare Filmora.
02 How to Add Voiceover to the TikTok Video?
03 Add Voiceover to TikTok Video with Extra Fusion: Wondershare Filmora
Part 1: How to Screen Record on TikTok?
Have you ever accidentally taken a screenshot of someone’s Instagram story or screen recorded it for future reference and got scared that the person may have got notified?
While Instagram had the feature of notifying users if their story or picture has been screen recorded, it has recently changed to restrict this notification to images and videos sent via private DMs.
However, TikTokers can rest assured as TikTok has never had a similar notification feature, and you can safely screen record TikTok without mentioning the publisher.
How to Record Computer Screens on Windows
PCs allow software products useful for various purposes. For example, if you would like to record your PC screen while using Windows-based software, you’ll be required a powerful screen recorder that lets you set up a new screencasting session in just a few simple steps.
Here are some of the steps you need to consider!
Step 1: Download Wondershare Filmora
Download Wondershare Filmora onto your computer and then launch the software.
Wondershare Filmora
Get started easily with Filmora’s powerful performance, intuitive interface, and countless effects!
Try It Free Try It Free Try It Free Learn More >
Just visit the browser and type the URL ‘tiktok.com’ in the search bar. Then, look for the TikTok video you would like to record.
Besides providing functions that activate you to control the screen recording procedure entirely, Wondershare Filmora is also a video editor program that lets you manipulate your videos in any way you want.
You must double-click on its desktop icon and open the Full Feature mode right after launching the software. Now, hit the Record tab and choose the Record PC screen option.
The Wondershare Screen Recorder window will appear on the screen so you can modify the settings for your upcoming screencasting session.
You’ll see the Settings icon in the window’s lower right corner and then click it. For example, you can select the computer’s hard drive destination where the recording will be saved, modify the frame rate or set the quality of the recording from the Quality drop-down menu.
Hit the Microphone icon to choose the mic you’ll be using to record narration, and you can select the Speakers icon if you want to disable or enable the computer’s speakers during the session of screen recording.
You’ll see the Settings icon in the window’s lower right corner and then click it. For example, you can select the computer’s hard drive destination where the recording will be saved, modify the frame rate or set the quality of the recording from the Quality drop-down menu.
Mark the Mouse checkbox if you wish the mouse clicks to display in the recording, and you can easily place the maximum duration of a recording session. It is done by inserting the preferred default screen recording duration into the Record Timer box.
Hit the Rec button to begin a new screencasting session, and the software will start recording after a three-second countdown.
Tap the F9 button on the keyboard to stop recording. It will automatically open the file in Filmora’s video editor so you can edit it before publishing online.
Part 2: How to Add Voiceover to the TikTok Video?
Steps to add a voiceover to your TikTok video.
Upload or record a new video by hitting the + at the menu’s center at the screen’s bottom area.
Hit the microphone icon on the screen’s upper right corner once you’re over with the recording and trimming clips to your desired edit. Beneath, the microphone icon must mention “Voiceover.”
Source: mashable.com
Now, you can record a voiceover timed to Video’s every frame here.
Hit the “Save“ button once you’re satisfied with the voiceover
Hitting the “Save“ button will offer you back to the video’s preview, where you can add filters, text, stickers, and various sounds.
It is needed to add effects to your voiceover by hitting the “voice effects”. Here, you can control the narrator’s volume as well.
Also, make sure to enable automatic captions to make sure your video is more accessible!
Tap the Next button once you’re over with your Video. Then, you can edit the Video’s privacy settings, add a caption, and select a cover.
Part 3: Add Voiceover to TikTok Video with Extra Fusion: Wondershare Filmora
Do you want to include your voice in a video, create a voiceover demo for sharing and uploading on social networking platforms, or frame a documentary for important content?
All you need is an ideal video editing program similar to the Wondershare Filmora Video Editor.
The Filmora’s voiceover feature allows you to record your voice or add voice-over files to Video easily. In addition, you can customize the pitch, speed, and volume of the recorded voiceover and apply fade-in and fade-out effects. I’ll share how to register and add voiceover to a video with Filmora on your computer in this post.
Firstly, you can edit your Video in Filmora and then record the voiceover afterward. Or, you can first record the voiceover and then edit the Video around.
Check the steps below on how to make TikTok videos with voiceover via Wondershare Filmora.
Wondershare Filmora
Get started easily with Filmora’s powerful performance, intuitive interface, and countless effects!
Try It Free Try It Free Try It Free Learn More >
Record Voiceover and Add it to Video
We suggest you record the voiceover first in most cases so the sound will become pretty natural.
Step 1: Connect Microphone to PC or laptop
Connect the microphone to your laptop/PC when you’re ready to begin. It’s advisable to use some professional external microphones to capture high-quality sound.
Step 2: Record voiceover
Tap the Wondershare Filmora icon to launch this software. Then, select the New Project option in the beginning interface to create a new one.
Enter the Record tab and choose the “Record a Voiceover” option to arouse the Record Audio windows.
Or hit the microphone icon, and you only need 3 seconds of countdown to begin speaking.
Click the microphone icon again after you finish the above. Then, a new Record file option will be automatically present on the audio track.
Step 3: Edit Recorded Voiceover to Video
To edit the recorded voiceover, you can adjust audio settings, such as changing the Speed, Pitch, Volume, etc.
You can cut and trim out unnecessary sound sections from the recorded voiceover or apply the fade effects to the voiceover for a smoother transition.
Step 4: Sync Voiceover to Video
Now, it’s time to synchronize the recorded voiceover to video to create a compelling video.
The Wondershare Filmora allows up to 100 audio tracks; you can also add some background music to the voiceover.
Then import and drag-n-drop the video content to the video track, drag and drop the soundtrack to the video’s right-side position. Keep the voice and video track in the exact video duration if required.
Here’s how to sync voiceover to video!
Now, sync the recorded voiceover to Video to create a video. Since Filmora is compatible with 100 plus audio tracks, you can add different background music to the voiceover.
Then import and drag-n-drop the video content to the video track, drag and drop the soundtrack to the Video’s right side position. You can keep the Video and audio track in the same video duration.
Note: If you’ve recorded the iPhone voiceover or other device already, you can import it in the Project Library if you wish to add it to the Video and then sync it to Video.
Here is the ultimate step-by-step guide about adding titles to videos after knowing how to do a voiceover on TikTok.
Step 5: Export and save the new file
Click the “Export“ tab to export your new video file after you complete the project. You can either save the Video to different formats or directly share it on other social media platforms.
Additionally, you can even burn a DVD in minutes to watch it on TV.
How to Record and Add Voice over File during Filmora’s Video Editing Process
If you’ve recorded the voice over on your iPhone or another device already, even via the Wondershare Filmora, and wish to add it to the Video, visit the steps mentioned below:
1. Upload the video to Filmora
After logging in to Filmora’s main editing interface, click “Import” or drag-drop your video and voiceover file to the project library.
Filmora video editing software is compatible with a vast range of formats, so there will be no need to convert the files before import.
Drag and drop the files or video content to the Video Timeline when all the files get imported.
2. Record Voiceover in Video Editing
3. Edit voiceover and Export
You can then edit the recorded voiceover for TikTok to perfectly fit the Video and export it to your laptop/PC or directly upload it to YouTube.
For improving the sound, Filmora features more audio editing tools.
Conclusion
This article offered you a step-by-step guide on how to record a TikTok. It also displays four different screen recording methods, along with how to do a voiceover on TikTok.
Now, don’t ever worry about losing out on your favorite TikTok without the original publisher knowing via screen record TikTok via Wondershare Filmora.
Expert Downloader for TikTok Videos in Watermark-Free MP4
Hovering through your TikTok For You page brings up an array of content to dive in. With a few of your finger swipes, you could find yourself seeing a confidence-boosting pep talk, going behind the fashion show behind the scenes, or assisting how to grow herbs in your kitchen.
With so much information to consume nowadays, it’s only natural that you might like to save a couple of TikTok content to watch at a later date and time, without even opening the TikTok app. In this guide, we’ll show you how to convert TikTok to MP4 via the best TikTok converters MP4 available.
In this article
01 Top 3 TikTok MP4 Converters in 2021
02 How to Convert TikTok Video to MP4 without Watermark?
03 How to Save TikTok without Watermark for Free?
Part 1: Top 3 TikTok MP4 Converters in 2021
1. ttdown.org
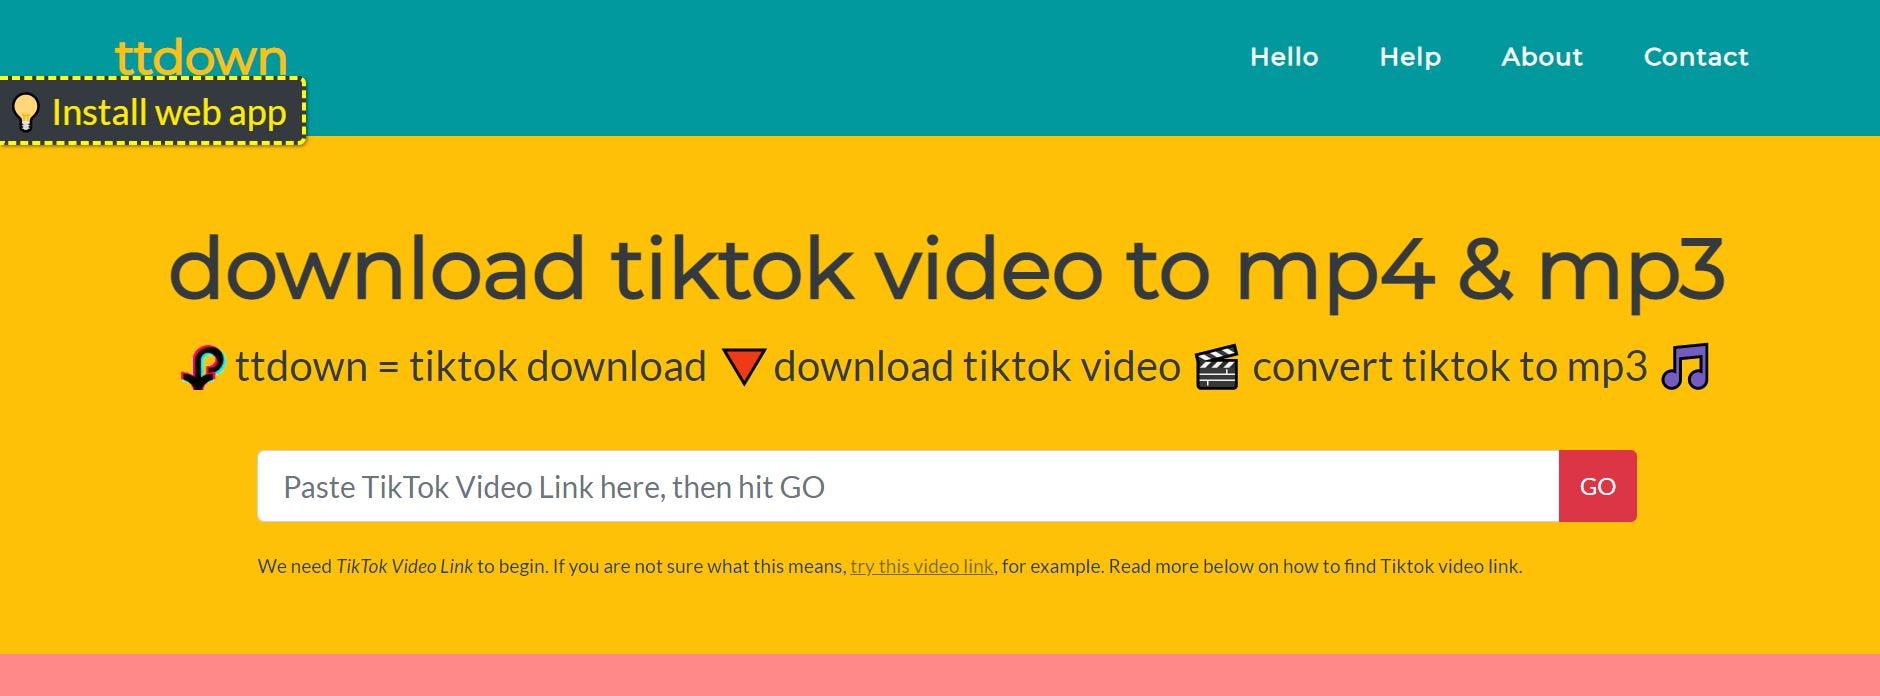
TTDown provides a colorful website to scroll through and learn about TikTok and a step-by-step tutorial on downloading TikTok MP4. In addition, TTDown brings you the most straightforward way to download TikTok MP4 videos by copy-pasting the video’s link on their website.
However, its Bookmarklet feature saves the users’ time from copy-pasting. They have provided their website link that you can drag into your browser’s bookmarks. Just hit the bookmark when you scroll through TikTok and wish to save a video.
Price: Free
2. Experts PHP
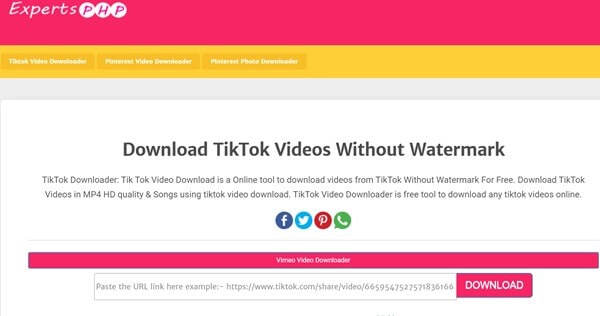
ExpertPHP TikTok converter MP4 lets you download TikTok files by pasting the file’s copied link to be downloaded into the text bar offered on the ExpertsPHP’s web page. It further enables us to download videos and images from platforms like Pinterest, TikTok, etc. Here, you can download videos freely without watermarks.
One downside of ExpertsPHP is that it does not provide other features, like converting videos into GIFs, as offered by its alternatives.
Price: Free
3. Qoob Clips
Qoob Clips lets us view and download unlimited TikTok and Instagram media files. You can even get access to the private accounts’ content through Qoob.
To proceed with the process, you are only required to install Qoob on your computer, enter your username, and begin viewing content downloaded automatically into your PC. Just by entering the username, you can even search for a private account’s content.
This MP4 TikTok downloader also lets you download unlimited highlights and stories. It further supports unlimited private accounts without displaying any ads.
Part 2: How to Convert TikTok Video to MP4 without Watermark?
Before proceeding further, it’s essential to consider whether any copyright infringement issues could arise from downloading a TikTok video. According to the Community Guidelines of TikTok, users cannot post, send, or share any content that violates someone else’s trademarks, copyrights, or intellectual property rights.
To prevent this, TikTok applies a watermark featuring both its account’s username and the logo that originally posted the content if someone downloads a TikTok video.
In other words, you have to ensure the watermark’s visibility or give full credit to the user in another way while reposting the user’s video on social media. And, this is where the job of the best TikTok converter MP4 comes in.
Cropping watermarks from your videos with Wondershare Filmora video editing software is a pretty straightforward process. You don’t need be a professional to finish these simple editing actions.
All you must do is choose a method that best suits your preferences and performs an easy action, though.
So, without any delay, let’s have a look at some editing techniques you can use to blur or crop watermarks from the downloaded videos of TikTok with Filmora.
Wondershare Filmora
Get started easily with Filmora’s powerful performance, intuitive interface, and countless effects!
Try It Free Try It Free Try It Free Learn More >
Note: the methods listed below won’t work perfectly if the watermark is in the middle of the screen. And you may need to subscribe to remove the watermark via Wondershare Filmora. In addition, you can fetch a special discount at Filmora Education Plan if you’re a student.
Method 1: Blurring the Watermark
The Filmora’s Mosaic feature will allow you to blur logos and all other on-screen graphics with just a few taps.
Hit the Effects tab at the top, select the Utility tab at left, and then hit the Mosaic option to preview the effect.
Click plus icon on the thumbnail on Mosaic or drag-and-drop it into the track above the video.
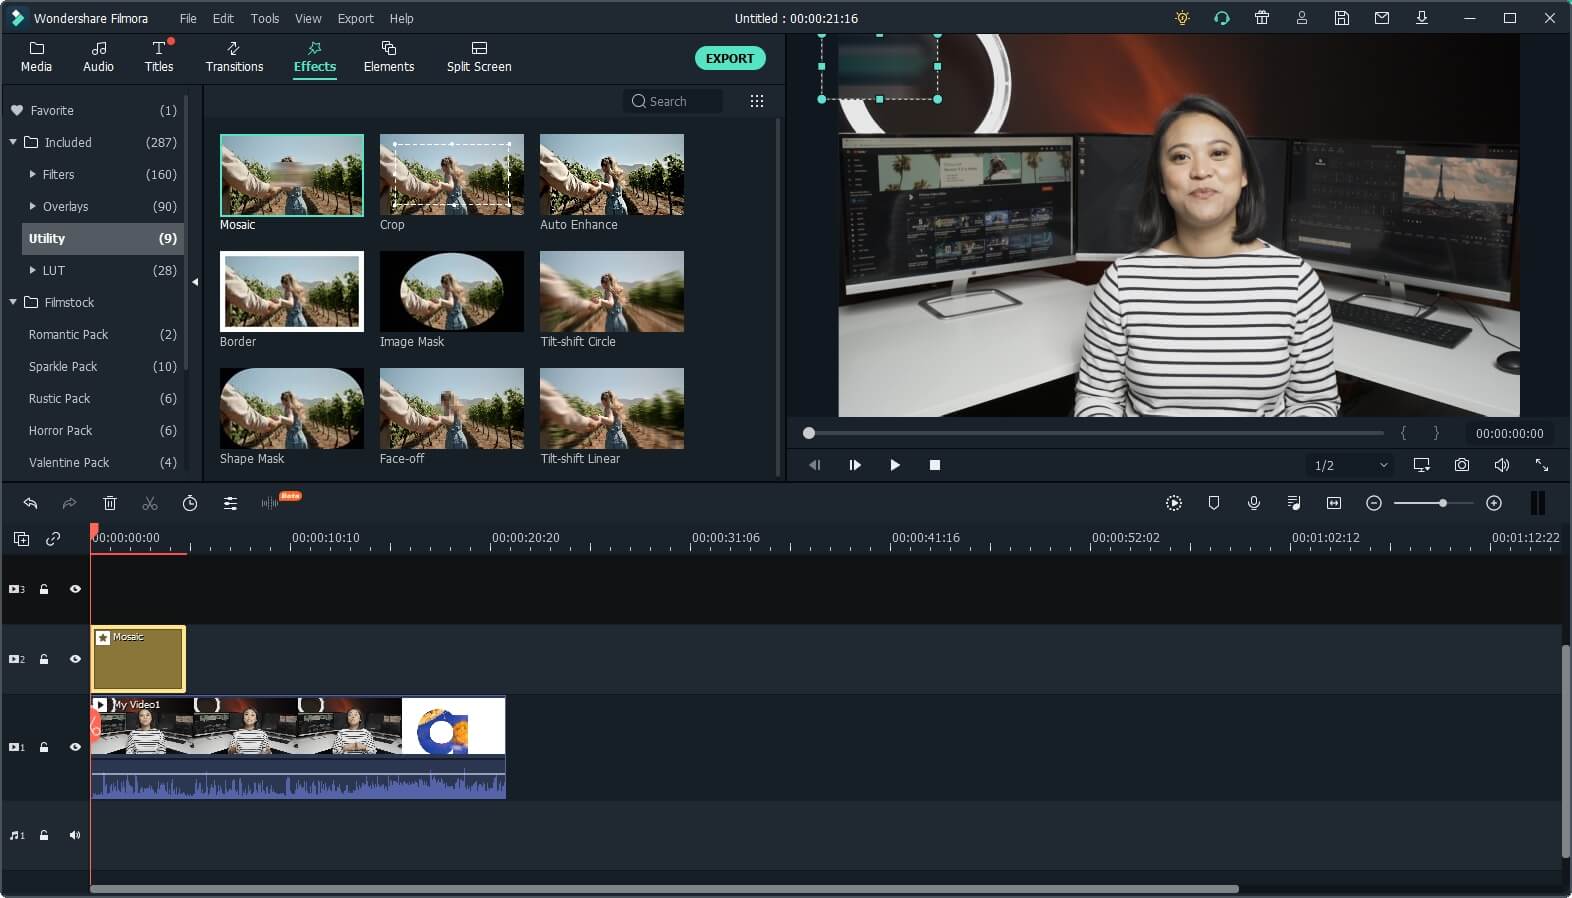
A mosaic square will appear after you apply it in the preview window by relocating it by simply dragging it to the preview window area or adjusting its size at the watermarked position.
If the downloaded video has more than one logo to hide, tapping the plus icon will introduce you to another mosaic square within the video
project.
In the timeline, double click those Mosaic effects; you can select Blur Amount and Type to adjust the shape and size of the mosaic. Hit the OK tab to apply the adjustment.

You can also consider using this Mosaic effect to blur other objects or even the face.
Method 2: Remove watermark by Cropping the video
This method will allow you to remove the watermark from your video entirely. Cropping the area where the watermark isn’t possible in any video editor, so if you select to crop the video, be prepared to lose a particular section of the picture.
Right-click the video and choose the Crop and Zoom option once the footage you wish to crop is on the video track in Filmora’s timeline.
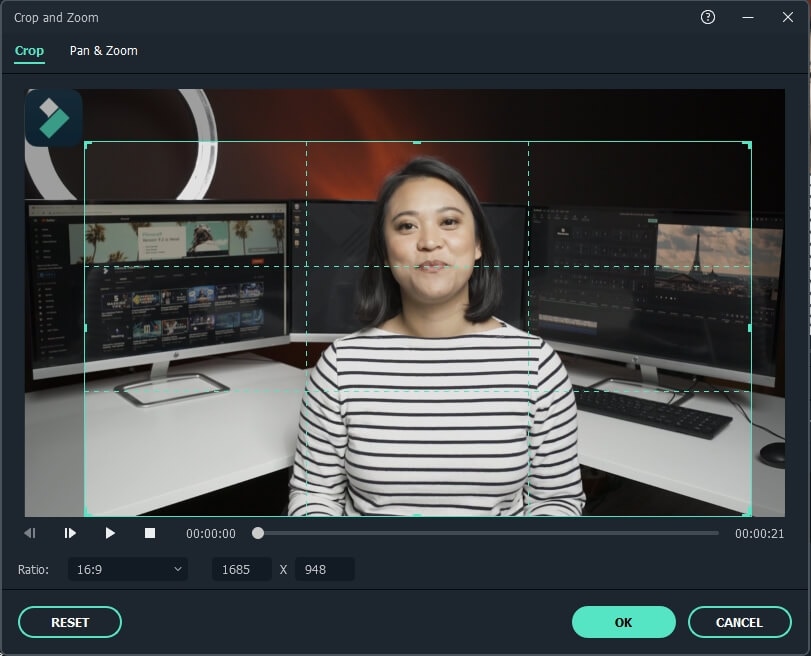
The crop window that enables you to use automatic aspect ratios or manually will appear on the screen. You can reposition the videos’ corners of the cropping rectangle from here by dragging it as much as essential to remove TikTok’s username watermark.
You can change the aspect ratios or keep them originally based on your needs. Hit the OK tab to apply the cropping effect, and you have successfully removed a watermark from your video.
So, it’s a worthy, reliable, and feature-rich TikTok watermark remover that you can easily use as the best TikTok MP4 converter.
Part 3: How to Save TikTok without Watermark for Free?
How to Save TikTok Without Watermark Online
When there is a need for the best TikTok video downloaders, you might get offers with various options. But the quantity of TikTok downloaders without watermarked videos is counted on the fingers of one hand.
We’ve founded SSSTikTok, an ideal online tool fit for the same.
We conducted the tutorial below on Windows 10’s Chrome browser, but it is almost the same on iOS, Android, and Mac.
Step 1. Copy the TikTok video’s URL on the Pc or TikTok mobile app.
Step 2. Open the web browser, and visit the SSSTikTok official website. Paste the video link to the blank tab and select the download tab. And it will take only a few secs to analyze the URL.
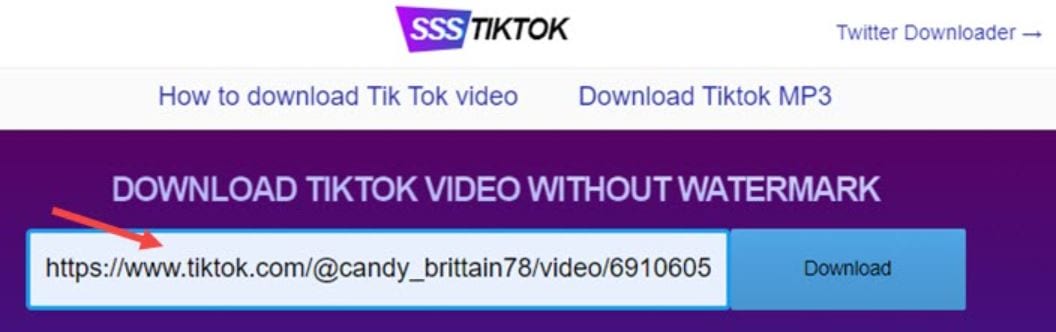
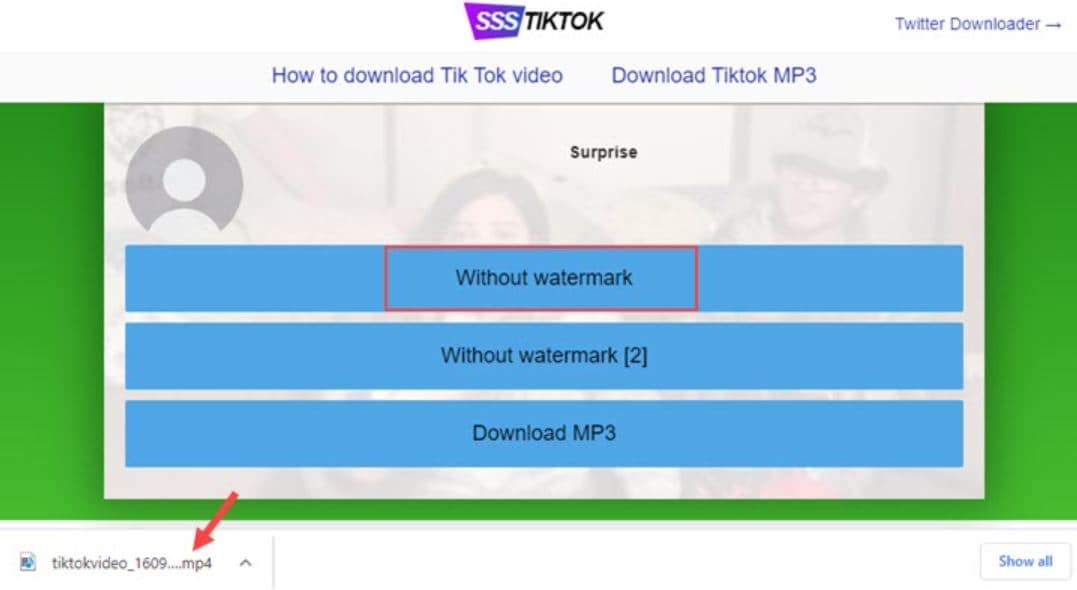
Step 3. Select the “Without Watermark“ option, and the video will be immediately get saved to the browser downloads folder.
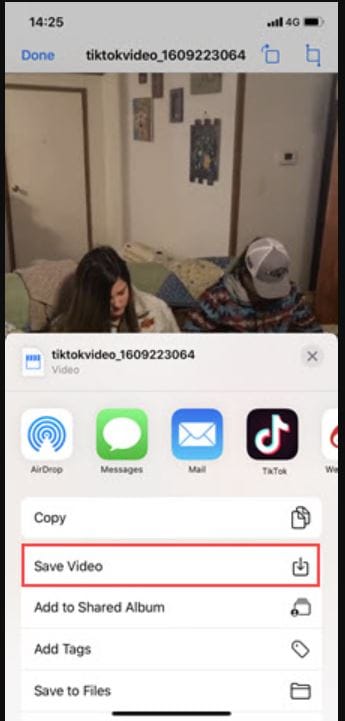
Tips for iPhone users: There’s one more step you should be aware of if you’re using this TikTok downloader. After downloading the video on iOS Safari, you can preview the video, hit the share icon, and select the “Save video “option.
Conclusion
Finally, we hope it won’t be that difficult to convert TikTok to MP4 via the best TikTok converters MP4 with the solution mentioned above. Ensure that you didn’t break the law whether you want to remove it with an online watermark remover or with a program for PC and Mac, or on iPhone or Android phones.
If you want to go for the straightforward and hassle-free option, check our video editing program Filmora and use it to blur or crop the watermarks of TikTok’s downloaded videos.
02 How to Convert TikTok Video to MP4 without Watermark?
03 How to Save TikTok without Watermark for Free?
Part 1: Top 3 TikTok MP4 Converters in 2021
1. ttdown.org
TTDown provides a colorful website to scroll through and learn about TikTok and a step-by-step tutorial on downloading TikTok MP4. In addition, TTDown brings you the most straightforward way to download TikTok MP4 videos by copy-pasting the video’s link on their website.
However, its Bookmarklet feature saves the users’ time from copy-pasting. They have provided their website link that you can drag into your browser’s bookmarks. Just hit the bookmark when you scroll through TikTok and wish to save a video.
Price: Free
2. Experts PHP
ExpertPHP TikTok converter MP4 lets you download TikTok files by pasting the file’s copied link to be downloaded into the text bar offered on the ExpertsPHP’s web page. It further enables us to download videos and images from platforms like Pinterest, TikTok, etc. Here, you can download videos freely without watermarks.
One downside of ExpertsPHP is that it does not provide other features, like converting videos into GIFs, as offered by its alternatives.
Price: Free
3. Qoob Clips
Qoob Clips lets us view and download unlimited TikTok and Instagram media files. You can even get access to the private accounts’ content through Qoob.
To proceed with the process, you are only required to install Qoob on your computer, enter your username, and begin viewing content downloaded automatically into your PC. Just by entering the username, you can even search for a private account’s content.
This MP4 TikTok downloader also lets you download unlimited highlights and stories. It further supports unlimited private accounts without displaying any ads.
Part 2: How to Convert TikTok Video to MP4 without Watermark?
Before proceeding further, it’s essential to consider whether any copyright infringement issues could arise from downloading a TikTok video. According to the Community Guidelines of TikTok, users cannot post, send, or share any content that violates someone else’s trademarks, copyrights, or intellectual property rights.
To prevent this, TikTok applies a watermark featuring both its account’s username and the logo that originally posted the content if someone downloads a TikTok video.
In other words, you have to ensure the watermark’s visibility or give full credit to the user in another way while reposting the user’s video on social media. And, this is where the job of the best TikTok converter MP4 comes in.
Cropping watermarks from your videos with Wondershare Filmora video editing software is a pretty straightforward process. You don’t need be a professional to finish these simple editing actions.
All you must do is choose a method that best suits your preferences and performs an easy action, though.
So, without any delay, let’s have a look at some editing techniques you can use to blur or crop watermarks from the downloaded videos of TikTok with Filmora.
Wondershare Filmora
Get started easily with Filmora’s powerful performance, intuitive interface, and countless effects!
Try It Free Try It Free Try It Free Learn More >
Note: the methods listed below won’t work perfectly if the watermark is in the middle of the screen. And you may need to subscribe to remove the watermark via Wondershare Filmora. In addition, you can fetch a special discount at Filmora Education Plan if you’re a student.
Method 1: Blurring the Watermark
The Filmora’s Mosaic feature will allow you to blur logos and all other on-screen graphics with just a few taps.
Hit the Effects tab at the top, select the Utility tab at left, and then hit the Mosaic option to preview the effect.
Click plus icon on the thumbnail on Mosaic or drag-and-drop it into the track above the video.
A mosaic square will appear after you apply it in the preview window by relocating it by simply dragging it to the preview window area or adjusting its size at the watermarked position.
If the downloaded video has more than one logo to hide, tapping the plus icon will introduce you to another mosaic square within the video
project.
In the timeline, double click those Mosaic effects; you can select Blur Amount and Type to adjust the shape and size of the mosaic. Hit the OK tab to apply the adjustment.
You can also consider using this Mosaic effect to blur other objects or even the face.
Method 2: Remove watermark by Cropping the video
This method will allow you to remove the watermark from your video entirely. Cropping the area where the watermark isn’t possible in any video editor, so if you select to crop the video, be prepared to lose a particular section of the picture.
Right-click the video and choose the Crop and Zoom option once the footage you wish to crop is on the video track in Filmora’s timeline.
The crop window that enables you to use automatic aspect ratios or manually will appear on the screen. You can reposition the videos’ corners of the cropping rectangle from here by dragging it as much as essential to remove TikTok’s username watermark.
You can change the aspect ratios or keep them originally based on your needs. Hit the OK tab to apply the cropping effect, and you have successfully removed a watermark from your video.
So, it’s a worthy, reliable, and feature-rich TikTok watermark remover that you can easily use as the best TikTok MP4 converter.
Part 3: How to Save TikTok without Watermark for Free?
How to Save TikTok Without Watermark Online
When there is a need for the best TikTok video downloaders, you might get offers with various options. But the quantity of TikTok downloaders without watermarked videos is counted on the fingers of one hand.
We’ve founded SSSTikTok, an ideal online tool fit for the same.
We conducted the tutorial below on Windows 10’s Chrome browser, but it is almost the same on iOS, Android, and Mac.
Step 1. Copy the TikTok video’s URL on the Pc or TikTok mobile app.
Step 2. Open the web browser, and visit the SSSTikTok official website. Paste the video link to the blank tab and select the download tab. And it will take only a few secs to analyze the URL.
Step 3. Select the “Without Watermark“ option, and the video will be immediately get saved to the browser downloads folder.
Tips for iPhone users: There’s one more step you should be aware of if you’re using this TikTok downloader. After downloading the video on iOS Safari, you can preview the video, hit the share icon, and select the “Save video “option.
Conclusion
Finally, we hope it won’t be that difficult to convert TikTok to MP4 via the best TikTok converters MP4 with the solution mentioned above. Ensure that you didn’t break the law whether you want to remove it with an online watermark remover or with a program for PC and Mac, or on iPhone or Android phones.
If you want to go for the straightforward and hassle-free option, check our video editing program Filmora and use it to blur or crop the watermarks of TikTok’s downloaded videos.
Also read:
- Discover the 50 Best-Viewed TikTok Hashtags
- [New] Top App for Turning Viral Videos Into Memetic Graphics
- [New] Strategic Steps to Leading the Top TikTok Marketing Moves for 2024
- [New] Mastering TikTok'enas a Game Changer Top 30 Unique Username Suggestions for 2024
- [New] In 2024, Top Techniques for Captivating TikTok Audien Written by [Your Name]
- [New] In 2024, Ultimate Edge Top 10 Wild TikTok Gaming Adventures
- Daily Motivation Delivered by TikTok's Best Ten
- [New] In 2024, Top TikTok Video Clips Editing Software
- [New] In 2024, Buy TikTok Fame Responsibly - Safe, Trusted Providers
- [New] In 2024, Next-Gen TikTok Editing How to Replace Video Borders Quickly
- [New] In 2024, Diverse Bites Foodies' Top International Menu Picks
- 2024 Approved Revealing the Best Gamers in Today's TikTok World
- [Updated] In 2024, Exploring Live Sessions Guesting Basics of TikTok
- Funnies Frontier Emerging Comedy Sensations on TikTok for 2024
- [New] In 2024, Easily Retrieve Your Videos Post-Accidental TikTok Reload Fix
- [Updated] 2024 Approved Food Frenzy on TikTok 15 Recipe Hits Worth a Try
- [Updated] In 2024, Achieve Your Desired Audio Presence on TikTok Through Voice Modification
- Quick Tips Innovative Lens Creation on Snapchat
- The Ultimate Cheat Sheet to Creating Captivating Slow Motion on TikTok
- In 2024, Chart-Topping TikTok Reaction Videos
- [New] 2024 Approved Mastering Anime Aesthetics in Viral TikToks
- Pioneering TikTok Creations with Foundational Tools for 2024
- Top TikTok Chefs & Culinary Stars
- [Updated] Mastering the Art of Digital Expression Top 7 & Secrets Emojis on TikTok
- In 2024, Chuckling Chapter The Most Shared Comedic Content on TikTok
- 2024 Approved Transform Audio Experience The Simplified Guide for TikTok Users
- [New] In 2024, Voice-Activated TikTok Mastering Siri on Your iPhone
- [New] 2024 Approved Text-to-Voice The Ultimate TikTok Technique
- Fusion of Fun and Functionality TikTok' Writes on Commerce Growth for 2024
- [New] 2024 Approved How to Make TikTok Reaction Videos in 2 Proven Ways - Filmora
- [New] Transform Your Online Presence on TikTok in 5 Easy Steps
- Discover How to Style Chat Text with Ease & Speed
- 2024 Approved Unraveling TikTok's Veiled Prohibitive Measures
- Ranking the Best TikTok Profit Estimators for 2024
- Essential Edits Top TikTok Cutting Tools for 2024
- [New] In 2024, Decoding High-Impact TikTok Campaign Techniques
- 30 Top Funny TikTok Jokes & Riddles for 2024
- [Updated] Cook-Up Clashes Top 10 TikTok Food Faceoffs
- [New] In 2024, Amplify Views on TikTok with These Standout Username Concepts
- [Updated] In 2024, Navigating the Realm of TikTok’s Anime Culture Rhythmic Dance and Sound Exploration
- [Updated] In 2024, Rethinking TikTok A 2023 Guide to Alternative Networks
- In 2024, Mastering the Art of Desktop-Made TikTok Content
- [New] How to Edit Video for TikTok on Mac for 2024
- Stand Out with a Stylish Overhaul of Your TikTok Image & Info
- [New] TikTok's Favorite Products The Best On Amazon
- How to Track WhatsApp Messages on Samsung Galaxy F14 5G Without Them Knowing? | Dr.fone
- Androids Finest Free Video Stabilizer Apps Reviewed for 2024
- Updated Enhance Your Audio Experience A Critical Look at the 5 Premium Voice Recorders for MP3s
- Updated Add Depth and Dimension A Guide to Creating 3D Videos on Windows for 2024
- New In 2024, A Guide to Speed up a Video on Splice
- [Updated] Instant Ideas Recording PPTs with Ease
- [Updated] Camera Glitches Ended by OBS Fix
- [New] In 2024, The Essentialist's Approach Saving Your Screen on an HP Notebook
- New In 2024, Digital Tunes on the House Mastering Free Audio Downloads Techniques
- The Easiest Methods to Hard Reset Realme 11 Pro | Dr.fone
- [Updated] Guide Capturing Your Desktop, Using EZvide Software
- In 2024, Disabled iPhone XS Max How to Unlock a Disabled iPhone XS Max? | Dr.fone
- [New] In 2024, InstaBoomtown Building Community with Loop Videos
- Why Your WhatsApp Live Location is Not Updating and How to Fix on your Vivo Y100A | Dr.fone
- Detailed Breakdown Chilled Delights on Your Screen for 2024
- In 2024, Forgot Pattern Lock? Heres How You Can Unlock Vivo T2 5G Pattern Lock Screen
- [Updated] Unveiling Instagram's Videography Timeframe for 2024
- The Art of Loudness in Windows Without the Cost - Exploring 2023S Top Techniques
- [Updated] Expert's Guide to Achieving Screencasting Perfection with Mobizen for 2024
- [New] 2024 Approved The Dawn of a New Era Key FB Ad Trends Arriving
- [Updated] Comprehensive Guide to Xbox Screen Recording Success for 2024
- Updated Venturing Beyond Jazz Norms Discovering Hidden Insights for 2024
- In 2024, 15 Best Strongest Pokémon To Use in Pokémon GO PvP Leagues For Motorola Edge 40 Neo | Dr.fone
- [Updated] Best Webcam Accessories Top 10 Secure Solutions for 2024
- [New] 2024 Approved Quick and Detailed Guide to Xbox Video Capture
- In 2024, Top 6 Apps/Services to Trace Any Samsung Galaxy XCover 6 Pro Tactical Edition Location By Mobile Number | Dr.fone
- [Updated] In 2024, Instagram Illumination Best-Covered IG Highlights on the Move
- In 2024, Fixing Foneazy MockGo Not Working On Oppo A58 4G | Dr.fone
- New The Ultimate Process Rewiring Audio in Film Projects
- 8 Workable Fixes to the SIM not provisioned MM#2 Error on OnePlus 11 5G | Dr.fone
- New Easy Way to Inset Text in Video
- 2024 Approved From Beginner to Pro The Ultimate Selection of 8 High-Performing DAW Platforms for Recording, Mixing, and Mastering Success
- Title: In 2024, The Definitive Guide to Capturing Great TikTok Content
- Author: Stephen
- Created at : 2024-05-23 03:14:35
- Updated at : 2024-05-24 03:14:35
- Link: https://tiktok-video-recordings.techidaily.com/in-2024-the-definitive-guide-to-capturing-great-tiktok-content/
- License: This work is licensed under CC BY-NC-SA 4.0.
