
:max_bytes(150000):strip_icc()/GettyImages-1407509890-920de041a49448b4970783337d3d00ff.jpg)
"Income Predictors Guide Top 6 for TikTok Creators"
Income Predictors Guide: Top 6 for TikTok Creators
Top 6 TikTok Money Calculators

Shanoon Cox
Mar 27, 2024• Proven solutions
“Who makes the most money on TikTok?” – Anonymous
Tik Tok is a platform to showcase talent with an indirect method of money-making. If you are using the Chinese version of Tik Tok, there won’t be any facility for TikTok earning calculator. The feature or you can say additional support by third parties is only available on the Western version of Tik Tok. However, the primary purpose of any Tik Tok money calculator is to check your earnings based on real-time engagement and your influencing activities. Follower count is also taken into account while doing so. For your kind information, all the money by influencers on Tik Tok comes from ads or paid sponsorships. So, what’s the use of these tools?
The answer is straightforward! These advanced tools help understand your audience, overall profile, and growth rate. Let’s discuss the top 6 Tik Tok money calculator tools to consider earnings on your Tik Tok account.
- Part 1: Top 6 Money Calculators to Help Influencers Estimate Earnings
- Part 2: Tips for Earning Money on TikTok
Top 6 Money Calculators to Help Influencers Estimate Earnings
Now, let’s get started by reviewing each Tik Tok money calculator in detail with the respective pros and cons. Also, remember that these tools are not in any way associated with Tik Tok officially. Instead, they act as supportive platforms for calculation.
1. Tik Tok Influencer Earnings Calculator
Tik Tok doesn’t provide a similar space like YouTube to earn money on videos via ads. However, their project of biddable ads is in progress. It will be launched soon after completion. What brands search for are different influencers either according to the niche or growth of a particular Tik Tok account. Nowadays, influencers have to contact brands for promotions or stuff like that. So, if you have more count on followers and engagement as an influencer, you would be going to get the right amount on those sponsorships.
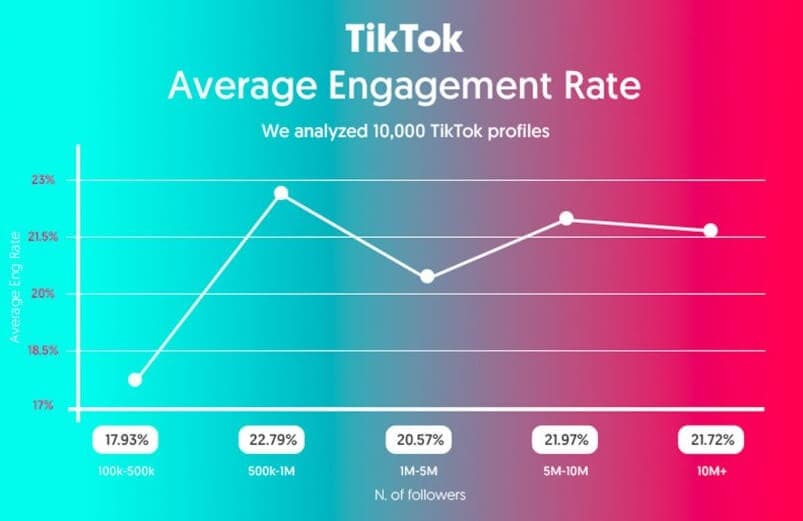
The most important aspect is to calculate the engagement rate. It is because it’s a highly considerable factor brand may look. However, there is no official method to calculate the engagement rate. Most of the published ones are inaccurate. They won’t tell you the correct specs about the percentage of people opening the app once a day. For accuracy concerns, we’ve devised a formula to calculate individual Tik Tok account engagement. The formula states as [No. of hearts + No. of comments]/ No. of followers] × 100.
Pros
- Calculates engagement rate
- DIY method
- Zero cost solution
Cons
- Not super effective
2. Igface
If you feel like an influencer, calculate your estimated earnings on the Tik Tok account via Igface. Even though it’s not in association with Tik Tok, this standalone tool is quite useful in the purpose. It analyzes your Tik Tok profile based on engagement, hearts, comments, and followers. As we said earlier, it’s a mere estimation and not real statistics. You can only predict your income level with Igface. Well, it would also be helpful as a Tik Tok money calculator. At some point, it also helps to avoid the exploitation of influencers as they can estimate their current value and charge accordingly.
The higher the engagement, the more money you will be paid as an influencer. Not just an individual creator, but this tool also proves to be helpful for brands and companies. They can use it to avoid fooling themselves by influencers. Metrics on particular Tik Tok accounts can be studied continuously to keep a check on the profiles of influencers. Finding an engagement rate on a specific pattern is also essential for brands to research for potential influencers in their product niche.
Pros
- Can be used by both brands and influencers
- Applicable on the western version
- Free
Cons
- No extra features
3. Ninjaoutreach
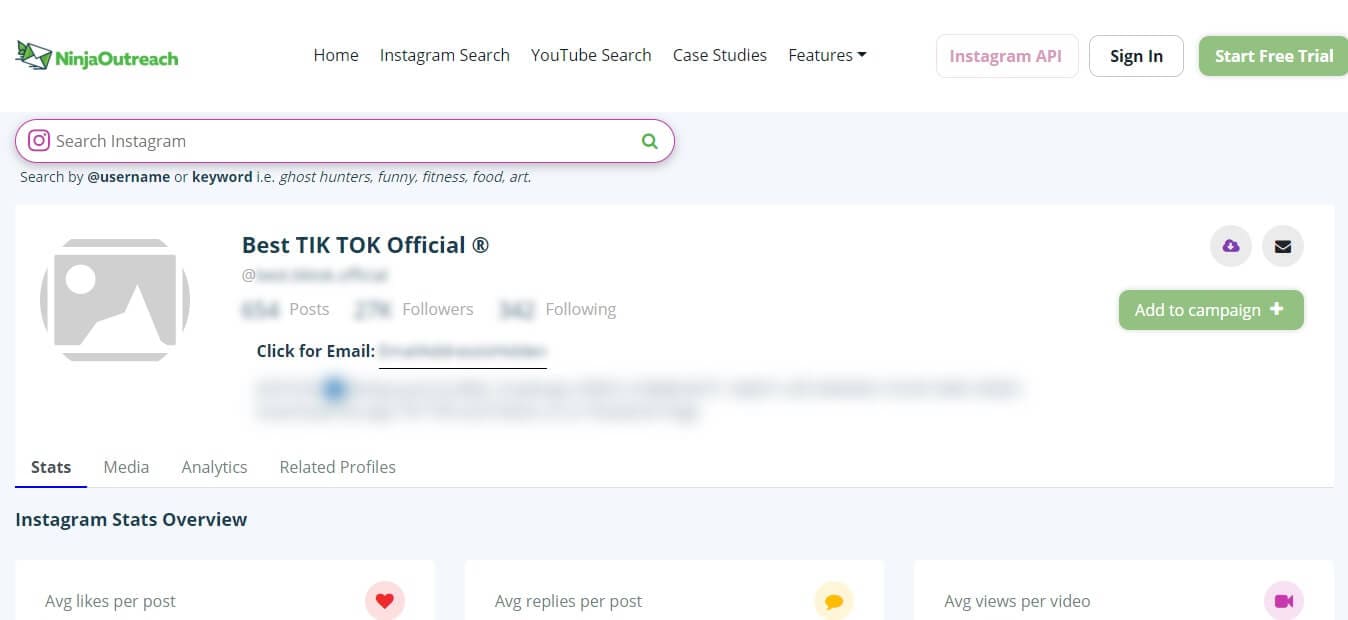
It is outreach software by Ninjaoutreach for all those digital marketers and small business owners. The tool uses pure keyword research to find potential influencers in your niche. Thus, it can be extensively great software for brands. Well, you need an email account registration for access to the software. All in all, it’s an excellent tool for making the right presence online.
Even though it’s not directly related to money calculation, but the software is quite useful for collecting an immense amount of valuable data. It also allows the user to run different campaigns and send customized templates from within the platform. All of this growth is the result of the ‘autoresponder’ tool of Ninja Outreach. Overall, it helps find target websites and influencers on various social media platforms.
Pros
- Significant outreach to find target customers
- Easy to use software
- Free trial available
Cons
- No direct interaction
4. Exolyt Tik Tok Money Calculator

Exolyt is a simple tool explicitly made to calculate earnings on any public Tik Tok account. Its user interface is pretty interactive with certain features such as Premium, Leaderboard, and Trends, etc.
Exolyt stresses the importance of influencer marketing as one way to earn money on the platform. And, the second method is an advertisement for your products and services.
Exolyt mentions that a super influencer on Tik Tok can earn an average of 50, 000 USD to 160, 000 USD for a single brand partnership. Other factors come into play, such as location, profile niche, target audience, profile engagement, etc. To become such a type of super influencer, Exolyt prefers using these analytics tools to track the growth.
Pros
- Free to use
- Interactive platform
- Great features
Cons
- A bit tricky sometimes
5. FeedPixel
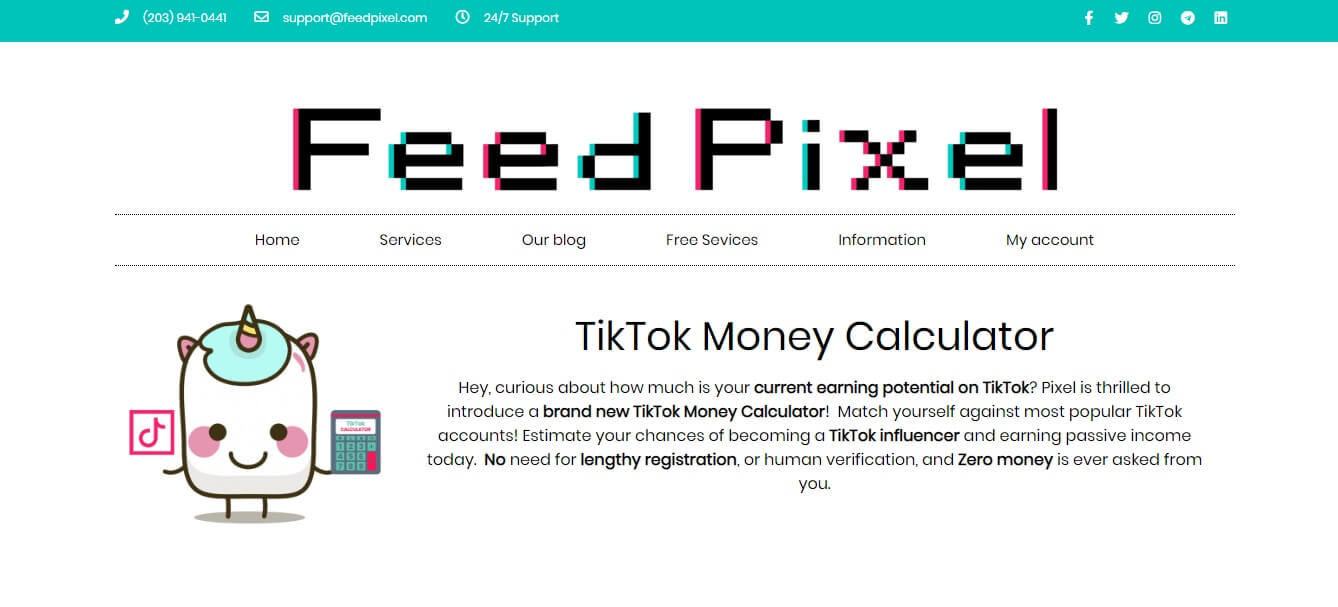
Make money on Tik Tok with FeedPixel. Much like other platforms, it also helps analyze the earning potential of Tik Tok. This Tik Tok earning calculator is however new and updated version. It provides a real and lifelike match with other super influencers on the platform. When used correctly, these tools can help an account become an influencer and make loads of money with the right marketing strategy.
The FeedPixel suggests four types of influencers based on their experience. These four kinds are namely the Nano-influencers, Micro-influencers, Macro-influencers, and Mid-tier influencers. And, another procedure of earning is almost the same as mentioned by other platforms. There is no such difference except the particular strategy and niche you choose for marketing purposes. The most earning influencers are Macro ones with a tremendous rate of commissions. On the other hand, rising Tik Tok influencers can make around $30 to $150 per sponsored content.
Pros
- Simple to use
- Free Services
- Applicable on most social media accounts
Cons
- Some paid services
6. Likigram
Likigram has also launched a Tik Tok money calculator with impressive specs. As you get into the user interface, it’s quite interactive and easy to use. You just need to enter the Tik Tok name to get all the related information about your particular account’s earning potential. They mention three crucial factors behind the earning purposes on Tik Tok i.e., hearts, real-time engagement, and follower count. All you need to maintain these three aspects to get into the Tik Tok earning potential.
Stunning analytics is consumed by the platform to measure these points at a certain level. For engagement, you can even buy fans, followers, and likes from Likigram. However, we’d not recommend this kind of commitment if it will be unreal. In case they are helping you get real followers and likes, then it’s okay for paid services.
Pros
- Simple usage
- Stunning analytics
- Some paid services for real-time engagement
Cons
- Slow loading
Tips for Earning Money on Tik Tok
Don’t go forward unless you read these Tik Tok earning tips given below. Apart from basic things, we’ve also mentioned some advanced tips for the overall and long-term growth strategy.
- Create a unique profile without copying. Focus on a niche so that brands can easily find potential in you.
- Use the tools mentioned above to find the right fit for earning potential.
- Use trending hashtags and don’t miss to participate in different challenges to expand your reach.
- Link Instagram and YouTube with your Tik Tok account.
- Reach out to other influencers and celebrities for promotion.
Custom TikTok Videos Easily with Powerful Video Editor
Making earnings from TikTok becomes easier after your videos go viral. Therefore, it is necessary to pick up a smart video editor to help you achieve your goal. Here, we recommend a professional video editing software that is suitable for both experts and beginners - Wondershare Filmora X.


Conclusion
So, this is all you need for a good catch on the Tik Tok account. Every success comes with using specific tools. Our list of Tik Tok money calculator tools are much like that and help you extensively grow on the platform. Be in touch with the right tools for the right strategy!
Shanoon Cox
Shanoon Cox is a writer and a lover of all things video.
Follow @Shanoon Cox
Shanoon Cox
Mar 27, 2024• Proven solutions
“Who makes the most money on TikTok?” – Anonymous
Tik Tok is a platform to showcase talent with an indirect method of money-making. If you are using the Chinese version of Tik Tok, there won’t be any facility for TikTok earning calculator. The feature or you can say additional support by third parties is only available on the Western version of Tik Tok. However, the primary purpose of any Tik Tok money calculator is to check your earnings based on real-time engagement and your influencing activities. Follower count is also taken into account while doing so. For your kind information, all the money by influencers on Tik Tok comes from ads or paid sponsorships. So, what’s the use of these tools?
The answer is straightforward! These advanced tools help understand your audience, overall profile, and growth rate. Let’s discuss the top 6 Tik Tok money calculator tools to consider earnings on your Tik Tok account.
- Part 1: Top 6 Money Calculators to Help Influencers Estimate Earnings
- Part 2: Tips for Earning Money on TikTok
Top 6 Money Calculators to Help Influencers Estimate Earnings
Now, let’s get started by reviewing each Tik Tok money calculator in detail with the respective pros and cons. Also, remember that these tools are not in any way associated with Tik Tok officially. Instead, they act as supportive platforms for calculation.
1. Tik Tok Influencer Earnings Calculator
Tik Tok doesn’t provide a similar space like YouTube to earn money on videos via ads. However, their project of biddable ads is in progress. It will be launched soon after completion. What brands search for are different influencers either according to the niche or growth of a particular Tik Tok account. Nowadays, influencers have to contact brands for promotions or stuff like that. So, if you have more count on followers and engagement as an influencer, you would be going to get the right amount on those sponsorships.
The most important aspect is to calculate the engagement rate. It is because it’s a highly considerable factor brand may look. However, there is no official method to calculate the engagement rate. Most of the published ones are inaccurate. They won’t tell you the correct specs about the percentage of people opening the app once a day. For accuracy concerns, we’ve devised a formula to calculate individual Tik Tok account engagement. The formula states as [No. of hearts + No. of comments]/ No. of followers] × 100.
Pros
- Calculates engagement rate
- DIY method
- Zero cost solution
Cons
- Not super effective
2. Igface
If you feel like an influencer, calculate your estimated earnings on the Tik Tok account via Igface. Even though it’s not in association with Tik Tok, this standalone tool is quite useful in the purpose. It analyzes your Tik Tok profile based on engagement, hearts, comments, and followers. As we said earlier, it’s a mere estimation and not real statistics. You can only predict your income level with Igface. Well, it would also be helpful as a Tik Tok money calculator. At some point, it also helps to avoid the exploitation of influencers as they can estimate their current value and charge accordingly.
The higher the engagement, the more money you will be paid as an influencer. Not just an individual creator, but this tool also proves to be helpful for brands and companies. They can use it to avoid fooling themselves by influencers. Metrics on particular Tik Tok accounts can be studied continuously to keep a check on the profiles of influencers. Finding an engagement rate on a specific pattern is also essential for brands to research for potential influencers in their product niche.
Pros
- Can be used by both brands and influencers
- Applicable on the western version
- Free
Cons
- No extra features
3. Ninjaoutreach
It is outreach software by Ninjaoutreach for all those digital marketers and small business owners. The tool uses pure keyword research to find potential influencers in your niche. Thus, it can be extensively great software for brands. Well, you need an email account registration for access to the software. All in all, it’s an excellent tool for making the right presence online.
Even though it’s not directly related to money calculation, but the software is quite useful for collecting an immense amount of valuable data. It also allows the user to run different campaigns and send customized templates from within the platform. All of this growth is the result of the ‘autoresponder’ tool of Ninja Outreach. Overall, it helps find target websites and influencers on various social media platforms.
Pros
- Significant outreach to find target customers
- Easy to use software
- Free trial available
Cons
- No direct interaction
4. Exolyt Tik Tok Money Calculator
Exolyt is a simple tool explicitly made to calculate earnings on any public Tik Tok account. Its user interface is pretty interactive with certain features such as Premium, Leaderboard, and Trends, etc.
Exolyt stresses the importance of influencer marketing as one way to earn money on the platform. And, the second method is an advertisement for your products and services.
Exolyt mentions that a super influencer on Tik Tok can earn an average of 50, 000 USD to 160, 000 USD for a single brand partnership. Other factors come into play, such as location, profile niche, target audience, profile engagement, etc. To become such a type of super influencer, Exolyt prefers using these analytics tools to track the growth.
Pros
- Free to use
- Interactive platform
- Great features
Cons
- A bit tricky sometimes
5. FeedPixel
Make money on Tik Tok with FeedPixel. Much like other platforms, it also helps analyze the earning potential of Tik Tok. This Tik Tok earning calculator is however new and updated version. It provides a real and lifelike match with other super influencers on the platform. When used correctly, these tools can help an account become an influencer and make loads of money with the right marketing strategy.
The FeedPixel suggests four types of influencers based on their experience. These four kinds are namely the Nano-influencers, Micro-influencers, Macro-influencers, and Mid-tier influencers. And, another procedure of earning is almost the same as mentioned by other platforms. There is no such difference except the particular strategy and niche you choose for marketing purposes. The most earning influencers are Macro ones with a tremendous rate of commissions. On the other hand, rising Tik Tok influencers can make around $30 to $150 per sponsored content.
Pros
- Simple to use
- Free Services
- Applicable on most social media accounts
Cons
- Some paid services
6. Likigram
Likigram has also launched a Tik Tok money calculator with impressive specs. As you get into the user interface, it’s quite interactive and easy to use. You just need to enter the Tik Tok name to get all the related information about your particular account’s earning potential. They mention three crucial factors behind the earning purposes on Tik Tok i.e., hearts, real-time engagement, and follower count. All you need to maintain these three aspects to get into the Tik Tok earning potential.
Stunning analytics is consumed by the platform to measure these points at a certain level. For engagement, you can even buy fans, followers, and likes from Likigram. However, we’d not recommend this kind of commitment if it will be unreal. In case they are helping you get real followers and likes, then it’s okay for paid services.
Pros
- Simple usage
- Stunning analytics
- Some paid services for real-time engagement
Cons
- Slow loading
Tips for Earning Money on Tik Tok
Don’t go forward unless you read these Tik Tok earning tips given below. Apart from basic things, we’ve also mentioned some advanced tips for the overall and long-term growth strategy.
- Create a unique profile without copying. Focus on a niche so that brands can easily find potential in you.
- Use the tools mentioned above to find the right fit for earning potential.
- Use trending hashtags and don’t miss to participate in different challenges to expand your reach.
- Link Instagram and YouTube with your Tik Tok account.
- Reach out to other influencers and celebrities for promotion.
Custom TikTok Videos Easily with Powerful Video Editor
Making earnings from TikTok becomes easier after your videos go viral. Therefore, it is necessary to pick up a smart video editor to help you achieve your goal. Here, we recommend a professional video editing software that is suitable for both experts and beginners - Wondershare Filmora X.
Conclusion
So, this is all you need for a good catch on the Tik Tok account. Every success comes with using specific tools. Our list of Tik Tok money calculator tools are much like that and help you extensively grow on the platform. Be in touch with the right tools for the right strategy!
Shanoon Cox
Shanoon Cox is a writer and a lover of all things video.
Follow @Shanoon Cox
Unveiling the Magic of Clear Audio: Eliminating Ambient Noises Using Audacity
The most frequent request you’ll get from video makers is to eliminate irritating noises like rumbling or humming from an original clip. Almost all of the time, capturing high-quality audio during filming is challenging since the conversation is often hard to hear or is made unclear due to surrounding noises, such as the dreadful air conditioners or fans.
To get rid of all these awful noises, this Audacity Noise Reduction feature will serve you a significant purpose in removing unwanted background noise for your future videos. Without further ado, let’s get started!
In this article
01 Things You Need to Prepare for Background Noise Reduction
02 How to Remove Background Noise in Audacity?
03 Why is Audacity Noise Reduction Not Working?
04 How to Prevent Background Noise in Audio Recording?
05 How to Remove Background Noise in Filmora?
Part 1: Things You Need to Prepare for Background Noise Reduction
Here are few things that you need to consider before you apply the noise reduction to your clips:
1. Noise Sample
A decent sample of the noise you wish to eliminate is perhaps the most crucial aspect of the Audacity remove noise procedure.
This will be used by Audacity to understand the noise and build a noise profile. The noise recording should last for a fair amount of time and be devoid of any other noises.
2. Avoid Copy Pasting Tiny Noise Section in Your Spoken Phrases
When you have a tiny part of noise between your stated words on your audio, please don’t copy/paste it to make a more significant piece of sound for Audacity to examine.
You would not be supplying Audacity with any more information that will help it generate a decent noise profile. The noise profile is what enables Audacity to tell the difference between speech and noise.
3. Minimum 2048 Data Samples Required
To build a noise profile, the Noise Reduction function requires a minimum of 2048 sample data. An audio file with a sampling frequency of 44.1kHz is roughly five hundredths of a second.
Note that this is the minor sound level that Audacity needs to generate a noise profile; however, should you supply a larger sample of the noise, Audacity can typically perform a great job of producing a suitable noise profile. As a result, attempt to capture a few seconds of background noises wherever possible.
4. Establish Recording Level and Record “Silence”
Setting your audio volume and capturing some “quiet” prior to speaking is the best way to achieve this. Instead, when you’ve finished talking, keep your camera/recorder going for a few moments.
Don’t move or create any sounds while capturing the background noises, and keep an ear open for any other noises. You only need to capture the ambient noise for a few moments; two to five seconds will suffice.
Part 2: How to Remove Background Noise in Audacity on Windows and Mac?
Whether you are using Windows or macOS, we will show you a step-by-step process to achieve your results using both software in this part of Audacity remove background music guide.
Remove background noise in Audacity on Windows
Step 1: On your recording, select a few moments of sound. Any segment of noise that incorporates other noises should be avoided.

Step 2: From the Effect menu, select Noise Reduction.

Step 3: Select the Get Noise Profile option whenever the Noise Reduction effect screen appears.

Note: Choose whether to implement the noise removal to the entire waveforms or only a portion of it.
Step 4: To access the Noise Reduction effects window, go to Effects > Noise Reduction. Raise the level of noise reduction progressively while previewing the result.

Step 5: Head over to the File section to Export and Save the result. Audacity does not save sound clips when you select Save Project; instead, you must choose Export. Select the file type you want to store and the place wherever you can save it. Select Save after giving the File Name.

Remove background noise in Audacity on Mac
Step 1: Create a room tone-containing audio file. When you don’t have a separate track for room tone, use a recording with a few moments of quiet in it. Click-and-drag to select a segment with a few minutes of silence using the Selection Tool.

Step 2: Select Noise Reduction from the Effects tab. Select the Get Noise Profile tab in the new tab under Step 1. The screen will shut, and Audacity will take noise profile samples of the indicated area.

Step 3: Click-and-drag to select the whole file, which requires noise reduction with the Selection Tool. To re-open the function, go to the Effect tab and pick Noise Reduction. Make modifications to the following parameters under Step 2:
- Reduce and Residue
- Frequency Smoothing (bands)
- Sensitivity
- Noise Reduction

Step 4: To listen to how the chosen file will look with the selected parameters, select Preview. Re-adjust until you have a sound noise reduction with no interference. When you’re finished, select Reduce and click OK.
Part 3: Why is Audacity Noise Reduction Not Working?
It’s possible that the Noise Reduction function isn’t letting you mop up your recording since your audio isn’t appropriate for it. The disturbance must be continuous, not random or fluctuating, to work for Audacity’s Noise Reduction function.
For example, the Noise Reduction function will not assist if your audio was made in a busy environment with unique noises such as background chatter, random traffic noises, or in an exhibition space or museum. The Noise Reduction feature in Audacity isn’t meant to cope with that kind of distortion. You’ll need to alter your recording approach if you’re capturing voice in either of those situations.
Under the following situations, the Audacity Noise Reduction function might underperform.
- Particular noise in the background, including traffic or people.
- When the harmonics of the sound and voice are comparable.
- There is sound variance where there is fluctuation in the noise.
- The volume of the voice is comparable to or lower than that of the background noise.
- When the noise is irregular or changeable rather than continuous.
- The loudness is deafening.
- The sound is a single click or pop.
Part 4: How to Prevent Background Noise in Audio Recording?
Although Audacity allows eliminating noise very simply, it is still an additional level that takes time to refine your podcast production. These pointers can help you avoid the necessity for noise reduction and cut down on the amount of time you spend processing.
1. Reduce the Computer Fan Noise
Whenever computers become too heated, they can produce a lot of noise. You may limit the amount of software that runs and position your mic away from the keyboard to help lessen this impact and avoid the fan from coming on.
However, even if you observe all of these guidelines, undesired recording sounds may still appear in your program. Fortunately, contemporary software makes this problem quite simple to resolve.
2. Reduce the Gain and Get Close to the Mic
Reduce the gain (sensitivity of the microphone) and go nearer to it. Talking straight into the microphone won’t distort your audio if you reduce the gain, and that would assist your microphone in concentrating on scooping up your voice’s tone.
Bonus Tip: Set your recorder’s (or DAW’s) sensitivity such that your speech peaks between -12 and -10db.
3. Utilize a Versatile Microphone
Condenser and dynamic microphones are the two most common types of podcast microphones. Condenser microphones are significantly more sensitive instruments meant to take up average atmospheric noise, whereas dynamic microphones have a narrower frequency range, picking up fewer ambient noises.
4. Optimize Your Recording Environment
The most significant and most crucial aspect of your podcasts’ sound quality is where you capture it. To optimize your personal podcasting space, we recommend choosing a peaceful, compact area away from HVAC systems, vehicles, external hard drives, background sound, motors, and other distractions. You may also increase the tone of your room by using natural sound absorbents such as curtains, rugs, carpets, and sofas.
Part 5: How to Remove Background Noise in Filmora?
Although there is a lot of software available to eliminate ambient noise, we highly suggest Wondershare Filmora Video Editor to edit audio and video in one place.
In addition to the standard audio editing capabilities, the recently redesigned Filmora currently includes enhanced waveforms, volume Keyframing , peak metering, and audio transitions, giving you a better audio editing interface.
For Win 7 or later (64-bit)
For macOS 10.12 or later
Filmora Video Editor will quickly remove ambient sound from both sound/video. You may also remove the sound from the video with this simple video editor, use the Audio Equalizer or Audio Mixer functions to modify the audio further, and then Export and save the audio in an Mp3 file. Here are the detailed steps:
Step 1: In the Wondershare Filmora Timeline menu, Import your footage. Trim the footage after previewing it and deleting the sections you don’t want to retain.

Step 2: To eliminate the ambient noise immediately, double-click on the video file, and go to the Audio panel to select the Remove Background Noise option. You will find that the background noise is removed automatically.

Step 3: After checking the results, select Export to download the noise-reduced clip to your desktop or upload it immediately to YouTube or Vimeo.

Conclusion
Well, there you have it. In this Audacity Remove Background Noise guide, we have reviewed every possible method you can adopt to get rid of the unnecessary background noise in the Audacity. And if the desired results are still not achieved, we highly recommend using the Wondershare Filmora editing software. Not only will it help you remove the unwanted ambient noise, but it will also allow you to customize your audio or video file further.
02 How to Remove Background Noise in Audacity?
03 Why is Audacity Noise Reduction Not Working?
04 How to Prevent Background Noise in Audio Recording?
05 How to Remove Background Noise in Filmora?
Part 1: Things You Need to Prepare for Background Noise Reduction
Here are few things that you need to consider before you apply the noise reduction to your clips:
1. Noise Sample
A decent sample of the noise you wish to eliminate is perhaps the most crucial aspect of the Audacity remove noise procedure.
This will be used by Audacity to understand the noise and build a noise profile. The noise recording should last for a fair amount of time and be devoid of any other noises.
2. Avoid Copy Pasting Tiny Noise Section in Your Spoken Phrases
When you have a tiny part of noise between your stated words on your audio, please don’t copy/paste it to make a more significant piece of sound for Audacity to examine.
You would not be supplying Audacity with any more information that will help it generate a decent noise profile. The noise profile is what enables Audacity to tell the difference between speech and noise.
3. Minimum 2048 Data Samples Required
To build a noise profile, the Noise Reduction function requires a minimum of 2048 sample data. An audio file with a sampling frequency of 44.1kHz is roughly five hundredths of a second.
Note that this is the minor sound level that Audacity needs to generate a noise profile; however, should you supply a larger sample of the noise, Audacity can typically perform a great job of producing a suitable noise profile. As a result, attempt to capture a few seconds of background noises wherever possible.
4. Establish Recording Level and Record “Silence”
Setting your audio volume and capturing some “quiet” prior to speaking is the best way to achieve this. Instead, when you’ve finished talking, keep your camera/recorder going for a few moments.
Don’t move or create any sounds while capturing the background noises, and keep an ear open for any other noises. You only need to capture the ambient noise for a few moments; two to five seconds will suffice.
Part 2: How to Remove Background Noise in Audacity on Windows and Mac?
Whether you are using Windows or macOS, we will show you a step-by-step process to achieve your results using both software in this part of Audacity remove background music guide.
Remove background noise in Audacity on Windows
Step 1: On your recording, select a few moments of sound. Any segment of noise that incorporates other noises should be avoided.
Step 2: From the Effect menu, select Noise Reduction.
Step 3: Select the Get Noise Profile option whenever the Noise Reduction effect screen appears.
Note: Choose whether to implement the noise removal to the entire waveforms or only a portion of it.
Step 4: To access the Noise Reduction effects window, go to Effects > Noise Reduction. Raise the level of noise reduction progressively while previewing the result.
Step 5: Head over to the File section to Export and Save the result. Audacity does not save sound clips when you select Save Project; instead, you must choose Export. Select the file type you want to store and the place wherever you can save it. Select Save after giving the File Name.
Remove background noise in Audacity on Mac
Step 1: Create a room tone-containing audio file. When you don’t have a separate track for room tone, use a recording with a few moments of quiet in it. Click-and-drag to select a segment with a few minutes of silence using the Selection Tool.
Step 2: Select Noise Reduction from the Effects tab. Select the Get Noise Profile tab in the new tab under Step 1. The screen will shut, and Audacity will take noise profile samples of the indicated area.
Step 3: Click-and-drag to select the whole file, which requires noise reduction with the Selection Tool. To re-open the function, go to the Effect tab and pick Noise Reduction. Make modifications to the following parameters under Step 2:
- Reduce and Residue
- Frequency Smoothing (bands)
- Sensitivity
- Noise Reduction
Step 4: To listen to how the chosen file will look with the selected parameters, select Preview. Re-adjust until you have a sound noise reduction with no interference. When you’re finished, select Reduce and click OK.
Part 3: Why is Audacity Noise Reduction Not Working?
It’s possible that the Noise Reduction function isn’t letting you mop up your recording since your audio isn’t appropriate for it. The disturbance must be continuous, not random or fluctuating, to work for Audacity’s Noise Reduction function.
For example, the Noise Reduction function will not assist if your audio was made in a busy environment with unique noises such as background chatter, random traffic noises, or in an exhibition space or museum. The Noise Reduction feature in Audacity isn’t meant to cope with that kind of distortion. You’ll need to alter your recording approach if you’re capturing voice in either of those situations.
Under the following situations, the Audacity Noise Reduction function might underperform.
- Particular noise in the background, including traffic or people.
- When the harmonics of the sound and voice are comparable.
- There is sound variance where there is fluctuation in the noise.
- The volume of the voice is comparable to or lower than that of the background noise.
- When the noise is irregular or changeable rather than continuous.
- The loudness is deafening.
- The sound is a single click or pop.
Part 4: How to Prevent Background Noise in Audio Recording?
Although Audacity allows eliminating noise very simply, it is still an additional level that takes time to refine your podcast production. These pointers can help you avoid the necessity for noise reduction and cut down on the amount of time you spend processing.
1. Reduce the Computer Fan Noise
Whenever computers become too heated, they can produce a lot of noise. You may limit the amount of software that runs and position your mic away from the keyboard to help lessen this impact and avoid the fan from coming on.
However, even if you observe all of these guidelines, undesired recording sounds may still appear in your program. Fortunately, contemporary software makes this problem quite simple to resolve.
2. Reduce the Gain and Get Close to the Mic
Reduce the gain (sensitivity of the microphone) and go nearer to it. Talking straight into the microphone won’t distort your audio if you reduce the gain, and that would assist your microphone in concentrating on scooping up your voice’s tone.
Bonus Tip: Set your recorder’s (or DAW’s) sensitivity such that your speech peaks between -12 and -10db.
3. Utilize a Versatile Microphone
Condenser and dynamic microphones are the two most common types of podcast microphones. Condenser microphones are significantly more sensitive instruments meant to take up average atmospheric noise, whereas dynamic microphones have a narrower frequency range, picking up fewer ambient noises.
4. Optimize Your Recording Environment
The most significant and most crucial aspect of your podcasts’ sound quality is where you capture it. To optimize your personal podcasting space, we recommend choosing a peaceful, compact area away from HVAC systems, vehicles, external hard drives, background sound, motors, and other distractions. You may also increase the tone of your room by using natural sound absorbents such as curtains, rugs, carpets, and sofas.
Part 5: How to Remove Background Noise in Filmora?
Although there is a lot of software available to eliminate ambient noise, we highly suggest Wondershare Filmora Video Editor to edit audio and video in one place.
In addition to the standard audio editing capabilities, the recently redesigned Filmora currently includes enhanced waveforms, volume Keyframing , peak metering, and audio transitions, giving you a better audio editing interface.
For Win 7 or later (64-bit)
For macOS 10.12 or later
Filmora Video Editor will quickly remove ambient sound from both sound/video. You may also remove the sound from the video with this simple video editor, use the Audio Equalizer or Audio Mixer functions to modify the audio further, and then Export and save the audio in an Mp3 file. Here are the detailed steps:
Step 1: In the Wondershare Filmora Timeline menu, Import your footage. Trim the footage after previewing it and deleting the sections you don’t want to retain.
Step 2: To eliminate the ambient noise immediately, double-click on the video file, and go to the Audio panel to select the Remove Background Noise option. You will find that the background noise is removed automatically.
Step 3: After checking the results, select Export to download the noise-reduced clip to your desktop or upload it immediately to YouTube or Vimeo.
Conclusion
Well, there you have it. In this Audacity Remove Background Noise guide, we have reviewed every possible method you can adopt to get rid of the unnecessary background noise in the Audacity. And if the desired results are still not achieved, we highly recommend using the Wondershare Filmora editing software. Not only will it help you remove the unwanted ambient noise, but it will also allow you to customize your audio or video file further.
Also read:
- [New] TikTok Broadcast Chrome, Android, iPhone Techniques
- In 2024, Cutting Through Clutter Standout Techniques for TikTok Stars
- [New] In 2024, Delving Into TikTok's Unique Visual Language (Filters)
- In 2024, Audience Focus The Ultimate Guide to Creating Powerful TikTok Captions
- [Updated] Unleashing Creativity The Ultimate Guide to Crafting Compelling TikTok Captions
- [Updated] 2024 Approved Top iPhones & Androids Ultimate TikTok Marker Erasers
- 2024 Approved Reel in Fun The Most Trending TikTok Challenges (Top 10)
- [New] Essential New TikTok Hits & Challenges for 2024
- [New] Discovering the Crème De La Gaming Crowd on TikTok
- In 2024, Conquer the Financial Frontier of TikTok with These 8 Money-Making Techniques
- Your Pathway to Mastering Slow Time Footage in TikTok for 2024
- [Updated] Unifying Media Mosaic The Ultimate TikTok Stitching Playbook for 2024
- Delightful Dishes on TikTok
- [Updated] Top 10 TikTok Influencers Redefining Gaming
- [New] In 2024, Flavor Quest The Best International Meals and Recipes
- [Updated] Seam Strengthening Secrets for the Socially Savvy Sewist
- [Updated] Earnings Unleashed Discovering 8 Lucrative TikTok Practices for 2024
- [New] Smart Ways to Keep TikTok Memories on Your Mobile
- [New] Chuckles Unleashed TikTok's Funniest Up-and-Comers for 2024
- [Updated] The Complete TikTok User Manual for PC & Apple Devices
- [New] Convert TikTok to MP4 [No Watermark] Top TikTok Downloaders for 2024
- [Updated] The Allure of TikTok Animation, Songs, Dances & Laughter for 2024
- In 2024, The Ultimate Guide to Creating Slow-Motion Content in TikTok
- [New] 2024 Approved Premium Choices Best TikTok Downloader Tools No Watermarks
- [Updated] Relaxation Playlist 20 Sweetest Country Tunes on TikTok for 2024
- [New] In 2024, Decoding High-Impact TikTok Campaign Techniques
- [Updated] In 2024, Unveiling TikTok’s Anime Essence A Treasury of Dancing, Audio-Visuals & Memes
- From Ordinary to Extraordinary Your Pathway with TikTok Templates
- [Updated] 2024 Approved How to Use Text to Speech on TikTok - A Complete Guide
- [New] 2024 Approved Gastronomic Globe-Trotting Iconic Recipes Worldwide
- [Updated] 2024 Approved Trending Apps Battle Royale Who'll Win Over Users, Likes or TikTok?
- [New] 2024 Approved Discover the Magic of Jujutsu Kaisen with TikTok Videos
- 2024 Approved Top 15 Emerging TikTok Patterns
- [New] In 2024, Viral Visionaries Top 10 TikTok Secrets
- [Updated] 2024 Approved Laugh Trails on TikTok The Best Joke Threads for a Chuckle
- [New] Top iPhones & Androids Ultimate TikTok Marker Erasers
- Effortless Alteration of Audio Velocity for Improved Accessibility for 2024
- How Can We Bypass Itel A05s FRP?
- In 2024, The Undisclosed Secrets to Growth on Social Media
- 2024 Approved Recording Google Voice A Comprehensive Tutorial
- Play Store Stuck on Downloading Of Vivo Y77t? 7 Ways to Resolve | Dr.fone
- Updated 2024 Approved Mastering Compression in FCPX A Step-by-Step Guide
- [New] Fine-Tuning Team Call Aesthetics Pre & Post Customization for 2024
- In 2024, Unlock Your iPhone 14 Pro Max in Minutes with ICCID Code Everything You Need to Know
- In 2024, Is Fake GPS Location Spoofer a Good Choice On Vivo Y100? | Dr.fone
- New Reviews, Features and Tutorial of Lexis Audio Editor
- [New] Ultimate Guide to Selecting Best Windows Screen Capture Tools
- Sports and Screen Capture The Best Ways to Document the Action
- Updated In 2024, Mastering Music Production Unveiling the Top 8 Tools Compatible with Mac and Windows
- New Unleash Creative Freedom Best Public Domain Video Resources
- [Updated] Correcting Time Jumps Fixing OBS Studio Problems for 2024
- Easy Tutorial for Activating iCloud on Apple iPhone 8 Safe and Legal
- New In 2024, How To Learn Cartoon Sketch Drawing
- Title: "Income Predictors Guide Top 6 for TikTok Creators"
- Author: Stephen
- Created at : 2024-05-23 02:26:52
- Updated at : 2024-05-24 02:26:52
- Link: https://tiktok-video-recordings.techidaily.com/income-predictors-guide-top-6-for-tiktok-creators/
- License: This work is licensed under CC BY-NC-SA 4.0.
