
:max_bytes(150000):strip_icc()/unnamed-d43fab70fbba4bc39949f9a4c84a80d0.png)
Navigate the Art of Snapchat Filters for Beginners
Navigate the Art of Snapchat Filters for Beginners
How to Create Snapchat Lenses Easily: 2 Methods

Ollie Mattison
Mar 27, 2024• Proven solutions
Are you feeling like creating your own Snapchat lens, so you can have an even better experience with the app? The good news is that two new Snapchat tools have been released – the Lens Studio and Create Your Own Lens applications.
If you are a regular Snapchat user, you may want to learn about the Snapchat lens and how it can help you. We will help you get started. Here is our step by step guide on how to make Snapchat lenses.
- Part1: Comparing Lens Studio and Creating Your Own Lens
- Part2: How to Use Lens Studio
- Part3: How to Create Snapchat Lenses Using Create Your Own Lens
Part 1: Comparing Lens Studio and Creating Your Own Lens
The two programs that we are highlighting today are Lens Studio and Create Your Own Lens. These are both fantastic programs for creating your own Snapchat lens, but they do have slightly different uses. If you are the type of person who wants to design a professional Snapchat lens, you are going to prefer Lens Studio.
But if you are hoping to come up with something creative that you can share with your friends and family, then you may love Create Your Own Lens. It is a very easy program to use, and it offers a ton of features that you may be surprised to see.
Snapchat lenses is for fun
The beauty of Snapchat lenses is that you can now create your own environment, which you can use each time you are taking photos or videos. Sure, you can always use the filters that are already available in the application, but not everyone would find those enough.
If you want some customization, or you just want to mess around until you get the filter that makes sense for you, Snapchat lenses are the way to go.

Lens Studio is for business
Lens Studio is perfect for businesses that may want to create unique environments for their clients, or the times when they are releasing company Snapchat posts. Say the company is hosting an event. They may want a custom graphic for that event, which is used for all the pictures and videos posted to Snapchat about the event. Using Lens Studio lets them do that with ease.
Create Your Own Lens is great when you are going to a special event, birthday party or graduating, and you want a special graphic that comes up in all your snaps. It is very intuitive to use, and is available through the App Store as a download.
Part 2: How to Use Lens Studio
1. Download Lens Studio
The first step involves downloading Lens Studio, which you can do from your computer. It is compatible with both Windows and Mac computers, and will run on any semi-modern system. According to the Snapchat team, Lens Studio is similar to the program used by their AR teams to create lenses. That means you are getting similar functionality, but with an easier to manage interface.
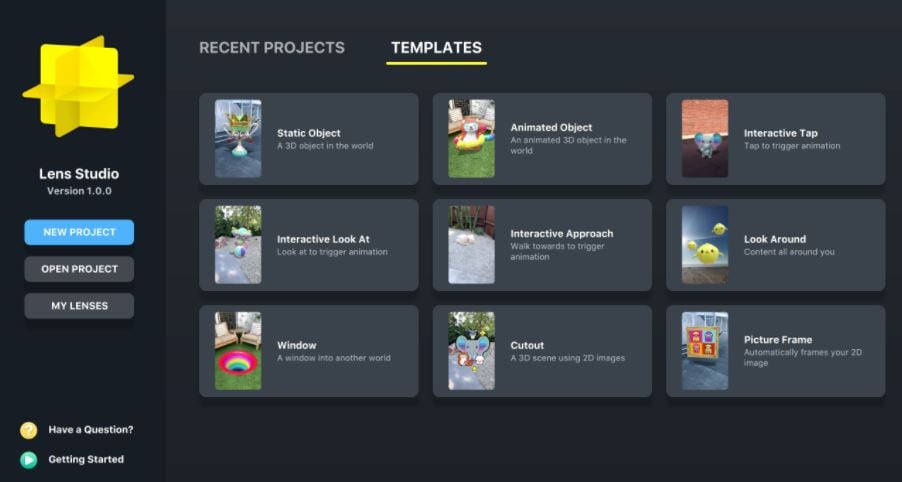
2. Choose Templates Page
It is normal to feel a little overwhelmed the first time you try and use this program. But that is why the templates page is so great. You can select from templates depending on the type of lens that you are hoping to create. You can just use a template, or you can incorporate your own ideas to customize the template.
There is also a Lens Studio Overview guide that you can access online, which will help you get acquainted with the program’s various features and quirks.
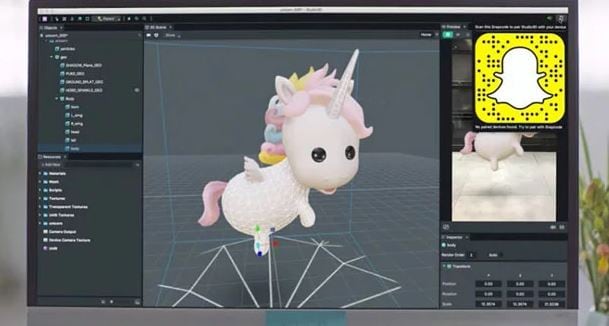
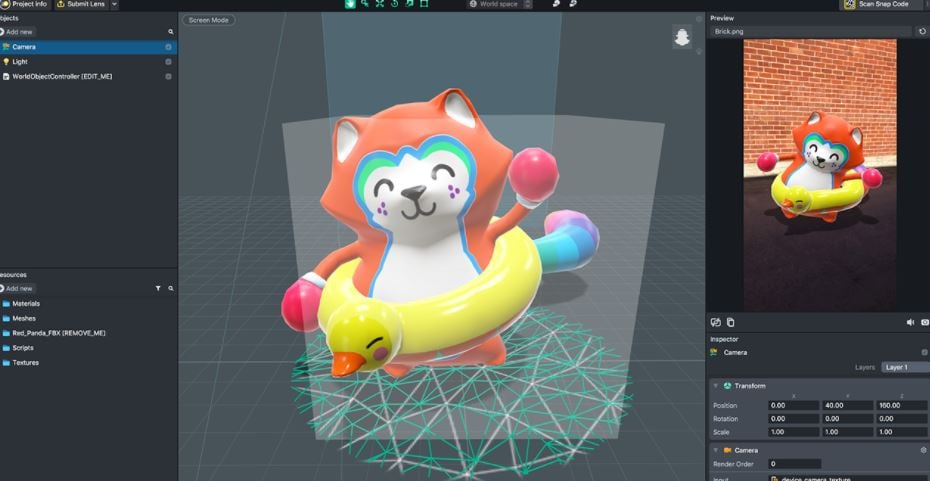
3. Use Studio Panels
Are you ready to create your own custom Snapchat lens? It is time to head over to Studio Panels on the application. This is the area where you can add your own 2D or 3D objects, and you can visualize how they would look as a Snapchat filter. You can add, remove, resize and drag objects to specific areas of the screen.
There are other tools accessible from the Resources panel. You can use these tools to ensure that your Snapchat lens is exactly as you want.
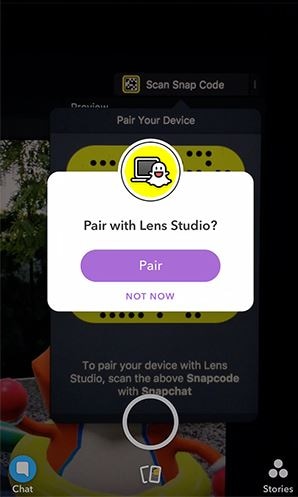
4. Preview the Snapchat Lens You Create
The great thing about this application is that you can preview the lens before you send it out to your phone. When you are satisfied with the image on the preview, you can pair your phone with the application, and you will be able to send that Snapchat lens onto your phone through your Snapcode. It is that simple!
Part 3: How to Create Snapchat Lenses Using Create Your Own Lens
- There are two ways that you can access the tool for creating fun Snapchat lenses. You can either visit the website snapchat.com/create, or you can go on the “filters and lenses” section on your iOS device. If you are using Snapchat on an Android device, you will only have the option for the website. But the feature is coming to the Android version of Snapchat very soon.
- When you are in the application or on the website, you may start to look at the different templates for Snapchat lenses. Now you can add other items into the templates, such as photographs, text or graphics.
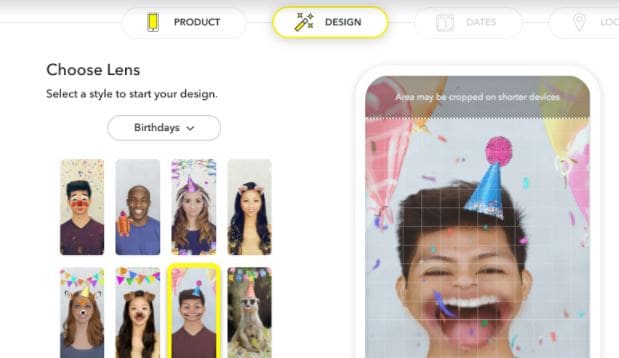
It is all up to your imagination. You can create the perfect Snapchat lens, which you can then send into your Snapchat account through your Snapcode. Of course, if you are using your iOS device to create the lens, it is already linked to your account.
Another cool feature is how you can set the location for where the Snapchat lens is available. Say you are hosting a party. You can have the Snapchat lens available to everyone who uses Snapchat within a set square footage of your home. That is an amazing way to let everyone share social media pictures and photos of your party, through the lens you created.
Conclusion
Creating Snapchat lenses has never been easier. Whether you are a business looking to add a custom lens, or you just want to create a fun lens for a graduation or party, there are tools that make the job very easy. Using these tools will allow you to create the perfect Snapchat lens for any occasion.
Ollie Mattison
Ollie Mattison is a writer and a lover of all things video.
Follow @Ollie Mattison
Ollie Mattison
Mar 27, 2024• Proven solutions
Are you feeling like creating your own Snapchat lens, so you can have an even better experience with the app? The good news is that two new Snapchat tools have been released – the Lens Studio and Create Your Own Lens applications.
If you are a regular Snapchat user, you may want to learn about the Snapchat lens and how it can help you. We will help you get started. Here is our step by step guide on how to make Snapchat lenses.
- Part1: Comparing Lens Studio and Creating Your Own Lens
- Part2: How to Use Lens Studio
- Part3: How to Create Snapchat Lenses Using Create Your Own Lens
Part 1: Comparing Lens Studio and Creating Your Own Lens
The two programs that we are highlighting today are Lens Studio and Create Your Own Lens. These are both fantastic programs for creating your own Snapchat lens, but they do have slightly different uses. If you are the type of person who wants to design a professional Snapchat lens, you are going to prefer Lens Studio.
But if you are hoping to come up with something creative that you can share with your friends and family, then you may love Create Your Own Lens. It is a very easy program to use, and it offers a ton of features that you may be surprised to see.
Snapchat lenses is for fun
The beauty of Snapchat lenses is that you can now create your own environment, which you can use each time you are taking photos or videos. Sure, you can always use the filters that are already available in the application, but not everyone would find those enough.
If you want some customization, or you just want to mess around until you get the filter that makes sense for you, Snapchat lenses are the way to go.
Lens Studio is for business
Lens Studio is perfect for businesses that may want to create unique environments for their clients, or the times when they are releasing company Snapchat posts. Say the company is hosting an event. They may want a custom graphic for that event, which is used for all the pictures and videos posted to Snapchat about the event. Using Lens Studio lets them do that with ease.
Create Your Own Lens is great when you are going to a special event, birthday party or graduating, and you want a special graphic that comes up in all your snaps. It is very intuitive to use, and is available through the App Store as a download.
Part 2: How to Use Lens Studio
1. Download Lens Studio
The first step involves downloading Lens Studio, which you can do from your computer. It is compatible with both Windows and Mac computers, and will run on any semi-modern system. According to the Snapchat team, Lens Studio is similar to the program used by their AR teams to create lenses. That means you are getting similar functionality, but with an easier to manage interface.
2. Choose Templates Page
It is normal to feel a little overwhelmed the first time you try and use this program. But that is why the templates page is so great. You can select from templates depending on the type of lens that you are hoping to create. You can just use a template, or you can incorporate your own ideas to customize the template.
There is also a Lens Studio Overview guide that you can access online, which will help you get acquainted with the program’s various features and quirks.
3. Use Studio Panels
Are you ready to create your own custom Snapchat lens? It is time to head over to Studio Panels on the application. This is the area where you can add your own 2D or 3D objects, and you can visualize how they would look as a Snapchat filter. You can add, remove, resize and drag objects to specific areas of the screen.
There are other tools accessible from the Resources panel. You can use these tools to ensure that your Snapchat lens is exactly as you want.
4. Preview the Snapchat Lens You Create
The great thing about this application is that you can preview the lens before you send it out to your phone. When you are satisfied with the image on the preview, you can pair your phone with the application, and you will be able to send that Snapchat lens onto your phone through your Snapcode. It is that simple!
Part 3: How to Create Snapchat Lenses Using Create Your Own Lens
- There are two ways that you can access the tool for creating fun Snapchat lenses. You can either visit the website snapchat.com/create, or you can go on the “filters and lenses” section on your iOS device. If you are using Snapchat on an Android device, you will only have the option for the website. But the feature is coming to the Android version of Snapchat very soon.
- When you are in the application or on the website, you may start to look at the different templates for Snapchat lenses. Now you can add other items into the templates, such as photographs, text or graphics.
It is all up to your imagination. You can create the perfect Snapchat lens, which you can then send into your Snapchat account through your Snapcode. Of course, if you are using your iOS device to create the lens, it is already linked to your account.
Another cool feature is how you can set the location for where the Snapchat lens is available. Say you are hosting a party. You can have the Snapchat lens available to everyone who uses Snapchat within a set square footage of your home. That is an amazing way to let everyone share social media pictures and photos of your party, through the lens you created.
Conclusion
Creating Snapchat lenses has never been easier. Whether you are a business looking to add a custom lens, or you just want to create a fun lens for a graduation or party, there are tools that make the job very easy. Using these tools will allow you to create the perfect Snapchat lens for any occasion.
Ollie Mattison
Ollie Mattison is a writer and a lover of all things video.
Follow @Ollie Mattison
Effortlessly Pinning Friends on Snapchat with Confidence
How to Pin Someone on Snapchat: All You Need to Know
Ollie Mattison
Mar 27, 2024• Proven solutions
One of the features that Snapchat provides is the ability to pin your contacts or conversations that you deem important. This will make the contacts or the conversations appear on top of the feed in your account. It saves you time from having to scroll through notifications from others to the ones that hold your interest. The process of how to pin someone on Snapchat is easy to do and is a helpful feature. Here we will explore how to do it and ways of making eye-catching Snapchat videos.
- Part 1: What Does a Pin Mean on Snapchat?
- Part 2: How to Pin/Unpin Someone on Snapchat?
- Part 3: Create Eye-Catching Snapchat Videos with Incredible Video Editor
What Does a Pin Mean on Snapchat?
If you are new to the term Pin in Snapchat, it is simply a function to help keep certain contacts or messages on top of your Snapchat feed. Pinning feature is available for the iOS app only till now. All you need to do is swipe right to go to the chat screen. Here you need to tap and hold the finger on a friend’s name or a conversation. Tap on chat settings to select ‘Pin Conversation’ as an option. This will set the friends and the conversations you have with them on top of the feed on your Snapchat account.
It helps you to communicate with a person easily and not have to scroll through other notifications to find a message or conversation chain that you want to access frequently.

How to Pin/Unpin Someone on Snapchat?
It is a small step that helps you pin conversations at the top of your Snapchat feed. However, with this simple feature, you can easily navigate through the app, making the process faster and convenient. How to pin someone on Snapchat might be a small aspect but definitely helps upgrade your Snapchat experience. Once conversations are pinned on top, new snaps or chats from such friends or groups would show up foremost.
Steps to do so are as follows:
- 1.Visit Friends Screen
- 2.Press and Hold on Contact or Entry
- 3.Choose Pin Option
- 4.Customize the Pins
1.Visit Friends Screen
Once you are on the app, visit the Friends screen. To do so you need to swipe right from the Camera screen.
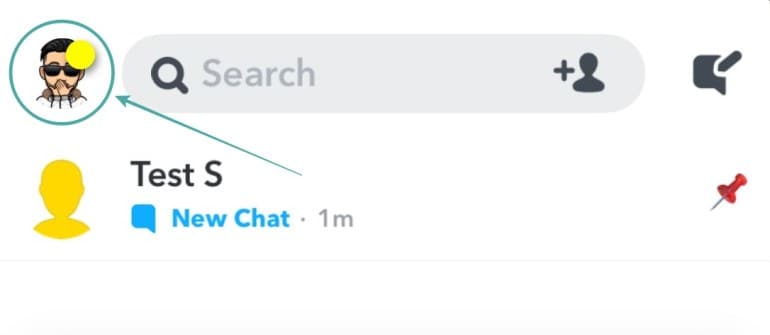
source:i1.wp.com
2.Press and Hold on Contact or Entry
To pin a contact or a conversation thread, press and hold down on the same.
source:webtrickz.com
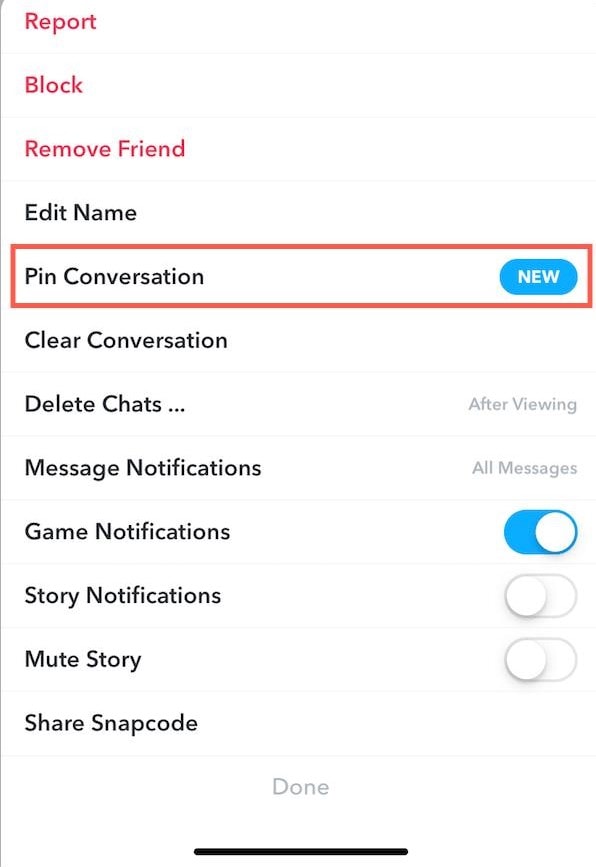
3.Choose Pin Option
There would be a number of options that would show up and tap on ‘Chat Settings’. Here you will find Pin Conversation as an option.
4.Customize the Pins
When you pin a contact or a conversation, it is represented by a pushpin in red by default. You can customize the pins to give them character and differentiate one contact from another. Visit Settings in My Profile. Scroll down and select Manage under the Additional Settings option. Tap on Friend emojis. This option allows you to change push pins to different emojis.

source:miro.medium.com
You can also unpin contact or conversation. Steps to do so remain similar. You can visit Chat Settings and choose Unpin Conversation. Also, an important thing to know is that your contacts would not be notified if you pin or even unpin their conversations. Hence, there is no social pressure when you use this feature. Also, you can pin at most three conversations on your Snapchat feed.
Create Eye-Catching Snapchat Videos with Incredible Video Editor
Filmora is a video editing tool that has a free as well as paid, premium version. Even with the free version users can edit and make videos of high quality. The software is useful if you wish to edit 4K videos. There are tools that support audio as well as video. It offers many options to add on styling, customizing, and other effects. The tool helps users add on overlays, audio, insert texts as well as animation effects.
If you wish to make your Snapchat videos impressive, this tool can come in handy. You can add on different kinds of effects, some of Hollywood movie standards. It allows you to crop and personalize video areas easily. For professional touches, you can add on dedications, tributes, stories in such videos. You can also increase or decrease video size, tilt, and shift or blur certain parts of a video. You can even rotate or flip audio or video content using this tool. It helps to remove video noise as well.


If you wish to make funny videos on Snapchat here are some ways to do so with the editor software:
1.Use Basic Edit Tools
If you wish to edit a video shot using Snapchat, you can easily do so with Filmora. You can start by touching up the video and enhancing the audio. Even if the original video shot is a funny one, you can enhance the effect by using all the basic handy editing tools on Filmora. Trim out portions that are unnecessary, add in background music, color corrections. You can double click on a clip that you add to the timeline of Filmora. The video then enters the editing panel and all edits are easy to do here.
2.Picture-In-Picture
To make funny videos you could put in several video clips in a frame. This helps tell different threads of a storyline. With Filmora it is easy to achieve such an effect. You simply need to drag and then drop a video or an overlay image. Do so above a background video. You can then adjust the duration of the overlay clip to match the background video. It is also possible to choose a template and apply it to your video with a single click. You can then drag a funny image or photo to the timeline and customize the position.
3.Record Voiceover
No funny video is complete without a strange and funny voice narrating the incidents. It is easy to replace audio as well as record voiceover for your Snapchat video using Filmora. All you need to do is click on the record button which captures voice recording in good quality. You can even change your voice or playing speed. Additionally, you can also remove or mute the original audio track and replace the same with a new recording.
4.Apply Different Effects
There are several templates included with Filmora. It can turn video clips and common photos into exciting and funny videos. You can add effects like a laugh, scream, fire, and snow with simple drag and drop gestures.
The tools that Filmora offers are several for making your Snapchat videos funny. You can add amazing effects effortlessly. For instance, you could toggle around with features such as Face-off, Mosaic, or Tilt-shift. These are professional editing features that can make your Snapchat video stand out and impress.
Once you have saved the effects on your video, you can preview the final output in the preview area. It is easy to share the video through the Export feature. You can also upload it to your Snapchat account and then share it with your friends and groups.
Conclusion
Snapchat enables you to share your favorite moments with your friends or different groups. You can easily know how to pin someone on Snapchat on top of your feed using the settings options elaborated above. Finally, to make your Snapchat videos funny and impressive, make use of the film editor software Filmora. It has easy tools that can make your video look professional and impressive.
Ollie Mattison
Ollie Mattison is a writer and a lover of all things video.
Follow @Ollie Mattison
Ollie Mattison
Mar 27, 2024• Proven solutions
One of the features that Snapchat provides is the ability to pin your contacts or conversations that you deem important. This will make the contacts or the conversations appear on top of the feed in your account. It saves you time from having to scroll through notifications from others to the ones that hold your interest. The process of how to pin someone on Snapchat is easy to do and is a helpful feature. Here we will explore how to do it and ways of making eye-catching Snapchat videos.
- Part 1: What Does a Pin Mean on Snapchat?
- Part 2: How to Pin/Unpin Someone on Snapchat?
- Part 3: Create Eye-Catching Snapchat Videos with Incredible Video Editor
What Does a Pin Mean on Snapchat?
If you are new to the term Pin in Snapchat, it is simply a function to help keep certain contacts or messages on top of your Snapchat feed. Pinning feature is available for the iOS app only till now. All you need to do is swipe right to go to the chat screen. Here you need to tap and hold the finger on a friend’s name or a conversation. Tap on chat settings to select ‘Pin Conversation’ as an option. This will set the friends and the conversations you have with them on top of the feed on your Snapchat account.
It helps you to communicate with a person easily and not have to scroll through other notifications to find a message or conversation chain that you want to access frequently.
How to Pin/Unpin Someone on Snapchat?
It is a small step that helps you pin conversations at the top of your Snapchat feed. However, with this simple feature, you can easily navigate through the app, making the process faster and convenient. How to pin someone on Snapchat might be a small aspect but definitely helps upgrade your Snapchat experience. Once conversations are pinned on top, new snaps or chats from such friends or groups would show up foremost.
Steps to do so are as follows:
- 1.Visit Friends Screen
- 2.Press and Hold on Contact or Entry
- 3.Choose Pin Option
- 4.Customize the Pins
1.Visit Friends Screen
Once you are on the app, visit the Friends screen. To do so you need to swipe right from the Camera screen.
source:i1.wp.com
2.Press and Hold on Contact or Entry
To pin a contact or a conversation thread, press and hold down on the same.
source:webtrickz.com
3.Choose Pin Option
There would be a number of options that would show up and tap on ‘Chat Settings’. Here you will find Pin Conversation as an option.
4.Customize the Pins
When you pin a contact or a conversation, it is represented by a pushpin in red by default. You can customize the pins to give them character and differentiate one contact from another. Visit Settings in My Profile. Scroll down and select Manage under the Additional Settings option. Tap on Friend emojis. This option allows you to change push pins to different emojis.
source:miro.medium.com
You can also unpin contact or conversation. Steps to do so remain similar. You can visit Chat Settings and choose Unpin Conversation. Also, an important thing to know is that your contacts would not be notified if you pin or even unpin their conversations. Hence, there is no social pressure when you use this feature. Also, you can pin at most three conversations on your Snapchat feed.
Create Eye-Catching Snapchat Videos with Incredible Video Editor
Filmora is a video editing tool that has a free as well as paid, premium version. Even with the free version users can edit and make videos of high quality. The software is useful if you wish to edit 4K videos. There are tools that support audio as well as video. It offers many options to add on styling, customizing, and other effects. The tool helps users add on overlays, audio, insert texts as well as animation effects.
If you wish to make your Snapchat videos impressive, this tool can come in handy. You can add on different kinds of effects, some of Hollywood movie standards. It allows you to crop and personalize video areas easily. For professional touches, you can add on dedications, tributes, stories in such videos. You can also increase or decrease video size, tilt, and shift or blur certain parts of a video. You can even rotate or flip audio or video content using this tool. It helps to remove video noise as well.
If you wish to make funny videos on Snapchat here are some ways to do so with the editor software:
1.Use Basic Edit Tools
If you wish to edit a video shot using Snapchat, you can easily do so with Filmora. You can start by touching up the video and enhancing the audio. Even if the original video shot is a funny one, you can enhance the effect by using all the basic handy editing tools on Filmora. Trim out portions that are unnecessary, add in background music, color corrections. You can double click on a clip that you add to the timeline of Filmora. The video then enters the editing panel and all edits are easy to do here.
2.Picture-In-Picture
To make funny videos you could put in several video clips in a frame. This helps tell different threads of a storyline. With Filmora it is easy to achieve such an effect. You simply need to drag and then drop a video or an overlay image. Do so above a background video. You can then adjust the duration of the overlay clip to match the background video. It is also possible to choose a template and apply it to your video with a single click. You can then drag a funny image or photo to the timeline and customize the position.
3.Record Voiceover
No funny video is complete without a strange and funny voice narrating the incidents. It is easy to replace audio as well as record voiceover for your Snapchat video using Filmora. All you need to do is click on the record button which captures voice recording in good quality. You can even change your voice or playing speed. Additionally, you can also remove or mute the original audio track and replace the same with a new recording.
4.Apply Different Effects
There are several templates included with Filmora. It can turn video clips and common photos into exciting and funny videos. You can add effects like a laugh, scream, fire, and snow with simple drag and drop gestures.
The tools that Filmora offers are several for making your Snapchat videos funny. You can add amazing effects effortlessly. For instance, you could toggle around with features such as Face-off, Mosaic, or Tilt-shift. These are professional editing features that can make your Snapchat video stand out and impress.
Once you have saved the effects on your video, you can preview the final output in the preview area. It is easy to share the video through the Export feature. You can also upload it to your Snapchat account and then share it with your friends and groups.
Conclusion
Snapchat enables you to share your favorite moments with your friends or different groups. You can easily know how to pin someone on Snapchat on top of your feed using the settings options elaborated above. Finally, to make your Snapchat videos funny and impressive, make use of the film editor software Filmora. It has easy tools that can make your video look professional and impressive.
Ollie Mattison
Ollie Mattison is a writer and a lover of all things video.
Follow @Ollie Mattison
Also read:
- [New] Top 10 Gamers Defining Modern TikTok Culture
- Deciphering the Platforms A Side-by-Side Analysis of Triller and TikTok (Max 156 Chars) for 2024
- [New] 2024 Approved Effortless Video Preservation Android & iOS Solutions
- [Updated] 2024 Approved Dive Deep Into TikTok’s PFP Symbol - Your Complete Guide
- [New] In 2024, Elite TikTok Videotaker Tools No Watermark Edition
- [Updated] In 2024, Mastering Slow Motion on TikTok A Step-by-Step Guide
- 2024 Approved 5 Proven Techniques for Live Streaming on TikTok Desktop
- [New] Producing an Expressive TikTok Conclusion Snippet for 2024
- [New] 2024 Approved Unlock the Potential of Top-Ranked TikTok Campaigns
- [New] 2024 Approved 7 Leading Free TikTok Audio Tools for Seamless MP3 Conversion
- 2024 Approved Rapid Video Filming Techniques for TikTok Success
- Crafty Creators The Top 15 of TikTok's Viral Visionaries
- Achieving Seamless Synchronization on Desktop & Mobile
- [New] In 2024, Mastering the Short-Video Sphere The Roadmap for Profitable TikTok Marketing
- [New] 2024 Approved Step-by-Step Achieve Professional TikTok Recording
- [New] Boost Creativity and Performance with These Top 10 FREE TikTok Editors for Mac
- Mouthwatering Moments The Hottest TikTok Food Videos for the Modern Kitchen Aficionado
- [New] Unleashing Creativity A TikTok Video Guide for Devices for 2024
- [Updated] In 2024, Elevate Your Creativity Top 50+ Viral TikTok Quotes
- [Updated] 2024 Approved Bite-Sized Culinary Creations on TikTok
- Amplify Video Messages Top 5 Ways to Craft Powerful TikTok Captions
- [Updated] The Best Animated Ideas Making Waves on TikTok
- Choreographing a Memorable TikTok Fade-Out for 2024
- 2024 Approved How to Tackle Unresponsive TikTok on Android/iOS
- [New] 2024 Approved Essential Tags for TikTok Fame and Viral Potential
- [Updated] 2024 Approved Top 7 Affordable TikTok Video Editing Software (Mac)
- [New] Jump Into Today's Buzzing TikTok Trials
- 2024 Approved Unveiling the Magic of Clear Audio Eliminating Ambient Noises Using Audacity
- 2024 Approved How to Make Money on TikTok in 8 Ways
- [New] Essential Earning Calculators A TikTok Creator's Toolkit for 2024
- Top-Tier TikTok Analytics 10 Tools to Enhance Your Social Media Strategy
- [Updated] Discovering TikTok's Power A 2023 Essentials Guidebook for 2024
- [New] How To Dive Into a Friend's Life Without Fuss on TikTok
- In 2024, Harmonizing Music and Video on TikTok
- Enter the TikTok Live Arena Procedures for Participation for 2024
- Effortless TikTok Video Enhancement Replace Backdrop Techniques for 2024
- [Updated] Immediate Harmony Videos on Youku Toujiang
- Discovering an Original TikTok Identifier Code for 2024
- In 2024, Video Stabilization Magic Transforming Shaky Clips in Adobe Premiere Pro
- In 2024, Delete Gmail Account With/Without Password On Poco X5 Pro
- 5 Easy Ways to Copy Contacts from Samsung Galaxy M34 to iPhone 14 and 15 | Dr.fone
- Best Pokemons for PVP Matches in Pokemon Go For Realme Narzo N53 | Dr.fone
- In 2024, Mastering Lock Screen Settings How to Enable and Disable on Vivo S17e
- 2024 Approved Basic Building Blocks Simplest MC Dwellings for Novices
- In 2024, 10 Best iMovie-Like Video Editors for Android Users
- How to Stop Life360 from Tracking You On Nokia G42 5G? | Dr.fone
- 2024 Approved Free Windows Movie Maker Download A Step-by-Step Guide
- In 2024, Here are Some of the Best Pokemon Discord Servers to Join On Lava Yuva 2 | Dr.fone
- New How to Add Font Effect
- New Effortless Video Conversion Top 10 WebM to MP4 Tools for 2024
- Updated Superior Sound Division Software for Mac – Latest 2024 Model Release
- [Updated] In 2024, Creating Seamless Zoom Experiences
- [Updated] QuickCapture HD Software for 2024
- In 2024, 3 Things You Must Know about Fake Snapchat Location On Realme 11X 5G | Dr.fone
- Mac Tips Capturing Class Notes Efficiently
- Is pgsharp legal when you are playing pokemon On Oppo Reno 8T 5G? | Dr.fone
- [New] In 2024, X-Recorder for Pc Audio Logger at No Cost
- Title: Navigate the Art of Snapchat Filters for Beginners
- Author: Stephen
- Created at : 2024-05-23 02:20:08
- Updated at : 2024-05-24 02:20:08
- Link: https://tiktok-video-recordings.techidaily.com/navigate-the-art-of-snapchat-filters-for-beginners/
- License: This work is licensed under CC BY-NC-SA 4.0.
