
!["[New] 2024 Approved Transform Your TikTok Footage Advanced Slow Motion Filming Techniques"](https://www.lifewire.com/thmb/U2_ZVqdtVZUlaa1Hl3NAfB66OEY=/400x300/filters:no_upscale():max_bytes(150000):strip_icc()/JSL2-de07f8b4e06e49d58026eedc72df66c7.png)
"[New] 2024 Approved Transform Your TikTok Footage Advanced Slow Motion Filming Techniques"
Transform Your TikTok Footage: Advanced Slow Motion Filming Techniques
TikTok is a music video-making program that enables users to create entertaining, innovative, and visually appealing videos. The program gives users a plethora of tools and alternatives to help them increase their creativity and originality when it comes to their material. It is possible to apply the Slow-motion effect to a video using one of the tools that TikTok gives to its users.
The slow-motion effect will slow down the pace of that specific area of the movie, which will significantly impact the overall quality of your content. Therefore, in this article, we have compiled a comprehensive guide that will show you the exact methods of making Slow Motion Tik Tok videos for your social content. Let’s get started!
In this article
01 How to Record Tik Tok Video Wit Slow Motion Effects?
02 How o Add Slow-Mo Effects After Recording Videos on Tik Tok?
03 How to Slow Down Tik Tok Videos Online for Free?
04 How to Slow TikTok Video And Song Using Filmora?
Part 1: How to Record Tik Tok Video Wit Slow Motion Effects?
TikTok videos may benefit from adding effects, which is a simple process. You may do it during the recording process or after the fact in post-production. One viral effect is slow-motion. You can use this to create some quite amusing videos, particularly when combined with other effects.
In this section, we’ll go through how to record a TikTok video with the slow-mo effect.
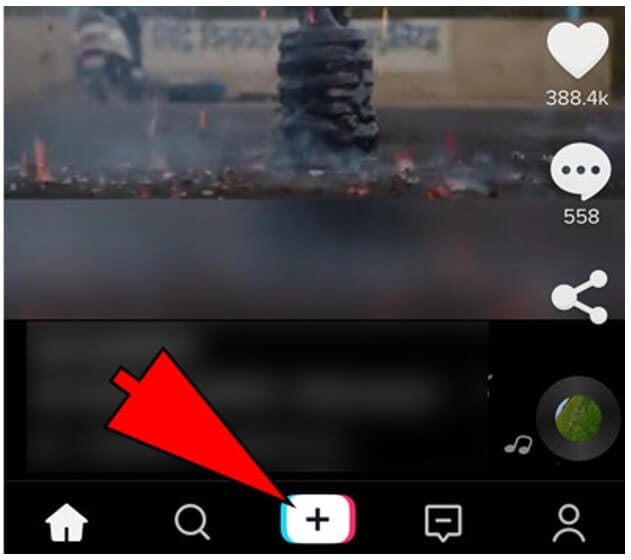
Step 1: The first step is to Open Tik Tok, which can be accomplished by searching for the program on your smartphone. When you first launch TikTok, it will open in the feed area by default, as seen below. Navigation to the new video screen requires one press on the + symbol at the bottom of your screen, as seen in the image below before it will appear.
Note: You will be taken to the recording area, where your phone’s camera will be launched immediately.
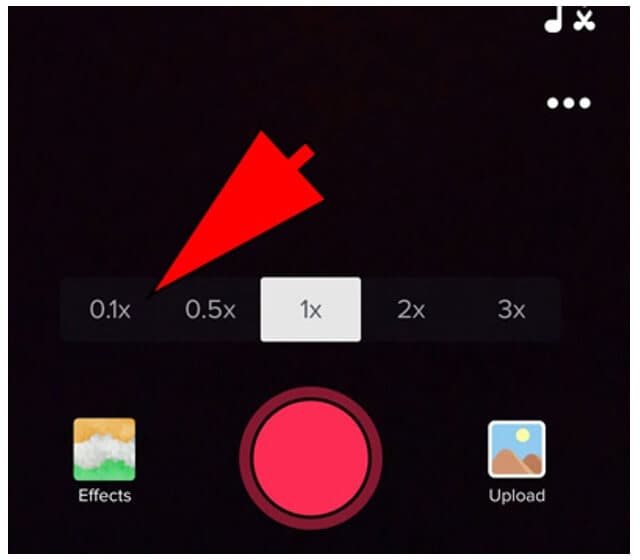
Step 2: When you first access the new video area, a bar displaying the various recording speeds displays, as seen in the screenshot below. It is necessary to pick the slowest feasible speed.
Tip: You may also select the video’s pace based on your preferences and how sluggish you want to make the movie seem.
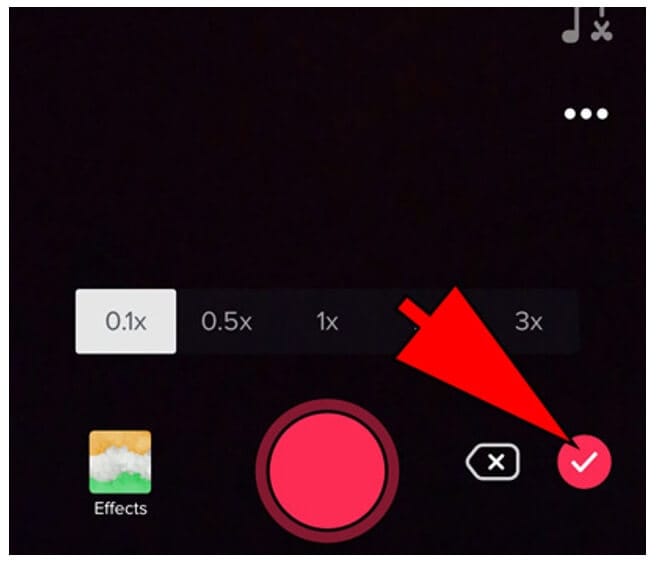
Step 3: Next to selecting the desired speed, you must go to the following screen. It is possible to see a Check Mark option appear in the right-hand corner of the screen, as seen in the illustration. Tap on it once to advance to the next stage.
Step 4: Then, go to the next step after selecting the desired speed. As seen below, you must record the video by Tapping and Holding the Red Color Record button for some time.
Note: Once the video has been recorded and is in a slower speed, it will automatically be recorded in slow motion. You can use this method to record your TikTok videos with a slow-motion effect.
Part 2: How o Add Slow-Mo Effects After Recording Videos on Tik Tok?
What about the videos you have already recorded on your TikTok application? Can you slow them down too? The following steps illustrate how to apply a slow-motion effect to your TikTok videos once they have been recorded using the app.
It is simple to record a video by simply going to the “Add new” area and selecting the video of your choosing to record. When you’ve finished recording, choose the next choice from the drop-down menu. Following that, you may proceed with the procedure.
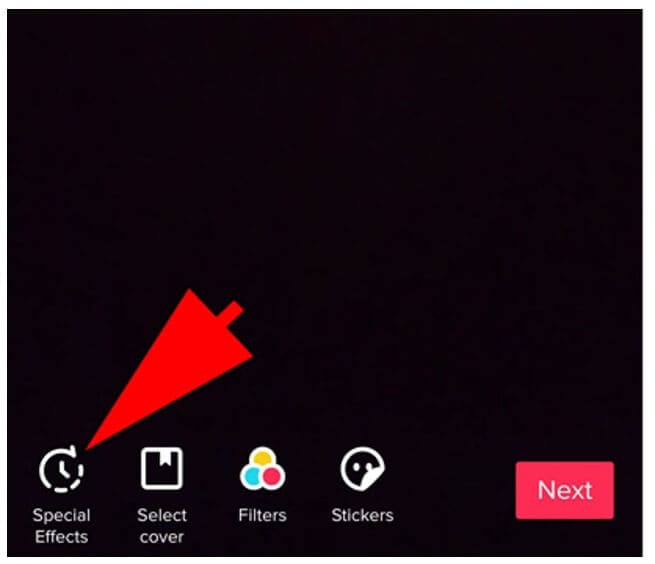
Step 1: Once you’ve arrived at the next screen, you’ll need to click on the Circular clock symbol to activate the effect. It is located in the bottom left corner of the screen, as seen below.
Tip: To access it, click on it. To access the effects, tap on it once. The effects under the Filter effects section will be immediately activated.
Step 2: To use this feature, you must browse the Time Effects part of the effects section. To do so, choose “Time effects“ from the drop-down menu in the bottom right corner of the screen, as shown by the arrow in the image below. It will provide you with different temporal effects.
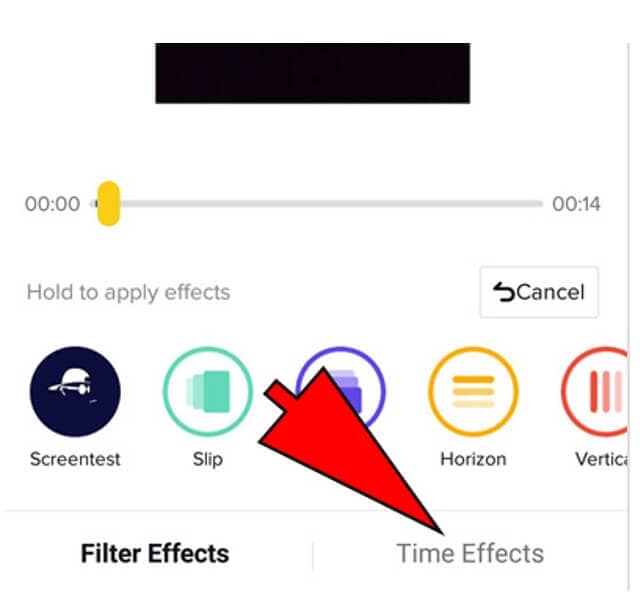
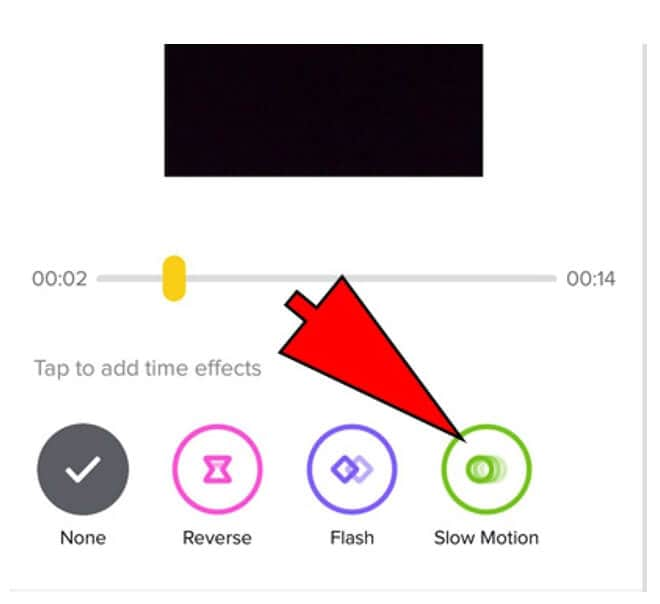
Step 3: It is necessary to choose the Slow Motion option from the list of alternatives that appears, as shown in the figure below. This will give the video the appearance of being in slow motion.
Tip: Changing the length of the slow-motion is accomplished by dragging the green square that appears on the screen. Drag it to any portion of the page where you want the slow-motion effect to appear.
Step 4: Once you’re pleased with the effect, you may save it by selecting the save option from the menu. As seen in the illustration below, click on “Save“ will save your work.
(Note: You will be returned to the previous screen if you do so. After that, you may edit it with whatever filters you want and publish it just like any other video).
Part 3: How to Slow Down Tik Tok Videos Online for Free?
Kapwing
In a couple of seconds, Kapwing can speed up and slow down short videos. Slo-mo, timelapse, and hyperspeed films may be made with no editing skills then shared on social networking websites like YouTube.
Get started by uploading a video or pasting a URL. AVI, MP4, MOV, and 3PG are all supported formats by Kapwing. As slow as 0.25x for a slow-motion movie and as much as 4x for an enhanced video are available. Let’s give you a step-by-step illustration:
Step 1: On TikTok, find the video you want to slow down and click on. You have the option of slowing down videos from other people’s profiles and those from your profile. Copy the URL that appears when you click the Share button.
Step 2: This is where Kapwing comes in, and we utilize it on our PC using Chrome to accomplish our objective. Visit https://www.kapwing.com/ and copy the URL of the TikTok video and paste it into Kapwing.
Step 3: Go to the Speed section, and use the – and + buttons to make the video slow down or speed up. After selecting “slow-motion“ as your preferred speed, press the “play“ button to begin watching the movie. If the video moves too slowly, click on the Plus sign and keep rewatching it until you’re satisfied with the pace.

Step 4: This step is optional, but it comes in useful if you’re performing in a duet or if you want to watch a TikTok video while you’re not connected to the internet. Following your completion of the speed adjustment, go to the top of the studio and click Export Video. After your video has been processed, you may save it to your device by clicking the Download button.

For more detail, you can check this article: How to make a slo-mo video with Kapwing?
Part 4: How to Slow TikTok Video And Song Using Filmora?
In principle, TikTok can meet the majority of users’ video creation, editing, and sharing requirements. While the TikTok app can produce high-quality videos, it may fall short when it comes to adding unique effects to your videos.
Then you’ll want the assistance of a professional video editing program to complete your project. Also, you must know about online TikTok downloaders without watermarks . But what if you wish to enhance and refine these videos? We want to offer to you Filmora Video Editor to make a slow-motion TikTok video as quickly and simply as possible.
For Win 7 or later (64-bit)
For macOS 10.12 or later
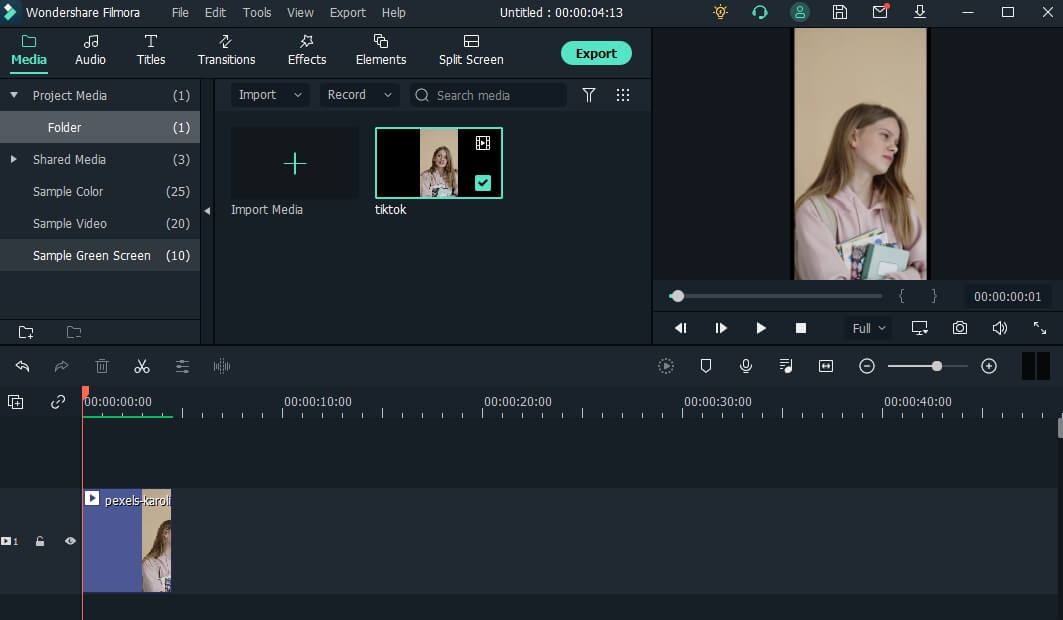
Step 1: Launch the Filmora Video Editor, with its aspect ratio set to 9:16 since it’s downloaded the TikTok video. Then, to access the editing panel, choose “New Project“ from the menu bar.

Step 2: Drag and drag the video right into the interface to edit it. Alternatively, you can choose “Add files“ from the drop-down menu by clicking the “+” button. Using the media library, drag and drop the video you wish to slow down onto the timeline once added to the project.
Step 3: To access the speed control panel, pick the video on the timeline and right-click on it, then choose “Speed“ from the context menu, and then select Speed and Duration option.
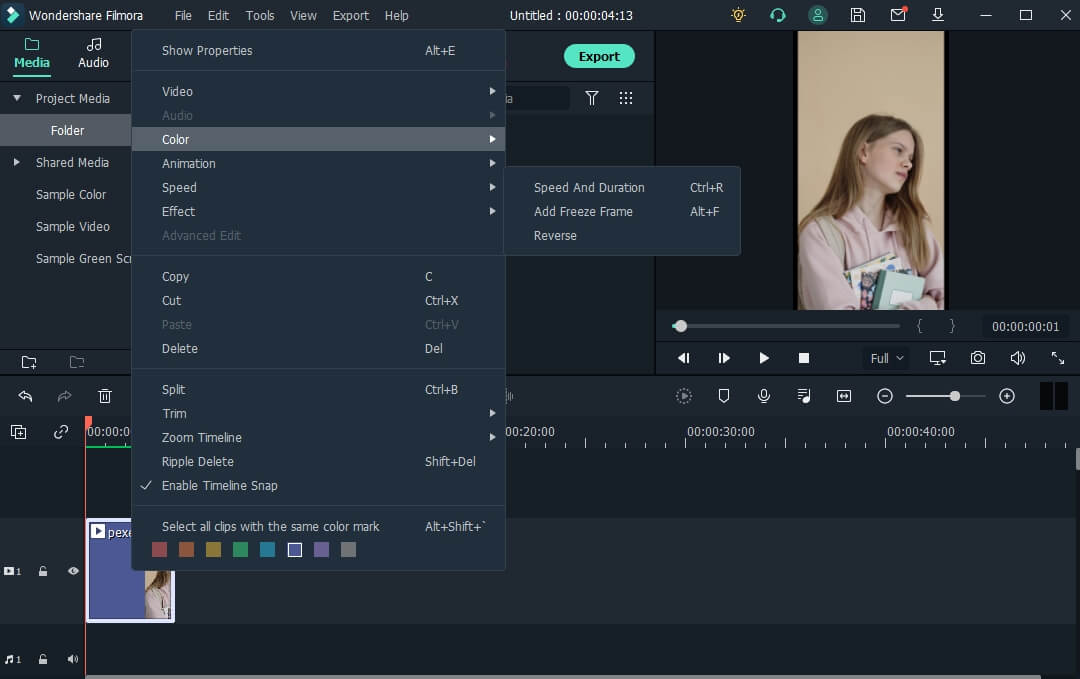
You may adjust the video speed by dragging the slider to the right or left as needed.

Note: The Filmora Video Editor enables you to modify the playback speed to as little as TEN times slower than the actual speed of the video.
After that, you may use various editing tools to create your video one-of-a-kind and spectacular, depending on your requirements.
Step 5: It’s time to save your modified movie clip to your device. Click the Export button to save the video to your local or share to YouTube or Vimeo directly.
Conclusion
Well, now you know how you can add the slo-mo effect on Slow Motion TikTok videos. We have covered the most straightforward steps with their respective screenshots that will give you a proper illustration to help you make and apply slow-motion effects to your videos. In the end, for PC users, you can even use Wondershare Filmora to apply slow-motion effects to your videos on PC. It’s one of the best and most easy-to-use software for PC users.
02 How o Add Slow-Mo Effects After Recording Videos on Tik Tok?
03 How to Slow Down Tik Tok Videos Online for Free?
04 How to Slow TikTok Video And Song Using Filmora?
Part 1: How to Record Tik Tok Video Wit Slow Motion Effects?
TikTok videos may benefit from adding effects, which is a simple process. You may do it during the recording process or after the fact in post-production. One viral effect is slow-motion. You can use this to create some quite amusing videos, particularly when combined with other effects.
In this section, we’ll go through how to record a TikTok video with the slow-mo effect.
Step 1: The first step is to Open Tik Tok, which can be accomplished by searching for the program on your smartphone. When you first launch TikTok, it will open in the feed area by default, as seen below. Navigation to the new video screen requires one press on the + symbol at the bottom of your screen, as seen in the image below before it will appear.
Note: You will be taken to the recording area, where your phone’s camera will be launched immediately.
Step 2: When you first access the new video area, a bar displaying the various recording speeds displays, as seen in the screenshot below. It is necessary to pick the slowest feasible speed.
Tip: You may also select the video’s pace based on your preferences and how sluggish you want to make the movie seem.
Step 3: Next to selecting the desired speed, you must go to the following screen. It is possible to see a Check Mark option appear in the right-hand corner of the screen, as seen in the illustration. Tap on it once to advance to the next stage.
Step 4: Then, go to the next step after selecting the desired speed. As seen below, you must record the video by Tapping and Holding the Red Color Record button for some time.
Note: Once the video has been recorded and is in a slower speed, it will automatically be recorded in slow motion. You can use this method to record your TikTok videos with a slow-motion effect.
Part 2: How o Add Slow-Mo Effects After Recording Videos on Tik Tok?
What about the videos you have already recorded on your TikTok application? Can you slow them down too? The following steps illustrate how to apply a slow-motion effect to your TikTok videos once they have been recorded using the app.
It is simple to record a video by simply going to the “Add new” area and selecting the video of your choosing to record. When you’ve finished recording, choose the next choice from the drop-down menu. Following that, you may proceed with the procedure.
Step 1: Once you’ve arrived at the next screen, you’ll need to click on the Circular clock symbol to activate the effect. It is located in the bottom left corner of the screen, as seen below.
Tip: To access it, click on it. To access the effects, tap on it once. The effects under the Filter effects section will be immediately activated.
Step 2: To use this feature, you must browse the Time Effects part of the effects section. To do so, choose “Time effects“ from the drop-down menu in the bottom right corner of the screen, as shown by the arrow in the image below. It will provide you with different temporal effects.
Step 3: It is necessary to choose the Slow Motion option from the list of alternatives that appears, as shown in the figure below. This will give the video the appearance of being in slow motion.
Tip: Changing the length of the slow-motion is accomplished by dragging the green square that appears on the screen. Drag it to any portion of the page where you want the slow-motion effect to appear.
Step 4: Once you’re pleased with the effect, you may save it by selecting the save option from the menu. As seen in the illustration below, click on “Save“ will save your work.
(Note: You will be returned to the previous screen if you do so. After that, you may edit it with whatever filters you want and publish it just like any other video).
Part 3: How to Slow Down Tik Tok Videos Online for Free?
Kapwing
In a couple of seconds, Kapwing can speed up and slow down short videos. Slo-mo, timelapse, and hyperspeed films may be made with no editing skills then shared on social networking websites like YouTube.
Get started by uploading a video or pasting a URL. AVI, MP4, MOV, and 3PG are all supported formats by Kapwing. As slow as 0.25x for a slow-motion movie and as much as 4x for an enhanced video are available. Let’s give you a step-by-step illustration:
Step 1: On TikTok, find the video you want to slow down and click on. You have the option of slowing down videos from other people’s profiles and those from your profile. Copy the URL that appears when you click the Share button.
Step 2: This is where Kapwing comes in, and we utilize it on our PC using Chrome to accomplish our objective. Visit https://www.kapwing.com/ and copy the URL of the TikTok video and paste it into Kapwing.
Step 3: Go to the Speed section, and use the – and + buttons to make the video slow down or speed up. After selecting “slow-motion“ as your preferred speed, press the “play“ button to begin watching the movie. If the video moves too slowly, click on the Plus sign and keep rewatching it until you’re satisfied with the pace.
Step 4: This step is optional, but it comes in useful if you’re performing in a duet or if you want to watch a TikTok video while you’re not connected to the internet. Following your completion of the speed adjustment, go to the top of the studio and click Export Video. After your video has been processed, you may save it to your device by clicking the Download button.
For more detail, you can check this article: How to make a slo-mo video with Kapwing?
Part 4: How to Slow TikTok Video And Song Using Filmora?
In principle, TikTok can meet the majority of users’ video creation, editing, and sharing requirements. While the TikTok app can produce high-quality videos, it may fall short when it comes to adding unique effects to your videos.
Then you’ll want the assistance of a professional video editing program to complete your project. Also, you must know about online TikTok downloaders without watermarks . But what if you wish to enhance and refine these videos? We want to offer to you Filmora Video Editor to make a slow-motion TikTok video as quickly and simply as possible.
For Win 7 or later (64-bit)
For macOS 10.12 or later
Step 1: Launch the Filmora Video Editor, with its aspect ratio set to 9:16 since it’s downloaded the TikTok video. Then, to access the editing panel, choose “New Project“ from the menu bar.
Step 2: Drag and drag the video right into the interface to edit it. Alternatively, you can choose “Add files“ from the drop-down menu by clicking the “+” button. Using the media library, drag and drop the video you wish to slow down onto the timeline once added to the project.
Step 3: To access the speed control panel, pick the video on the timeline and right-click on it, then choose “Speed“ from the context menu, and then select Speed and Duration option.
You may adjust the video speed by dragging the slider to the right or left as needed.
Note: The Filmora Video Editor enables you to modify the playback speed to as little as TEN times slower than the actual speed of the video.
After that, you may use various editing tools to create your video one-of-a-kind and spectacular, depending on your requirements.
Step 5: It’s time to save your modified movie clip to your device. Click the Export button to save the video to your local or share to YouTube or Vimeo directly.
Conclusion
Well, now you know how you can add the slo-mo effect on Slow Motion TikTok videos. We have covered the most straightforward steps with their respective screenshots that will give you a proper illustration to help you make and apply slow-motion effects to your videos. In the end, for PC users, you can even use Wondershare Filmora to apply slow-motion effects to your videos on PC. It’s one of the best and most easy-to-use software for PC users.
Pioneering Gigantic Appearance Tricks for TikTok Videos
On TikTok, the Big head effect is commonly employed by content producers to generate humorous videos. In particular, the Big head filter may be utilized for various creative production projects, including caricature films, memes, and teaching.
How to get that TikTok Big Head effect? Would you like to make your head look larger than your body in TikTok videos or photos? It’s effortless to do on your Android smartphone. The best part is that we will show you how to use a Big head filter on different applications in this article and how to edit it. Aside from TikTok, there’s another software you can use to enlarge your head in videos or images. Let’s show you!
In this article
01 How to Get the Big Head Filter on TikTok?
02 How to Make a Big Head Effect in CapCut?
03 How to Add Big Head Effect in Filmora Video Editor? [3 Ways]
Part 1: How to Get the Big Head Filter on TikTok?
The TikTok Big Head effect is an extremely entertaining filter. TikTok is a social media platform that specializes in sharing short video content. Its consumer subscription has surpassed Facebook, Instagram, Twitter, and even Snapchat, and its download percentages are much greater than those of the above said social networking sites.
The TikTok Big Head effect on TikTok, on the other hand, was so widespread that it began to be used by more prominent ‘TikTokers.’ Afterward, in a single glance, all users of the social networking in concern began to use it on TikTok live broadcasts. This is how you can use the TikTok Big Head effect:
Step 1: Go to TikTok’s Discover menu to access the Big Head effects.
Step 2: Type “Big Head“ or #bighead into the search bar and choose the top hashtag**_, #bighead_**. Each TikTok video that employs a Big Head filter would then be displayed.
Step 3: To test out a filter, choose one of the numerous videos available and look for the filter’s name in the lower-left corner.
Step 4: Try pressing on the filter’s title, then touch on the Camera icon at the bottom of the display to make a TikTok video employing the Big Head filter in concern.
Here is a detailed video tutorial about how to make a big head effect in TikTok directly.
Part 2: How to Make a Big Head Effect in CapCut?
CapCut is a content creation application that lets users apply various stickers, filters , and effects to their videos. It also has an essential green screen function, a zooming capability that acts like a Ken Burns effect , and many more features.
With the CapCut software, you can quickly enlarge your head in videos. With a single click of the big head effect, your head would instantly become larger than your body. Here’s how to do it step by step:
Step 1: In the CapCut software, create a New Project and then upload a video in which you will enlarge your head.
Step 2: Click the Effects option at the bottom of the display, and then tap the Facial or Body Effects option.
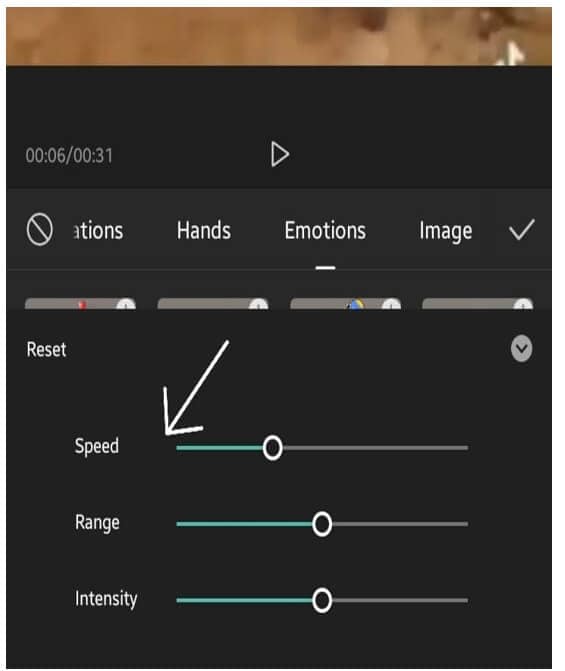
Step 3: Locate and choose the Big Head effect from the Emotions effect section.
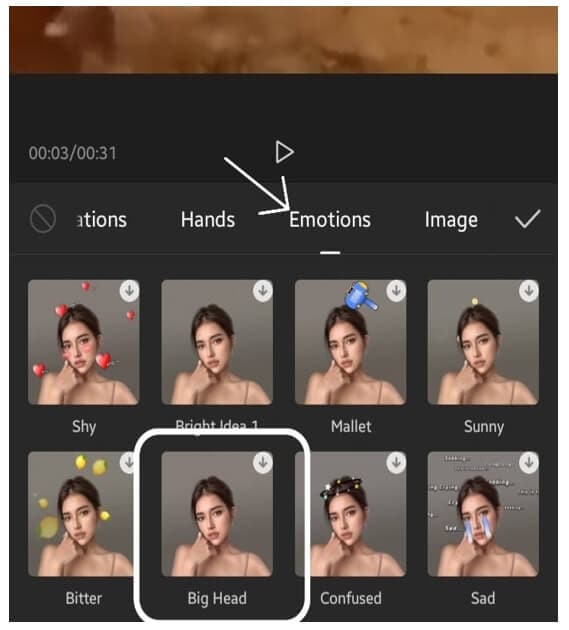
Step 4: The big head effect may be modified in speed, range, and intensity. Finally, adjust the duration of the Big head effect to match the video’s length.
You can check the video tutorial below to find out more details in creating big head and small body effect on video with CapCut.
Part 3: How to Add Big Head Effect in Filmora Video Editor? [3 Ways]
Filmora video editor by Wondershare includes the typical overlays, transitions, trimming, as well as the effects that we’ve grown to expect from the enthusiast-level video editor. It features a user-friendly interface that is clean, minimalistic, and dark. If that wasn’t enough, we’re sure you’ll be pleased to learn that the Filmora program can be used to create the TikTok big head effect in several ways.
With all of the characteristics we’ve discussed so far, you may further customize the Big Head effect with various Filmora effects. Let’s show you how:
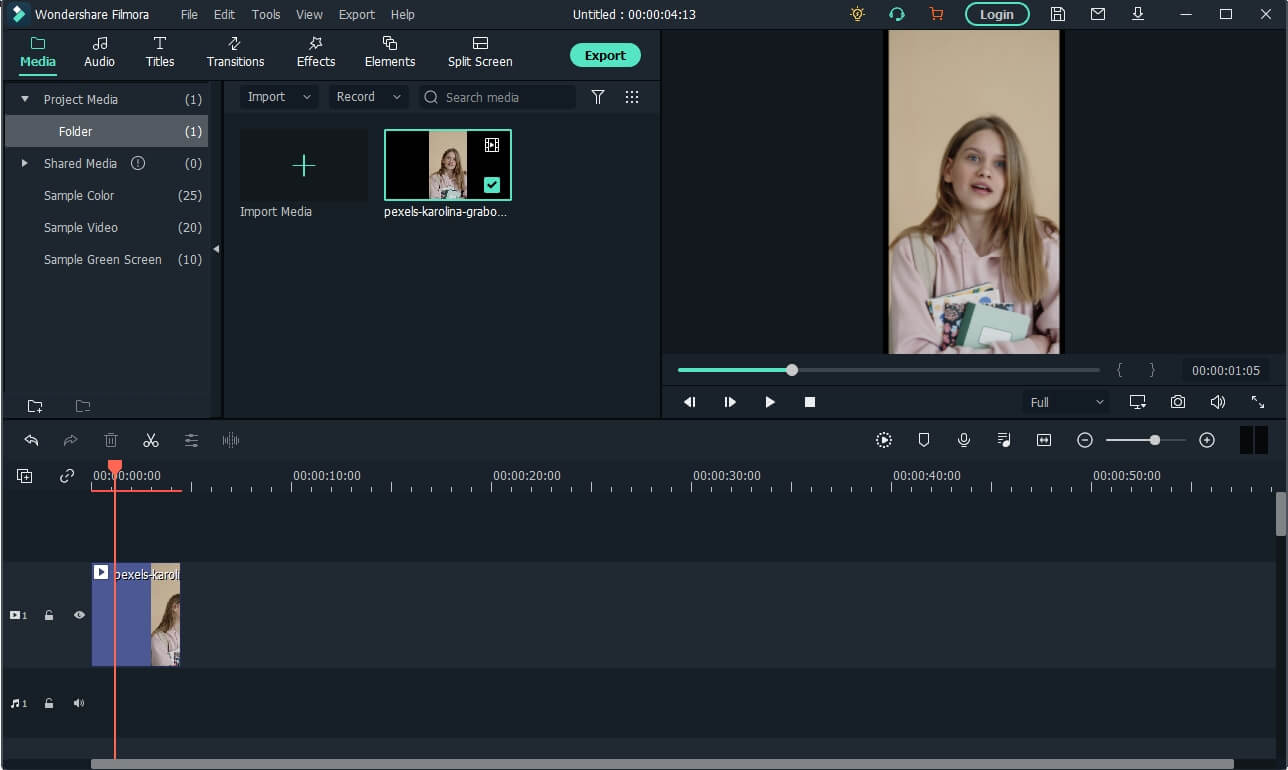
Launch Filmora and click on the Import tab to select the video file you want to use. And then drag and drop the imported media file onto the timeline panel.
For Win 7 or later (64-bit)
For macOS 10.12 or later
Method 1: Create Big Head with AR Stick Bubble Head Effect in Filmora Video Editor
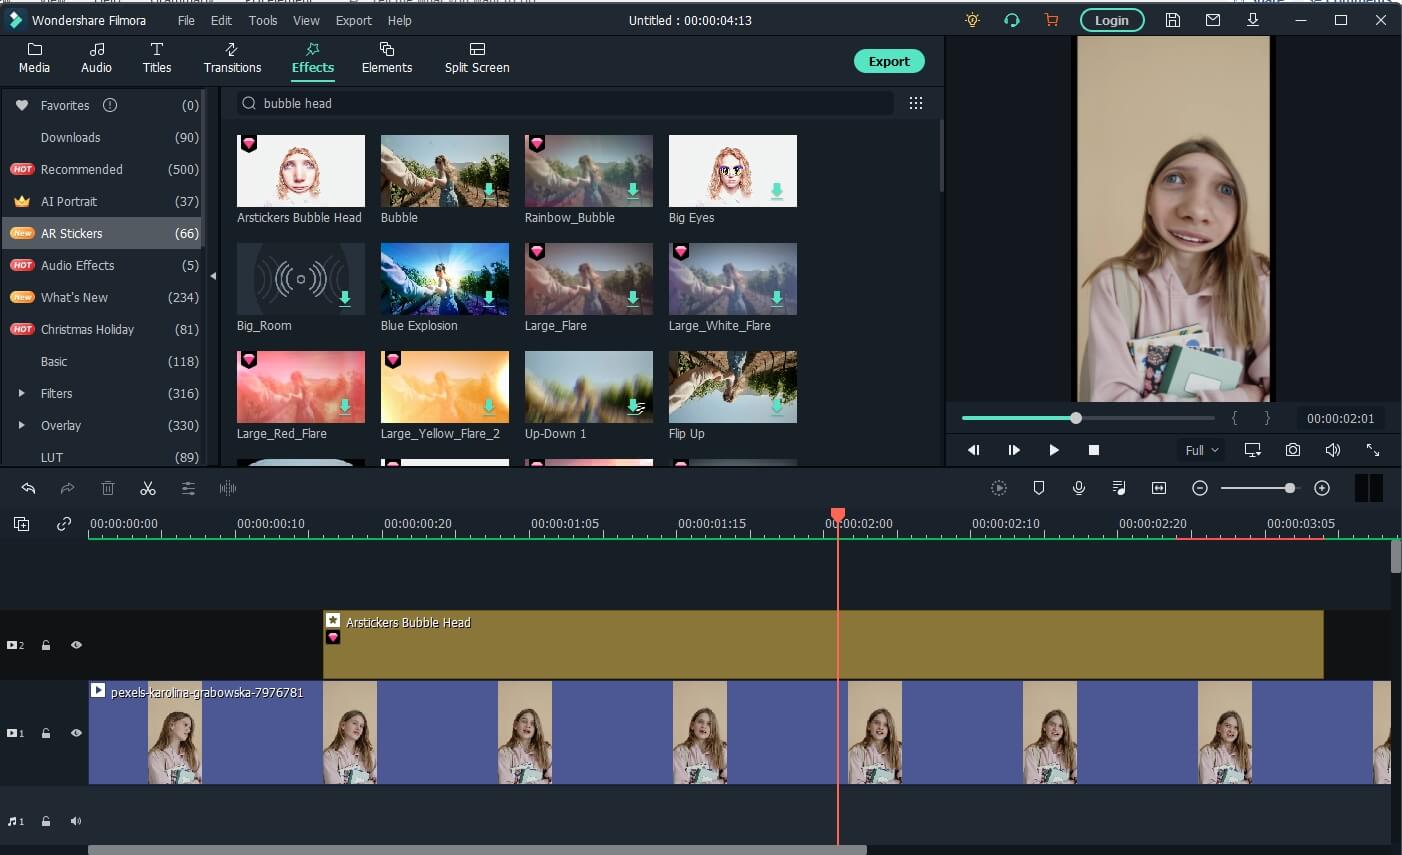
To add the Big Head effect on Filmora, click on the Effects option and select the AR Stickers option. Type bubble head in the search bar and then you will see it in the screen. Then, drag and drop the AR Stickers Bubble Head effect onto the timeline**,** specifically to the portion of the video where you want to add the Big Head filter on the person. As you do that, you will see a Bubble present on the video.
Besides the bubble head effect, there are many more AR stickers available, such as heart eyes, censor bar, emojis, and big eyes. Download the Filmora video editor now and check it yourself.
For Win 7 or later (64-bit)
For macOS 10.12 or later
Method 2: Add Magnify Effect to Video
In the Effects tab, go to the Recommended category, and then you will see the magnify effect. Drag and drop it to the timeline above the video track, and you will see part of the video has been magnified accordingly.
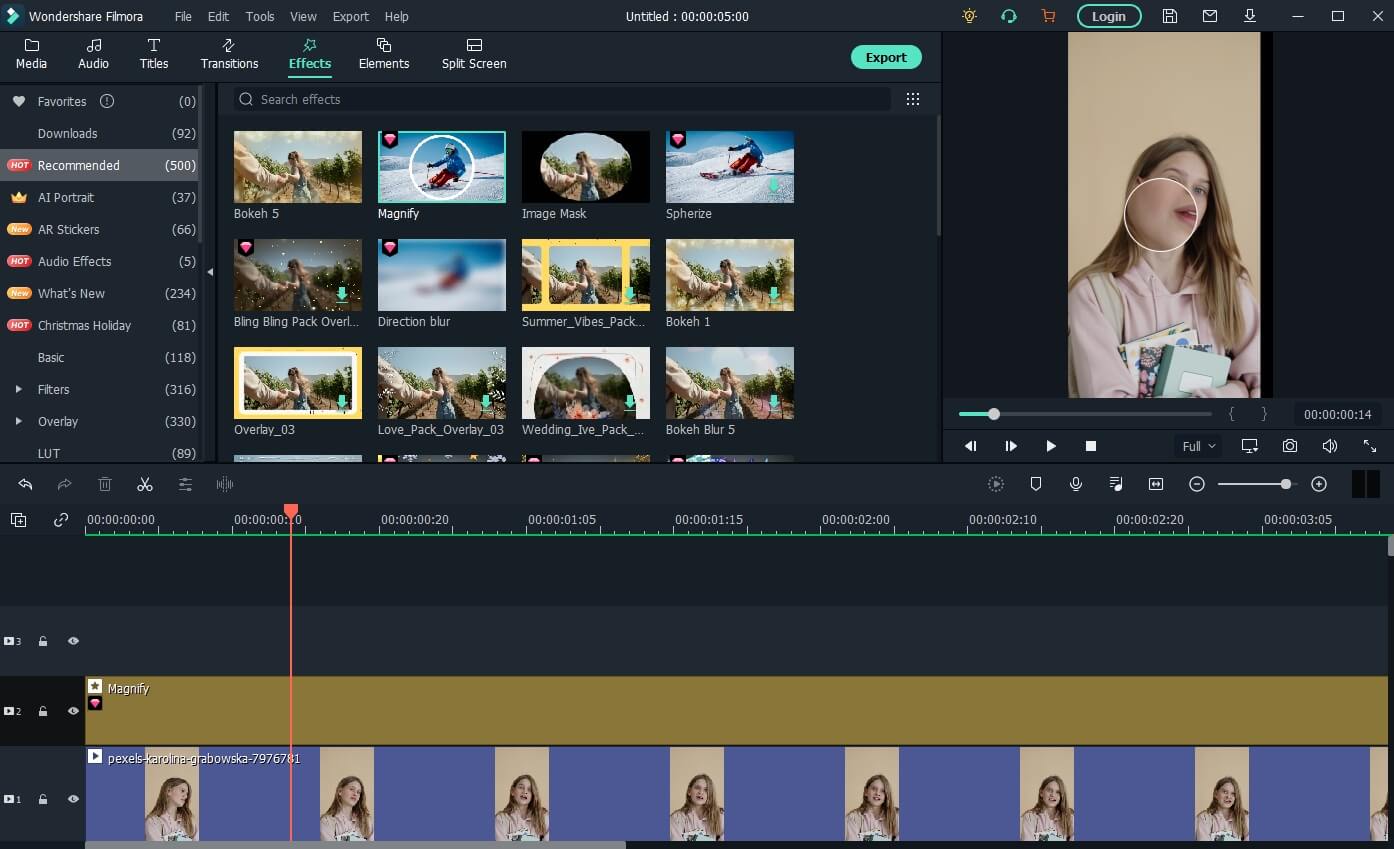
Now, double click on the effect in the timeline and open the Properties of the magnify effect. From the Properties section, you can adjust the size of the bubble using functions such as the Radius, CenterY, CenterX, Alpha, Zoom rate, etc to get a better video with big head effects.
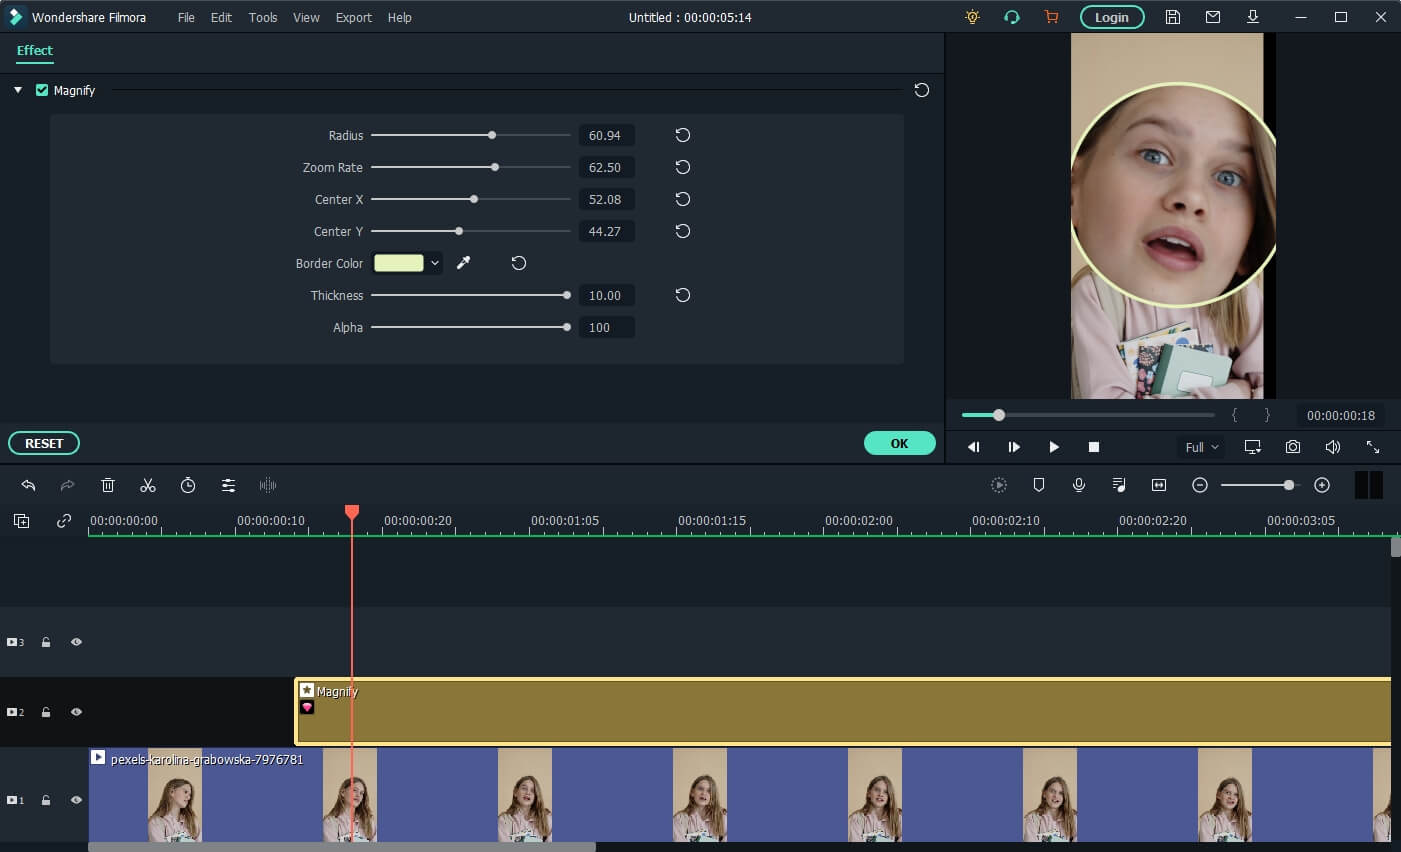
Note: If you’re unable to locate the Magnify option in the Effects tab, please download and install the latest version of Filmora, and then type “Magnify” in the search bar, and the system will directly take you to where the option is present.
Method 3: Use Mask and Scale to Make a Video with Big Head Effect
Besides adding magnify effects and bubblehead effects, you can also use the mask preset to create a big head effect in Filmora.
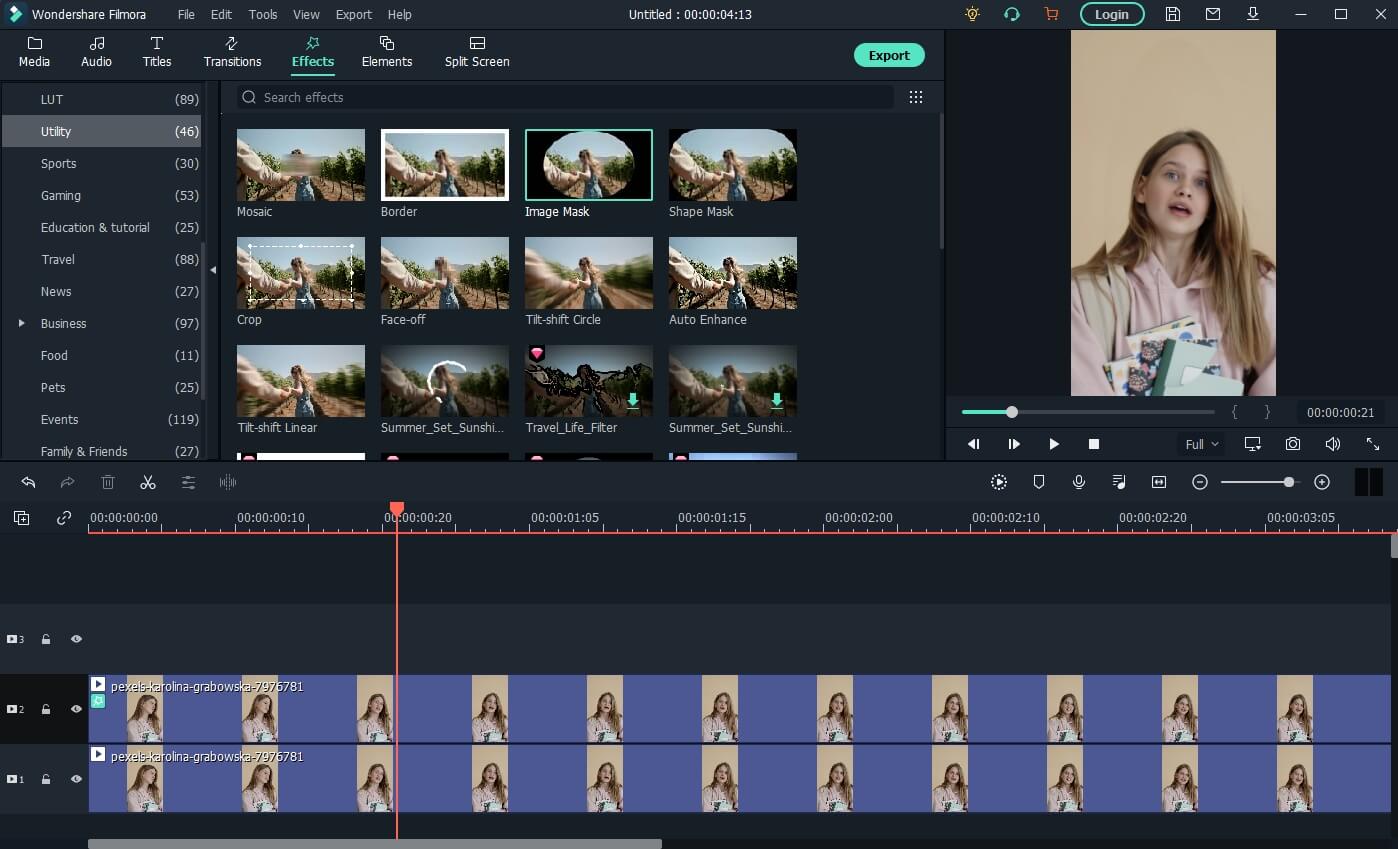
Drag and drop the video to video track 1 and video track 2 respectively in Filmora. Then go to the Effect tab, and scroll down to the Utility category, and place the Image Mask effect to the video above. Or, you can type image mask in the search bar to locate it quickly.
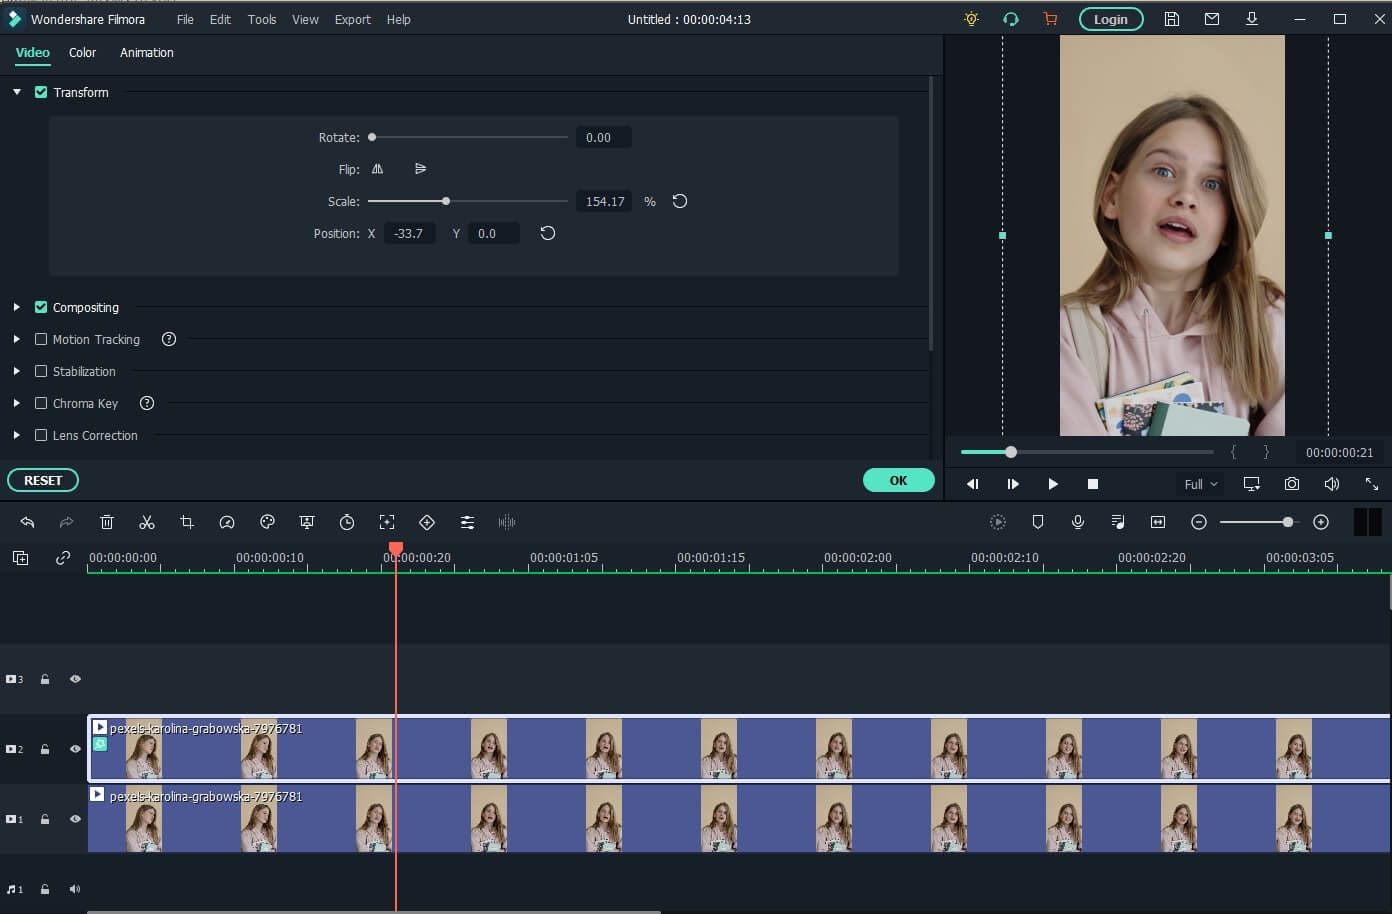
Now, double-click the video with the image mask to adjust the properties. Scroll down to the Video Effects field, and you will see the Image Mask. Click the arrow icon to choose a mask preset, adjust its position and size settings to fit the video.
Tips: You can hide the video in track 1 by clicking the eye icon so you can adjust the video with the image mask conveniently. Click it again then you will see the video.
Next, click the video in track 2 again, and then go to the Transform tab, use the Scale slider to adjust the video size to make a big head effect.
Watch the video tutorial below to find out how to use the Image Mask effect to create a video with a big head effect in Filmora.
For Win 7 or later (64-bit)
For macOS 10.12 or later
After creating the video with a big head effect, click the Export button on the screen to save the video on the computer, and then upload it to TikTok from your computer directly.
Conclusion
This article demonstrates the steps you need to take to add the TikTok Big Head filter to your videos. Remember, the Big Head filter is used to make videos more amusing for entertainment purposes.
Not only TikTok, but different apps such as CapCut on Android and Wondershare Filmora on PC can be of great use to you. Especially in Filmora, you get tons of video editing features that unlock your way into the editing world!
02 How to Make a Big Head Effect in CapCut?
03 How to Add Big Head Effect in Filmora Video Editor? [3 Ways]
Part 1: How to Get the Big Head Filter on TikTok?
The TikTok Big Head effect is an extremely entertaining filter. TikTok is a social media platform that specializes in sharing short video content. Its consumer subscription has surpassed Facebook, Instagram, Twitter, and even Snapchat, and its download percentages are much greater than those of the above said social networking sites.
The TikTok Big Head effect on TikTok, on the other hand, was so widespread that it began to be used by more prominent ‘TikTokers.’ Afterward, in a single glance, all users of the social networking in concern began to use it on TikTok live broadcasts. This is how you can use the TikTok Big Head effect:
Step 1: Go to TikTok’s Discover menu to access the Big Head effects.
Step 2: Type “Big Head“ or #bighead into the search bar and choose the top hashtag**_, #bighead_**. Each TikTok video that employs a Big Head filter would then be displayed.
Step 3: To test out a filter, choose one of the numerous videos available and look for the filter’s name in the lower-left corner.
Step 4: Try pressing on the filter’s title, then touch on the Camera icon at the bottom of the display to make a TikTok video employing the Big Head filter in concern.
Here is a detailed video tutorial about how to make a big head effect in TikTok directly.
Part 2: How to Make a Big Head Effect in CapCut?
CapCut is a content creation application that lets users apply various stickers, filters , and effects to their videos. It also has an essential green screen function, a zooming capability that acts like a Ken Burns effect , and many more features.
With the CapCut software, you can quickly enlarge your head in videos. With a single click of the big head effect, your head would instantly become larger than your body. Here’s how to do it step by step:
Step 1: In the CapCut software, create a New Project and then upload a video in which you will enlarge your head.
Step 2: Click the Effects option at the bottom of the display, and then tap the Facial or Body Effects option.
Step 3: Locate and choose the Big Head effect from the Emotions effect section.
Step 4: The big head effect may be modified in speed, range, and intensity. Finally, adjust the duration of the Big head effect to match the video’s length.
You can check the video tutorial below to find out more details in creating big head and small body effect on video with CapCut.
Part 3: How to Add Big Head Effect in Filmora Video Editor? [3 Ways]
Filmora video editor by Wondershare includes the typical overlays, transitions, trimming, as well as the effects that we’ve grown to expect from the enthusiast-level video editor. It features a user-friendly interface that is clean, minimalistic, and dark. If that wasn’t enough, we’re sure you’ll be pleased to learn that the Filmora program can be used to create the TikTok big head effect in several ways.
With all of the characteristics we’ve discussed so far, you may further customize the Big Head effect with various Filmora effects. Let’s show you how:
Launch Filmora and click on the Import tab to select the video file you want to use. And then drag and drop the imported media file onto the timeline panel.
For Win 7 or later (64-bit)
For macOS 10.12 or later
Method 1: Create Big Head with AR Stick Bubble Head Effect in Filmora Video Editor
To add the Big Head effect on Filmora, click on the Effects option and select the AR Stickers option. Type bubble head in the search bar and then you will see it in the screen. Then, drag and drop the AR Stickers Bubble Head effect onto the timeline**,** specifically to the portion of the video where you want to add the Big Head filter on the person. As you do that, you will see a Bubble present on the video.
Besides the bubble head effect, there are many more AR stickers available, such as heart eyes, censor bar, emojis, and big eyes. Download the Filmora video editor now and check it yourself.
For Win 7 or later (64-bit)
For macOS 10.12 or later
Method 2: Add Magnify Effect to Video
In the Effects tab, go to the Recommended category, and then you will see the magnify effect. Drag and drop it to the timeline above the video track, and you will see part of the video has been magnified accordingly.
Now, double click on the effect in the timeline and open the Properties of the magnify effect. From the Properties section, you can adjust the size of the bubble using functions such as the Radius, CenterY, CenterX, Alpha, Zoom rate, etc to get a better video with big head effects.
Note: If you’re unable to locate the Magnify option in the Effects tab, please download and install the latest version of Filmora, and then type “Magnify” in the search bar, and the system will directly take you to where the option is present.
Method 3: Use Mask and Scale to Make a Video with Big Head Effect
Besides adding magnify effects and bubblehead effects, you can also use the mask preset to create a big head effect in Filmora.
Drag and drop the video to video track 1 and video track 2 respectively in Filmora. Then go to the Effect tab, and scroll down to the Utility category, and place the Image Mask effect to the video above. Or, you can type image mask in the search bar to locate it quickly.
Now, double-click the video with the image mask to adjust the properties. Scroll down to the Video Effects field, and you will see the Image Mask. Click the arrow icon to choose a mask preset, adjust its position and size settings to fit the video.
Tips: You can hide the video in track 1 by clicking the eye icon so you can adjust the video with the image mask conveniently. Click it again then you will see the video.
Next, click the video in track 2 again, and then go to the Transform tab, use the Scale slider to adjust the video size to make a big head effect.
Watch the video tutorial below to find out how to use the Image Mask effect to create a video with a big head effect in Filmora.
For Win 7 or later (64-bit)
For macOS 10.12 or later
After creating the video with a big head effect, click the Export button on the screen to save the video on the computer, and then upload it to TikTok from your computer directly.
Conclusion
This article demonstrates the steps you need to take to add the TikTok Big Head filter to your videos. Remember, the Big Head filter is used to make videos more amusing for entertainment purposes.
Not only TikTok, but different apps such as CapCut on Android and Wondershare Filmora on PC can be of great use to you. Especially in Filmora, you get tons of video editing features that unlock your way into the editing world!
Also read:
- [Updated] Outrageous Odyssey Your Roadmap to the Funniest TikTok Challenges
- Boosting Discord Chats' Quality with VoiceMod Tips and Tricks
- [Updated] 2024 Approved Master the Quick Art of TikTok Film Rate
- [New] In 2024, Unlock Innovative TikTok Edits with Leading Windows Tools
- The Ultimate TikTok Boosting Playbook Strategies to Grow Your Community
- [New] 2024 Approved Maximize TikTok Impact Unique Usernames That Attract Viewers
- [New] Fast Track Fame on TikTok Crucial Steps for Expansion
- 2024 Approved Download Unmarked TikTok The Easy Way
- [Updated] Download Unbranded TikTok Videos Online for 2024
- Earn Big, Fast The Ultimate Guide to TikTok's Wealth Generation (8 Strategies)
- In 2024, Critical Considerations for Successful TikTok Use on macOS
- [Updated] Mastering TikTok Engagement to Boost Your Brand for 2024
- [New] In 2024, Boost Creativity on TikTok - Top 10 Free Edits for Mac Users
- [New] Step Into the Arena Joining Lives on TikTok for 2024
- Exploring the Significance of PFP on TikTok Platform for 2024
- In 2024, The Ultimate TikTok Voiceover Playbook
- [Updated] 2024 Approved Unlock the Secrets of High-Quality TikTok Filming
- Trending Apps Battle Royale Who'll Win Over Users, Likes or TikTok?
- [Updated] The Most Sharing Videos TikTok Reactions
- Smooth Video Uploads to TikTok with Chrome/Android/iOS (Updated ) for 2024
- [New] In 2024, Navigating TikTok with Mac Key Knowledge Points
- In 2024, Unwind and Learn Top Relaxing TikTok Dances
- [Updated] In 2024, Top 20 Hilarious TikTok Skits for Giggle Fests
- Top TikTok Titans to Motivate You Every Day for 2024
- Carving Out the Ultimate TikTok Final Act for 2024
- [Updated] Stitch Storytelling Creating Content that Closes the Gap
- [New] In 2024, Ignite Your Videos with These Top 50+ Inspirational Quotes
- [Updated] Planetary Palate Pleasures Iconic Dishes From Around the Globe
- 2024 Approved Laugh Riot on TikTok Unveiling the Best Jokes and Riddles
- [New] Navigating Through Best 6 Free Online Converters TikTok to MP3
- [Updated] Sketching Your Signature TikTok End-Note for 2024
- [Updated] Step Up and Shine with These 15 TikTok Talents
- [New] In 2024, Swiftly Secure Your Favorite TikToks
- [New] In 2024, Savoring Secrets #Tiktok Food Trends You Can't Miss
- [Updated] 2024 Approved Achieving Professional-Grade Slow Motions in Your TikTok Content
- In 2024, Mastering Virality on TikTok Essential Hits
- [New] In 2024, Innovative Techniques for Self-Duplication on Social Media's Star Platform, TikTok
- [Updated] From Proportions to Portrayals Gigantic Heads in TikTok
- Top 10 Customizable TikFilters for Unique Content for 2024
- [Updated] 2024 Approved Scaling Up Integrating TikTok Into Your Brand's Strategy
- [New] In 2024, Inadvertent TikTok Redownload – What's Next?
- [Updated] 2024 Approved Culinary Journey Worldwide Popular Foods & Recipes
- [New] In 2024, Eliminate Visual Annoyances Best Mobile Apps
- [New] The Ultimate Guide to TikTok Substitutes (Updated List) for 2024
- How to Rescue Lost Photos from Asus ROG Phone 8 Pro?
- [New] In 2024, Your Journey Through the World of iPhone Memos
- Sim Unlock Vivo V27e Phones without Code 2 Ways to Remove Android Sim Lock
- 2024 Approved How to Screen Hulu On Any System Seamlessly
- Can Life360 Track Or See Text Messages? What Can You Do with Life360 On Xiaomi 13T Pro? | Dr.fone
- [New] Rage, Raid and Rebel Without a GTA Tale for 2024
- In 2024, A Comprehensive Guide to iCloud Unlock On Apple iPhone 14 Online
- In 2024, A Comprehensive List of Incredible Games
- In 2024, 10 Matching Color Combination That Works Together
- In 2024, Top 10 Telegram Spy Tools On Oppo Reno 8T for Parents | Dr.fone
- Do You Want to Excel at Using Adobe Premiere Pro Software for Splitting Videos and Audio? Learn About Splitting a Video and Audio Using Different Tools and Add a New Skill to Your Skillset with a Step-by-Step Guide in This Article
- [Updated] The Top-Tier Phone Apps Evolving How You Communicate for 2024
- [New] In 2024, A-List PPTs Into Screen Capture
- What to Do if Google Play Services Keeps Stopping on Itel P55+ | Dr.fone
- [Updated] InstaStars Academy How to Amass 1,000+ Followers Each Month
- Top 11 Free Apps to Check IMEI on iPhone 13
- 2024 Approved Navigating Through Instagram Video Woes with Ease
- In 2024, iPogo will be the new iSpoofer On Google Pixel 7a? | Dr.fone
- [Updated] Quick Recording Trick Webcam + Display on the Fly
- Fixing Foneazy MockGo Not Working On Samsung Galaxy M34 5G | Dr.fone
- [Updated] Unveiling the Truth A Speedy Guide to Spotting Phony Followers on Instagram
- [Updated] In 2024, High-Quality Video Calling Solutions Top 10 Best Apps Ranked!
- In 2024, How to Migrate Android Data From Honor V Purse to New Android Phone? | Dr.fone
- In 2024, How To Enable USB Debugging on a Locked Samsung Galaxy S23 Ultra Phone
- [New] Snapchat Soundscapes Full Playback, No Missed Beats
- 2024 Approved Essential Websites & Applications for Supercharging Your Videography with Captivating Audio Tracks Pros, Cons, and More
- Updated 11 Best Free Audio Editors for Windows and Mac (Totally Free)
- 2024 Approved Achieving Professional Results Attaching Soundtracks to Videos with Magix Movie Editor
- Leveraging Instagram Stories with Ease and Flair
- A Quick Guide to Samsung Galaxy S24 Ultra FRP Bypass Instantly
- [Updated] Decoding Instagram Selfies The Validation Handbook
- Title: "[New] 2024 Approved Transform Your TikTok Footage Advanced Slow Motion Filming Techniques"
- Author: Stephen
- Created at : 2024-05-23 04:27:08
- Updated at : 2024-05-24 04:27:08
- Link: https://tiktok-video-recordings.techidaily.com/new-2024-approved-transform-your-tiktok-footage-advanced-slow-motion-filming-techniques/
- License: This work is licensed under CC BY-NC-SA 4.0.
