
!["[New] Ace Your TikTok Videos 10 Top Editing Software Picks (Win)"](https://www.lifewire.com/thmb/YUHk21uRtPeftxU6877erNIAxw0=/400x300/filters:no_upscale():max_bytes(150000):strip_icc()/GettyImages-629584038-5b58e85a46e0fb0024c67b2f.jpg)
"[New] Ace Your TikTok Videos 10 Top Editing Software Picks (Win)"
Ace Your TikTok Videos: 10 Top Editing Software Picks (Win)
Best 10 TikTok Video Editors to Make a TikTok Video [Online/Windows/PC]

Liza Brown
Mar 27, 2024• Proven solutions
TikTok is one of the widely used video platforms all over the world, especially in Asia by people of all age groups. It is a platform that allows people to display their skills to a huge audience and gain popularity, even to a celebrity level.
TikTok allows its users to create videos of them and share them to gain popularity. Since TikTok is a popular platform, there any many TikTok video editors in the market to create attractive videos.
These TikTok video editors have a lot of features that can help you make TikTok videos that stand out among the crowd and even allow you to edit TikTok videos. You can create a unique video that displays your skills beautifully using these TikTok video editing apps.
A well-edited TikTok video is found to be more appealing and can gather more likes which in turn will help to boost your popularity. So here we will discuss some of the best TikTok video editing apps in the market that can help you bring out the best TikTok videos to the platform.
Best 10 TikTok Video Editors to Make a TikTok Video
There are a lot of TikTok video editing apps in the market and it can often be confusing which one to choose to make a TikTok video. A good video editor is one that provides you with a number of quality editing features that can boost both the appearance and quality of your video. Here we will be discussing 10 such TikTok video editors so that it is easy for you to choose.
- 1.Wondershare Filmora – Windows and Mac
- 2.LightMV - Online
- 3.Renderforest - Online
- 4.VSDC Video Editor – Windows and Mac
- 5.Windows Movie Maker - Windows
- 6.Adobe Premiere Pro – Windows and Mac
- 7.Cyberlink PowerDirector – Windows and Mac
- 8.iMovie - Mac
- 9.Final Cut Pro X (Windows and Mac)
- 10.Openshot - Windows and Mac
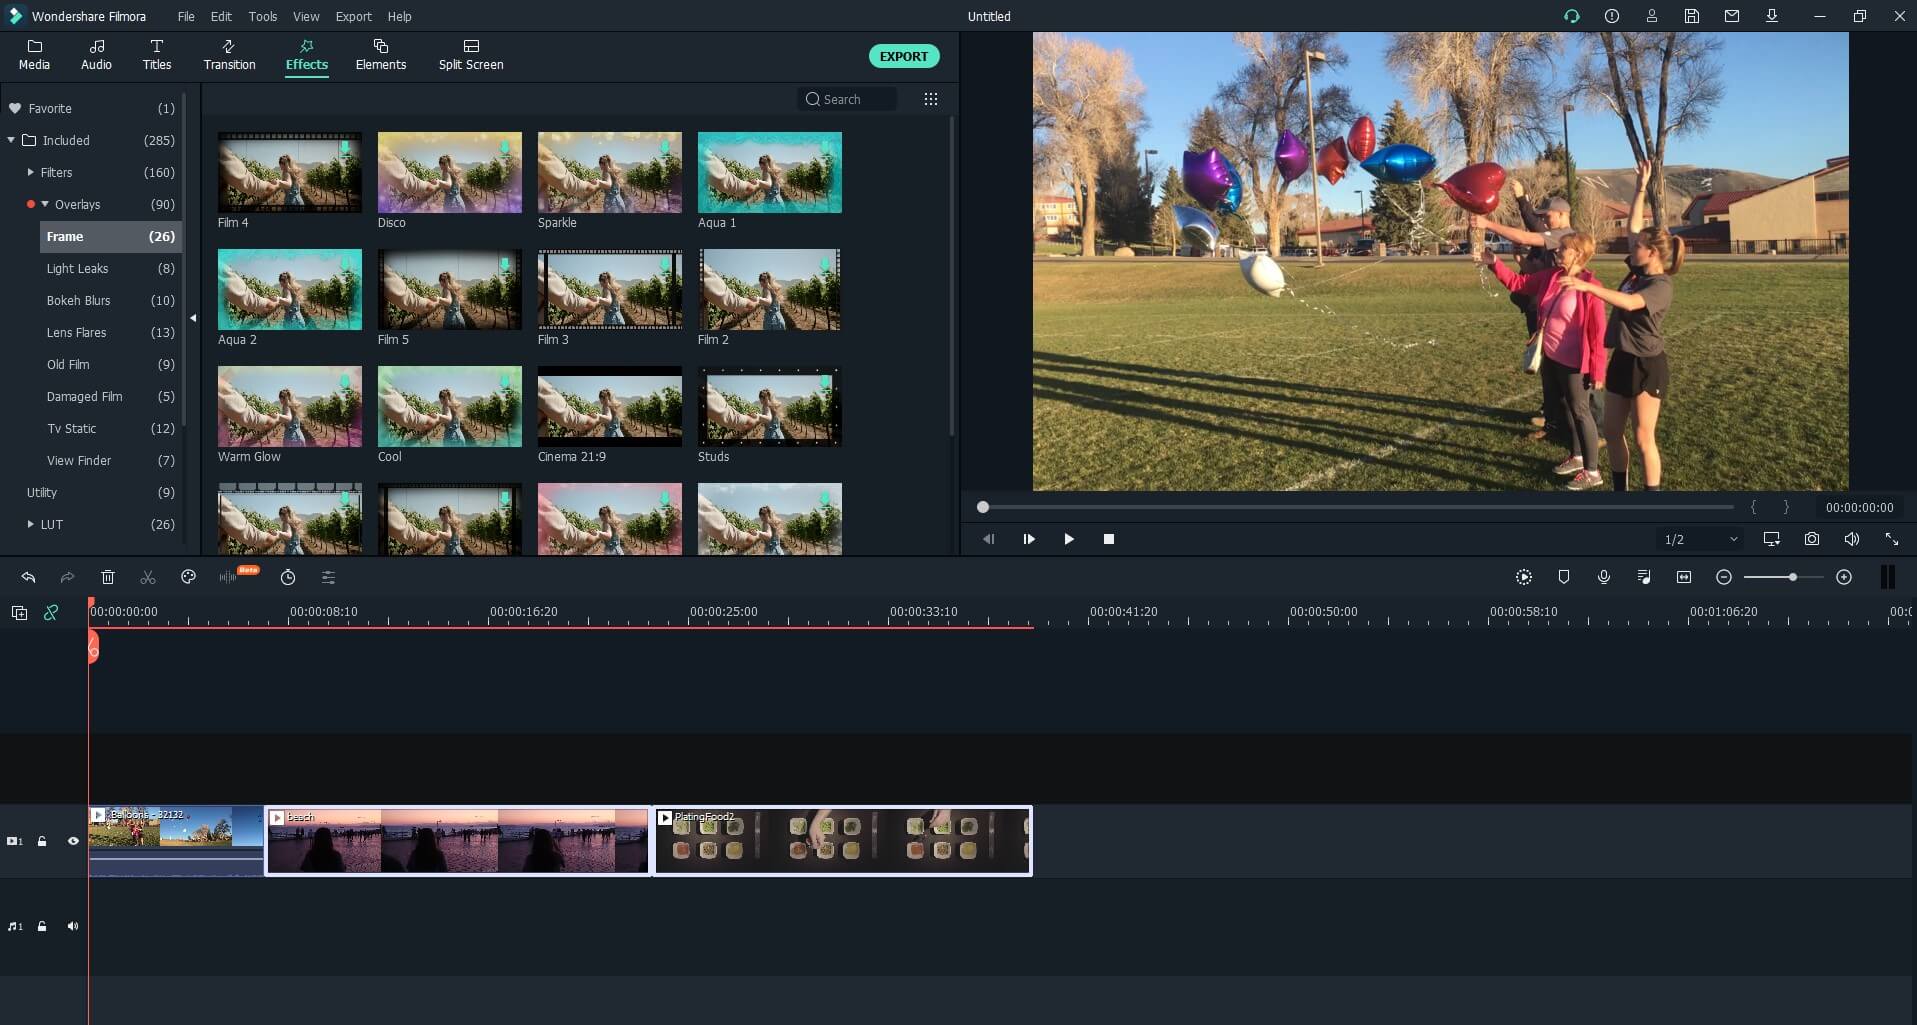
1.Wondershare Filmora – Windows and Mac
Wondershare Filmora is one of the widely used TikTok video editors that gives its users access to a large number of editing features and options to create the best music and comedy videos. It allows to edit and create wonderful videos whether it be captured using DSLRs, action cameras, smartphone cameras, or any other digital cameras.
For Win 7 or later (64-bit)
 Secure Download
For macOS 10.12 or later
Secure Download
Price
- Unlimited free trial
- Provides different plans for individuals, education, and busines
Key Features
- Supports editing of 4K videos
- Provides a large number of audio options, colorful visual effects, and transitions
- Editing tools for both audio and videos
- Noise removal, color tuning, advanced text editor, etc.
- Slow-motion, backward motion, and other video features
2.LightMV - Online
LightMV is an online video maker that can be used to make TikTok videos that are so cool to be missed. It allows to mix photos and video and create an appealing video. This tool has a number of templates to choose from and is compatible with any devices including android and iOS phones.
Price
- $29 for downloading 5 videos
- $39 for downloading 30 videos
- $299 fordownloading 365 videos
Key Features
- A regular update of video templates that are designed professionally
- Unlimited HD video creation technology
- Occasion based themes for easy video editing
- No annoying watermarks while saving the video
3.Renderforest - Online
Renderforest is an all in one video editing toolkit that can help you bring out some amazing TikTok videos. It is an application that is being used by some of the world-famous companies for video editing purposes.

Price
- Free
- Amateur version - $59 per month
- Pro version - $89per month
- Business version - $119per month
- Enterprise version - $299per month
Key Features
- Many visual templates to choose from depending on the category of videos you are creating
- Simple and easy to use user interface
- A clean pack of typography that makes the TikTok video stand out
- Unique animation effects and modern feel transitions
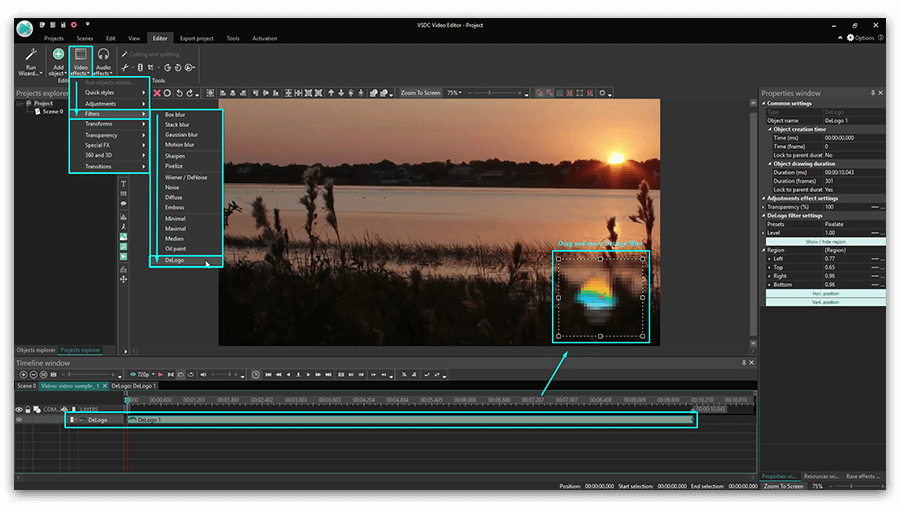
4.VSDC Video Editor – Windows and Mac
VSDC Video Editor is an application that brings together a set of interesting tools for video and audio editing apt for creating an amazing TikTok video. This application has about 5 million users around the world and can edit TikTok videos to a simple as well as to a complicated level.
Price
- Free
- Pro version - $19.99
Key Features
- Offers a large number of trendy video transitions, effects, and filters
- Incorporate tools like zoom, color correction, 360 video editing, etc.
- A feature of the Powerful Chroma Key, that can be used to remove green background
- Supports most of the popular video formats and codecs
5.Windows Movie Maker - Windows
Windows movie maker is one of the simplest and widely used video editing application for a long time. It offers a lot of simple but standard editing features and allows you to create and edit TikTok videos in a short time.
Price
- Free
- Lifetime license for $39.95
Key Features
- Add Music, Effects, Text, Animations, and Mosaic to the videos
- Cut, crop, join and rotate the videos
- Easy mixing of video and photos with music
6.Adobe Premiere Pro – Windows and Mac
Adobe Premiere Pro is one of the widely used video editing applications all over the world by armatures as well as professionals alike. Its extensive video editing features make it capable of editing any type of videos, ranging from small TikTok videos to movies.
Price:
- Free trial
- $19.99 per month, for an annual term
Key Features
- Creative tools that help to create polished videos and films
- Adobe Sensei powered automated tools that help to save editing time
- Edit videos from any camera, in any format, and for any platforms
7.Cyberlink PowerDirector – Windows and Mac
Cyberlink PowerDirector is a video editing application that offers powerful tools, infinite possibilities, and inspirations. Its intuitive user interface along with the editing features makes it one of the best tools for creating TikTok videos.
Price
- Free
- PowerDirector 19 Ultra - $99.99 (lifetime)
- PowerDirector 19 Ultimate - $139.99 (lifetime)
- PowerDirector 365 - $51.99 per year
Key Features
- New advanced mask tools that allow to cut and combine images from clips
- Motion graphic tiles that are customizable
- Animated sketch templates
- Intuitive motion tracking in videos
8.iMovie - Mac
iMovie is an apple device exclusive video editing application that has intuitive editing features and a streamlined design, which makes it perfect to be used as a TikTok video editor. It allows you to edit videos in 4K resolution and can be used across all Apple devices, i.e. u can finish editing the video on your Mac which you started on an iPhone or iPad.

Price
- Free
Key Features
- 29 trailer templates with awesome graphics
- Animated drop zones that help to select the best photos and videos
- Allows to enhance videos by adding titles, transitions, travel maps, and 3D globes
- Allows to create cool soundtracks using sound effects, built-in music, & the iTunes library
9.Final Cut Pro X (Windows and Mac)
Final Cut Po X is a very user-friendly video editing application that provides a lot of basic as well as pro-level video editing features. This application is preferred by many people as it offers all the needed editing tools under one roof, to make TikTok videos.
Price
- Free trial
- One time purchase - $299.99
Key Features
- Motion graphics, editing audio, and delivery
- Advanced HDR support, color grading, and ProRes RAW
- VR headset playback and 360° video editing
- An accelerated post product that ensures fast delivery of the final video
10.Openshot - Windows and Mac
Openshot is an incredibly simple and powerful application that can be used to create awesome TikTok videos appealing to people. It is an open-sourced application that is easy to use, quick to learn, and yields the expected results.

Price
- Free
Key Features
- Quick trimming and cropping of videos from any position
- Availability of wonderful animations and keyframes
- Unlimited audio tracks and layers for mixing with the video
- Allows to visualize audio files as waveforms
Conclusion
TikTok is a media platform that allows its users to display their skills and gain popularity by uploading unique videos into one’s profile. So the quality of the videos is equally important as the skills displayed. This is why we have listed the best TikTok video editors in the market that can make wonderful TikTok videos.
These TikTok video editing apps have all the features and functions needed to make TikTok videos stand out among the crowd, as well as edit a TikTok video to make it more appealing. Better the video, the larger the audience.
You can use any of these TikTok video editors to create TikTok videos on your own within a short time. We hope our suggestion will help you create outstanding TikTok videos in the future. Please leave feedback about our suggestions in the comment box below. Thank you
Liza Brown
Liza Brown is a writer and a lover of all things video.
Follow @Liza Brown
Liza Brown
Mar 27, 2024• Proven solutions
TikTok is one of the widely used video platforms all over the world, especially in Asia by people of all age groups. It is a platform that allows people to display their skills to a huge audience and gain popularity, even to a celebrity level.
TikTok allows its users to create videos of them and share them to gain popularity. Since TikTok is a popular platform, there any many TikTok video editors in the market to create attractive videos.
These TikTok video editors have a lot of features that can help you make TikTok videos that stand out among the crowd and even allow you to edit TikTok videos. You can create a unique video that displays your skills beautifully using these TikTok video editing apps.
A well-edited TikTok video is found to be more appealing and can gather more likes which in turn will help to boost your popularity. So here we will discuss some of the best TikTok video editing apps in the market that can help you bring out the best TikTok videos to the platform.
Best 10 TikTok Video Editors to Make a TikTok Video
There are a lot of TikTok video editing apps in the market and it can often be confusing which one to choose to make a TikTok video. A good video editor is one that provides you with a number of quality editing features that can boost both the appearance and quality of your video. Here we will be discussing 10 such TikTok video editors so that it is easy for you to choose.
- 1.Wondershare Filmora – Windows and Mac
- 2.LightMV - Online
- 3.Renderforest - Online
- 4.VSDC Video Editor – Windows and Mac
- 5.Windows Movie Maker - Windows
- 6.Adobe Premiere Pro – Windows and Mac
- 7.Cyberlink PowerDirector – Windows and Mac
- 8.iMovie - Mac
- 9.Final Cut Pro X (Windows and Mac)
- 10.Openshot - Windows and Mac
1.Wondershare Filmora – Windows and Mac
Wondershare Filmora is one of the widely used TikTok video editors that gives its users access to a large number of editing features and options to create the best music and comedy videos. It allows to edit and create wonderful videos whether it be captured using DSLRs, action cameras, smartphone cameras, or any other digital cameras.
For Win 7 or later (64-bit)
Secure Download
For macOS 10.12 or later
Secure Download
Price
- Unlimited free trial
- Provides different plans for individuals, education, and busines
Key Features
- Supports editing of 4K videos
- Provides a large number of audio options, colorful visual effects, and transitions
- Editing tools for both audio and videos
- Noise removal, color tuning, advanced text editor, etc.
- Slow-motion, backward motion, and other video features
2.LightMV - Online
LightMV is an online video maker that can be used to make TikTok videos that are so cool to be missed. It allows to mix photos and video and create an appealing video. This tool has a number of templates to choose from and is compatible with any devices including android and iOS phones.
Price
- $29 for downloading 5 videos
- $39 for downloading 30 videos
- $299 fordownloading 365 videos
Key Features
- A regular update of video templates that are designed professionally
- Unlimited HD video creation technology
- Occasion based themes for easy video editing
- No annoying watermarks while saving the video
3.Renderforest - Online
Renderforest is an all in one video editing toolkit that can help you bring out some amazing TikTok videos. It is an application that is being used by some of the world-famous companies for video editing purposes.
Price
- Free
- Amateur version - $59 per month
- Pro version - $89per month
- Business version - $119per month
- Enterprise version - $299per month
Key Features
- Many visual templates to choose from depending on the category of videos you are creating
- Simple and easy to use user interface
- A clean pack of typography that makes the TikTok video stand out
- Unique animation effects and modern feel transitions
4.VSDC Video Editor – Windows and Mac
VSDC Video Editor is an application that brings together a set of interesting tools for video and audio editing apt for creating an amazing TikTok video. This application has about 5 million users around the world and can edit TikTok videos to a simple as well as to a complicated level.
Price
- Free
- Pro version - $19.99
Key Features
- Offers a large number of trendy video transitions, effects, and filters
- Incorporate tools like zoom, color correction, 360 video editing, etc.
- A feature of the Powerful Chroma Key, that can be used to remove green background
- Supports most of the popular video formats and codecs
5.Windows Movie Maker - Windows
Windows movie maker is one of the simplest and widely used video editing application for a long time. It offers a lot of simple but standard editing features and allows you to create and edit TikTok videos in a short time.
Price
- Free
- Lifetime license for $39.95
Key Features
- Add Music, Effects, Text, Animations, and Mosaic to the videos
- Cut, crop, join and rotate the videos
- Easy mixing of video and photos with music
6.Adobe Premiere Pro – Windows and Mac
Adobe Premiere Pro is one of the widely used video editing applications all over the world by armatures as well as professionals alike. Its extensive video editing features make it capable of editing any type of videos, ranging from small TikTok videos to movies.
Price:
- Free trial
- $19.99 per month, for an annual term
Key Features
- Creative tools that help to create polished videos and films
- Adobe Sensei powered automated tools that help to save editing time
- Edit videos from any camera, in any format, and for any platforms
7.Cyberlink PowerDirector – Windows and Mac
Cyberlink PowerDirector is a video editing application that offers powerful tools, infinite possibilities, and inspirations. Its intuitive user interface along with the editing features makes it one of the best tools for creating TikTok videos.
Price
- Free
- PowerDirector 19 Ultra - $99.99 (lifetime)
- PowerDirector 19 Ultimate - $139.99 (lifetime)
- PowerDirector 365 - $51.99 per year
Key Features
- New advanced mask tools that allow to cut and combine images from clips
- Motion graphic tiles that are customizable
- Animated sketch templates
- Intuitive motion tracking in videos
8.iMovie - Mac
iMovie is an apple device exclusive video editing application that has intuitive editing features and a streamlined design, which makes it perfect to be used as a TikTok video editor. It allows you to edit videos in 4K resolution and can be used across all Apple devices, i.e. u can finish editing the video on your Mac which you started on an iPhone or iPad.
Price
- Free
Key Features
- 29 trailer templates with awesome graphics
- Animated drop zones that help to select the best photos and videos
- Allows to enhance videos by adding titles, transitions, travel maps, and 3D globes
- Allows to create cool soundtracks using sound effects, built-in music, & the iTunes library
9.Final Cut Pro X (Windows and Mac)
Final Cut Po X is a very user-friendly video editing application that provides a lot of basic as well as pro-level video editing features. This application is preferred by many people as it offers all the needed editing tools under one roof, to make TikTok videos.
Price
- Free trial
- One time purchase - $299.99
Key Features
- Motion graphics, editing audio, and delivery
- Advanced HDR support, color grading, and ProRes RAW
- VR headset playback and 360° video editing
- An accelerated post product that ensures fast delivery of the final video
10.Openshot - Windows and Mac
Openshot is an incredibly simple and powerful application that can be used to create awesome TikTok videos appealing to people. It is an open-sourced application that is easy to use, quick to learn, and yields the expected results.
Price
- Free
Key Features
- Quick trimming and cropping of videos from any position
- Availability of wonderful animations and keyframes
- Unlimited audio tracks and layers for mixing with the video
- Allows to visualize audio files as waveforms
Conclusion
TikTok is a media platform that allows its users to display their skills and gain popularity by uploading unique videos into one’s profile. So the quality of the videos is equally important as the skills displayed. This is why we have listed the best TikTok video editors in the market that can make wonderful TikTok videos.
These TikTok video editing apps have all the features and functions needed to make TikTok videos stand out among the crowd, as well as edit a TikTok video to make it more appealing. Better the video, the larger the audience.
You can use any of these TikTok video editors to create TikTok videos on your own within a short time. We hope our suggestion will help you create outstanding TikTok videos in the future. Please leave feedback about our suggestions in the comment box below. Thank you
Liza Brown
Liza Brown is a writer and a lover of all things video.
Follow @Liza Brown
Audacity Guide: Cutting Out Unwanted Sounds
The most frequent request you’ll get from video makers is to eliminate irritating noises like rumbling or humming from an original clip. Almost all of the time, capturing high-quality audio during filming is challenging since the conversation is often hard to hear or is made unclear due to surrounding noises, such as the dreadful air conditioners or fans.
To get rid of all these awful noises, this Audacity Noise Reduction feature will serve you a significant purpose in removing unwanted background noise for your future videos. Without further ado, let’s get started!
In this article
01 Things You Need to Prepare for Background Noise Reduction
02 How to Remove Background Noise in Audacity?
03 Why is Audacity Noise Reduction Not Working?
04 How to Prevent Background Noise in Audio Recording?
05 How to Remove Background Noise in Filmora?
Part 1: Things You Need to Prepare for Background Noise Reduction
Here are few things that you need to consider before you apply the noise reduction to your clips:
1. Noise Sample
A decent sample of the noise you wish to eliminate is perhaps the most crucial aspect of the Audacity remove noise procedure.
This will be used by Audacity to understand the noise and build a noise profile. The noise recording should last for a fair amount of time and be devoid of any other noises.
2. Avoid Copy Pasting Tiny Noise Section in Your Spoken Phrases
When you have a tiny part of noise between your stated words on your audio, please don’t copy/paste it to make a more significant piece of sound for Audacity to examine.
You would not be supplying Audacity with any more information that will help it generate a decent noise profile. The noise profile is what enables Audacity to tell the difference between speech and noise.
3. Minimum 2048 Data Samples Required
To build a noise profile, the Noise Reduction function requires a minimum of 2048 sample data. An audio file with a sampling frequency of 44.1kHz is roughly five hundredths of a second.
Note that this is the minor sound level that Audacity needs to generate a noise profile; however, should you supply a larger sample of the noise, Audacity can typically perform a great job of producing a suitable noise profile. As a result, attempt to capture a few seconds of background noises wherever possible.
4. Establish Recording Level and Record “Silence”
Setting your audio volume and capturing some “quiet” prior to speaking is the best way to achieve this. Instead, when you’ve finished talking, keep your camera/recorder going for a few moments.
Don’t move or create any sounds while capturing the background noises, and keep an ear open for any other noises. You only need to capture the ambient noise for a few moments; two to five seconds will suffice.
Part 2: How to Remove Background Noise in Audacity on Windows and Mac?
Whether you are using Windows or macOS, we will show you a step-by-step process to achieve your results using both software in this part of Audacity remove background music guide.
Remove background noise in Audacity on Windows
Step 1: On your recording, select a few moments of sound. Any segment of noise that incorporates other noises should be avoided.

Step 2: From the Effect menu, select Noise Reduction.

Step 3: Select the Get Noise Profile option whenever the Noise Reduction effect screen appears.

Note: Choose whether to implement the noise removal to the entire waveforms or only a portion of it.
Step 4: To access the Noise Reduction effects window, go to Effects > Noise Reduction. Raise the level of noise reduction progressively while previewing the result.

Step 5: Head over to the File section to Export and Save the result. Audacity does not save sound clips when you select Save Project; instead, you must choose Export. Select the file type you want to store and the place wherever you can save it. Select Save after giving the File Name.

Remove background noise in Audacity on Mac
Step 1: Create a room tone-containing audio file. When you don’t have a separate track for room tone, use a recording with a few moments of quiet in it. Click-and-drag to select a segment with a few minutes of silence using the Selection Tool.

Step 2: Select Noise Reduction from the Effects tab. Select the Get Noise Profile tab in the new tab under Step 1. The screen will shut, and Audacity will take noise profile samples of the indicated area.

Step 3: Click-and-drag to select the whole file, which requires noise reduction with the Selection Tool. To re-open the function, go to the Effect tab and pick Noise Reduction. Make modifications to the following parameters under Step 2:
- Reduce and Residue
- Frequency Smoothing (bands)
- Sensitivity
- Noise Reduction

Step 4: To listen to how the chosen file will look with the selected parameters, select Preview. Re-adjust until you have a sound noise reduction with no interference. When you’re finished, select Reduce and click OK.
Part 3: Why is Audacity Noise Reduction Not Working?
It’s possible that the Noise Reduction function isn’t letting you mop up your recording since your audio isn’t appropriate for it. The disturbance must be continuous, not random or fluctuating, to work for Audacity’s Noise Reduction function.
For example, the Noise Reduction function will not assist if your audio was made in a busy environment with unique noises such as background chatter, random traffic noises, or in an exhibition space or museum. The Noise Reduction feature in Audacity isn’t meant to cope with that kind of distortion. You’ll need to alter your recording approach if you’re capturing voice in either of those situations.
Under the following situations, the Audacity Noise Reduction function might underperform.
- Particular noise in the background, including traffic or people.
- When the harmonics of the sound and voice are comparable.
- There is sound variance where there is fluctuation in the noise.
- The volume of the voice is comparable to or lower than that of the background noise.
- When the noise is irregular or changeable rather than continuous.
- The loudness is deafening.
- The sound is a single click or pop.
Part 4: How to Prevent Background Noise in Audio Recording?
Although Audacity allows eliminating noise very simply, it is still an additional level that takes time to refine your podcast production. These pointers can help you avoid the necessity for noise reduction and cut down on the amount of time you spend processing.
1. Reduce the Computer Fan Noise
Whenever computers become too heated, they can produce a lot of noise. You may limit the amount of software that runs and position your mic away from the keyboard to help lessen this impact and avoid the fan from coming on.
However, even if you observe all of these guidelines, undesired recording sounds may still appear in your program. Fortunately, contemporary software makes this problem quite simple to resolve.
2. Reduce the Gain and Get Close to the Mic
Reduce the gain (sensitivity of the microphone) and go nearer to it. Talking straight into the microphone won’t distort your audio if you reduce the gain, and that would assist your microphone in concentrating on scooping up your voice’s tone.
Bonus Tip: Set your recorder’s (or DAW’s) sensitivity such that your speech peaks between -12 and -10db.
3. Utilize a Versatile Microphone
Condenser and dynamic microphones are the two most common types of podcast microphones. Condenser microphones are significantly more sensitive instruments meant to take up average atmospheric noise, whereas dynamic microphones have a narrower frequency range, picking up fewer ambient noises.
4. Optimize Your Recording Environment
The most significant and most crucial aspect of your podcasts’ sound quality is where you capture it. To optimize your personal podcasting space, we recommend choosing a peaceful, compact area away from HVAC systems, vehicles, external hard drives, background sound, motors, and other distractions. You may also increase the tone of your room by using natural sound absorbents such as curtains, rugs, carpets, and sofas.
Part 5: How to Remove Background Noise in Filmora?
Although there is a lot of software available to eliminate ambient noise, we highly suggest Wondershare Filmora Video Editor to edit audio and video in one place.
In addition to the standard audio editing capabilities, the recently redesigned Filmora currently includes enhanced waveforms, volume Keyframing , peak metering, and audio transitions, giving you a better audio editing interface.
For Win 7 or later (64-bit)
For macOS 10.12 or later
Filmora Video Editor will quickly remove ambient sound from both sound/video. You may also remove the sound from the video with this simple video editor, use the Audio Equalizer or Audio Mixer functions to modify the audio further, and then Export and save the audio in an Mp3 file. Here are the detailed steps:
Step 1: In the Wondershare Filmora Timeline menu, Import your footage. Trim the footage after previewing it and deleting the sections you don’t want to retain.

Step 2: To eliminate the ambient noise immediately, double-click on the video file, and go to the Audio panel to select the Remove Background Noise option. You will find that the background noise is removed automatically.

Step 3: After checking the results, select Export to download the noise-reduced clip to your desktop or upload it immediately to YouTube or Vimeo.

Conclusion
Well, there you have it. In this Audacity Remove Background Noise guide, we have reviewed every possible method you can adopt to get rid of the unnecessary background noise in the Audacity. And if the desired results are still not achieved, we highly recommend using the Wondershare Filmora editing software. Not only will it help you remove the unwanted ambient noise, but it will also allow you to customize your audio or video file further.
02 How to Remove Background Noise in Audacity?
03 Why is Audacity Noise Reduction Not Working?
04 How to Prevent Background Noise in Audio Recording?
05 How to Remove Background Noise in Filmora?
Part 1: Things You Need to Prepare for Background Noise Reduction
Here are few things that you need to consider before you apply the noise reduction to your clips:
1. Noise Sample
A decent sample of the noise you wish to eliminate is perhaps the most crucial aspect of the Audacity remove noise procedure.
This will be used by Audacity to understand the noise and build a noise profile. The noise recording should last for a fair amount of time and be devoid of any other noises.
2. Avoid Copy Pasting Tiny Noise Section in Your Spoken Phrases
When you have a tiny part of noise between your stated words on your audio, please don’t copy/paste it to make a more significant piece of sound for Audacity to examine.
You would not be supplying Audacity with any more information that will help it generate a decent noise profile. The noise profile is what enables Audacity to tell the difference between speech and noise.
3. Minimum 2048 Data Samples Required
To build a noise profile, the Noise Reduction function requires a minimum of 2048 sample data. An audio file with a sampling frequency of 44.1kHz is roughly five hundredths of a second.
Note that this is the minor sound level that Audacity needs to generate a noise profile; however, should you supply a larger sample of the noise, Audacity can typically perform a great job of producing a suitable noise profile. As a result, attempt to capture a few seconds of background noises wherever possible.
4. Establish Recording Level and Record “Silence”
Setting your audio volume and capturing some “quiet” prior to speaking is the best way to achieve this. Instead, when you’ve finished talking, keep your camera/recorder going for a few moments.
Don’t move or create any sounds while capturing the background noises, and keep an ear open for any other noises. You only need to capture the ambient noise for a few moments; two to five seconds will suffice.
Part 2: How to Remove Background Noise in Audacity on Windows and Mac?
Whether you are using Windows or macOS, we will show you a step-by-step process to achieve your results using both software in this part of Audacity remove background music guide.
Remove background noise in Audacity on Windows
Step 1: On your recording, select a few moments of sound. Any segment of noise that incorporates other noises should be avoided.
Step 2: From the Effect menu, select Noise Reduction.
Step 3: Select the Get Noise Profile option whenever the Noise Reduction effect screen appears.
Note: Choose whether to implement the noise removal to the entire waveforms or only a portion of it.
Step 4: To access the Noise Reduction effects window, go to Effects > Noise Reduction. Raise the level of noise reduction progressively while previewing the result.
Step 5: Head over to the File section to Export and Save the result. Audacity does not save sound clips when you select Save Project; instead, you must choose Export. Select the file type you want to store and the place wherever you can save it. Select Save after giving the File Name.
Remove background noise in Audacity on Mac
Step 1: Create a room tone-containing audio file. When you don’t have a separate track for room tone, use a recording with a few moments of quiet in it. Click-and-drag to select a segment with a few minutes of silence using the Selection Tool.
Step 2: Select Noise Reduction from the Effects tab. Select the Get Noise Profile tab in the new tab under Step 1. The screen will shut, and Audacity will take noise profile samples of the indicated area.
Step 3: Click-and-drag to select the whole file, which requires noise reduction with the Selection Tool. To re-open the function, go to the Effect tab and pick Noise Reduction. Make modifications to the following parameters under Step 2:
- Reduce and Residue
- Frequency Smoothing (bands)
- Sensitivity
- Noise Reduction
Step 4: To listen to how the chosen file will look with the selected parameters, select Preview. Re-adjust until you have a sound noise reduction with no interference. When you’re finished, select Reduce and click OK.
Part 3: Why is Audacity Noise Reduction Not Working?
It’s possible that the Noise Reduction function isn’t letting you mop up your recording since your audio isn’t appropriate for it. The disturbance must be continuous, not random or fluctuating, to work for Audacity’s Noise Reduction function.
For example, the Noise Reduction function will not assist if your audio was made in a busy environment with unique noises such as background chatter, random traffic noises, or in an exhibition space or museum. The Noise Reduction feature in Audacity isn’t meant to cope with that kind of distortion. You’ll need to alter your recording approach if you’re capturing voice in either of those situations.
Under the following situations, the Audacity Noise Reduction function might underperform.
- Particular noise in the background, including traffic or people.
- When the harmonics of the sound and voice are comparable.
- There is sound variance where there is fluctuation in the noise.
- The volume of the voice is comparable to or lower than that of the background noise.
- When the noise is irregular or changeable rather than continuous.
- The loudness is deafening.
- The sound is a single click or pop.
Part 4: How to Prevent Background Noise in Audio Recording?
Although Audacity allows eliminating noise very simply, it is still an additional level that takes time to refine your podcast production. These pointers can help you avoid the necessity for noise reduction and cut down on the amount of time you spend processing.
1. Reduce the Computer Fan Noise
Whenever computers become too heated, they can produce a lot of noise. You may limit the amount of software that runs and position your mic away from the keyboard to help lessen this impact and avoid the fan from coming on.
However, even if you observe all of these guidelines, undesired recording sounds may still appear in your program. Fortunately, contemporary software makes this problem quite simple to resolve.
2. Reduce the Gain and Get Close to the Mic
Reduce the gain (sensitivity of the microphone) and go nearer to it. Talking straight into the microphone won’t distort your audio if you reduce the gain, and that would assist your microphone in concentrating on scooping up your voice’s tone.
Bonus Tip: Set your recorder’s (or DAW’s) sensitivity such that your speech peaks between -12 and -10db.
3. Utilize a Versatile Microphone
Condenser and dynamic microphones are the two most common types of podcast microphones. Condenser microphones are significantly more sensitive instruments meant to take up average atmospheric noise, whereas dynamic microphones have a narrower frequency range, picking up fewer ambient noises.
4. Optimize Your Recording Environment
The most significant and most crucial aspect of your podcasts’ sound quality is where you capture it. To optimize your personal podcasting space, we recommend choosing a peaceful, compact area away from HVAC systems, vehicles, external hard drives, background sound, motors, and other distractions. You may also increase the tone of your room by using natural sound absorbents such as curtains, rugs, carpets, and sofas.
Part 5: How to Remove Background Noise in Filmora?
Although there is a lot of software available to eliminate ambient noise, we highly suggest Wondershare Filmora Video Editor to edit audio and video in one place.
In addition to the standard audio editing capabilities, the recently redesigned Filmora currently includes enhanced waveforms, volume Keyframing , peak metering, and audio transitions, giving you a better audio editing interface.
For Win 7 or later (64-bit)
For macOS 10.12 or later
Filmora Video Editor will quickly remove ambient sound from both sound/video. You may also remove the sound from the video with this simple video editor, use the Audio Equalizer or Audio Mixer functions to modify the audio further, and then Export and save the audio in an Mp3 file. Here are the detailed steps:
Step 1: In the Wondershare Filmora Timeline menu, Import your footage. Trim the footage after previewing it and deleting the sections you don’t want to retain.
Step 2: To eliminate the ambient noise immediately, double-click on the video file, and go to the Audio panel to select the Remove Background Noise option. You will find that the background noise is removed automatically.
Step 3: After checking the results, select Export to download the noise-reduced clip to your desktop or upload it immediately to YouTube or Vimeo.
Conclusion
Well, there you have it. In this Audacity Remove Background Noise guide, we have reviewed every possible method you can adopt to get rid of the unnecessary background noise in the Audacity. And if the desired results are still not achieved, we highly recommend using the Wondershare Filmora editing software. Not only will it help you remove the unwanted ambient noise, but it will also allow you to customize your audio or video file further.
Also read:
- 2024 Approved Tasty Treats Who's Cooking Up Trends?
- [New] Capture Attention with Influential Tags on Social Media's TikTok for 2024
- [Updated] In 2024, In-Depth Analysis of TikTok Visual Elements
- [Updated] In 2024, Crafting Share-Worthy Videos with Top TikTok Ideas
- [New] 2024 Approved Country Rhythms for Peaceful Evenings Top 20 TikTok Tracks
- [Updated] 2024 Approved Cutting Edge Channels to Watch in a Post-TikTok World
- [Updated] In 2024, Designing High Impact TikTok Content on Desktop
- Most Popular TikTok Filters Enhancing Video Quality for 2024
- [New] Mastering TikTok Mac/PC Interface Guide for 2024
- [New] Advanced TikTok Video to MP4 Maker
- [Updated] Giggle Grove A Top 20 List of Hilarious TikTok Content for 2024
- 2024 Approved Mastering TikTok Top Video Editing Tools Released
- [Updated] 2024 Approved What Are You Missing Out On? 5 Non-TikTok Apps to Try
- [New] Groove Guru's Top 20 Dances on TikTok for 2024
- In 2024, 120 Top Comedic TikTok Content
- [New] Tips and Tricks Mastering Voiceover on TikTok for 2024
- [Updated] 2024 Approved From Minuscule to Monumental A TikTok Guide for Oversized Characters
- [Updated] In 2024, Choreography in Clicks Constructing Captivating Mac-Based TikTok Dancing
- Unraveling the Wonders of TikTok' Written Language (Filters)
- Redefine Your Online Persona with a New TikTok Profile
- Elevate Your Social Media Impact with Inspiring TikTok Usernames for 2024
- [Updated] In 2024, Mastering the Art of TikTok Emojis A Comprehensive Guide
- TikTok's Finest High-Quality Downloads No Watermark for 2024
- Unlock Your Drive with Top TikTokers
- [New] In 2024, Top 15 Global TikTok Stars Their Journey of Fame Unveiled
- [Updated] Cross-Cuisine Delights Tasty Treats From Around The Globe for 2024
- [Updated] In 2024, Craft an Enigmatic Profile on TikTok with These Unique Ideas
- [New] In 2024, Building a Fanbase Key Strategies for Desktop TikTok Videos
- Resolving Recurring TikTok Problems Easily
- [Updated] Top 10 TikTok Influencers Redefining Gaming
- [New] In 2024, Gastronomic Adventures Await with These 15 Must-Watch Food Challenges on TikTok
- [Updated] Easy Steps to Dance & Unwind with These Top 20 Songs (Country Edition) for 2024
- [Updated] Enhance VFX Quality Best TikTok Watermark Removers
- [New] Mastering the Art of Powerful TikTok Campaigns for 2024
- [New] The Art of Eating 10 Social Media Staples
- [New] Navigating the Launch of TikTok Videos From PC
- [New] Unveiling Social Media's Gastronomic Waves for 2024
- In 2024, Innovative Frame Concepts to Make Your TikTok Presence Shine
- [Updated] Breaking Free From the Old A Complete, Step-By-Step Guide to Updating Your TikTok Avatar for 2024
- [New] Navigating a New Digital Landscape Detailed Steps for Updating TikTok Handle for 2024
- [New] 2024 Approved Boost Your Creativity Top 50+ TikTok Motivational Quotes
- [Updated] 2024 Approved Mastery in Evasion Free Your TikTok Account
- [Updated] Ranking the Best TikTok Profit Estimators for 2024
- [Updated] The Ultimate Guide to Revamping Your Virtual Self on TikTok
- [Updated] Strategies for Signature Content Against Dominant TikTok Figures for 2024
- Decoding Emote Designers Elevating Discord Interaction
- [New] In 2024, The Ultimate Guide to Desktop-Based TikTok Videos
- [New] 2024 Approved Revolutionize Social Media Success with the Best 30 TikTok Names
- [Updated] Unlock TikTok Potential with Essentials Guide
- Mastering Unlocking Your Personalized TikTok Hashtag for 2024
- [New] Ultimate 5 PS1 Emulation Tools for Modern PCs
- Updated 2024 Approved Top 12 Sony Vegas Slideshow Templates for Free Download
- How to Stop My Spouse from Spying on My Nokia C32 | Dr.fone
- Full Guide to Unlock Your Infinix Zero 30 5G
- What Pokémon Evolve with A Dawn Stone For Tecno Pova 5? | Dr.fone
- 6 Solutions to Fix Error 505 in Google Play Store on Infinix Hot 30 5G | Dr.fone
- In 2024, Trouble with iPhone 12 Swipe-Up? Try These 11 Solutions
- No Frills Screensaver - Windows Compatible for 2024
- How to Change Tecno Spark 20 Location on Skout | Dr.fone
- 2024 Approved Top 15 Pc/Mac Apps That Turn Your Gameplay Into Art
- 2024 Approved Mastering Downloads IGTV Media for Phone Users
- Best Buys in Screen Recording - Focusing on Tunefab's Innovations
- [Updated] In 2024, How to Record Screen and Video on Android?
- 2024 Approved You Can Make Stylish Chroma Key Text Effects After Reading This Article. Wondershare Filmora Will Fill the Crazy Colors in Your Handwritten Note or Words
- In 2024, How To Use Special Features - Virtual Location On Apple iPhone 14? | Dr.fone
- Updated Windows 10 Video Editors The Best iMovie Lookalikes for 2024
- Updated Color Match Game Tips for You
- In 2024, Video Editors Use Transitions to Tie Their Shots and Clips Together Into a Cohesive, Polished Program. Learn the Best Method to Create a Smooth Cut Transition Effect
- Title: "[New] Ace Your TikTok Videos 10 Top Editing Software Picks (Win)"
- Author: Stephen
- Created at : 2024-05-23 02:35:48
- Updated at : 2024-05-24 02:35:48
- Link: https://tiktok-video-recordings.techidaily.com/new-ace-your-tiktok-videos-10-top-editing-software-picks-win/
- License: This work is licensed under CC BY-NC-SA 4.0.
