![[New] Achieving Large-Head Aesthetics on TikTok Step by Step (3 Techniques) for 2024](https://thmb.techidaily.com/633e4476d735dff824b3250c253c09c234e7613f83678c9c2635006dd72b341f.jpg)
"[New] Achieving Large-Head Aesthetics on TikTok Step by Step (3 Techniques) for 2024"
Achieving Large-Head Aesthetics on TikTok: Step by Step (3 Techniques)
On TikTok, the Big head effect is commonly employed by content producers to generate humorous videos. In particular, the Big head filter may be utilized for various creative production projects, including caricature films, memes, and teaching.
How to get that TikTok Big Head effect? Would you like to make your head look larger than your body in TikTok videos or photos? It’s effortless to do on your Android smartphone. The best part is that we will show you how to use a Big head filter on different applications in this article and how to edit it. Aside from TikTok, there’s another software you can use to enlarge your head in videos or images. Let’s show you!
In this article
01 How to Get the Big Head Filter on TikTok?
02 How to Make a Big Head Effect in CapCut?
03 How to Add Big Head Effect in Filmora Video Editor? [3 Ways]
Part 1: How to Get the Big Head Filter on TikTok?
The TikTok Big Head effect is an extremely entertaining filter. TikTok is a social media platform that specializes in sharing short video content. Its consumer subscription has surpassed Facebook, Instagram, Twitter, and even Snapchat, and its download percentages are much greater than those of the above said social networking sites.
The TikTok Big Head effect on TikTok, on the other hand, was so widespread that it began to be used by more prominent ‘TikTokers.’ Afterward, in a single glance, all users of the social networking in concern began to use it on TikTok live broadcasts. This is how you can use the TikTok Big Head effect:
Step 1: Go to TikTok’s Discover menu to access the Big Head effects.
Step 2: Type “Big Head“ or #bighead into the search bar and choose the top hashtag**_, #bighead_**. Each TikTok video that employs a Big Head filter would then be displayed.
Step 3: To test out a filter, choose one of the numerous videos available and look for the filter’s name in the lower-left corner.
Step 4: Try pressing on the filter’s title, then touch on the Camera icon at the bottom of the display to make a TikTok video employing the Big Head filter in concern.
Here is a detailed video tutorial about how to make a big head effect in TikTok directly.
Part 2: How to Make a Big Head Effect in CapCut?
CapCut is a content creation application that lets users apply various stickers, filters , and effects to their videos. It also has an essential green screen function, a zooming capability that acts like a Ken Burns effect , and many more features.
With the CapCut software, you can quickly enlarge your head in videos. With a single click of the big head effect, your head would instantly become larger than your body. Here’s how to do it step by step:
Step 1: In the CapCut software, create a New Project and then upload a video in which you will enlarge your head.
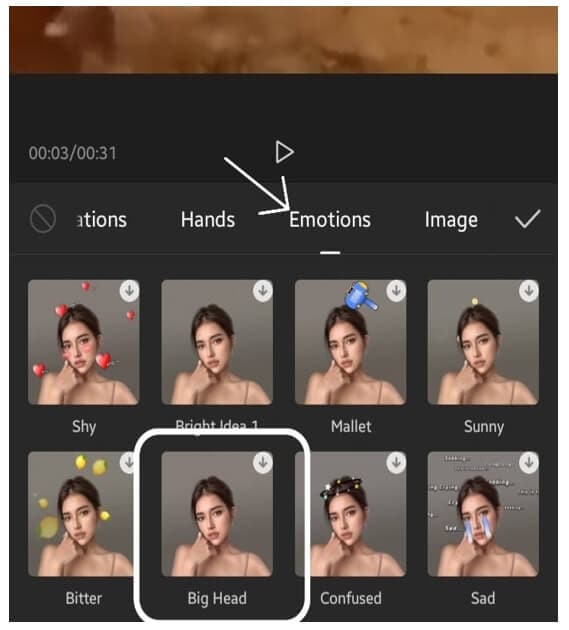
Step 2: Click the Effects option at the bottom of the display, and then tap the Facial or Body Effects option.
Step 3: Locate and choose the Big Head effect from the Emotions effect section.
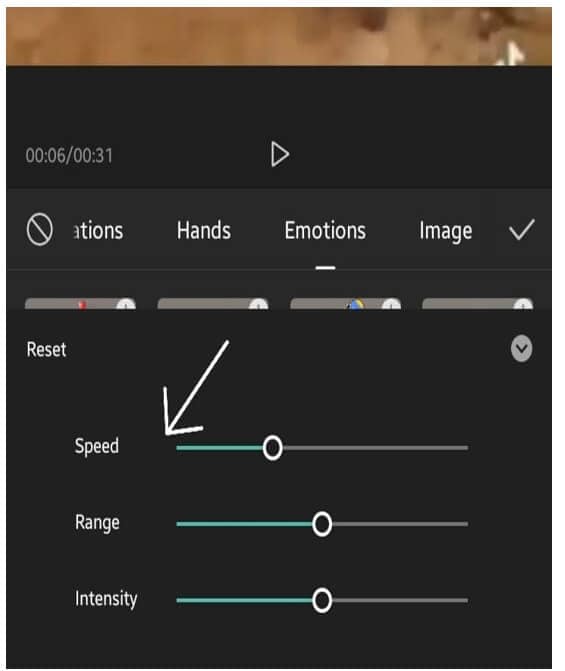
Step 4: The big head effect may be modified in speed, range, and intensity. Finally, adjust the duration of the Big head effect to match the video’s length.
You can check the video tutorial below to find out more details in creating big head and small body effect on video with CapCut.
Part 3: How to Add Big Head Effect in Filmora Video Editor? [3 Ways]
Filmora video editor by Wondershare includes the typical overlays, transitions, trimming, as well as the effects that we’ve grown to expect from the enthusiast-level video editor. It features a user-friendly interface that is clean, minimalistic, and dark. If that wasn’t enough, we’re sure you’ll be pleased to learn that the Filmora program can be used to create the TikTok big head effect in several ways.
With all of the characteristics we’ve discussed so far, you may further customize the Big Head effect with various Filmora effects. Let’s show you how:
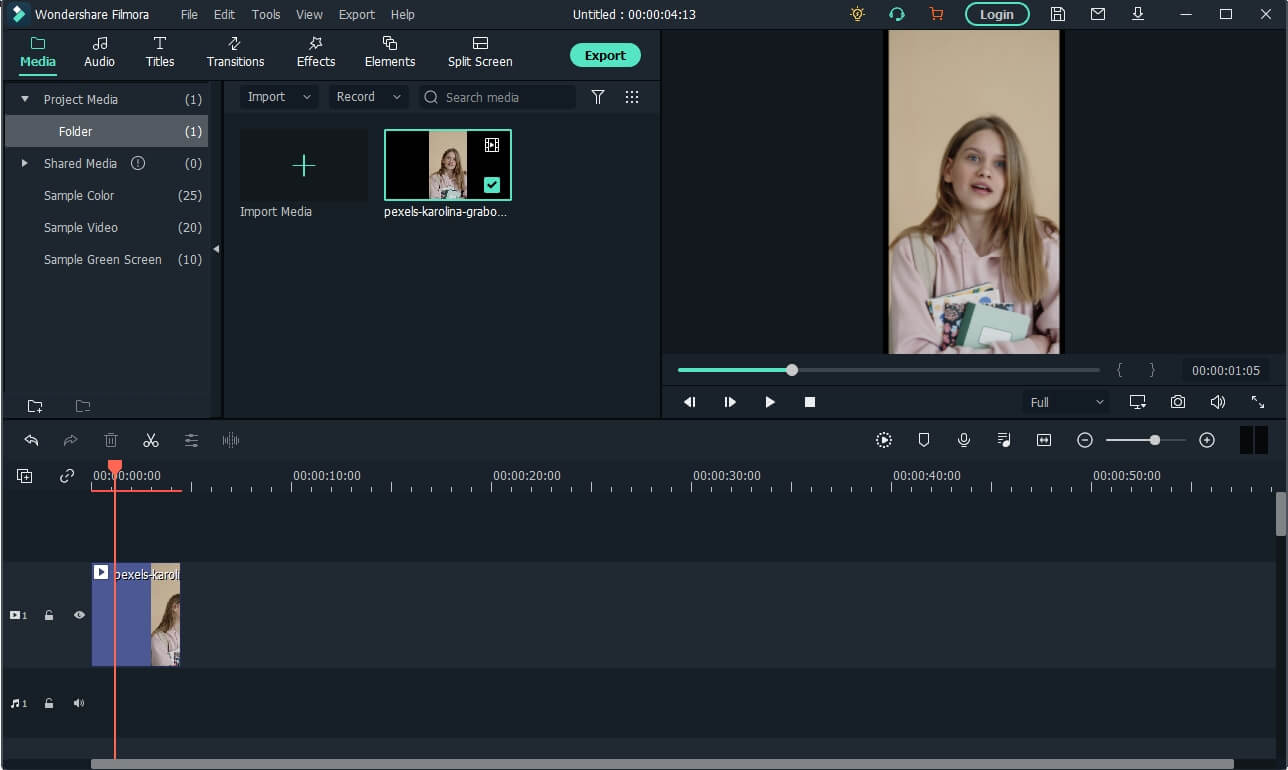
Launch Filmora and click on the Import tab to select the video file you want to use. And then drag and drop the imported media file onto the timeline panel.
For Win 7 or later (64-bit)
For macOS 10.12 or later
Method 1: Create Big Head with AR Stick Bubble Head Effect in Filmora Video Editor
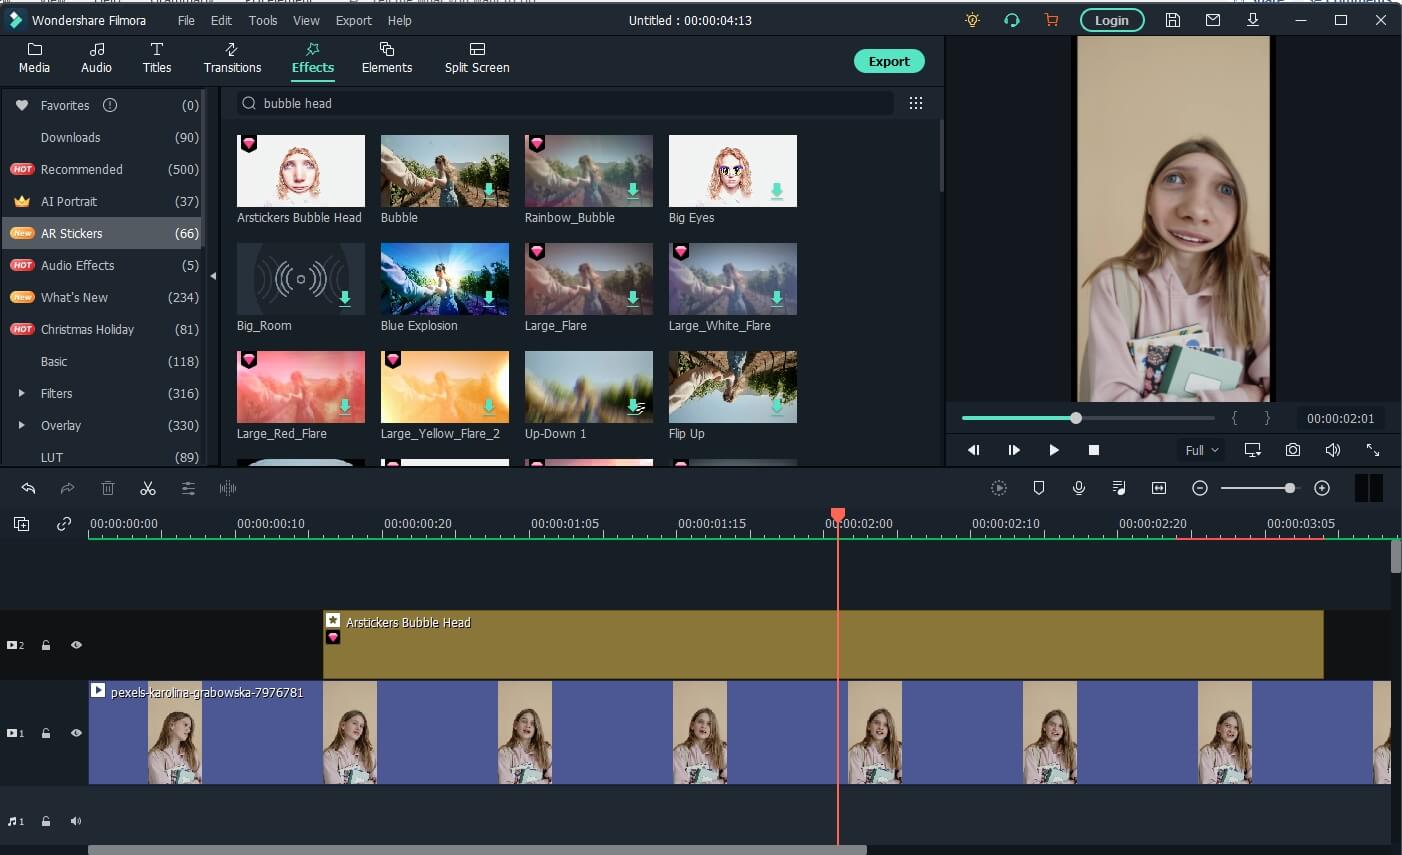
To add the Big Head effect on Filmora, click on the Effects option and select the AR Stickers option. Type bubble head in the search bar and then you will see it in the screen. Then, drag and drop the AR Stickers Bubble Head effect onto the timeline**,** specifically to the portion of the video where you want to add the Big Head filter on the person. As you do that, you will see a Bubble present on the video.
Besides the bubble head effect, there are many more AR stickers available, such as heart eyes, censor bar, emojis, and big eyes. Download the Filmora video editor now and check it yourself.
For Win 7 or later (64-bit)
For macOS 10.12 or later
Method 2: Add Magnify Effect to Video
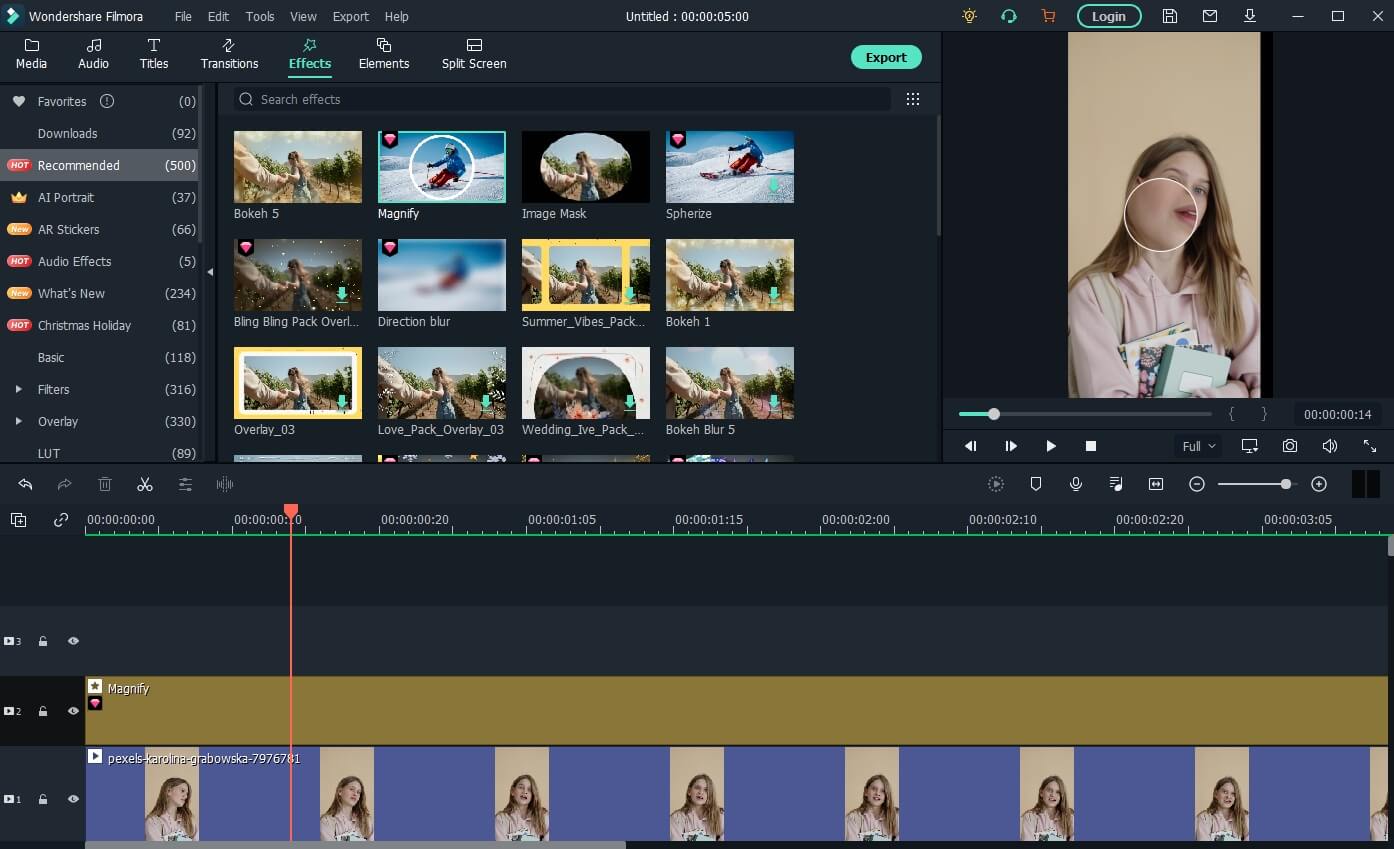
In the Effects tab, go to the Recommended category, and then you will see the magnify effect. Drag and drop it to the timeline above the video track, and you will see part of the video has been magnified accordingly.
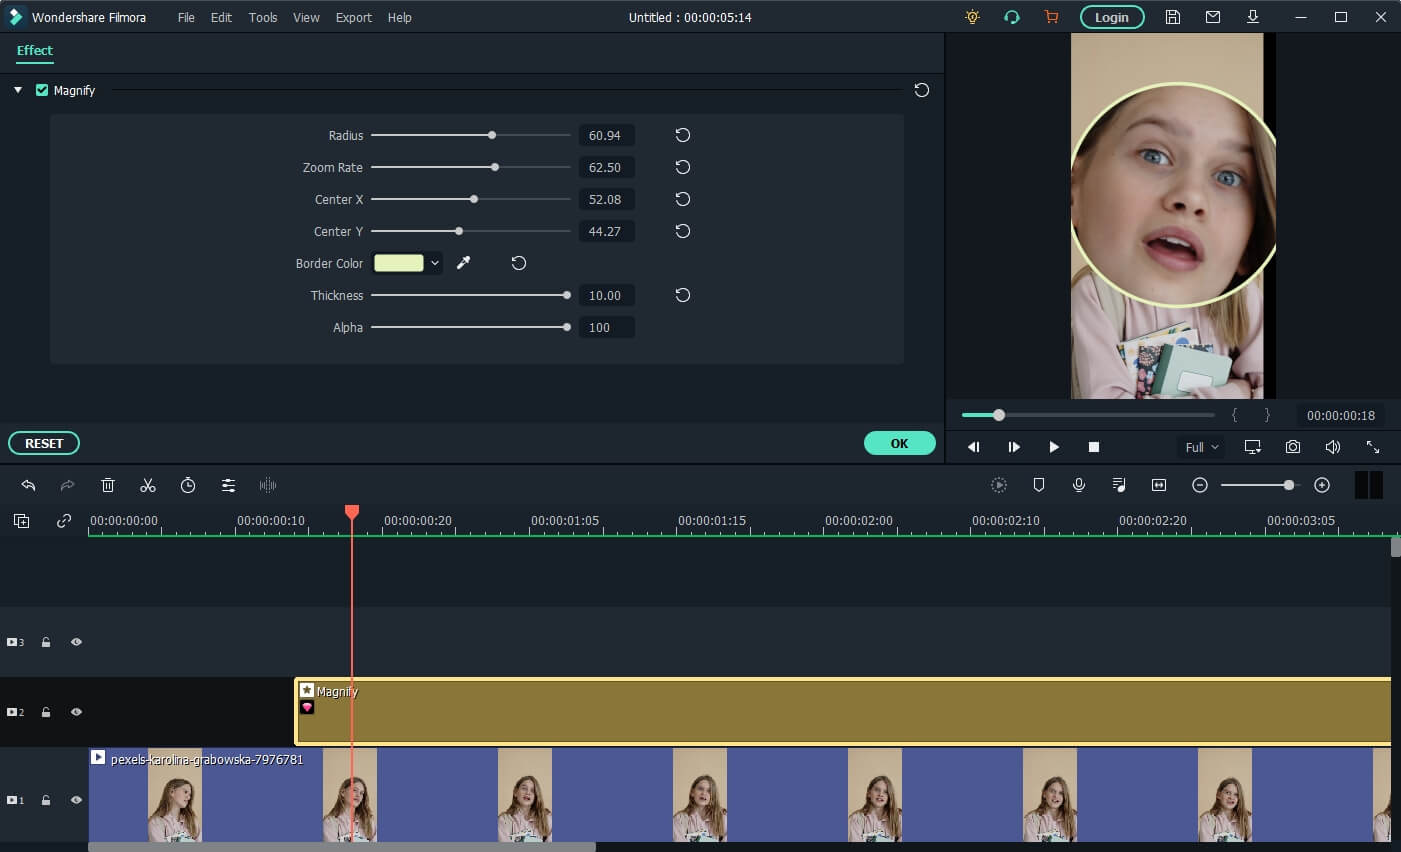
Now, double click on the effect in the timeline and open the Properties of the magnify effect. From the Properties section, you can adjust the size of the bubble using functions such as the Radius, CenterY, CenterX, Alpha, Zoom rate, etc to get a better video with big head effects.
Note: If you’re unable to locate the Magnify option in the Effects tab, please download and install the latest version of Filmora, and then type “Magnify” in the search bar, and the system will directly take you to where the option is present.
Method 3: Use Mask and Scale to Make a Video with Big Head Effect
Besides adding magnify effects and bubblehead effects, you can also use the mask preset to create a big head effect in Filmora.
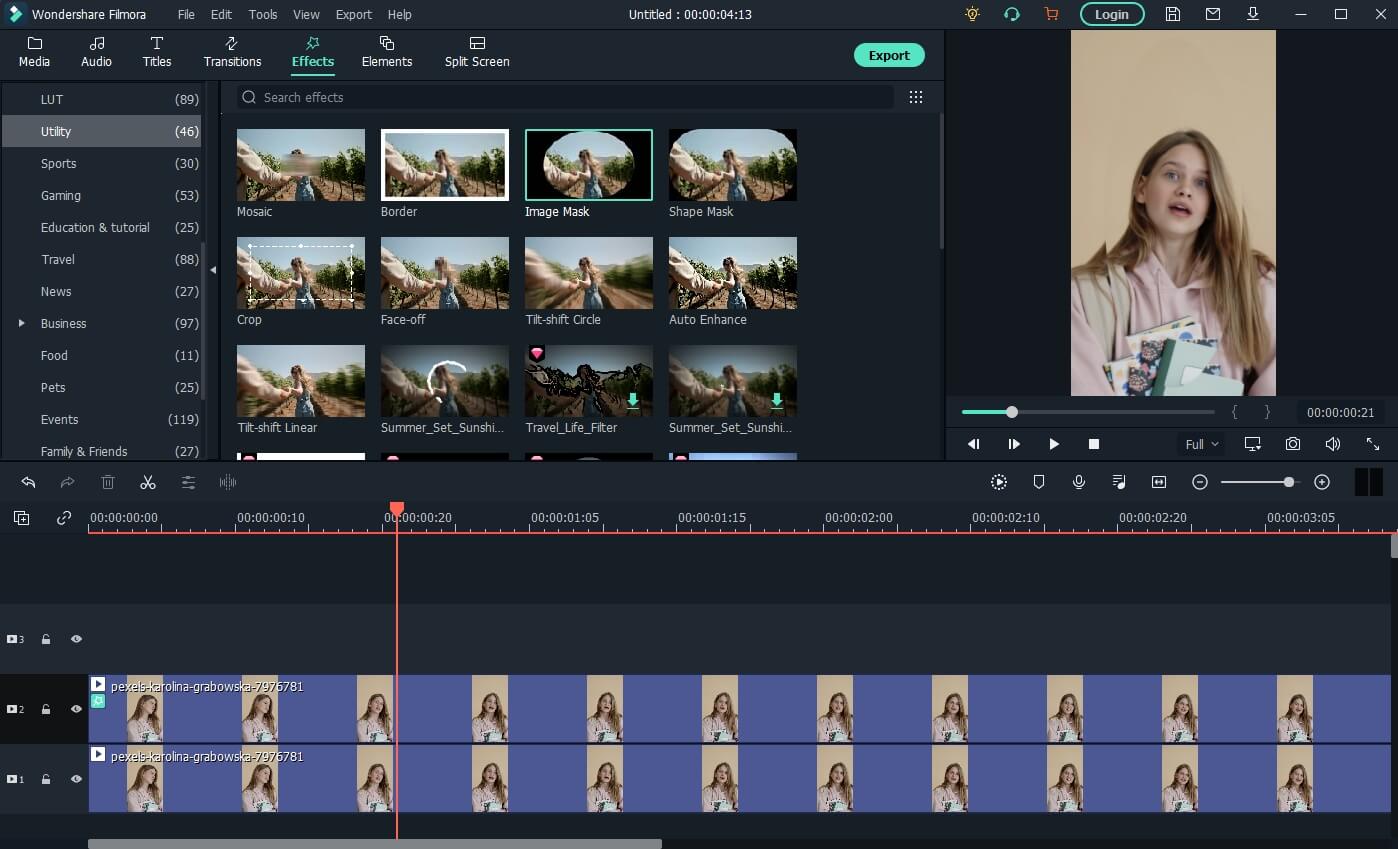
Drag and drop the video to video track 1 and video track 2 respectively in Filmora. Then go to the Effect tab, and scroll down to the Utility category, and place the Image Mask effect to the video above. Or, you can type image mask in the search bar to locate it quickly.
Now, double-click the video with the image mask to adjust the properties. Scroll down to the Video Effects field, and you will see the Image Mask. Click the arrow icon to choose a mask preset, adjust its position and size settings to fit the video.
Tips: You can hide the video in track 1 by clicking the eye icon so you can adjust the video with the image mask conveniently. Click it again then you will see the video.
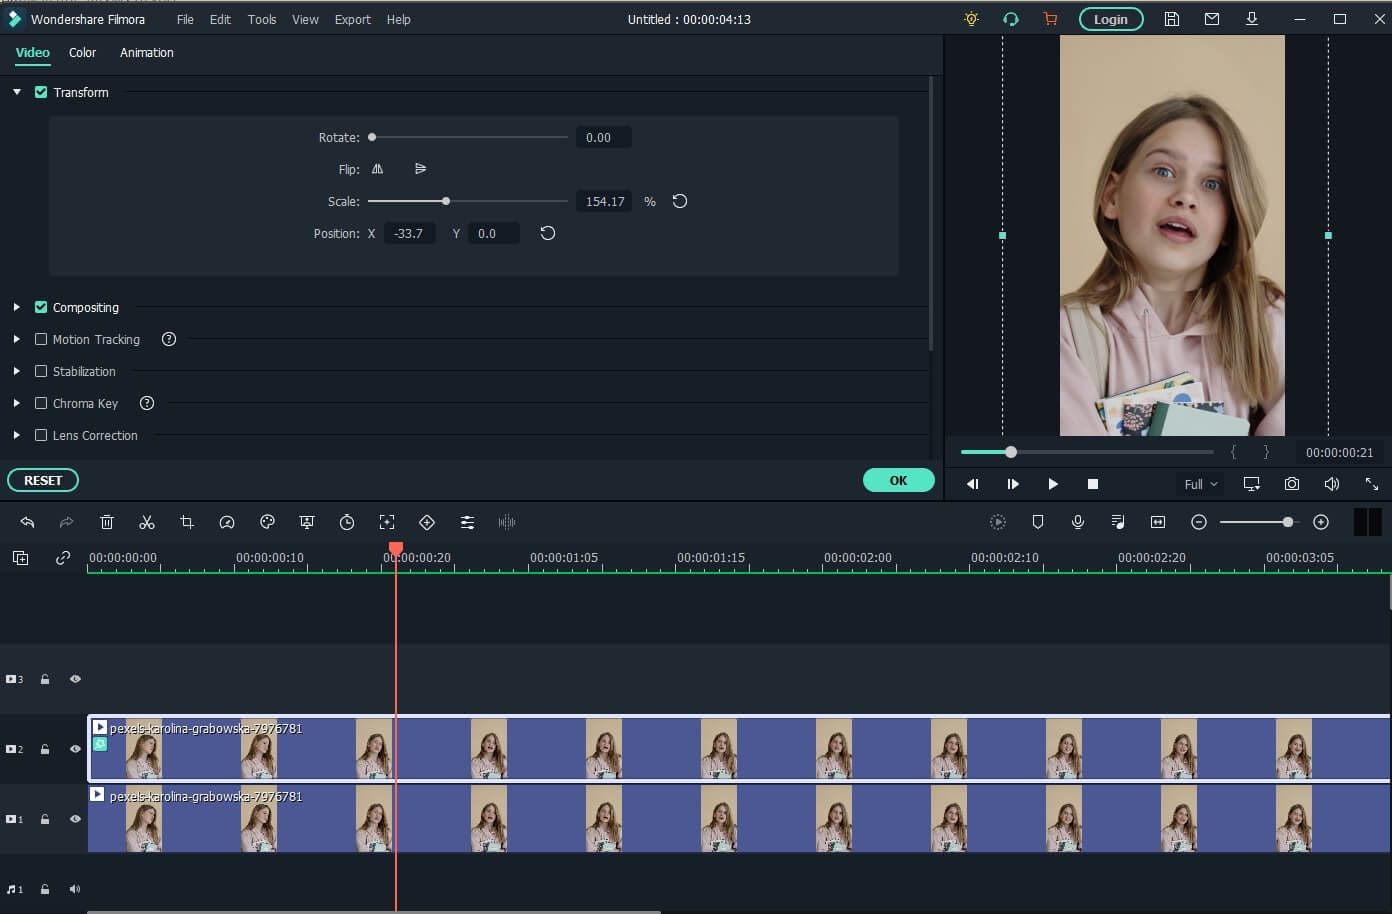
Next, click the video in track 2 again, and then go to the Transform tab, use the Scale slider to adjust the video size to make a big head effect.
Watch the video tutorial below to find out how to use the Image Mask effect to create a video with a big head effect in Filmora.
For Win 7 or later (64-bit)
For macOS 10.12 or later
After creating the video with a big head effect, click the Export button on the screen to save the video on the computer, and then upload it to TikTok from your computer directly.
Conclusion
This article demonstrates the steps you need to take to add the TikTok Big Head filter to your videos. Remember, the Big Head filter is used to make videos more amusing for entertainment purposes.
Not only TikTok, but different apps such as CapCut on Android and Wondershare Filmora on PC can be of great use to you. Especially in Filmora, you get tons of video editing features that unlock your way into the editing world!
02 How to Make a Big Head Effect in CapCut?
03 How to Add Big Head Effect in Filmora Video Editor? [3 Ways]
Part 1: How to Get the Big Head Filter on TikTok?
The TikTok Big Head effect is an extremely entertaining filter. TikTok is a social media platform that specializes in sharing short video content. Its consumer subscription has surpassed Facebook, Instagram, Twitter, and even Snapchat, and its download percentages are much greater than those of the above said social networking sites.
The TikTok Big Head effect on TikTok, on the other hand, was so widespread that it began to be used by more prominent ‘TikTokers.’ Afterward, in a single glance, all users of the social networking in concern began to use it on TikTok live broadcasts. This is how you can use the TikTok Big Head effect:
Step 1: Go to TikTok’s Discover menu to access the Big Head effects.
Step 2: Type “Big Head“ or #bighead into the search bar and choose the top hashtag**_, #bighead_**. Each TikTok video that employs a Big Head filter would then be displayed.
Step 3: To test out a filter, choose one of the numerous videos available and look for the filter’s name in the lower-left corner.
Step 4: Try pressing on the filter’s title, then touch on the Camera icon at the bottom of the display to make a TikTok video employing the Big Head filter in concern.
Here is a detailed video tutorial about how to make a big head effect in TikTok directly.
Part 2: How to Make a Big Head Effect in CapCut?
CapCut is a content creation application that lets users apply various stickers, filters , and effects to their videos. It also has an essential green screen function, a zooming capability that acts like a Ken Burns effect , and many more features.
With the CapCut software, you can quickly enlarge your head in videos. With a single click of the big head effect, your head would instantly become larger than your body. Here’s how to do it step by step:
Step 1: In the CapCut software, create a New Project and then upload a video in which you will enlarge your head.
Step 2: Click the Effects option at the bottom of the display, and then tap the Facial or Body Effects option.
Step 3: Locate and choose the Big Head effect from the Emotions effect section.
Step 4: The big head effect may be modified in speed, range, and intensity. Finally, adjust the duration of the Big head effect to match the video’s length.
You can check the video tutorial below to find out more details in creating big head and small body effect on video with CapCut.
Part 3: How to Add Big Head Effect in Filmora Video Editor? [3 Ways]
Filmora video editor by Wondershare includes the typical overlays, transitions, trimming, as well as the effects that we’ve grown to expect from the enthusiast-level video editor. It features a user-friendly interface that is clean, minimalistic, and dark. If that wasn’t enough, we’re sure you’ll be pleased to learn that the Filmora program can be used to create the TikTok big head effect in several ways.
With all of the characteristics we’ve discussed so far, you may further customize the Big Head effect with various Filmora effects. Let’s show you how:
Launch Filmora and click on the Import tab to select the video file you want to use. And then drag and drop the imported media file onto the timeline panel.
For Win 7 or later (64-bit)
For macOS 10.12 or later
Method 1: Create Big Head with AR Stick Bubble Head Effect in Filmora Video Editor
To add the Big Head effect on Filmora, click on the Effects option and select the AR Stickers option. Type bubble head in the search bar and then you will see it in the screen. Then, drag and drop the AR Stickers Bubble Head effect onto the timeline**,** specifically to the portion of the video where you want to add the Big Head filter on the person. As you do that, you will see a Bubble present on the video.
Besides the bubble head effect, there are many more AR stickers available, such as heart eyes, censor bar, emojis, and big eyes. Download the Filmora video editor now and check it yourself.
For Win 7 or later (64-bit)
For macOS 10.12 or later
Method 2: Add Magnify Effect to Video
In the Effects tab, go to the Recommended category, and then you will see the magnify effect. Drag and drop it to the timeline above the video track, and you will see part of the video has been magnified accordingly.
Now, double click on the effect in the timeline and open the Properties of the magnify effect. From the Properties section, you can adjust the size of the bubble using functions such as the Radius, CenterY, CenterX, Alpha, Zoom rate, etc to get a better video with big head effects.
Note: If you’re unable to locate the Magnify option in the Effects tab, please download and install the latest version of Filmora, and then type “Magnify” in the search bar, and the system will directly take you to where the option is present.
Method 3: Use Mask and Scale to Make a Video with Big Head Effect
Besides adding magnify effects and bubblehead effects, you can also use the mask preset to create a big head effect in Filmora.
Drag and drop the video to video track 1 and video track 2 respectively in Filmora. Then go to the Effect tab, and scroll down to the Utility category, and place the Image Mask effect to the video above. Or, you can type image mask in the search bar to locate it quickly.
Now, double-click the video with the image mask to adjust the properties. Scroll down to the Video Effects field, and you will see the Image Mask. Click the arrow icon to choose a mask preset, adjust its position and size settings to fit the video.
Tips: You can hide the video in track 1 by clicking the eye icon so you can adjust the video with the image mask conveniently. Click it again then you will see the video.
Next, click the video in track 2 again, and then go to the Transform tab, use the Scale slider to adjust the video size to make a big head effect.
Watch the video tutorial below to find out how to use the Image Mask effect to create a video with a big head effect in Filmora.
For Win 7 or later (64-bit)
For macOS 10.12 or later
After creating the video with a big head effect, click the Export button on the screen to save the video on the computer, and then upload it to TikTok from your computer directly.
Conclusion
This article demonstrates the steps you need to take to add the TikTok Big Head filter to your videos. Remember, the Big Head filter is used to make videos more amusing for entertainment purposes.
Not only TikTok, but different apps such as CapCut on Android and Wondershare Filmora on PC can be of great use to you. Especially in Filmora, you get tons of video editing features that unlock your way into the editing world!
Validate Video Rights: A Guide to Pre-Uploading on TikTok
So, you have successfully created an awesome TikTok video with the perfect dance moves and accurate lip-sync. But what’s this? Your video gets muted or taken down! What a bummer!
The reason?
Copyright infringement, or in simple words, using music without the permission of the singer!
This includes external sounds that are not a part of the TikTok library.
So, what should we do to avoid this, you ask?
To avoid this, you need to learn how to check TikTok video copyright before uploading.
And, in this article, we will tell you exactly why you need to follow TikTok copyright, and how to check it before posting a video.
Why Do You Need to Follow Tiktok Copyright?
To avoid getting banned!
You see, TikTok has a vast library of sounds with proper legal authorization that is available for the users to use in their videos. However, sometimes people use their own music in the videos.
The external sound may or may not be copyrighted.
If it does not have any copyrights on it, all is good. But in case you accidentally use a copyrighted video, TikTok automatically detects it, and either mutes your video or takes it down entirely. If the copyright is detected while posting, the platform will prevent you from uploading it in the first place.
To be on the safe side, we recommend using sounds already present in the TikTok library.
But, what if you want to use an external sound? Is there a way to check TikTok video copyright before uploading?
Yes, there is! And in the next section, we will tell you all about it.
Wondershare Filmora
Get started easily with Filmora’s powerful performance, intuitive interface, and countless effects!
Try It Free Try It Free Try It Free

Check Tiktok Video Copyright Before Uploading
Whenever you’re posting a video to TikTok, you get the option of running a copyright check on it. But this option is only available on desktop browsers.
Therefore, if you’re posting a sound other than one from TikTok’s library, you can check if it’s copyrighted or not from your PC.
Here’s how:
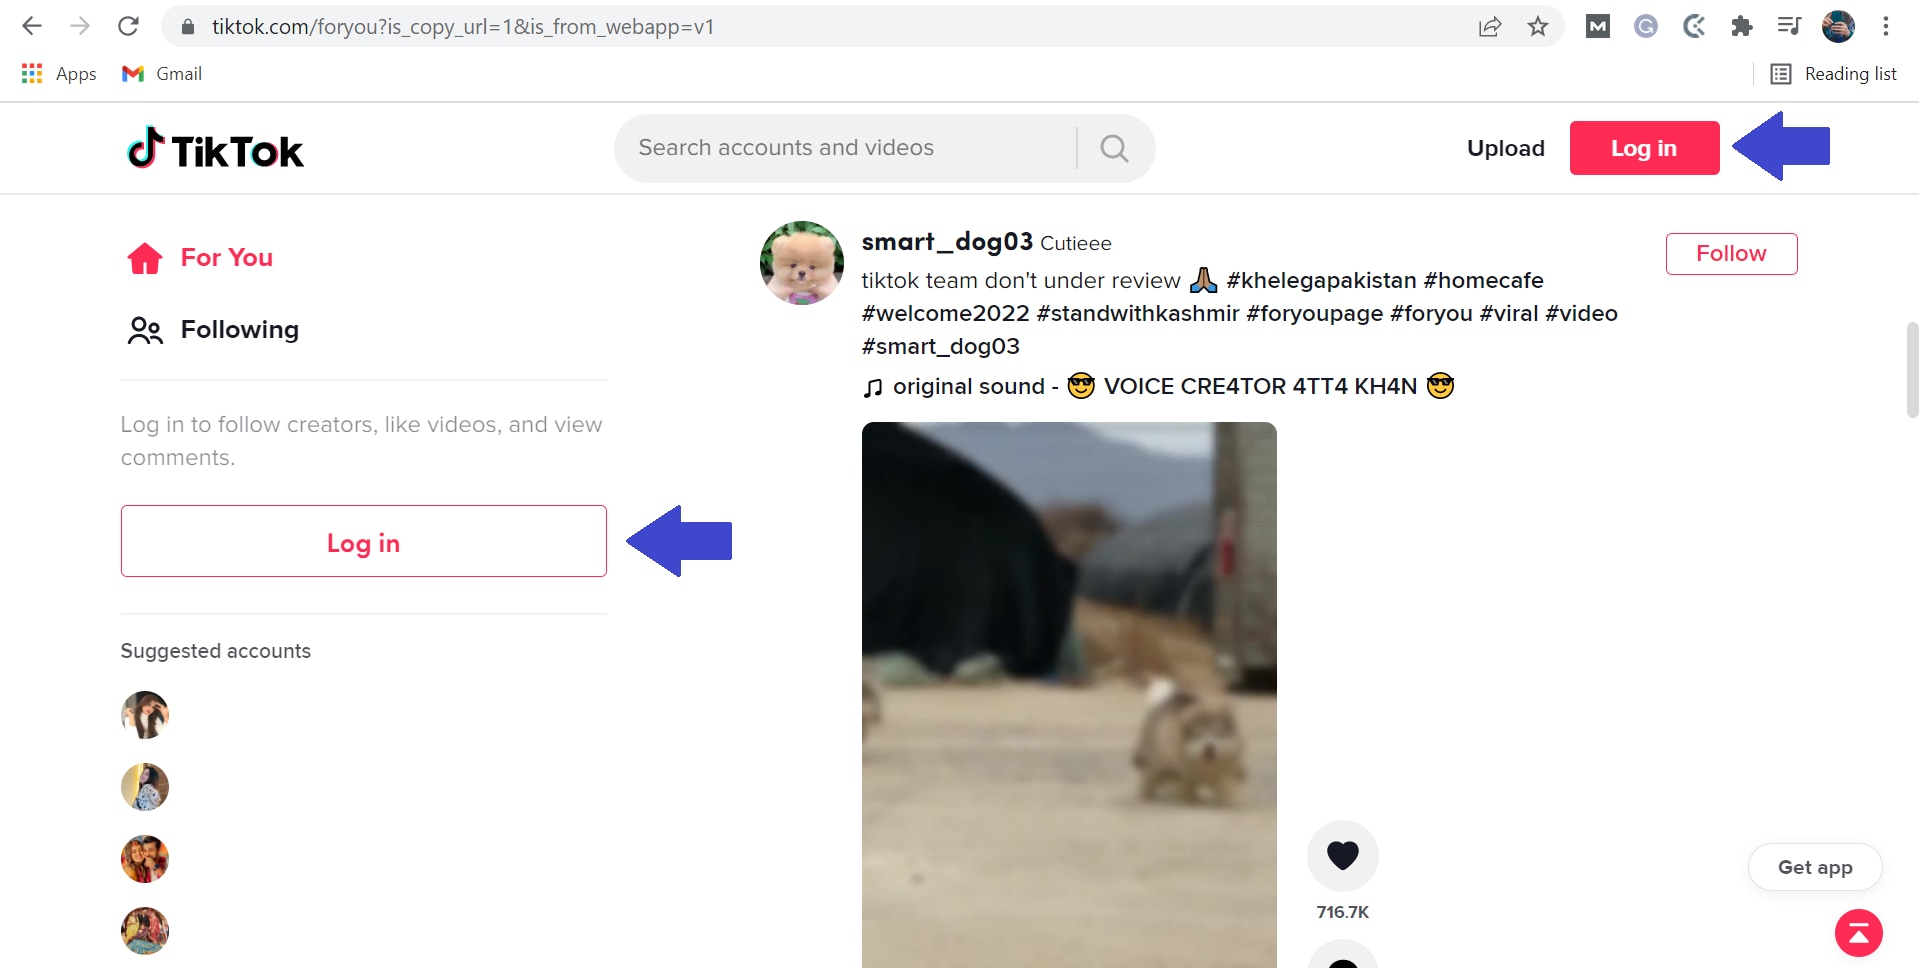
Step 1
Go to the website version of Tiktok from Chrome, and click on “Log In” at the top-right corner of the page. You can also click on “Log In” under the “Following” option on the left.
Step 2
You will get a popup asking you to either sign up to Tiktok or log in using your email, Facebook, Twitter, Google, Apple, or Instagram. You can choose whichever option you find convenient.

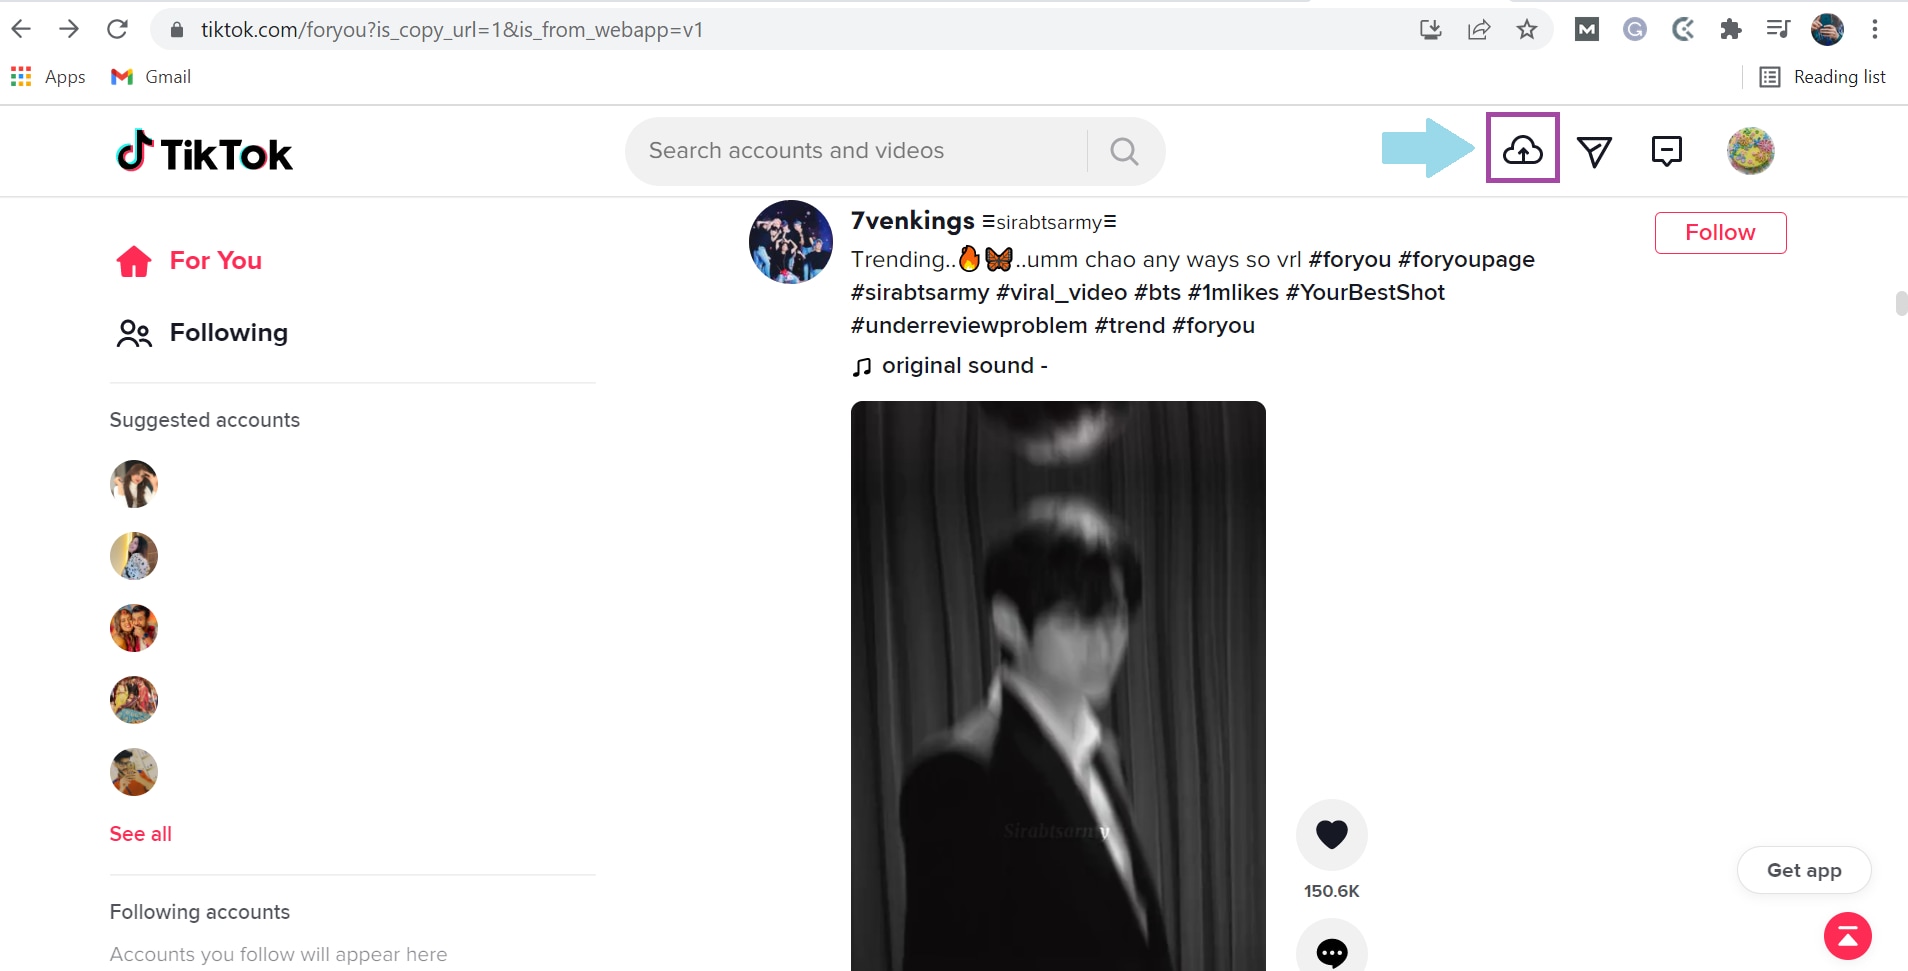
Step 3
Click on the “Upload” option indicated by a cloud with an arrow.
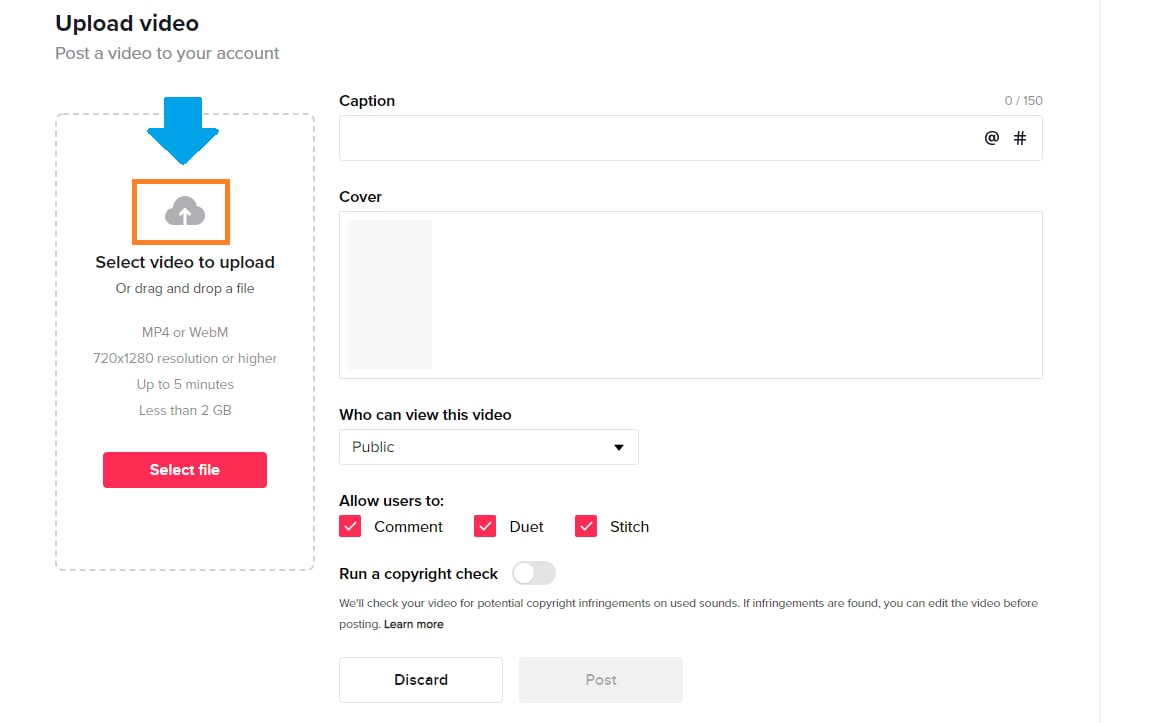
Step 4
Click on “Select Video to Upload” and choose a video from your PC’s storage.
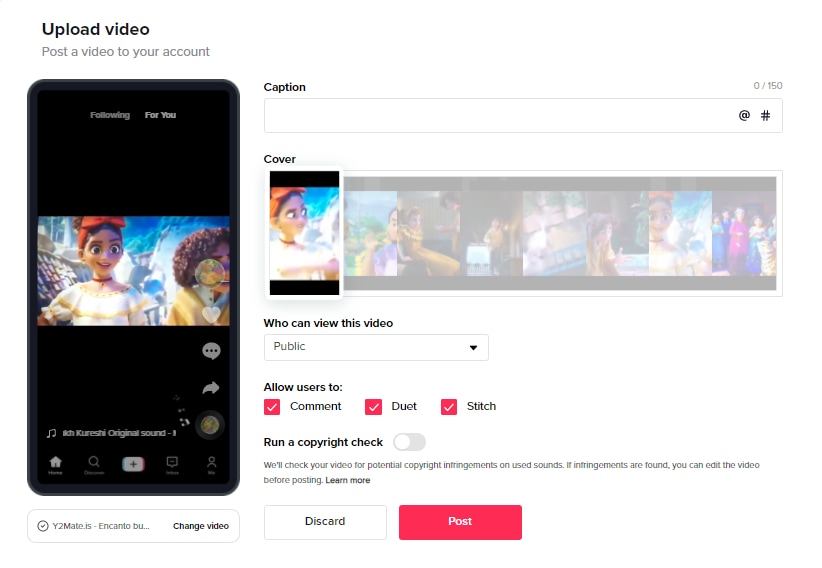
Step 5
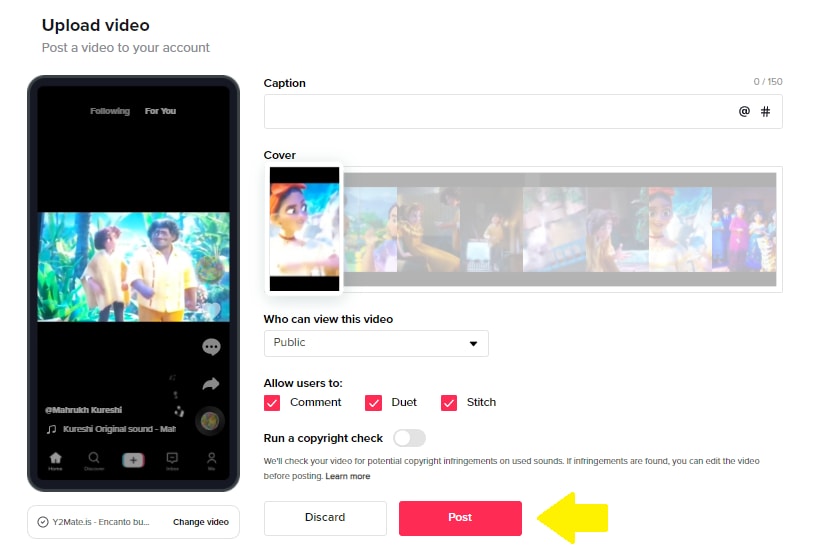
Once the video is uploaded, add a caption with hashtags and select the cover for your video.
Step 6
The next step is to choose whether your video can be viewed by the public or your friends or whether you want to keep it private from everyone.
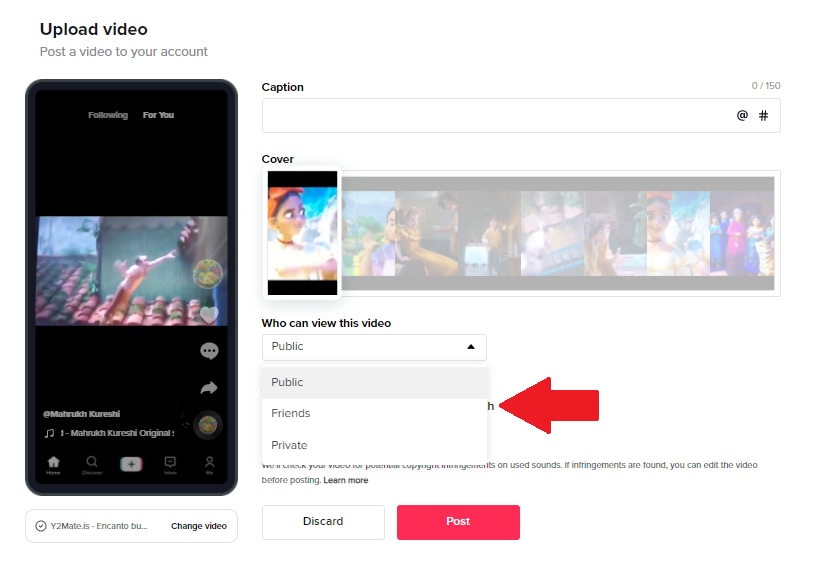
Step 7
You can also allow or restrict users to comment on your video, make duets, or stitch your video.
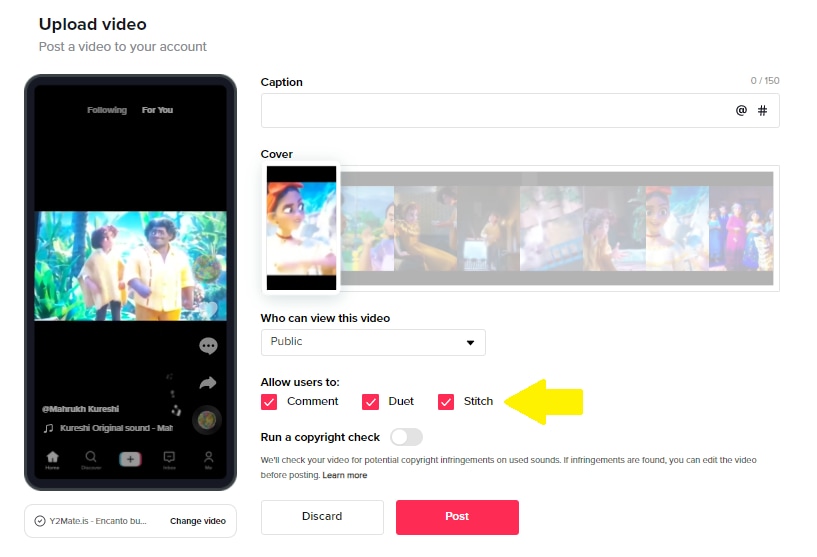
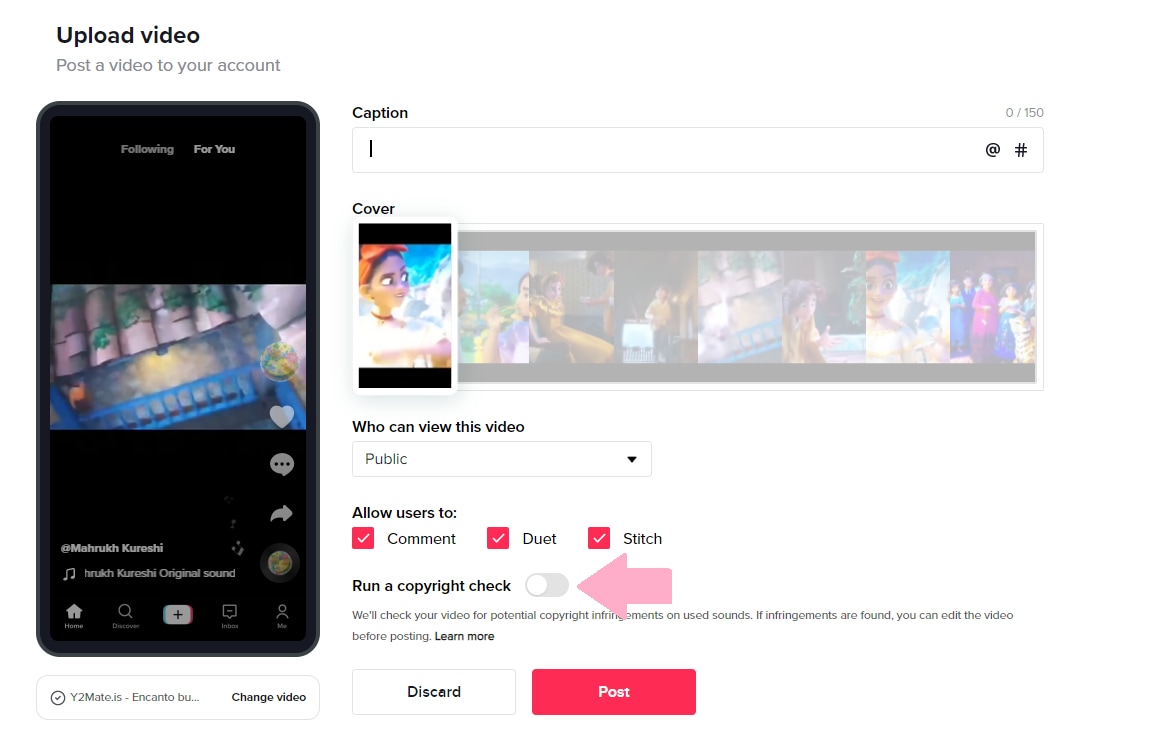
Step 8
Now comes the part where you run a copyright check on the video. Turn the toggle on for “Run a Copyright Check” and wait to see if any issues arise.
As you can see, this video does not have any copyright-related issues, so it is safe to post it.
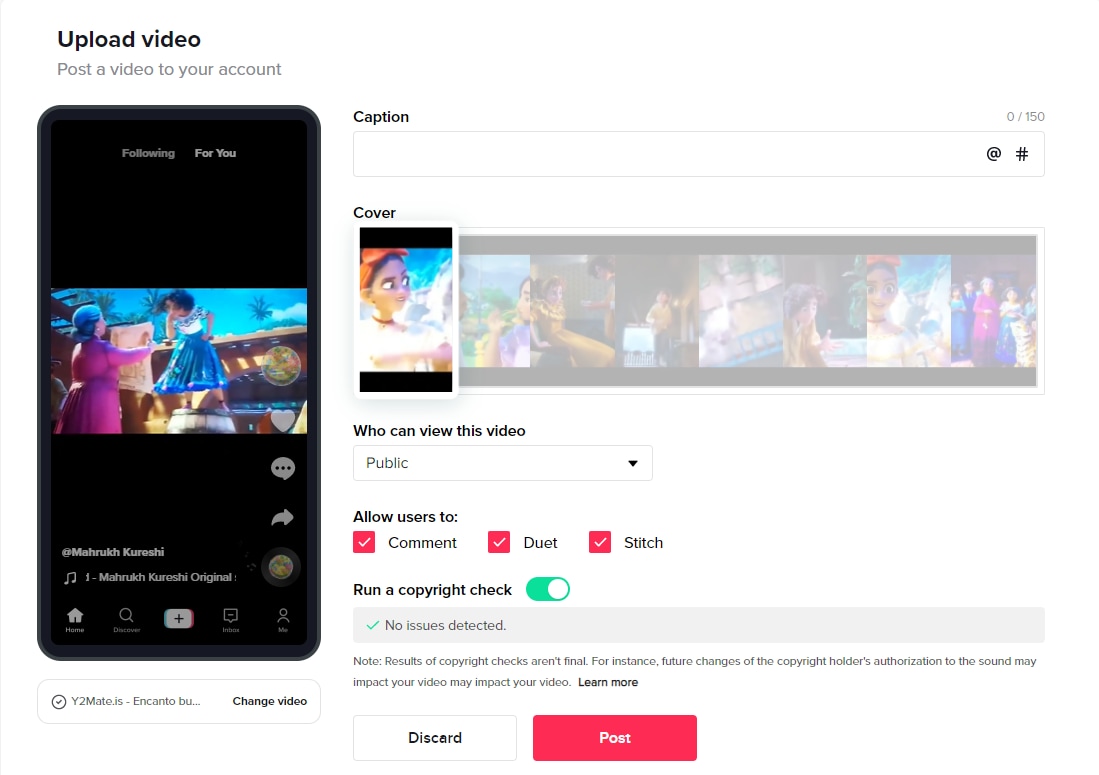
However, if your video comes up with an issue, you can try using a sound from TikTok’s built-in library and proceed to post your video without any fear.
Conclusion
While making TikTok videos is quite a fun activity, we have to follow the rules, especially those revolving around using copyrighted material. According to TikTok’s policies, if a video has copyrighted sound, it will be muted, and if the video itself is copyrighted, like a clip from a movie or song, it will be taken down.
However, if you continue posting copyrighted content even after receiving copyright infringement notices from TikTok, it can result in your getting shut down for good!
Therefore, it’s good to know how to check TikTok video copyright before uploading through the steps explained in the article.
So, run a copyright check, and play it safe!
Check Tiktok Video Copyright Before Uploading
Whenever you’re posting a video to TikTok, you get the option of running a copyright check on it. But this option is only available on desktop browsers.
Therefore, if you’re posting a sound other than one from TikTok’s library, you can check if it’s copyrighted or not from your PC.
Here’s how:
Step 1
Go to the website version of Tiktok from Chrome, and click on “Log In” at the top-right corner of the page. You can also click on “Log In” under the “Following” option on the left.
Step 2
You will get a popup asking you to either sign up to Tiktok or log in using your email, Facebook, Twitter, Google, Apple, or Instagram. You can choose whichever option you find convenient.
Step 3
Click on the “Upload” option indicated by a cloud with an arrow.
Step 4
Click on “Select Video to Upload” and choose a video from your PC’s storage.
Step 5
Once the video is uploaded, add a caption with hashtags and select the cover for your video.
Step 6
The next step is to choose whether your video can be viewed by the public or your friends or whether you want to keep it private from everyone.
Step 7
You can also allow or restrict users to comment on your video, make duets, or stitch your video.
Step 8
Now comes the part where you run a copyright check on the video. Turn the toggle on for “Run a Copyright Check” and wait to see if any issues arise.
As you can see, this video does not have any copyright-related issues, so it is safe to post it.
However, if your video comes up with an issue, you can try using a sound from TikTok’s built-in library and proceed to post your video without any fear.
Conclusion
While making TikTok videos is quite a fun activity, we have to follow the rules, especially those revolving around using copyrighted material. According to TikTok’s policies, if a video has copyrighted sound, it will be muted, and if the video itself is copyrighted, like a clip from a movie or song, it will be taken down.
However, if you continue posting copyrighted content even after receiving copyright infringement notices from TikTok, it can result in your getting shut down for good!
Therefore, it’s good to know how to check TikTok video copyright before uploading through the steps explained in the article.
So, run a copyright check, and play it safe!
Also read:
- [New] '21 Edition Examination – The Gambler’s Guide to Vegas Pro
- [New] 2024 Approved Combining Zoom & Facebook Live A Step-by-Step Guide
- [New] 2024 Approved Safeguard Creativity Validating Content for TikTok Posting
- [New] 2024’S Elite Shotters’ Pick Ranked #1-10 Camera Lenses
- [New] How Much Do Podcasters Earn on Average?
- [New] Your Starting Guide to TikTok (macOS) Basics
- [Updated] Creating Popular Jujutsu Kaisen TikTok Content
- [Updated] Step-by-Step Guide to Crafting TikTok Videos
- 2024 Approved Transform Your TikTok Videos Immediate Backdrop Changes Explored
- A Step-by-Step Approach to Disabling Chrome Tab Clones
- Exploring the Five Pillars of ChatGPT's Phenomenal Growth Trajectory: A Deep Dive Into Its Swift Rise
- How can I get more stardust in pokemon go On Tecno Camon 20? | Dr.fone
- In 2024, Revolutionize Your TikTok Photos with Proven Hacks
- In 2024, The Rising Stars Top 10 Gamers on TikTok
- Solving the Unplugged Sound Dilemma in Windows 11/8/7: A Step-by-nStep Guide for Fixing Audio Issues
- Unlocking AI Potential with ChatGPT: How to Leverage Its Personalized Instruction Function
- Title: [New] Achieving Large-Head Aesthetics on TikTok Step by Step (3 Techniques) for 2024
- Author: Stephen
- Created at : 2024-11-22 16:39:32
- Updated at : 2024-11-24 16:53:57
- Link: https://tiktok-video-recordings.techidaily.com/new-achieving-large-head-aesthetics-on-tiktok-step-by-step-3-techniques-for-2024/
- License: This work is licensed under CC BY-NC-SA 4.0.