![[New] Elevating Your Edits – A Step-by-Step Guide to Captivating TikTok React Videos in Filmora](https://thmb.techidaily.com/4fe1c562a7e3ab45c8b1f68d5fb5d836545aa73283e591a5a7261febdc4cbc2c.jpg)
"[New] Elevating Your Edits – A Step-by-Step Guide to Captivating TikTok React Videos in Filmora"
Elevating Your Edits – A Step-by-Step Guide to Captivating TikTok React Videos in Filmora
How to Make TikTok Reaction Videos Easily in 2 Ways

Shanoon Cox
Mar 27, 2024• Proven solutions
With all the videos of different moods and categories available on the platform, TikTok’s reaction is something that makes the footage more engaging. Available for both iOS and Android platforms, TikTok allows you to record, edit , and compile a video of up to 60 seconds, and apply a plethora of filters and animation effects to them along with adding relevant music to awe your audience.
Considering this, here you will learn how to make TikTok reaction videos with ease from within the app itself, and if that’s not enough, using one of the best and most efficient programs available in the market that can even allow you to add unique effects to the reactions you create.
- Part 1: How to Make React Videos on TikTok
- Part 2: How to Use Snap Filmora to Make TikTok Reaction Videos
Bonus: Create A More Attractive Video with Human Segmentation Effect
The human segmentation effect under AI Portrait allows you to isolate people from video background even without a green screen, and then you can composite it to make a reaction video easily. Watch the video tutorial below to find out more details.


Want to read the texts instead of watching videos? Check the complete guide to making a reaction video in 3 ways .
Part 1: How to React to a TikTok Video
After being equipped with all the worldly knowledge about TikTok reaction videos, you can follow the steps given below to learn how to react to the footage created by other people:
1. Tap Share and Record Your Reaction
Start TikTok, play the video you want to react on, tap the Share icon from the lower-right area, and tap the React option from the Share to menu. Tap Flip from the top-right corner of the Camera screen to switch between the front and rear camera as needed, optionally tap the Mic icon to disable or enable voice and system audio capture, drag and reposition React window according to the source footage, and tap the Record button from the bottom to start shooting your TikTok reaction. Wait while the source clip and your recording process are complete successfully before moving forward to the next step.

2. Apply Filters
Tap the Filters icon from the top-right corner, tap to pick a filter from those available at the bottom, and tap anywhere on the screen to accept the one you selected and to get back to the previous window.

3. Manage Audio
Tap the Mixer icon from the upper-right corner of the screen, drag the My Voice and Soundtrack Volume sliders to manage your voice recording and the internal audio respectively, and tap Done to save the changes once you’re through with the modifications. Back on the previous window, tap Next from the bottom-right corner.

4. Publish the Video
Tap the Who can view this video option to manage your reaction’s visibility settings (optional). Tap the Save to device toggle switch to prevent TikTok reaction from being stored on your mobile’s storage (optional). Next, tap the Post button from the bottom-right corner to publish the video to TikTok.

More creative tricks about TikTok video: Clone Yourself in TikTok
Part 2: How to Make Reaction Videos with Filmora
Even though you can make TikTok reaction videos using its own filters and audio mixing tools that work pretty well under ideal conditions, if you are a perfectionist and like precision in anything you do or create, you need a dedicated program that has been designed specifically for the purpose.
Although several such tools are available in the market and can be easily downloaded and used, the best among them is Filmora by Wondershare. Wondershare Filmora is an industry-standard production and post-production tool for both Mac and Windows PCs that the majority of users prefer over its competitors such as Adobe Premiere Pro, Final Cut Pro X, etc. This is because Filmora offers simple UI, is less resource-intensive, and is able to render the outputs significantly faster.
You can learn how to make TikTok reaction videos using Wondershare Filmora by following the steps given below:
Note: Before proceeding, make sure that you have already copied the source (and the reaction) video(s) from your smartphone to your computer.
1. Create New Project and Set Preferences
Start Wondershare Filmora on your Windows or Mac PC, go to File > New Project and click 9:16 (Portrait) from the submenu that appears.
Click Split Screen from the standard toolbar at the top, hover mouse to the screen type preset you want to use, click the + ( Add to Project ) icon that appears at the bottom-right corner of the thumbnail, and click OK from the bottom-right corner once the preset is added to the Timeline.

2. Import and Add Video(s) Preview/Timeline
Click the Media button from the standard toolbar, click anywhere inside the Media window at the upper-left corner, and when the Open box comes up, select and import the video file(s) you want to participate in the TikTok reaction. Alternatively, you can also click Record from below the standard toolbar, and choose any of the options to record your own video or voice right from within Wondershare Filmora itself.
Next, click and drag each of the imported videos to their corresponding screen sections in the Preview window in the upper-right area. Notice how the files are automatically added to the Timeline at the bottom.
3. Add Elements and Titles
Click Elements from the standard toolbar, hover mouse to the element you want to add to the reaction, click the + icon that appears at the center of the thumbnail, and reposition the element in the Timeline to match the duration with that of the reaction you are creating.

4. Export the Reaction

Click EXPORT from the top-middle section of the interface, go to the Local tab from the top of the Export box that appears next, select your preferred format from the left bar, optionally choose a destination folder from the right window, optionally click SETTINGS to fine-tune the output preferences as needed, and click EXPORT from the bottom-right corner to export the TikTok reaction. Or, you can save it in the settings perfect for iPhone or another device.
Below is a sample reaction video made with Filmora, you can do much better than that for your TikTok account:
Besides using Filmora to edit reaction videos with the split-screen presets, you can also use some other video editing software to create a reaction video . Filmora can empower your video creation with more creativity, watch the video below and download Filmora to try.
Conclusion
A TikTok reaction enables you to make the source videos more fun and entertaining. Luckily the app itself has a “React” button that helps you create TikTok reaction videos with merely a few simple taps. However, if you feel that the built-in options are not as robust as they should be, a third-party program like Wondershare Filmora is something you would definitely love to try your hands on as the software is not only easy to use, it is also lightweight, and doesn’t put any overhead on your computer hardware.
Shanoon Cox
Shanoon Cox is a writer and a lover of all things video.
Follow @Shanoon Cox
Shanoon Cox
Mar 27, 2024• Proven solutions
With all the videos of different moods and categories available on the platform, TikTok’s reaction is something that makes the footage more engaging. Available for both iOS and Android platforms, TikTok allows you to record, edit , and compile a video of up to 60 seconds, and apply a plethora of filters and animation effects to them along with adding relevant music to awe your audience.
Considering this, here you will learn how to make TikTok reaction videos with ease from within the app itself, and if that’s not enough, using one of the best and most efficient programs available in the market that can even allow you to add unique effects to the reactions you create.
- Part 1: How to Make React Videos on TikTok
- Part 2: How to Use Snap Filmora to Make TikTok Reaction Videos
Bonus: Create A More Attractive Video with Human Segmentation Effect
The human segmentation effect under AI Portrait allows you to isolate people from video background even without a green screen, and then you can composite it to make a reaction video easily. Watch the video tutorial below to find out more details.
Want to read the texts instead of watching videos? Check the complete guide to making a reaction video in 3 ways .
Part 1: How to React to a TikTok Video
After being equipped with all the worldly knowledge about TikTok reaction videos, you can follow the steps given below to learn how to react to the footage created by other people:
1. Tap Share and Record Your Reaction
Start TikTok, play the video you want to react on, tap the Share icon from the lower-right area, and tap the React option from the Share to menu. Tap Flip from the top-right corner of the Camera screen to switch between the front and rear camera as needed, optionally tap the Mic icon to disable or enable voice and system audio capture, drag and reposition React window according to the source footage, and tap the Record button from the bottom to start shooting your TikTok reaction. Wait while the source clip and your recording process are complete successfully before moving forward to the next step.
2. Apply Filters
Tap the Filters icon from the top-right corner, tap to pick a filter from those available at the bottom, and tap anywhere on the screen to accept the one you selected and to get back to the previous window.
3. Manage Audio
Tap the Mixer icon from the upper-right corner of the screen, drag the My Voice and Soundtrack Volume sliders to manage your voice recording and the internal audio respectively, and tap Done to save the changes once you’re through with the modifications. Back on the previous window, tap Next from the bottom-right corner.
4. Publish the Video
Tap the Who can view this video option to manage your reaction’s visibility settings (optional). Tap the Save to device toggle switch to prevent TikTok reaction from being stored on your mobile’s storage (optional). Next, tap the Post button from the bottom-right corner to publish the video to TikTok.
More creative tricks about TikTok video: Clone Yourself in TikTok
Part 2: How to Make Reaction Videos with Filmora
Even though you can make TikTok reaction videos using its own filters and audio mixing tools that work pretty well under ideal conditions, if you are a perfectionist and like precision in anything you do or create, you need a dedicated program that has been designed specifically for the purpose.
Although several such tools are available in the market and can be easily downloaded and used, the best among them is Filmora by Wondershare. Wondershare Filmora is an industry-standard production and post-production tool for both Mac and Windows PCs that the majority of users prefer over its competitors such as Adobe Premiere Pro, Final Cut Pro X, etc. This is because Filmora offers simple UI, is less resource-intensive, and is able to render the outputs significantly faster.
You can learn how to make TikTok reaction videos using Wondershare Filmora by following the steps given below:
Note: Before proceeding, make sure that you have already copied the source (and the reaction) video(s) from your smartphone to your computer.
1. Create New Project and Set Preferences
Start Wondershare Filmora on your Windows or Mac PC, go to File > New Project and click 9:16 (Portrait) from the submenu that appears.
Click Split Screen from the standard toolbar at the top, hover mouse to the screen type preset you want to use, click the + ( Add to Project ) icon that appears at the bottom-right corner of the thumbnail, and click OK from the bottom-right corner once the preset is added to the Timeline.
2. Import and Add Video(s) Preview/Timeline
Click the Media button from the standard toolbar, click anywhere inside the Media window at the upper-left corner, and when the Open box comes up, select and import the video file(s) you want to participate in the TikTok reaction. Alternatively, you can also click Record from below the standard toolbar, and choose any of the options to record your own video or voice right from within Wondershare Filmora itself.
Next, click and drag each of the imported videos to their corresponding screen sections in the Preview window in the upper-right area. Notice how the files are automatically added to the Timeline at the bottom.
3. Add Elements and Titles
Click Elements from the standard toolbar, hover mouse to the element you want to add to the reaction, click the + icon that appears at the center of the thumbnail, and reposition the element in the Timeline to match the duration with that of the reaction you are creating.
4. Export the Reaction
Click EXPORT from the top-middle section of the interface, go to the Local tab from the top of the Export box that appears next, select your preferred format from the left bar, optionally choose a destination folder from the right window, optionally click SETTINGS to fine-tune the output preferences as needed, and click EXPORT from the bottom-right corner to export the TikTok reaction. Or, you can save it in the settings perfect for iPhone or another device.
Below is a sample reaction video made with Filmora, you can do much better than that for your TikTok account:
Besides using Filmora to edit reaction videos with the split-screen presets, you can also use some other video editing software to create a reaction video . Filmora can empower your video creation with more creativity, watch the video below and download Filmora to try.
Conclusion
A TikTok reaction enables you to make the source videos more fun and entertaining. Luckily the app itself has a “React” button that helps you create TikTok reaction videos with merely a few simple taps. However, if you feel that the built-in options are not as robust as they should be, a third-party program like Wondershare Filmora is something you would definitely love to try your hands on as the software is not only easy to use, it is also lightweight, and doesn’t put any overhead on your computer hardware.
Shanoon Cox
Shanoon Cox is a writer and a lover of all things video.
Follow @Shanoon Cox
Audiovisual Cooperation: The Duet Phenomenon
How to Make Duet On TikToK?
Shanoon Cox
Mar 27, 2024• Proven solutions
You might have heard about the TikTok app that people are using popularly these days to make short duet videos online. These custom videos can be posted online, and they play automatically on the left side of the screen along with another video.
There is no doubt to say that TikTok duet is one of the most popular platforms for gaining more followers and fans online. In this article, we are going to discuss a few tips and tricks to make the best out of duet videos. Hope it will help you get started quickly with the TikTok app.

- Part 1: Why Should I Create Duet Videos?
- Part 2: How to Make a Duet Video in TikTok?
- Part 3: Tips for Making Duet video in TikTok
- Part 4: FAQs about Making Duet on TikTok
Why Should I Create Duet Videos?
If you want to be an influencer on TikTok, the quickest way to become famous is to try and shape a duet challenge, and so does a brand. As a dispensable part of TikTok culture, duet challenges remain special due to its abundant user-generated content, which really encourages you to attend social events.
Do you want to spread the influence of your brand? Let’s see the tutorial below about making a duet video without hassle.
How to Make a Duet Video in TikTok?
Before creating your duet video, let’s see how other people do the popcorn duet.
Those who are eager to learn how to duet in Tik Tok app are advised to go through the steps below:
Creating Duet Video Via TikTok App
Step 1: Get the TikTok app installed on your gadget.
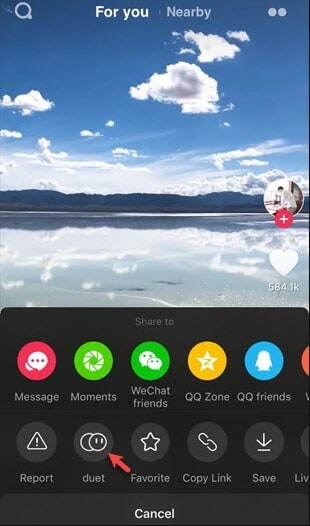
Step 2: Open the app and look for the video that you want to duet. Hit the share button and choose the duet option from the bottom of the screen. Now start recording your own video while the selected video is automatically playing on another side of the screen.
Step 3: Now you can modify your video by adding interesting stickers and special effects available in the TikTok app. Choose a cover for your recorded video and hit the next button. Finally hit post button to share your split-screen video.
Tips for Making Duet Video in TikTok
- Never forget to add tags to your duet video to make it go viral soon.
- The bolt button can be used to see all the notifications about how followed your profile and likes your videos.
- Set alerts to get notified when a particular person publishes a new musical.ly video online.
- Never forget to share your videos on Instagram to enjoy more popularity.
- Prefer to comment and like other videos; it will help you develop healthy relations online, and they will pay for promotions in the long run.
FAQs about Making Duet on TikTok
Quick Fix: Why can’t I make a duet video or how to prevent people from creating duet videos with me?
There are chances that you will not be able to create duet videos with some people. It happens just because those people have prevented others from creating duet videos with them. Although there is no method to delete the duet videos that others have created with you, yes, you can prevent it in the future by using app settings. By doing this, you are keeping your profile publicly visible, but you are not allowing other people to create a duet with you. If you want to do such settings; go through the steps below.
How to prevent people from creating duet videos with you?
Step 1: First of all, open the app and then go to privacy settings.
Step 2: Now move to the Safety option.
Step 3: Click on the option “Who Can Duet With Me.” Now you can choose the suitable option out of “Everyone,” “Friends” or simply “Off.” The last option doesn’t allow anyone to make duet videos with you; however, the second one allows only mutual followers to create videos with you.
Edit Your Duet Video with Versatile Video Editing Software
Conclusion
So, you must be now ready to create interesting duet videos on the TikTok platform. Get ready to choose your duet partner online and use some eye-catching effects to make your video more popular. Prefer to share your videos on a few other social media platforms to enjoy more engagement online. This is the simplest trick to entertain the public on the internet.
Shanoon Cox
Shanoon Cox is a writer and a lover of all things video.
Follow @Shanoon Cox
Shanoon Cox
Mar 27, 2024• Proven solutions
You might have heard about the TikTok app that people are using popularly these days to make short duet videos online. These custom videos can be posted online, and they play automatically on the left side of the screen along with another video.
There is no doubt to say that TikTok duet is one of the most popular platforms for gaining more followers and fans online. In this article, we are going to discuss a few tips and tricks to make the best out of duet videos. Hope it will help you get started quickly with the TikTok app.
- Part 1: Why Should I Create Duet Videos?
- Part 2: How to Make a Duet Video in TikTok?
- Part 3: Tips for Making Duet video in TikTok
- Part 4: FAQs about Making Duet on TikTok
Why Should I Create Duet Videos?
If you want to be an influencer on TikTok, the quickest way to become famous is to try and shape a duet challenge, and so does a brand. As a dispensable part of TikTok culture, duet challenges remain special due to its abundant user-generated content, which really encourages you to attend social events.
Do you want to spread the influence of your brand? Let’s see the tutorial below about making a duet video without hassle.
How to Make a Duet Video in TikTok?
Before creating your duet video, let’s see how other people do the popcorn duet.
Those who are eager to learn how to duet in Tik Tok app are advised to go through the steps below:
Creating Duet Video Via TikTok App
Step 1: Get the TikTok app installed on your gadget.
Step 2: Open the app and look for the video that you want to duet. Hit the share button and choose the duet option from the bottom of the screen. Now start recording your own video while the selected video is automatically playing on another side of the screen.
Step 3: Now you can modify your video by adding interesting stickers and special effects available in the TikTok app. Choose a cover for your recorded video and hit the next button. Finally hit post button to share your split-screen video.
Tips for Making Duet Video in TikTok
- Never forget to add tags to your duet video to make it go viral soon.
- The bolt button can be used to see all the notifications about how followed your profile and likes your videos.
- Set alerts to get notified when a particular person publishes a new musical.ly video online.
- Never forget to share your videos on Instagram to enjoy more popularity.
- Prefer to comment and like other videos; it will help you develop healthy relations online, and they will pay for promotions in the long run.
FAQs about Making Duet on TikTok
Quick Fix: Why can’t I make a duet video or how to prevent people from creating duet videos with me?
There are chances that you will not be able to create duet videos with some people. It happens just because those people have prevented others from creating duet videos with them. Although there is no method to delete the duet videos that others have created with you, yes, you can prevent it in the future by using app settings. By doing this, you are keeping your profile publicly visible, but you are not allowing other people to create a duet with you. If you want to do such settings; go through the steps below.
How to prevent people from creating duet videos with you?
Step 1: First of all, open the app and then go to privacy settings.
Step 2: Now move to the Safety option.
Step 3: Click on the option “Who Can Duet With Me.” Now you can choose the suitable option out of “Everyone,” “Friends” or simply “Off.” The last option doesn’t allow anyone to make duet videos with you; however, the second one allows only mutual followers to create videos with you.
Edit Your Duet Video with Versatile Video Editing Software
Conclusion
So, you must be now ready to create interesting duet videos on the TikTok platform. Get ready to choose your duet partner online and use some eye-catching effects to make your video more popular. Prefer to share your videos on a few other social media platforms to enjoy more engagement online. This is the simplest trick to entertain the public on the internet.
Shanoon Cox
Shanoon Cox is a writer and a lover of all things video.
Follow @Shanoon Cox
Also read:
- [New] 2024 Approved Breaking Barriers World’s Best & Largest Shorts Downloaders
- [New] 2024 Approved The Definitive List of Best Cameras for Snow Lovers
- [New] 2024 Approved Unlock the Potential of Your TikTok Videos with New Backgrounds
- [New] From No Cash to YouTube Wealth Unlocking Earnings at the 500 Subs Level for 2024
- [New] Hastening Vimeo Media Transmission
- [New] In 2024, Top Premier Pro Templates for the Year 2023
- [New] Joke Jungle TikTok's Cracking Content Creators
- [New] Unveiling the Secrets of Superior TikTok Captions (Top 5 Strategies)
- [Updated] In 2024, Explore and Learn Personalized TikTok Identifier Creation
- [Updated] In 2024, The Ultimate Guide to Stellar TikTok Content Through Template Utilization
- 2024 Approved A Comprehensive Guide to Crafting Memes on 9GAG
- 2024 Approved Adding Value with Recommendations
- Essential Tips to Ensure Solid, Hole-Free 3D Prints Every Time
- In 2024, Chrome's Multi-Screen Magic PIP Tutorial
- In 2024, Perfect Plays in a Minute TikTok Templates for Stellar Videos
- Revel in Reading BookTok’s Best Titles of the Year
- Snapchat Screen Recording via Mobile Devices A Guide
- Top 10 Windows & PC TikTok Video Mashup Tools for 2024
- Top 8 Free iPhone Music Apps You Must Try!
- Title: [New] Elevating Your Edits – A Step-by-Step Guide to Captivating TikTok React Videos in Filmora
- Author: Stephen
- Created at : 2024-12-18 23:27:31
- Updated at : 2024-12-25 00:28:27
- Link: https://tiktok-video-recordings.techidaily.com/new-elevating-your-edits-a-step-by-step-guide-to-captivating-tiktok-react-videos-in-filmora/
- License: This work is licensed under CC BY-NC-SA 4.0.