
![[New] Exclusive MP4 Extraction Software for TikTok Content for 2024](https://www.lifewire.com/thmb/3c1cTWiTn2Xcx6PnSP-2IA67Da0=/400x300/filters:no_upscale():max_bytes(150000):strip_icc()/Apple-Watch-Ultra-2-23e8ec3e4ee04c6e98c9d654a35f59ec.jpg)
[New] Exclusive MP4 Extraction Software for TikTok Content for 2024
Exclusive MP4 Extraction Software for TikTok Content
Hovering through your TikTok For You page brings up an array of content to dive in. With a few of your finger swipes, you could find yourself seeing a confidence-boosting pep talk, going behind the fashion show behind the scenes, or assisting how to grow herbs in your kitchen.
With so much information to consume nowadays, it’s only natural that you might like to save a couple of TikTok content to watch at a later date and time, without even opening the TikTok app. In this guide, we’ll show you how to convert TikTok to MP4 via the best TikTok converters MP4 available.
In this article
01 Top 3 TikTok MP4 Converters in 2021
02 How to Convert TikTok Video to MP4 without Watermark?
03 How to Save TikTok without Watermark for Free?
Part 1: Top 3 TikTok MP4 Converters in 2021
1. ttdown.org
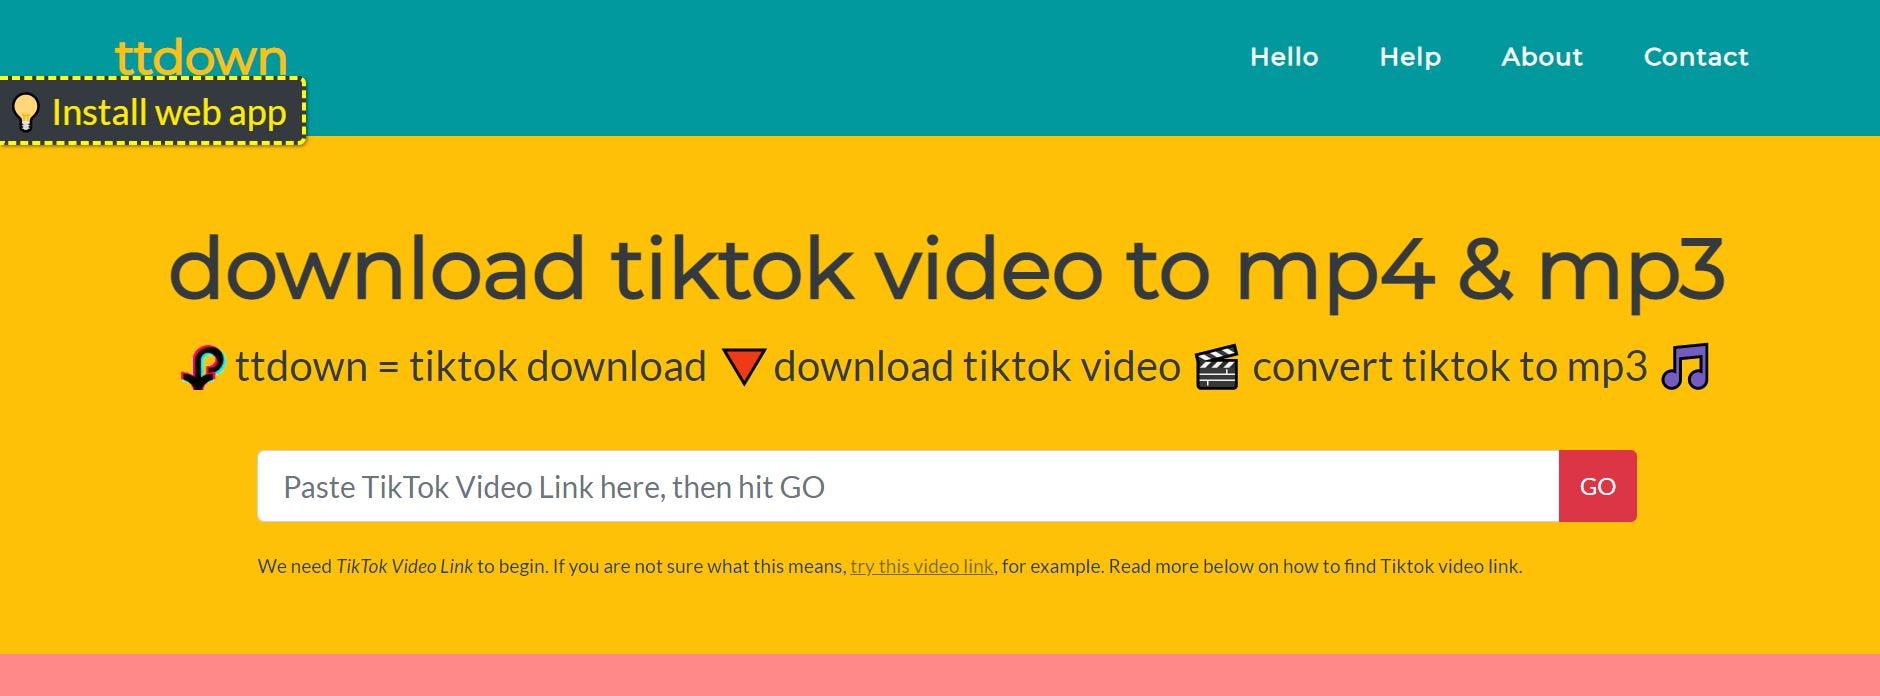
TTDown provides a colorful website to scroll through and learn about TikTok and a step-by-step tutorial on downloading TikTok MP4. In addition, TTDown brings you the most straightforward way to download TikTok MP4 videos by copy-pasting the video’s link on their website.
However, its Bookmarklet feature saves the users’ time from copy-pasting. They have provided their website link that you can drag into your browser’s bookmarks. Just hit the bookmark when you scroll through TikTok and wish to save a video.
Price: Free
2. Experts PHP
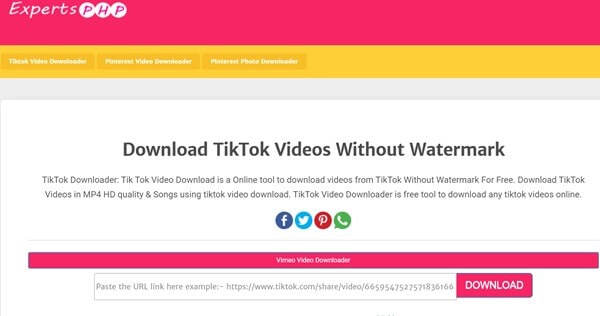
ExpertPHP TikTok converter MP4 lets you download TikTok files by pasting the file’s copied link to be downloaded into the text bar offered on the ExpertsPHP’s web page. It further enables us to download videos and images from platforms like Pinterest, TikTok, etc. Here, you can download videos freely without watermarks.
One downside of ExpertsPHP is that it does not provide other features, like converting videos into GIFs, as offered by its alternatives.
Price: Free
3. Qoob Clips
Qoob Clips lets us view and download unlimited TikTok and Instagram media files. You can even get access to the private accounts’ content through Qoob.
To proceed with the process, you are only required to install Qoob on your computer, enter your username, and begin viewing content downloaded automatically into your PC. Just by entering the username, you can even search for a private account’s content.
This MP4 TikTok downloader also lets you download unlimited highlights and stories. It further supports unlimited private accounts without displaying any ads.
Part 2: How to Convert TikTok Video to MP4 without Watermark?
Before proceeding further, it’s essential to consider whether any copyright infringement issues could arise from downloading a TikTok video. According to the Community Guidelines of TikTok, users cannot post, send, or share any content that violates someone else’s trademarks, copyrights, or intellectual property rights.
To prevent this, TikTok applies a watermark featuring both its account’s username and the logo that originally posted the content if someone downloads a TikTok video.
In other words, you have to ensure the watermark’s visibility or give full credit to the user in another way while reposting the user’s video on social media. And, this is where the job of the best TikTok converter MP4 comes in.
Cropping watermarks from your videos with Wondershare Filmora video editing software is a pretty straightforward process. You don’t need be a professional to finish these simple editing actions.
All you must do is choose a method that best suits your preferences and performs an easy action, though.
So, without any delay, let’s have a look at some editing techniques you can use to blur or crop watermarks from the downloaded videos of TikTok with Filmora.
Wondershare Filmora
Get started easily with Filmora’s powerful performance, intuitive interface, and countless effects!
Try It Free Try It Free Try It Free Learn More >

Note: the methods listed below won’t work perfectly if the watermark is in the middle of the screen. And you may need to subscribe to remove the watermark via Wondershare Filmora. In addition, you can fetch a special discount at Filmora Education Plan if you’re a student.
Method 1: Blurring the Watermark
The Filmora’s Mosaic feature will allow you to blur logos and all other on-screen graphics with just a few taps.
Hit the Effects tab at the top, select the Utility tab at left, and then hit the Mosaic option to preview the effect.
Click plus icon on the thumbnail on Mosaic or drag-and-drop it into the track above the video.
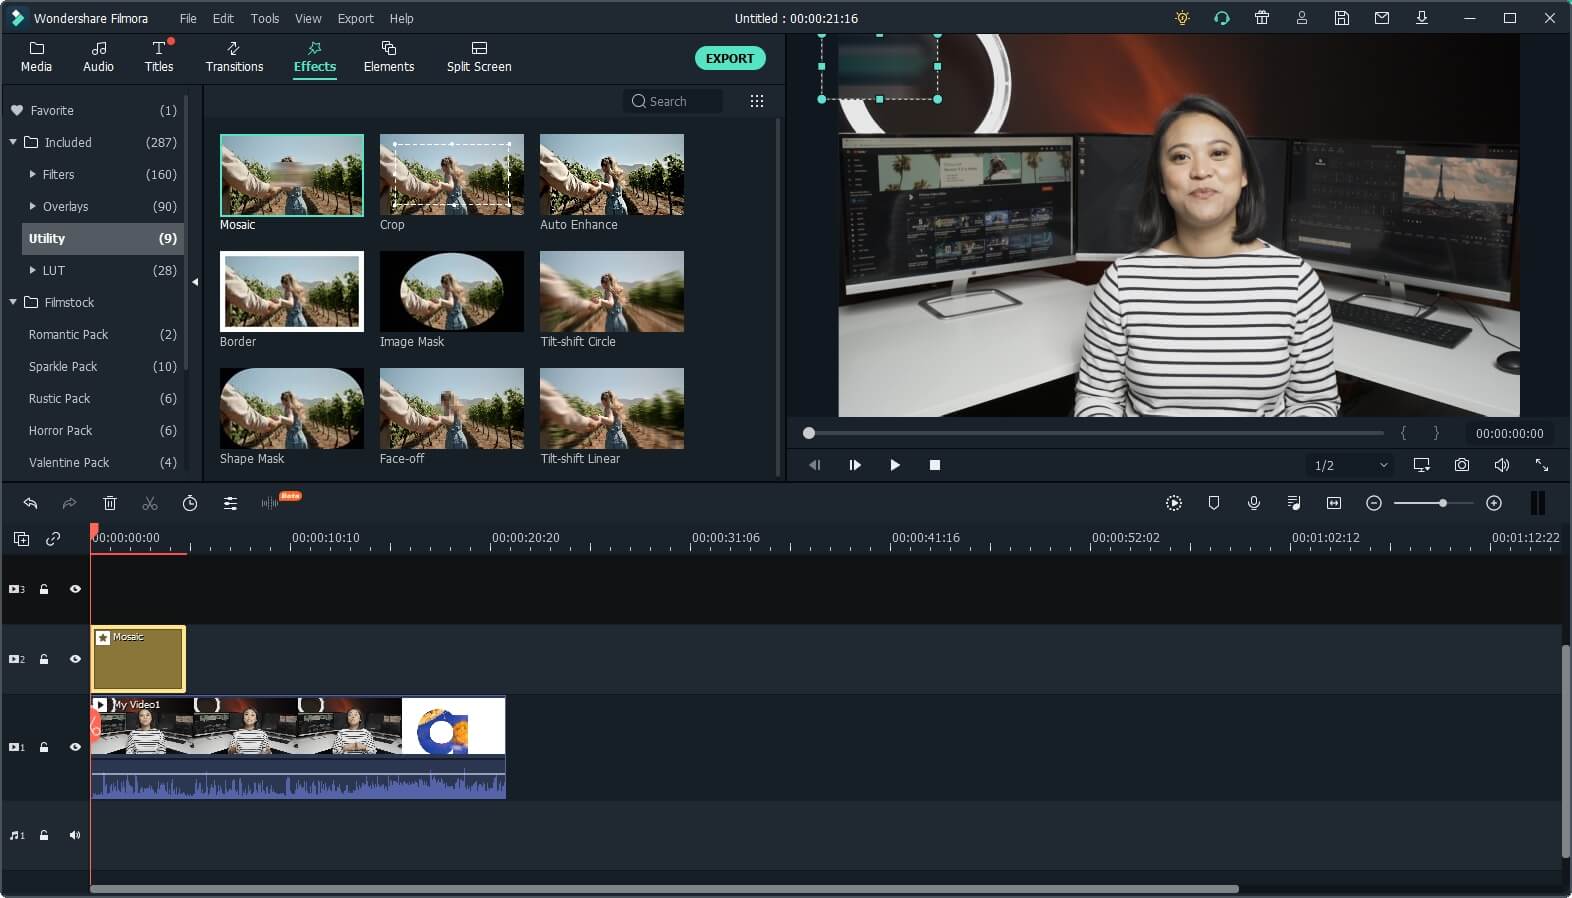
A mosaic square will appear after you apply it in the preview window by relocating it by simply dragging it to the preview window area or adjusting its size at the watermarked position.
If the downloaded video has more than one logo to hide, tapping the plus icon will introduce you to another mosaic square within the video
project.
In the timeline, double click those Mosaic effects; you can select Blur Amount and Type to adjust the shape and size of the mosaic. Hit the OK tab to apply the adjustment.

You can also consider using this Mosaic effect to blur other objects or even the face.
Method 2: Remove watermark by Cropping the video
This method will allow you to remove the watermark from your video entirely. Cropping the area where the watermark isn’t possible in any video editor, so if you select to crop the video, be prepared to lose a particular section of the picture.
Right-click the video and choose the Crop and Zoom option once the footage you wish to crop is on the video track in Filmora’s timeline.
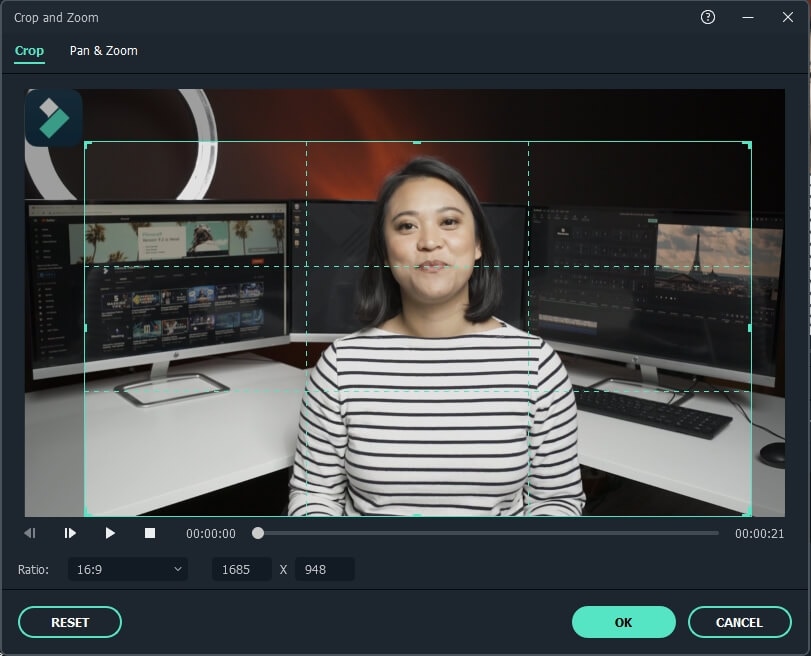
The crop window that enables you to use automatic aspect ratios or manually will appear on the screen. You can reposition the videos’ corners of the cropping rectangle from here by dragging it as much as essential to remove TikTok’s username watermark.
You can change the aspect ratios or keep them originally based on your needs. Hit the OK tab to apply the cropping effect, and you have successfully removed a watermark from your video.
So, it’s a worthy, reliable, and feature-rich TikTok watermark remover that you can easily use as the best TikTok MP4 converter.
Part 3: How to Save TikTok without Watermark for Free?
How to Save TikTok Without Watermark Online
When there is a need for the best TikTok video downloaders, you might get offers with various options. But the quantity of TikTok downloaders without watermarked videos is counted on the fingers of one hand.
We’ve founded SSSTikTok, an ideal online tool fit for the same.
We conducted the tutorial below on Windows 10’s Chrome browser, but it is almost the same on iOS, Android, and Mac.
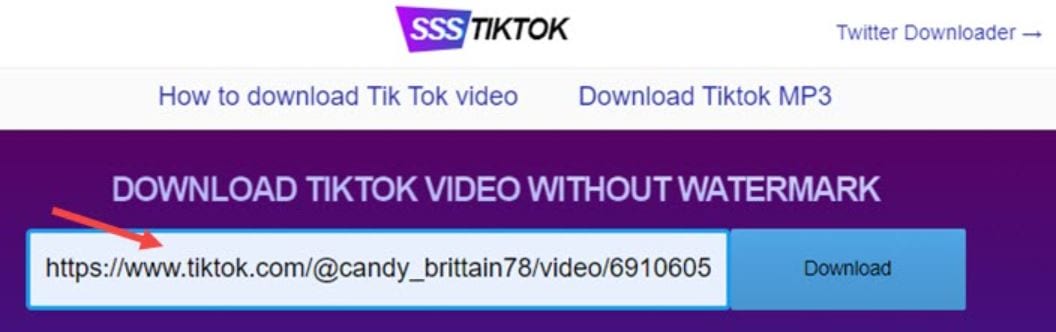
Step 1. Copy the TikTok video’s URL on the Pc or TikTok mobile app.
Step 2. Open the web browser, and visit the SSSTikTok official website. Paste the video link to the blank tab and select the download tab. And it will take only a few secs to analyze the URL.
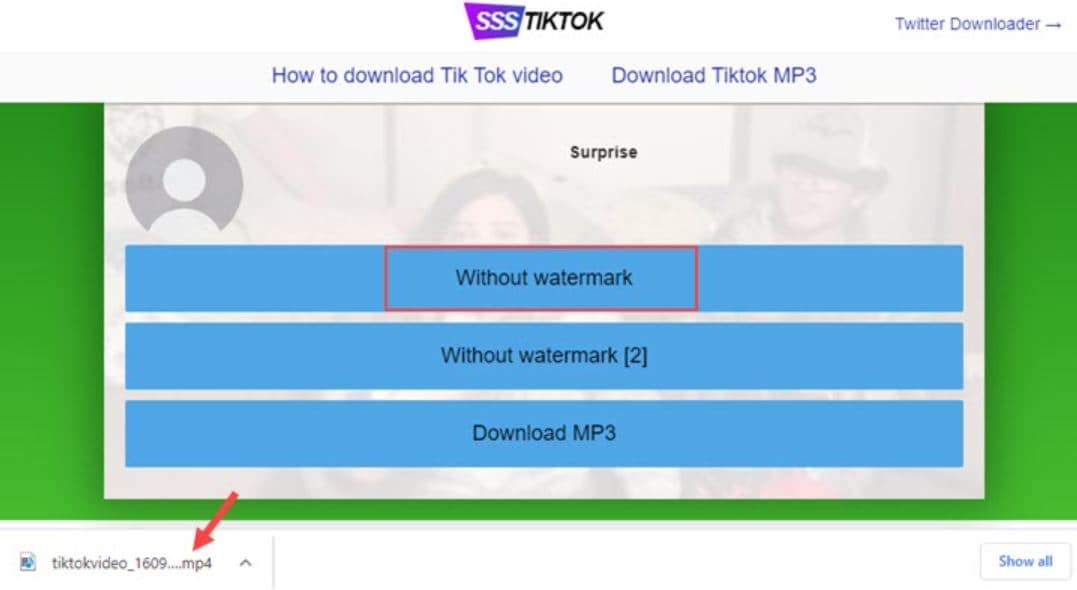
Step 3. Select the “Without Watermark“ option, and the video will be immediately get saved to the browser downloads folder.
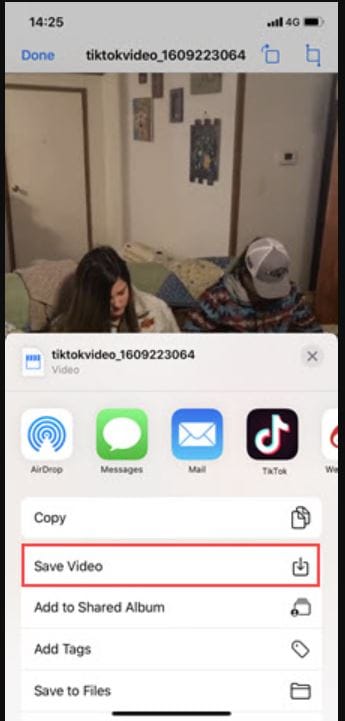
Tips for iPhone users: There’s one more step you should be aware of if you’re using this TikTok downloader. After downloading the video on iOS Safari, you can preview the video, hit the share icon, and select the “Save video “option.
Conclusion
Finally, we hope it won’t be that difficult to convert TikTok to MP4 via the best TikTok converters MP4 with the solution mentioned above. Ensure that you didn’t break the law whether you want to remove it with an online watermark remover or with a program for PC and Mac, or on iPhone or Android phones.
If you want to go for the straightforward and hassle-free option, check our video editing program Filmora and use it to blur or crop the watermarks of TikTok’s downloaded videos.
02 How to Convert TikTok Video to MP4 without Watermark?
03 How to Save TikTok without Watermark for Free?
Part 1: Top 3 TikTok MP4 Converters in 2021
1. ttdown.org
TTDown provides a colorful website to scroll through and learn about TikTok and a step-by-step tutorial on downloading TikTok MP4. In addition, TTDown brings you the most straightforward way to download TikTok MP4 videos by copy-pasting the video’s link on their website.
However, its Bookmarklet feature saves the users’ time from copy-pasting. They have provided their website link that you can drag into your browser’s bookmarks. Just hit the bookmark when you scroll through TikTok and wish to save a video.
Price: Free
2. Experts PHP
ExpertPHP TikTok converter MP4 lets you download TikTok files by pasting the file’s copied link to be downloaded into the text bar offered on the ExpertsPHP’s web page. It further enables us to download videos and images from platforms like Pinterest, TikTok, etc. Here, you can download videos freely without watermarks.
One downside of ExpertsPHP is that it does not provide other features, like converting videos into GIFs, as offered by its alternatives.
Price: Free
3. Qoob Clips
Qoob Clips lets us view and download unlimited TikTok and Instagram media files. You can even get access to the private accounts’ content through Qoob.
To proceed with the process, you are only required to install Qoob on your computer, enter your username, and begin viewing content downloaded automatically into your PC. Just by entering the username, you can even search for a private account’s content.
This MP4 TikTok downloader also lets you download unlimited highlights and stories. It further supports unlimited private accounts without displaying any ads.
Part 2: How to Convert TikTok Video to MP4 without Watermark?
Before proceeding further, it’s essential to consider whether any copyright infringement issues could arise from downloading a TikTok video. According to the Community Guidelines of TikTok, users cannot post, send, or share any content that violates someone else’s trademarks, copyrights, or intellectual property rights.
To prevent this, TikTok applies a watermark featuring both its account’s username and the logo that originally posted the content if someone downloads a TikTok video.
In other words, you have to ensure the watermark’s visibility or give full credit to the user in another way while reposting the user’s video on social media. And, this is where the job of the best TikTok converter MP4 comes in.
Cropping watermarks from your videos with Wondershare Filmora video editing software is a pretty straightforward process. You don’t need be a professional to finish these simple editing actions.
All you must do is choose a method that best suits your preferences and performs an easy action, though.
So, without any delay, let’s have a look at some editing techniques you can use to blur or crop watermarks from the downloaded videos of TikTok with Filmora.
Wondershare Filmora
Get started easily with Filmora’s powerful performance, intuitive interface, and countless effects!
Try It Free Try It Free Try It Free Learn More >
Note: the methods listed below won’t work perfectly if the watermark is in the middle of the screen. And you may need to subscribe to remove the watermark via Wondershare Filmora. In addition, you can fetch a special discount at Filmora Education Plan if you’re a student.
Method 1: Blurring the Watermark
The Filmora’s Mosaic feature will allow you to blur logos and all other on-screen graphics with just a few taps.
Hit the Effects tab at the top, select the Utility tab at left, and then hit the Mosaic option to preview the effect.
Click plus icon on the thumbnail on Mosaic or drag-and-drop it into the track above the video.
A mosaic square will appear after you apply it in the preview window by relocating it by simply dragging it to the preview window area or adjusting its size at the watermarked position.
If the downloaded video has more than one logo to hide, tapping the plus icon will introduce you to another mosaic square within the video
project.
In the timeline, double click those Mosaic effects; you can select Blur Amount and Type to adjust the shape and size of the mosaic. Hit the OK tab to apply the adjustment.
You can also consider using this Mosaic effect to blur other objects or even the face.
Method 2: Remove watermark by Cropping the video
This method will allow you to remove the watermark from your video entirely. Cropping the area where the watermark isn’t possible in any video editor, so if you select to crop the video, be prepared to lose a particular section of the picture.
Right-click the video and choose the Crop and Zoom option once the footage you wish to crop is on the video track in Filmora’s timeline.
The crop window that enables you to use automatic aspect ratios or manually will appear on the screen. You can reposition the videos’ corners of the cropping rectangle from here by dragging it as much as essential to remove TikTok’s username watermark.
You can change the aspect ratios or keep them originally based on your needs. Hit the OK tab to apply the cropping effect, and you have successfully removed a watermark from your video.
So, it’s a worthy, reliable, and feature-rich TikTok watermark remover that you can easily use as the best TikTok MP4 converter.
Part 3: How to Save TikTok without Watermark for Free?
How to Save TikTok Without Watermark Online
When there is a need for the best TikTok video downloaders, you might get offers with various options. But the quantity of TikTok downloaders without watermarked videos is counted on the fingers of one hand.
We’ve founded SSSTikTok, an ideal online tool fit for the same.
We conducted the tutorial below on Windows 10’s Chrome browser, but it is almost the same on iOS, Android, and Mac.
Step 1. Copy the TikTok video’s URL on the Pc or TikTok mobile app.
Step 2. Open the web browser, and visit the SSSTikTok official website. Paste the video link to the blank tab and select the download tab. And it will take only a few secs to analyze the URL.
Step 3. Select the “Without Watermark“ option, and the video will be immediately get saved to the browser downloads folder.
Tips for iPhone users: There’s one more step you should be aware of if you’re using this TikTok downloader. After downloading the video on iOS Safari, you can preview the video, hit the share icon, and select the “Save video “option.
Conclusion
Finally, we hope it won’t be that difficult to convert TikTok to MP4 via the best TikTok converters MP4 with the solution mentioned above. Ensure that you didn’t break the law whether you want to remove it with an online watermark remover or with a program for PC and Mac, or on iPhone or Android phones.
If you want to go for the straightforward and hassle-free option, check our video editing program Filmora and use it to blur or crop the watermarks of TikTok’s downloaded videos.
How to Stitch on TikTok
Best Video Editor for Beginners on Windows and Mac
Wondershare Filmora is one of the most popular video editing software among TikTokers , download and have a try.
TikTok’s collaborative nature is one of its most appealing features. Your video is not finished the moment you publish it. They can be responded to, remixed, and re-shared by anybody. TikTok is meant to allow users to construct on other’s films shared on the network, whether you’re utilizing audio from some other video or making a duet.
Thanks to the stitch tool, creators may remix, remake, and reply to videos with a couple of taps. This article will tell you what you need to know about stitching videos on TikTok. Continue reading to learn more about Stitching and how to stitch on TikTok. Let’s get started!
In this article
02 How to Turn Stitch On or Off?
04 How to Stitch Any TikTok Video withFilmora Video Editor ?
05 FAQs About TikTok Video Stitch
Part 1: What is Stitch on TikTok?
TikTok’s latest video editing tool ‘Stitch,’ lets people incorporate video snippets from other people into their own. Creators may use Stitch to provide a five-second snippet from a TikTok video out of their own. Unlike duets that play videos together, stitched videos play in the sequence they were stitched. Videos containing open-ended questions have gained in popularity with the advent of the stitch.
Whenever you Stitch a clip-on TikTok, you are essentially inserting your video after yet another video that has already been submitted. People frequently utilize this to remark on or reply to other videos. And, when done well, it can add a lot more context to your movies.
The one limitation of the Stitch tool is that you may only publish up to five seconds from some other video. So, if you’re focusing on a Stitch, you must select the five seconds which are most critical to highlight your message.
Part 2: How to Turn Stitch On or Off?
By enabling the Stitch feature, you make your material available to millions of prospective collaborators. Consider the possibilities – it might be a fantastic approach to enhance reach and virility.
If you aren’t comfortable exposing your films to the whole TikTok community, users can opt out of allowing others to Stitch their work. You may modify them under the Privacy Controls. Here’s how to do a Stitch on TikTok:
Step 1: Launch the TikTok app and then head to your profile by clicking on the Profile option at the bottom right. After that, select the three dots to open the settings.
Step 2: After entering the settings, select Privacy to proceed, and then tap on the Stitch option to open the Stitch settings.
Step 3: Now, you will see three options that are No-one, Everyone, and Friends. If you want to allow the Stitching, select either Everyone or Friends. However, to restrict the people from stitching your videos, choose No-one. After you are done selecting, click on the back arrow to save the applied changes.
Part 3: How to Stitch on TikTok?
TikTok keeps giving creators more reasons to continue producing, and fans like us are more committed to continuing to open it. Stitch, a new app functionality from the famous social networking platform, makes things more straightforward than ever for artists to interact with each other.
But, you might be wondering, how to do a stitch on TikTok? Don’t worry; you’ve come to the right place. Here’s how:
Step 1: Launch TikTok and then go to the video that you want to stitch. Select the Share icon, which resembles an arrow. Select the Stitch symbol from the menu that displays, and then wait a few seconds for the video to complete. The lengthier the video is, the more the loading time.

Step 2: When it’s finished, you’ll be sent to a screen where you may take five seconds of the film and use it on your own. To navigate through the movie, use the sliders and the red bars to choose the portion you want. When you’re finished, tap Next.

Step 3: You’ll be sent to TikTok’s normal recording screen. Record the remainder of your TikTok video with all of the features you’re accustomed to utilizing. You may use whatever effects, stickers, texts, voiceovers, or captions you desire. After that, press the Next button.

Step 4: Make a title and hashtags for your TikTok video. You could also choose whether or not these users may Stitch your movie here – hit the toggle switch beside Allow Stitch to turn it off. Following that, hit the Post option, and your stitched video will be uploaded.

Part 4: How to Stitch Any TikTok Video with Filmora Video Editor ?
Before getting started, understand why people opt for Filmora video editor for stitching videos on TikTok when this can be done through the official TikTok application. TikTok app only allows you to stitch a video for up to five seconds which is quite frustrating if you wish to stitch an entire video.
One more reason is that, with TikTok, you cannot stitch the already existing video from the camera roll, which restricts creators from adding the already edited content to the existing video. So, to avoid the above problems, Filmora is used for stitching TikTok videos.
For Win 7 or later (64-bit)
For macOS 10.12 or later
To begin, download the video that you wish to stitch with from TikTok. After, follow the below stepwise guide:
Step 1: Launch the Filmora software on your PC and import the video files by clicking on the File and then Import/Export Media. You can simply drag and drop the videos as well.
Step 2: Drag the clips from the media library to the Timeline’s video track. All video files will be stitched into a single video with no transitions.

Note: To add a transition to the video , go to the Transition tab and drop the desired transition to the junction of two clips.

Step 3: Now, preview the stitched video and, when finished, click the Export option to save numerous video segments to a single file. Choose any format from the Format tab’s list.
Part 5: FAQs About TikTok Video Stitch
1. Can you do a Stitch on TikTok with a video from your Camera Roll?
Unfortunately, you cannot utilize a video from your Camera Roll in a Stitch at the time of this writing. So, whatever your reaction to a Stitch is, you must record 100% unique footage shot with the TikTok camera. However, you may download the video first and then stitch it with some third-party software such as Filmora.
2. Can you stitch longer than 5 seconds?
No, it is not possible to stitch a video for longer than five seconds using the built-in Stitching feature of the TikTok app. But this can be done by stitching the videos using third-party applications and software.
3. How do I see TikTok stitches?
Users who want to view as many stitches as possible can do it by browsing for them on the app. You must first browse to Discover, and from there to the search box. Then type #Stitch @username, where the username is the name of the account from which you wish to view stitches.
4. TikTok Stitch option not showing. How to fix it?
Users may choose whether or not someone else can Stitch their work in their settings. The option may be found under the Settings and Privacy tab, where users can activate or uncheck Stitch for all videos. So, if the Stitch option is not showing, the user may have disabled the Stitch option.
Conclusion
The Stitch feature is an excellent way to continue the discussion with your videos. You may leave comments on popular content on the site. Most importantly, it may be a fun method to generate material different from what you usually publish. And since you know How to Stitch on TikTok after reading this article, stitch the videos today and create unique content!
TikTok’s collaborative nature is one of its most appealing features. Your video is not finished the moment you publish it. They can be responded to, remixed, and re-shared by anybody. TikTok is meant to allow users to construct on other’s films shared on the network, whether you’re utilizing audio from some other video or making a duet.
Thanks to the stitch tool, creators may remix, remake, and reply to videos with a couple of taps. This article will tell you what you need to know about stitching videos on TikTok. Continue reading to learn more about Stitching and how to stitch on TikTok. Let’s get started!
In this article
02 How to Turn Stitch On or Off?
04 How to Stitch Any TikTok Video withFilmora Video Editor ?
05 FAQs About TikTok Video Stitch
Part 1: What is Stitch on TikTok?
TikTok’s latest video editing tool ‘Stitch,’ lets people incorporate video snippets from other people into their own. Creators may use Stitch to provide a five-second snippet from a TikTok video out of their own. Unlike duets that play videos together, stitched videos play in the sequence they were stitched. Videos containing open-ended questions have gained in popularity with the advent of the stitch.
Whenever you Stitch a clip-on TikTok, you are essentially inserting your video after yet another video that has already been submitted. People frequently utilize this to remark on or reply to other videos. And, when done well, it can add a lot more context to your movies.
The one limitation of the Stitch tool is that you may only publish up to five seconds from some other video. So, if you’re focusing on a Stitch, you must select the five seconds which are most critical to highlight your message.
Part 2: How to Turn Stitch On or Off?
By enabling the Stitch feature, you make your material available to millions of prospective collaborators. Consider the possibilities – it might be a fantastic approach to enhance reach and virility.
If you aren’t comfortable exposing your films to the whole TikTok community, users can opt out of allowing others to Stitch their work. You may modify them under the Privacy Controls. Here’s how to do a Stitch on TikTok:
Step 1: Launch the TikTok app and then head to your profile by clicking on the Profile option at the bottom right. After that, select the three dots to open the settings.
Step 2: After entering the settings, select Privacy to proceed, and then tap on the Stitch option to open the Stitch settings.
Step 3: Now, you will see three options that are No-one, Everyone, and Friends. If you want to allow the Stitching, select either Everyone or Friends. However, to restrict the people from stitching your videos, choose No-one. After you are done selecting, click on the back arrow to save the applied changes.
Part 3: How to Stitch on TikTok?
TikTok keeps giving creators more reasons to continue producing, and fans like us are more committed to continuing to open it. Stitch, a new app functionality from the famous social networking platform, makes things more straightforward than ever for artists to interact with each other.
But, you might be wondering, how to do a stitch on TikTok? Don’t worry; you’ve come to the right place. Here’s how:
Step 1: Launch TikTok and then go to the video that you want to stitch. Select the Share icon, which resembles an arrow. Select the Stitch symbol from the menu that displays, and then wait a few seconds for the video to complete. The lengthier the video is, the more the loading time.
Step 2: When it’s finished, you’ll be sent to a screen where you may take five seconds of the film and use it on your own. To navigate through the movie, use the sliders and the red bars to choose the portion you want. When you’re finished, tap Next.
Step 3: You’ll be sent to TikTok’s normal recording screen. Record the remainder of your TikTok video with all of the features you’re accustomed to utilizing. You may use whatever effects, stickers, texts, voiceovers, or captions you desire. After that, press the Next button.
Step 4: Make a title and hashtags for your TikTok video. You could also choose whether or not these users may Stitch your movie here – hit the toggle switch beside Allow Stitch to turn it off. Following that, hit the Post option, and your stitched video will be uploaded.
Part 4: How to Stitch Any TikTok Video with Filmora Video Editor ?
Before getting started, understand why people opt for Filmora video editor for stitching videos on TikTok when this can be done through the official TikTok application. TikTok app only allows you to stitch a video for up to five seconds which is quite frustrating if you wish to stitch an entire video.
One more reason is that, with TikTok, you cannot stitch the already existing video from the camera roll, which restricts creators from adding the already edited content to the existing video. So, to avoid the above problems, Filmora is used for stitching TikTok videos.
For Win 7 or later (64-bit)
For macOS 10.12 or later
To begin, download the video that you wish to stitch with from TikTok. After, follow the below stepwise guide:
Step 1: Launch the Filmora software on your PC and import the video files by clicking on the File and then Import/Export Media. You can simply drag and drop the videos as well.
Step 2: Drag the clips from the media library to the Timeline’s video track. All video files will be stitched into a single video with no transitions.
Note: To add a transition to the video , go to the Transition tab and drop the desired transition to the junction of two clips.
Step 3: Now, preview the stitched video and, when finished, click the Export option to save numerous video segments to a single file. Choose any format from the Format tab’s list.
Part 5: FAQs About TikTok Video Stitch
1. Can you do a Stitch on TikTok with a video from your Camera Roll?
Unfortunately, you cannot utilize a video from your Camera Roll in a Stitch at the time of this writing. So, whatever your reaction to a Stitch is, you must record 100% unique footage shot with the TikTok camera. However, you may download the video first and then stitch it with some third-party software such as Filmora.
2. Can you stitch longer than 5 seconds?
No, it is not possible to stitch a video for longer than five seconds using the built-in Stitching feature of the TikTok app. But this can be done by stitching the videos using third-party applications and software.
3. How do I see TikTok stitches?
Users who want to view as many stitches as possible can do it by browsing for them on the app. You must first browse to Discover, and from there to the search box. Then type #Stitch @username, where the username is the name of the account from which you wish to view stitches.
4. TikTok Stitch option not showing. How to fix it?
Users may choose whether or not someone else can Stitch their work in their settings. The option may be found under the Settings and Privacy tab, where users can activate or uncheck Stitch for all videos. So, if the Stitch option is not showing, the user may have disabled the Stitch option.
Conclusion
The Stitch feature is an excellent way to continue the discussion with your videos. You may leave comments on popular content on the site. Most importantly, it may be a fun method to generate material different from what you usually publish. And since you know How to Stitch on TikTok after reading this article, stitch the videos today and create unique content!
Also read:
- Foodie Hits Top TikTok Chefs & Cooks for 2024
- [Updated] Capture Stellar TikToks Easily & Effectively
- Critical Considerations for Successful TikTok Use on macOS
- Triller Vs. TikTok A Comparative Analysis (Max 156 Chars)
- [Updated] Amazon's Viral Discoveries - Your Essential List From TikTok for 2024
- [Updated] In 2024, Top 10 Tiktok Analytics Tools to Improve Account Performance
- [Updated] 2024 Approved The Final Act of Severing TikTok Ties Temporarily
- [New] In 2024, Laugh Outloud A Curation of the Funniest TikTok Videos and Joke Threads
- [New] How to Do Slow Mo On Tik Tok?
- [New] 2024 Approved How to Change or Edit Your TikTok Profile A Complete Guide
- [New] 2024 Approved Inspire & Engage Top 50+ TikTok Lyrics Guide
- [New] Mastering Rapid Downloads for the Latest Musicals on TikTok for 2024
- [New] 2024 Approved Top 5 Must-Know Aspects of Using TikTok (macOS)
- In 2024, The Secret Sauce for Successful Self-Clone Campaigns on Social Media's Trending Platform, TikTok
- Stepping Into TikTok's Anime Universe The Harmony of Movement, Music & Visual Trends for 2024
- [New] Perfecting Pitches Removing Ambient Rustling
- [New] Capture Attention with Influential Tags on Social Media's TikTok for 2024
- TikTok's Hottest Culinary Trends - Try These 15 Easy Delights for 2024
- [Updated] The Professional’s Playbook Streaming Live Videos on TikTok From Computer
- In 2024, Streamline TikTok to MP4 Conversion Process
- [Updated] Overcoming Saturation Marketing Yourself Above Top TikToks for 2024
- 2024 Approved Dodging the Unseen Ban Avoiding TikTok's Hidden Censorship
- [Updated] In 2024, Unexpected TikTok Refresh How to Restore Lost Content?
- [Updated] Filmmaking in 90 Seconds A Filmora Approach to TikTok Reacts for 2024
- [New] In 2024, Zany Zeal Your Ultimate Guide to Wildest TikTok Picks
- [Updated] Top 20 Effortless Trending TikTok Dance Moves for 2024
- [Updated] In 2024, From Thread to Thrill Sewing Secrets on TikTok
- [Updated] 2024 Approved Explore Next-Level TikTok Edits with Simple Background Swapping Techniques
- [New] Perfecting Pitches Removing Ambient Rustling for 2024
- 2024 Approved Navigating TikTok's Unique Artistic Expressions
- [New] Innovative Ideas to Elevate Your TikTok PFP
- How to Transfer Data from Samsung Galaxy A54 5G to Samsung Phone | Dr.fone
- [Updated] In 2024, How to Turn Off IGTV?
- [New] 2024 Approved VDG Screen Snatcher Synopsis Full Breakdown
- In 2024, Samsung Galaxy S23 Ultra ADB Format Tool for PC vs. Other Unlocking Tools Which One is the Best?
- In 2024, Full guide to Apple iPhone SE (2022) iCloud Bypass
- In 2024, Streamlining Screen Shots Efficiently Documenting Your Roblox Adventures on MacOS
- [Updated] Effortless Technique Mirror Video Playback in VLC Player
- New 2024 Approved Stop Motion Mastery The Top 5 Online Tools
- New 2024 Approved Transform YouTube Live with These Must-Know Secrets
- Pokemon Go No GPS Signal? Heres Every Possible Solution On Oppo F23 5G | Dr.fone
- [New] In 2024, Ideal Portals to Rewind at Your Computer (PS3 Edition)
- In 2024, How to Unlock Vivo Bootloader Easily
- How to Remove the Activation Lock On your iPad and Apple iPhone 14 Plus without Apple Account
- In 2024, Securing Virtual Triumphs - Mastering Screen Captures in PC Games
- New Uncovering the Secrets of the Best OGG Converters
- In 2024, Here are Some Pro Tips for Pokemon Go PvP Battles On Tecno Pop 8 | Dr.fone
- 3 Ways to Track Oppo Find N3 Flip without Them Knowing | Dr.fone
- CatchEmAll Celebrate National Pokémon Day with Virtual Location On Honor X50i+ | Dr.fone
- In 2024, Everything You Need to Know about Lock Screen Settings on your Samsung Galaxy S23
- How Can I Unlock My Apple iPhone 6s Plus After Forgetting my PIN Code? | Dr.fone
- Updated Swift Solutions for Auditory Clarity Banishing Buildup Noise for 2024
- New In 2024, Create Cartoons Like a Pro Top 10 Software for Beginners
- [Updated] In 2024, How to Capture Computer Screens and Webcam Video Simultaneously on Windows10?
- In 2024, Is pgsharp legal when you are playing pokemon On Poco X5? | Dr.fone
- [New] 2024 Approved Voicing It Up How to Save on iPhone
- In 2024, Amplify Reach Today's Most Effective Instagram Tag Strategies
- Capturing Desktop Image on Windows Editions
- [New] Professional Setup for Screen Capture During Games
- Maximizing Engagement with YouTube on Facebook Platforms
- Reviving OBS Camera Glitches
- New 2024 Approved How to Combine Multiple Videos Into One on Instagram
- Title: [New] Exclusive MP4 Extraction Software for TikTok Content for 2024
- Author: Stephen
- Created at : 2024-05-23 03:49:00
- Updated at : 2024-05-24 03:49:00
- Link: https://tiktok-video-recordings.techidaily.com/new-exclusive-mp4-extraction-software-for-tiktok-content-for-2024/
- License: This work is licensed under CC BY-NC-SA 4.0.
