
![[New] In 2024, A Beginner’s Blueprint to Crafting Engaging TikTok Reaction Videos with Filmora](https://www.lifewire.com/thmb/fj7LHxQR3xXkmWG7B0RVwIMdJVY=/400x300/filters:no_upscale():max_bytes(150000):strip_icc()/DemetriusGray-370f2f60b93b4808b029f80359cc8244.jpg)
[New] In 2024, A Beginner’s Blueprint to Crafting Engaging TikTok Reaction Videos with Filmora
A Beginner’s Blueprint to Crafting Engaging TikTok Reaction Videos with Filmora
How to Make TikTok Reaction Videos Easily in 2 Ways

Shanoon Cox
Mar 27, 2024• Proven solutions
With all the videos of different moods and categories available on the platform, TikTok’s reaction is something that makes the footage more engaging. Available for both iOS and Android platforms, TikTok allows you to record, edit , and compile a video of up to 60 seconds, and apply a plethora of filters and animation effects to them along with adding relevant music to awe your audience.
Considering this, here you will learn how to make TikTok reaction videos with ease from within the app itself, and if that’s not enough, using one of the best and most efficient programs available in the market that can even allow you to add unique effects to the reactions you create.
- Part 1: How to Make React Videos on TikTok
- Part 2: How to Use Snap Filmora to Make TikTok Reaction Videos
Bonus: Create A More Attractive Video with Human Segmentation Effect
The human segmentation effect under AI Portrait allows you to isolate people from video background even without a green screen, and then you can composite it to make a reaction video easily. Watch the video tutorial below to find out more details.


Want to read the texts instead of watching videos? Check the complete guide to making a reaction video in 3 ways .
Part 1: How to React to a TikTok Video
After being equipped with all the worldly knowledge about TikTok reaction videos, you can follow the steps given below to learn how to react to the footage created by other people:
1. Tap Share and Record Your Reaction
Start TikTok, play the video you want to react on, tap the Share icon from the lower-right area, and tap the React option from the Share to menu. Tap Flip from the top-right corner of the Camera screen to switch between the front and rear camera as needed, optionally tap the Mic icon to disable or enable voice and system audio capture, drag and reposition React window according to the source footage, and tap the Record button from the bottom to start shooting your TikTok reaction. Wait while the source clip and your recording process are complete successfully before moving forward to the next step.

2. Apply Filters
Tap the Filters icon from the top-right corner, tap to pick a filter from those available at the bottom, and tap anywhere on the screen to accept the one you selected and to get back to the previous window.

3. Manage Audio
Tap the Mixer icon from the upper-right corner of the screen, drag the My Voice and Soundtrack Volume sliders to manage your voice recording and the internal audio respectively, and tap Done to save the changes once you’re through with the modifications. Back on the previous window, tap Next from the bottom-right corner.

4. Publish the Video
Tap the Who can view this video option to manage your reaction’s visibility settings (optional). Tap the Save to device toggle switch to prevent TikTok reaction from being stored on your mobile’s storage (optional). Next, tap the Post button from the bottom-right corner to publish the video to TikTok.

More creative tricks about TikTok video: Clone Yourself in TikTok
Part 2: How to Make Reaction Videos with Filmora
Even though you can make TikTok reaction videos using its own filters and audio mixing tools that work pretty well under ideal conditions, if you are a perfectionist and like precision in anything you do or create, you need a dedicated program that has been designed specifically for the purpose.
Although several such tools are available in the market and can be easily downloaded and used, the best among them is Filmora by Wondershare. Wondershare Filmora is an industry-standard production and post-production tool for both Mac and Windows PCs that the majority of users prefer over its competitors such as Adobe Premiere Pro, Final Cut Pro X, etc. This is because Filmora offers simple UI, is less resource-intensive, and is able to render the outputs significantly faster.
You can learn how to make TikTok reaction videos using Wondershare Filmora by following the steps given below:
Note: Before proceeding, make sure that you have already copied the source (and the reaction) video(s) from your smartphone to your computer.
1. Create New Project and Set Preferences
Start Wondershare Filmora on your Windows or Mac PC, go to File > New Project and click 9:16 (Portrait) from the submenu that appears.
Click Split Screen from the standard toolbar at the top, hover mouse to the screen type preset you want to use, click the + ( Add to Project ) icon that appears at the bottom-right corner of the thumbnail, and click OK from the bottom-right corner once the preset is added to the Timeline.

2. Import and Add Video(s) Preview/Timeline
Click the Media button from the standard toolbar, click anywhere inside the Media window at the upper-left corner, and when the Open box comes up, select and import the video file(s) you want to participate in the TikTok reaction. Alternatively, you can also click Record from below the standard toolbar, and choose any of the options to record your own video or voice right from within Wondershare Filmora itself.
Next, click and drag each of the imported videos to their corresponding screen sections in the Preview window in the upper-right area. Notice how the files are automatically added to the Timeline at the bottom.
3. Add Elements and Titles
Click Elements from the standard toolbar, hover mouse to the element you want to add to the reaction, click the + icon that appears at the center of the thumbnail, and reposition the element in the Timeline to match the duration with that of the reaction you are creating.

4. Export the Reaction

Click EXPORT from the top-middle section of the interface, go to the Local tab from the top of the Export box that appears next, select your preferred format from the left bar, optionally choose a destination folder from the right window, optionally click SETTINGS to fine-tune the output preferences as needed, and click EXPORT from the bottom-right corner to export the TikTok reaction. Or, you can save it in the settings perfect for iPhone or another device.
Below is a sample reaction video made with Filmora, you can do much better than that for your TikTok account:
Besides using Filmora to edit reaction videos with the split-screen presets, you can also use some other video editing software to create a reaction video . Filmora can empower your video creation with more creativity, watch the video below and download Filmora to try.
Conclusion
A TikTok reaction enables you to make the source videos more fun and entertaining. Luckily the app itself has a “React” button that helps you create TikTok reaction videos with merely a few simple taps. However, if you feel that the built-in options are not as robust as they should be, a third-party program like Wondershare Filmora is something you would definitely love to try your hands on as the software is not only easy to use, it is also lightweight, and doesn’t put any overhead on your computer hardware.
Shanoon Cox
Shanoon Cox is a writer and a lover of all things video.
Follow @Shanoon Cox
Shanoon Cox
Mar 27, 2024• Proven solutions
With all the videos of different moods and categories available on the platform, TikTok’s reaction is something that makes the footage more engaging. Available for both iOS and Android platforms, TikTok allows you to record, edit , and compile a video of up to 60 seconds, and apply a plethora of filters and animation effects to them along with adding relevant music to awe your audience.
Considering this, here you will learn how to make TikTok reaction videos with ease from within the app itself, and if that’s not enough, using one of the best and most efficient programs available in the market that can even allow you to add unique effects to the reactions you create.
- Part 1: How to Make React Videos on TikTok
- Part 2: How to Use Snap Filmora to Make TikTok Reaction Videos
Bonus: Create A More Attractive Video with Human Segmentation Effect
The human segmentation effect under AI Portrait allows you to isolate people from video background even without a green screen, and then you can composite it to make a reaction video easily. Watch the video tutorial below to find out more details.
Want to read the texts instead of watching videos? Check the complete guide to making a reaction video in 3 ways .
Part 1: How to React to a TikTok Video
After being equipped with all the worldly knowledge about TikTok reaction videos, you can follow the steps given below to learn how to react to the footage created by other people:
1. Tap Share and Record Your Reaction
Start TikTok, play the video you want to react on, tap the Share icon from the lower-right area, and tap the React option from the Share to menu. Tap Flip from the top-right corner of the Camera screen to switch between the front and rear camera as needed, optionally tap the Mic icon to disable or enable voice and system audio capture, drag and reposition React window according to the source footage, and tap the Record button from the bottom to start shooting your TikTok reaction. Wait while the source clip and your recording process are complete successfully before moving forward to the next step.
2. Apply Filters
Tap the Filters icon from the top-right corner, tap to pick a filter from those available at the bottom, and tap anywhere on the screen to accept the one you selected and to get back to the previous window.
3. Manage Audio
Tap the Mixer icon from the upper-right corner of the screen, drag the My Voice and Soundtrack Volume sliders to manage your voice recording and the internal audio respectively, and tap Done to save the changes once you’re through with the modifications. Back on the previous window, tap Next from the bottom-right corner.
4. Publish the Video
Tap the Who can view this video option to manage your reaction’s visibility settings (optional). Tap the Save to device toggle switch to prevent TikTok reaction from being stored on your mobile’s storage (optional). Next, tap the Post button from the bottom-right corner to publish the video to TikTok.
More creative tricks about TikTok video: Clone Yourself in TikTok
Part 2: How to Make Reaction Videos with Filmora
Even though you can make TikTok reaction videos using its own filters and audio mixing tools that work pretty well under ideal conditions, if you are a perfectionist and like precision in anything you do or create, you need a dedicated program that has been designed specifically for the purpose.
Although several such tools are available in the market and can be easily downloaded and used, the best among them is Filmora by Wondershare. Wondershare Filmora is an industry-standard production and post-production tool for both Mac and Windows PCs that the majority of users prefer over its competitors such as Adobe Premiere Pro, Final Cut Pro X, etc. This is because Filmora offers simple UI, is less resource-intensive, and is able to render the outputs significantly faster.
You can learn how to make TikTok reaction videos using Wondershare Filmora by following the steps given below:
Note: Before proceeding, make sure that you have already copied the source (and the reaction) video(s) from your smartphone to your computer.
1. Create New Project and Set Preferences
Start Wondershare Filmora on your Windows or Mac PC, go to File > New Project and click 9:16 (Portrait) from the submenu that appears.
Click Split Screen from the standard toolbar at the top, hover mouse to the screen type preset you want to use, click the + ( Add to Project ) icon that appears at the bottom-right corner of the thumbnail, and click OK from the bottom-right corner once the preset is added to the Timeline.
2. Import and Add Video(s) Preview/Timeline
Click the Media button from the standard toolbar, click anywhere inside the Media window at the upper-left corner, and when the Open box comes up, select and import the video file(s) you want to participate in the TikTok reaction. Alternatively, you can also click Record from below the standard toolbar, and choose any of the options to record your own video or voice right from within Wondershare Filmora itself.
Next, click and drag each of the imported videos to their corresponding screen sections in the Preview window in the upper-right area. Notice how the files are automatically added to the Timeline at the bottom.
3. Add Elements and Titles
Click Elements from the standard toolbar, hover mouse to the element you want to add to the reaction, click the + icon that appears at the center of the thumbnail, and reposition the element in the Timeline to match the duration with that of the reaction you are creating.
4. Export the Reaction
Click EXPORT from the top-middle section of the interface, go to the Local tab from the top of the Export box that appears next, select your preferred format from the left bar, optionally choose a destination folder from the right window, optionally click SETTINGS to fine-tune the output preferences as needed, and click EXPORT from the bottom-right corner to export the TikTok reaction. Or, you can save it in the settings perfect for iPhone or another device.
Below is a sample reaction video made with Filmora, you can do much better than that for your TikTok account:
Besides using Filmora to edit reaction videos with the split-screen presets, you can also use some other video editing software to create a reaction video . Filmora can empower your video creation with more creativity, watch the video below and download Filmora to try.
Conclusion
A TikTok reaction enables you to make the source videos more fun and entertaining. Luckily the app itself has a “React” button that helps you create TikTok reaction videos with merely a few simple taps. However, if you feel that the built-in options are not as robust as they should be, a third-party program like Wondershare Filmora is something you would definitely love to try your hands on as the software is not only easy to use, it is also lightweight, and doesn’t put any overhead on your computer hardware.
Shanoon Cox
Shanoon Cox is a writer and a lover of all things video.
Follow @Shanoon Cox
The Compreenas Guide to TikTok Content Sharing (Chrome/Android)
Tiktok started out as a popular video-sharing platform for smartphones, but due to the massive response it got from people all around the world, it also launched a desktop version in 2021.
While creating, editing, and uploading videos on Tiktok via smartphones is as easy as pie, many people find it confusing, especially those new to this platform.
Therefore, in this article, we have compiled a step-by-step guide on how to upload Tiktok videos on Chrome, Android, and iPhone.
So, let’s get into it asap!
Upload Tiktok Videos on Chrome
Uploading Tiktok videos via Chrome is quite an easy and straightforward process. Just follow these steps, and you’re done!
Step 1
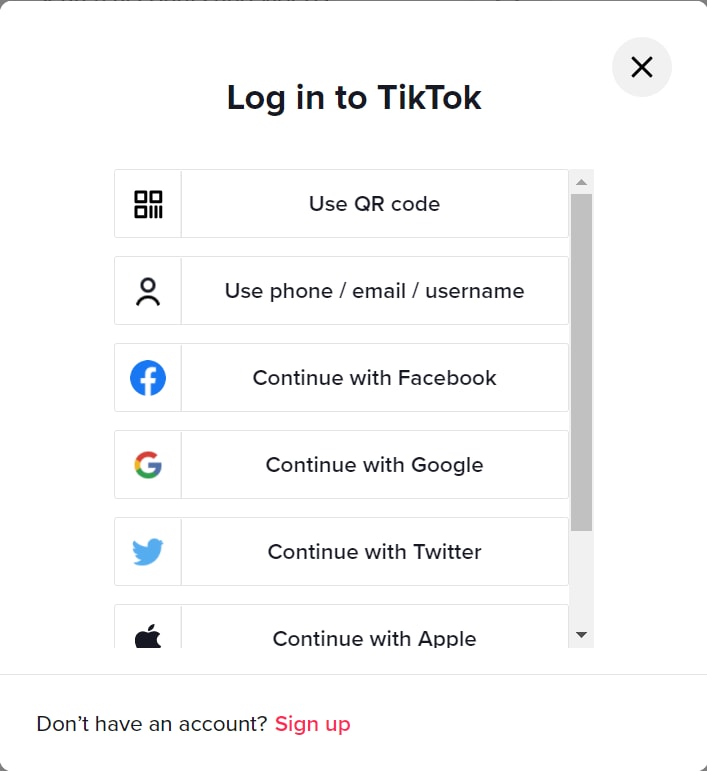
Go to the website version of Tiktok from Chrome, and click on “Log In” at the top-right corner of the page. You can also click on “Log In” under the “Following” option on the left.

Step 2
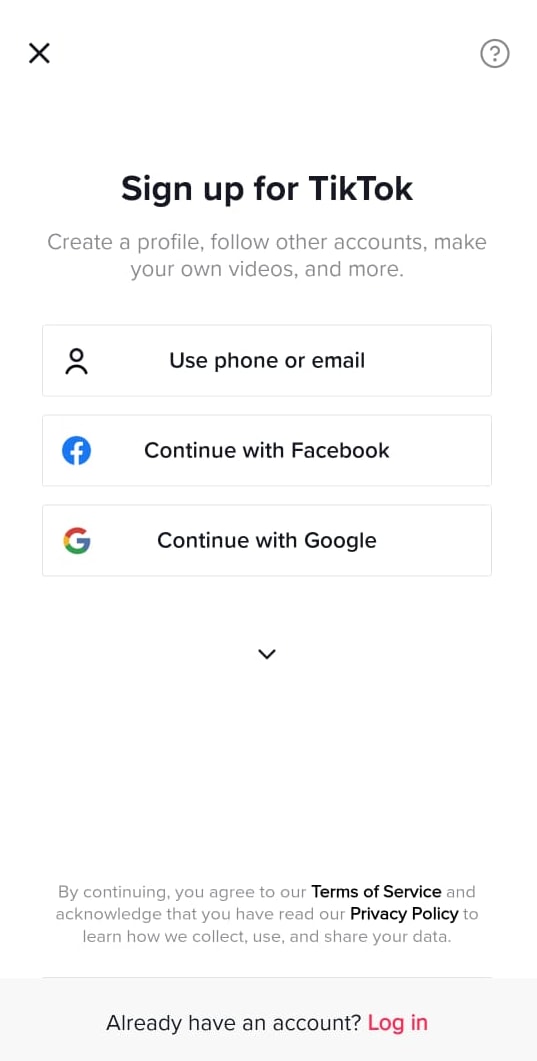
You will get a popup asking you to either sign up to Tiktok or log in using your email, Facebook, Twitter, Google, Apple, or Instagram. You can choose whichever option you find convenient.
Step 3
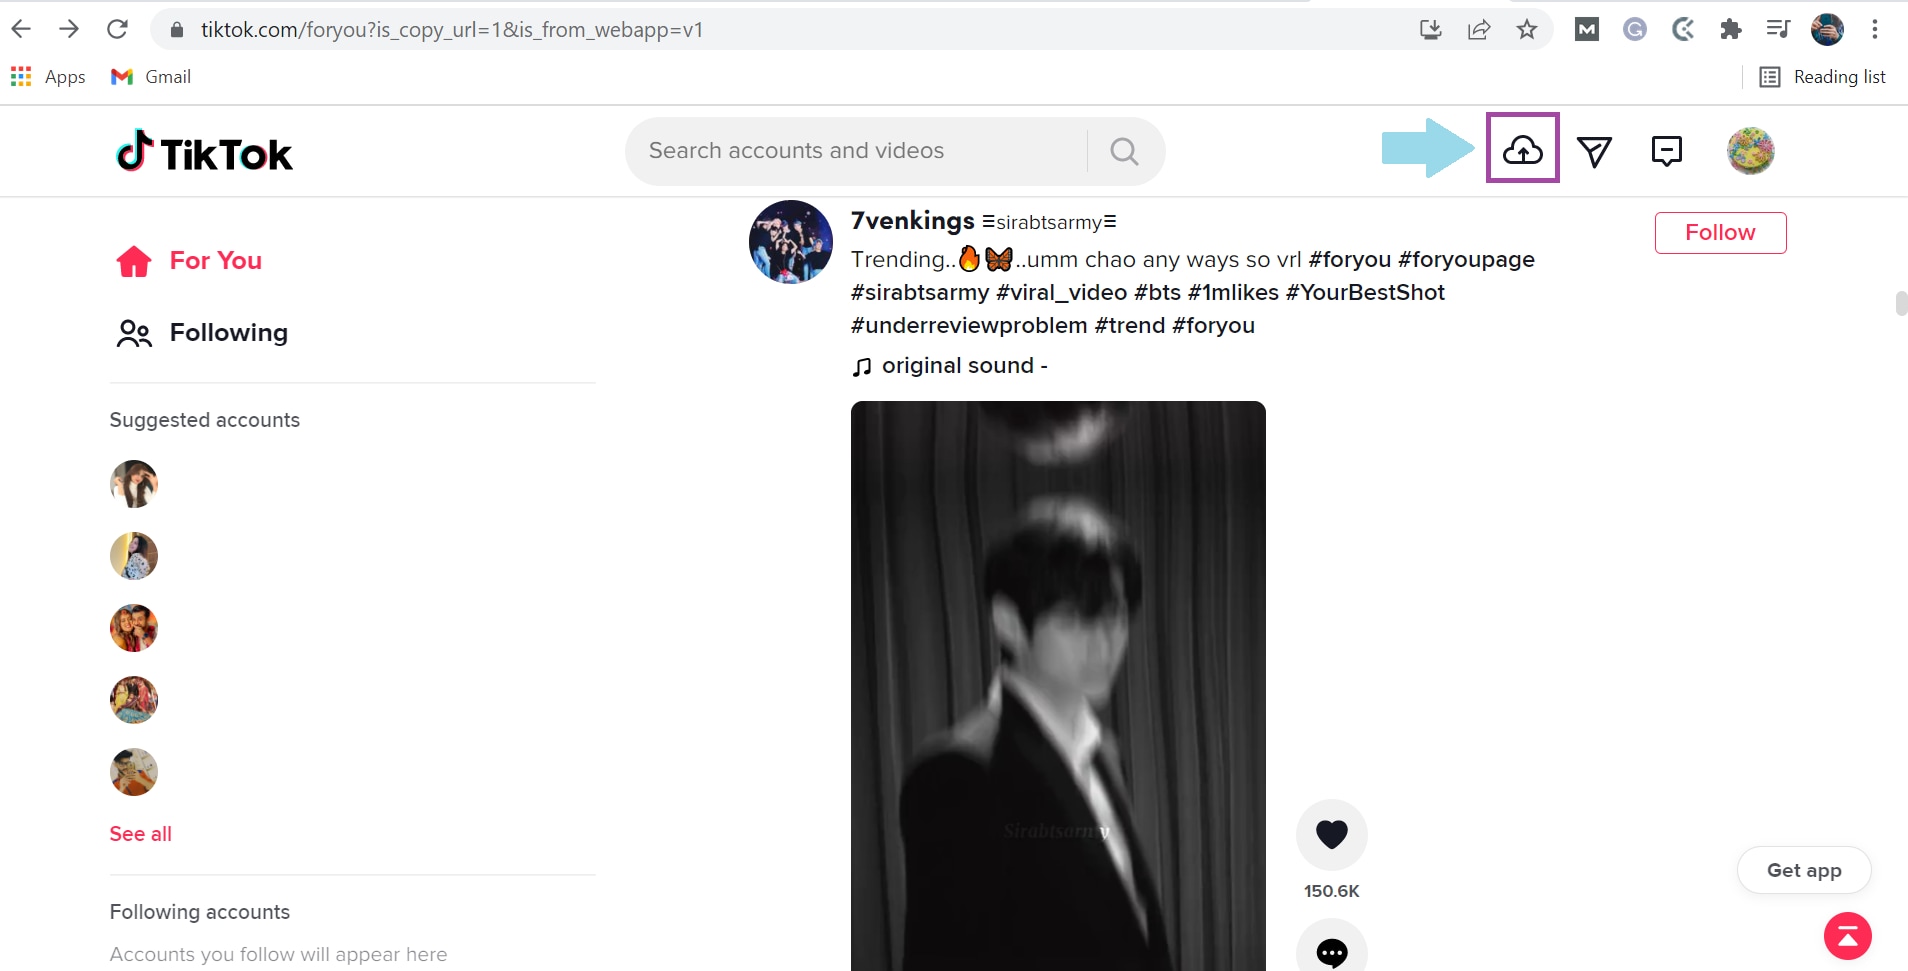
Click on the “Upload” option indicated by a cloud with an arrow.
Step 4
Click on “Select Video to Upload” and choose a video from your PC’s storage.
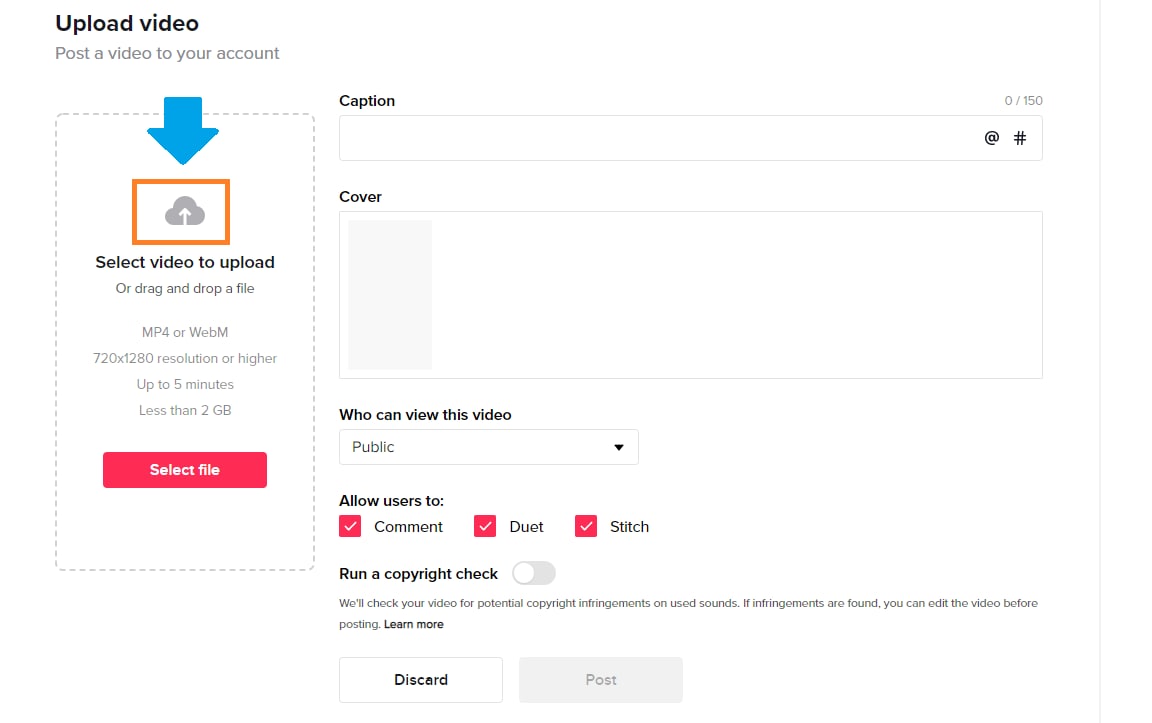
Step 5
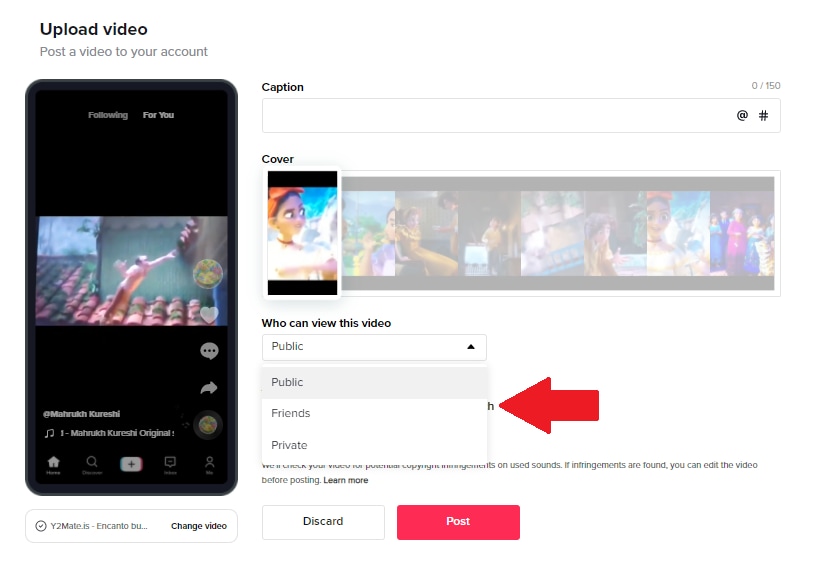
Once the video is uploaded, add a caption with hashtags and select the cover for your video.

Step 6
The next step is to choose whether your video can be viewed by the public or your friends or whether you want to keep it private from everyone.
Step 7
You can also allow or restrict users to comment on your video, make duets, or stitch your video.
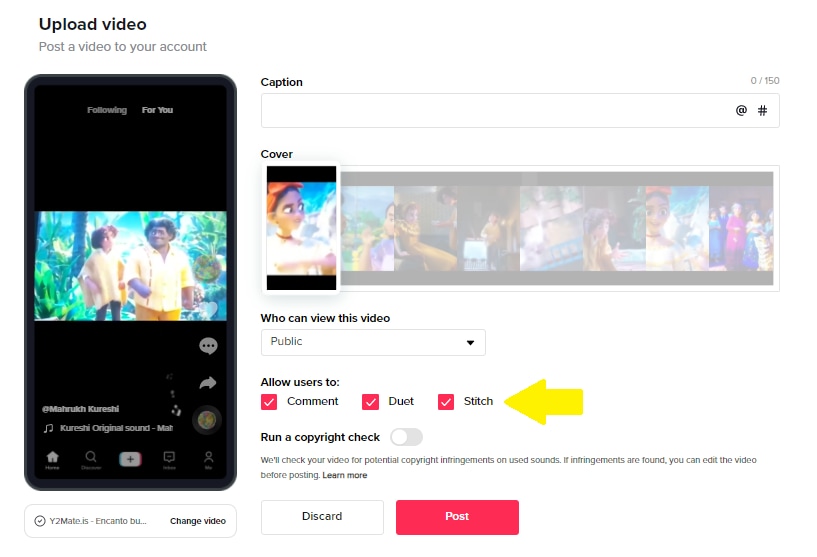
Step 8
Once you have adjusted all the settings, click on “Post” to upload the video to Tiktok.
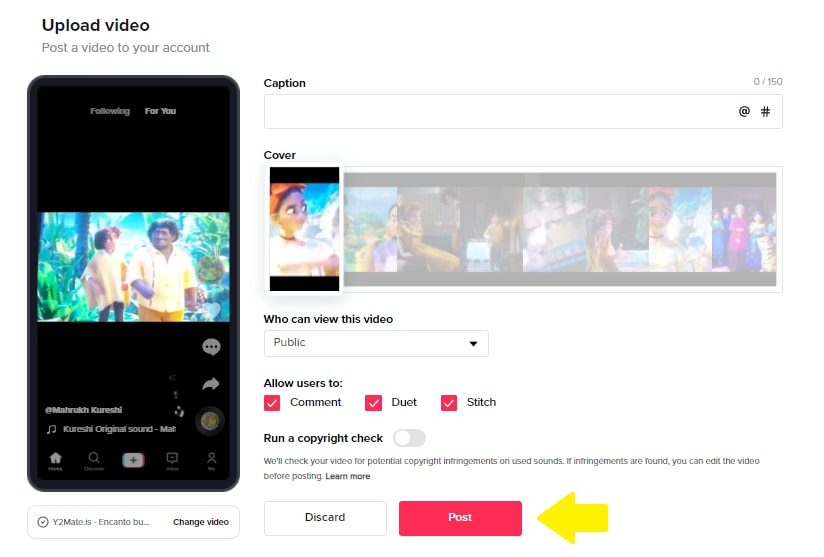
Your video will be uploaded on Tiktok and ready to receive comments and likes!
Wasn’t that easy?
Now, if you want to upload a Tiktok video on Android or iPhone, we have a tutorial for that too!
Upload Tiktok Videos on Android/iPhone
Here are the steps to upload Tiktok videos on Android or iPhone.
Step 1
Launch the Tiktok app on your Android or iOS device, and sign up using any of the given methods or log in if you already have an account.
Step 2
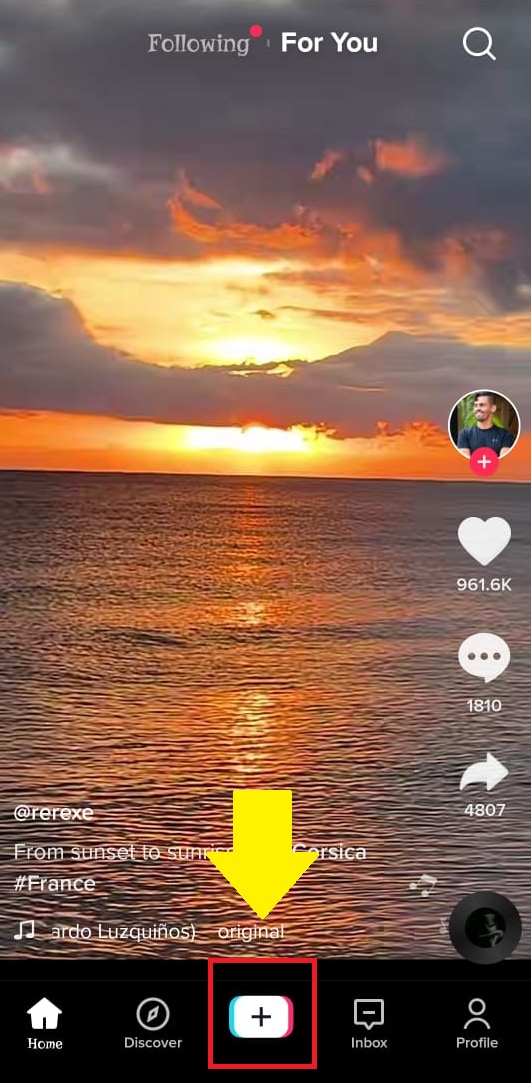
Click on the “+” sign to go to the video recording page.
Step 3
Click on the “Upload” option at the bottom right of the screen. This will take you to your device’s gallery/photos.
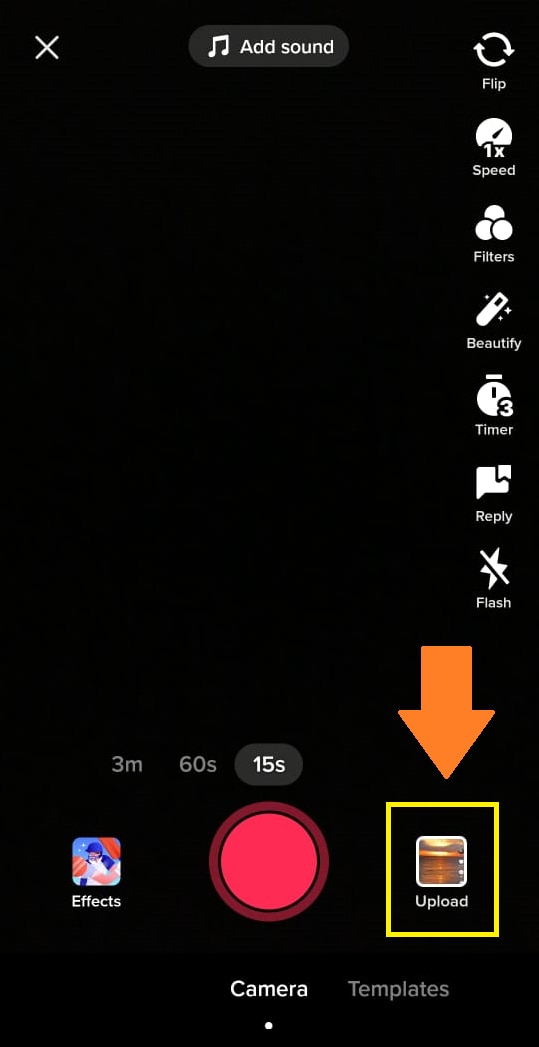
Step 4
Tap on the video you want to upload to Tiktok and click “Next.”
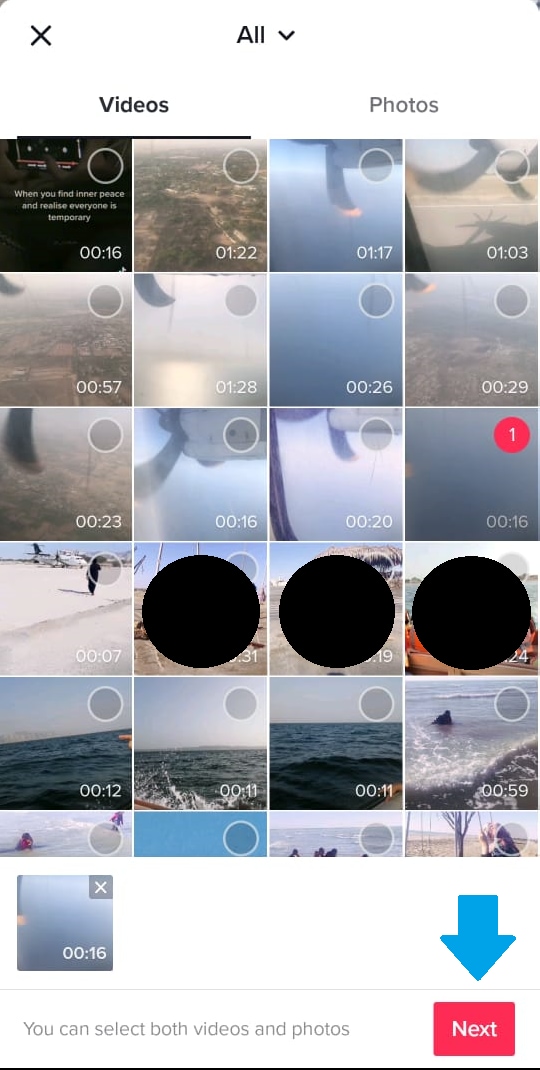
Step 5
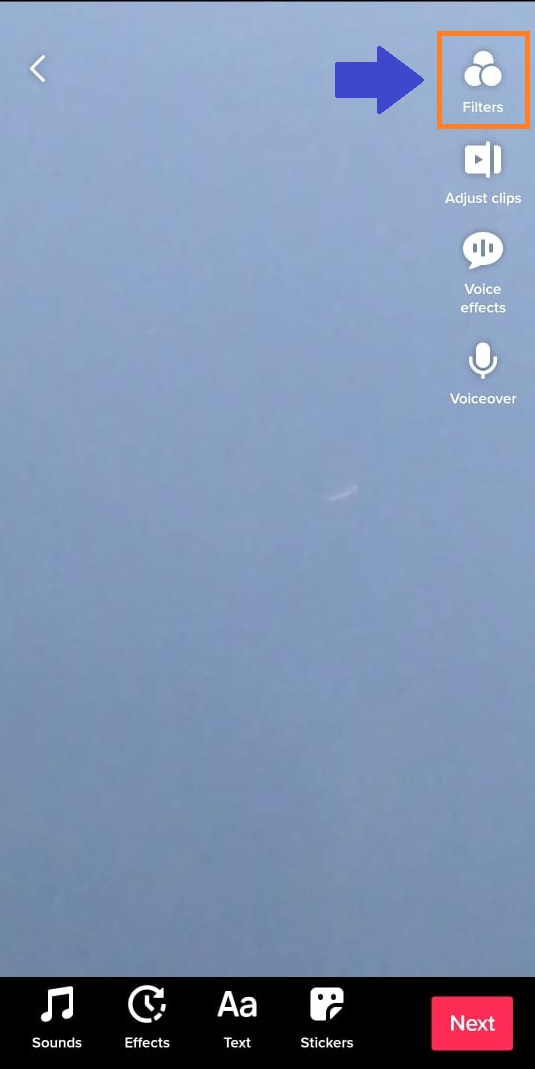
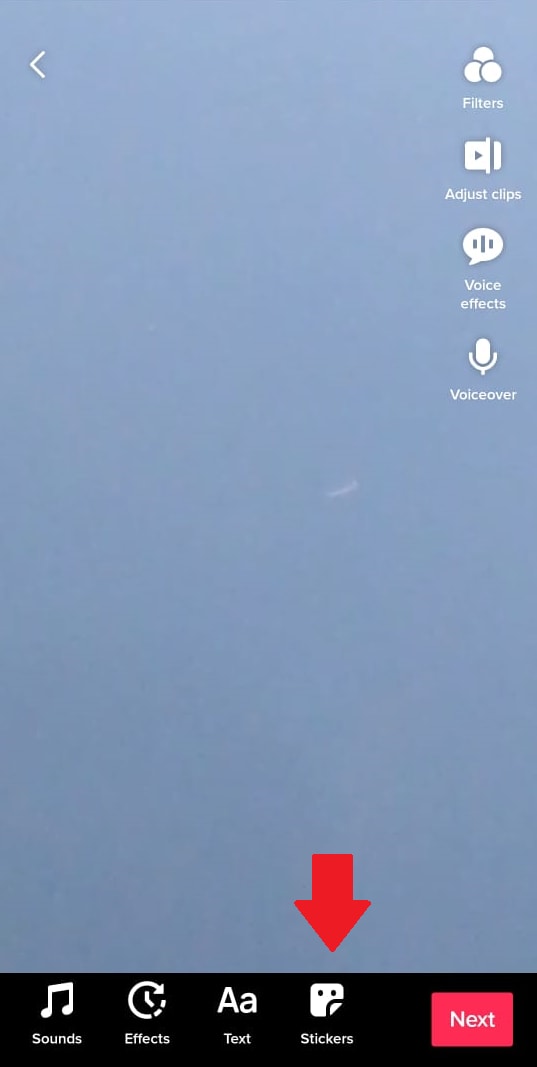
On the next page, you will see several different options to edit your video.
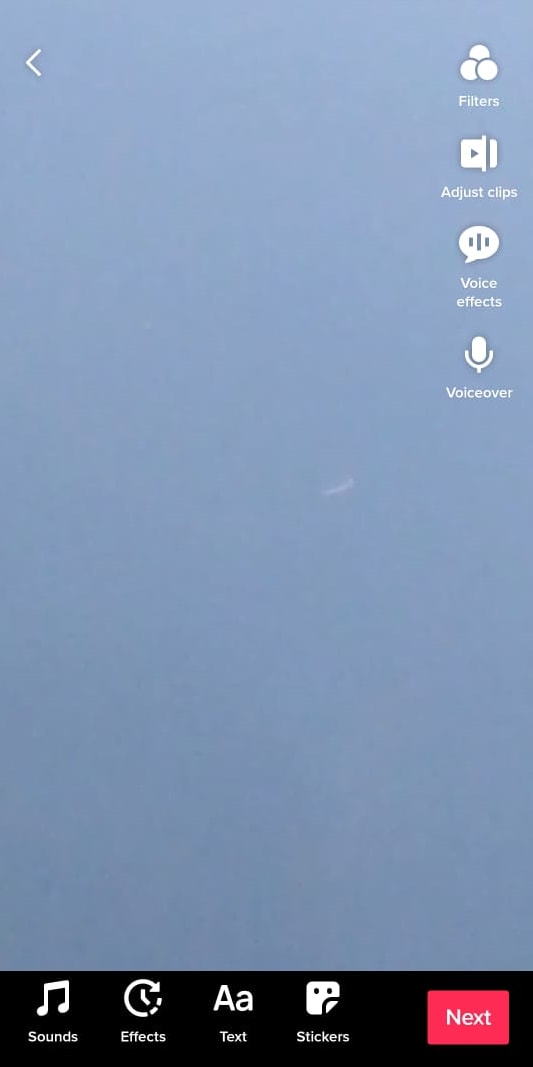
- You can add filters to your video by tapping on the “Filter” option at the top.
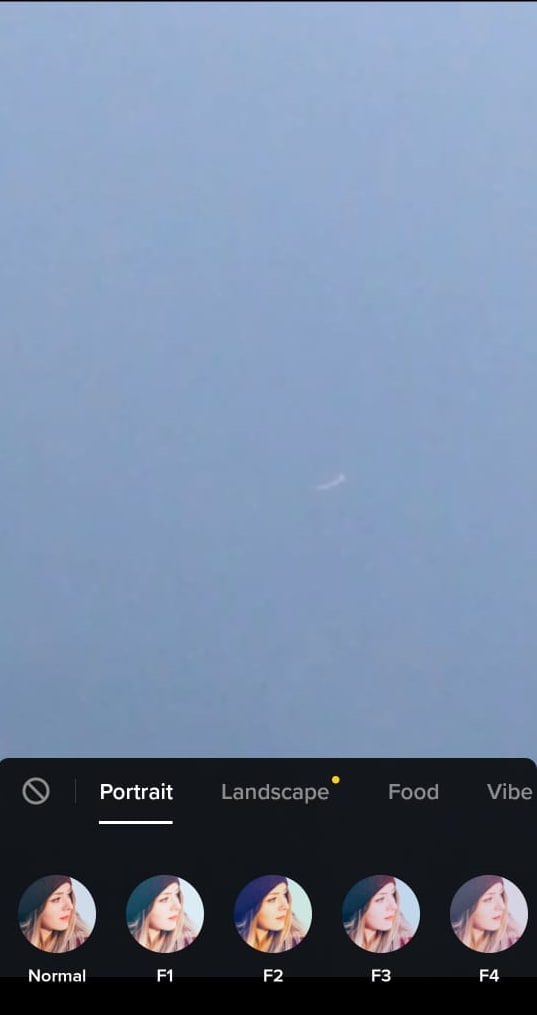
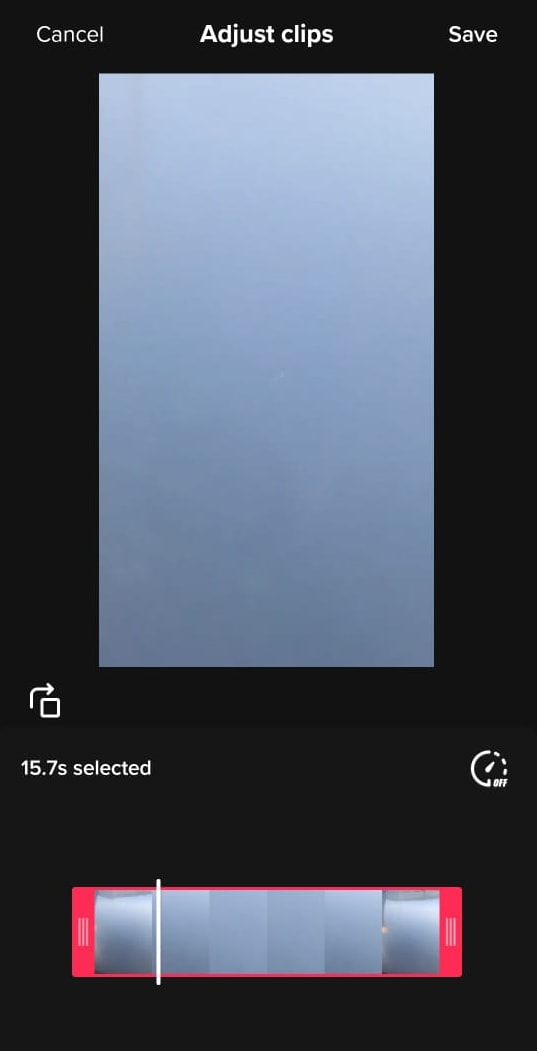
- To trim, rotate, and set the playback speed of your video, tap on “Adjust Clips.”
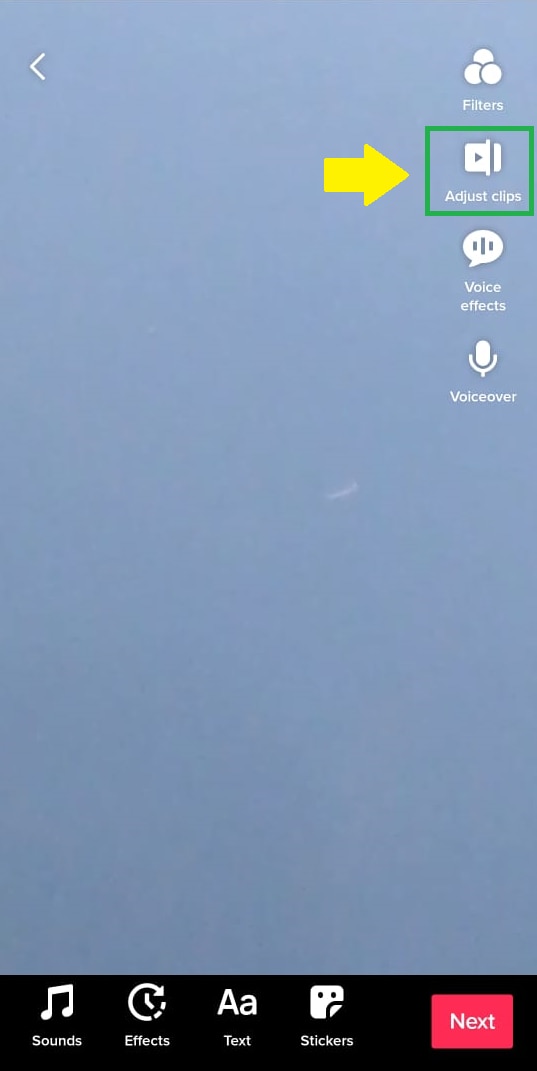
- You can also add voice effects to your videos by tapping on the “Voice Effects” button.
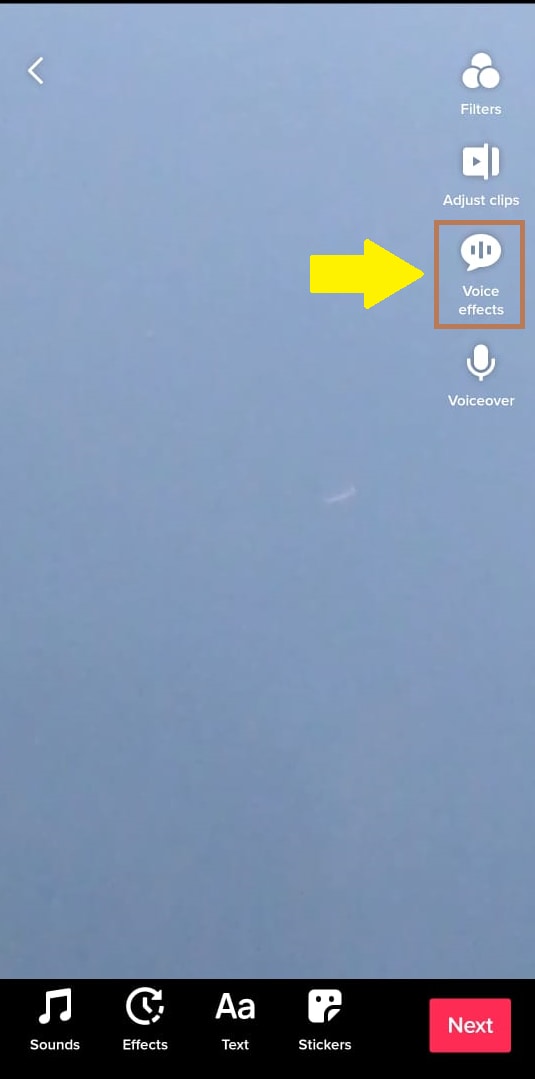
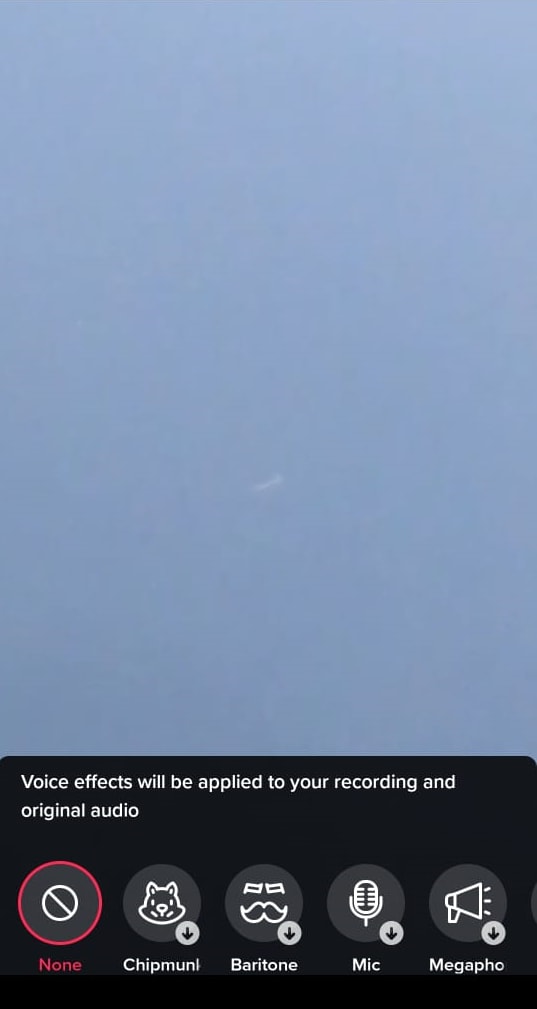
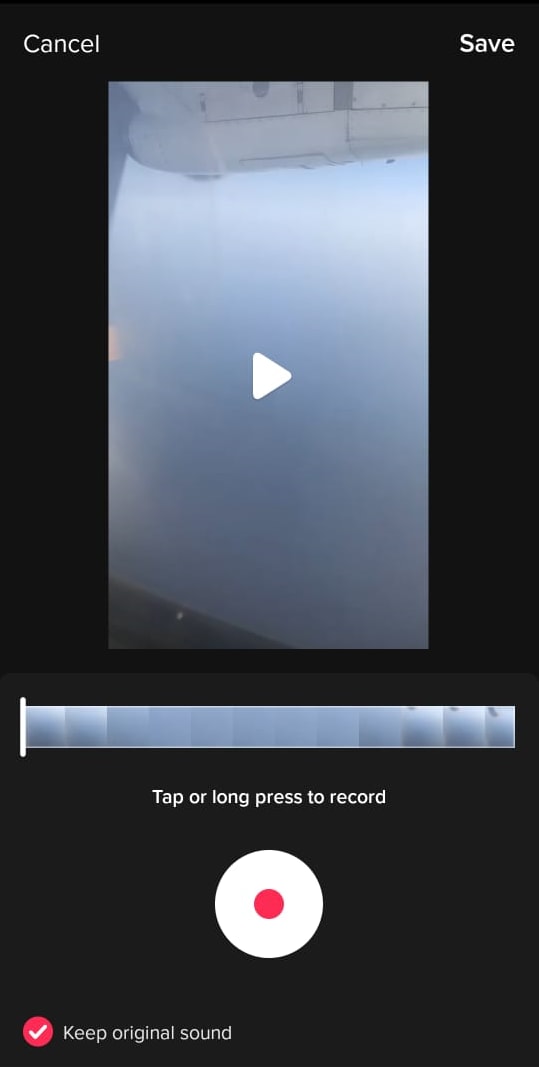
- If you want to explain something during the video, you can do so by adding a voiceover.
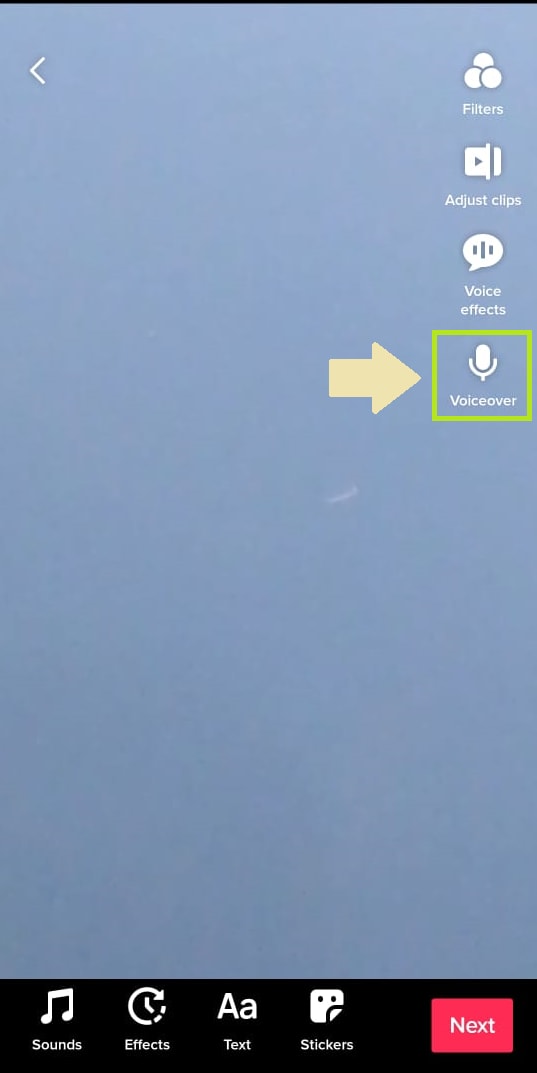
- To add effects to your video from Tiktok’s built-in effects library, tap on “Effects.”
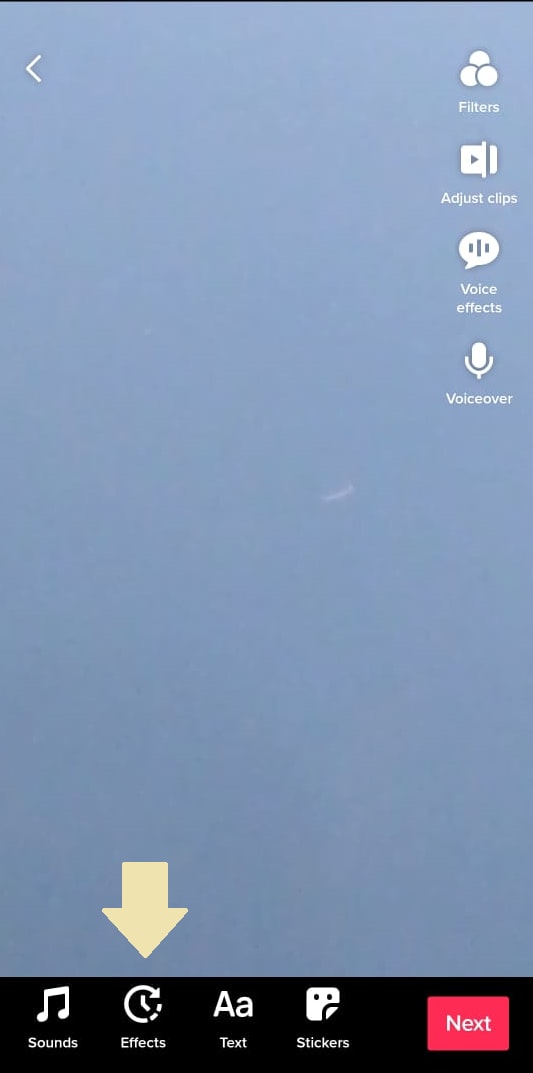
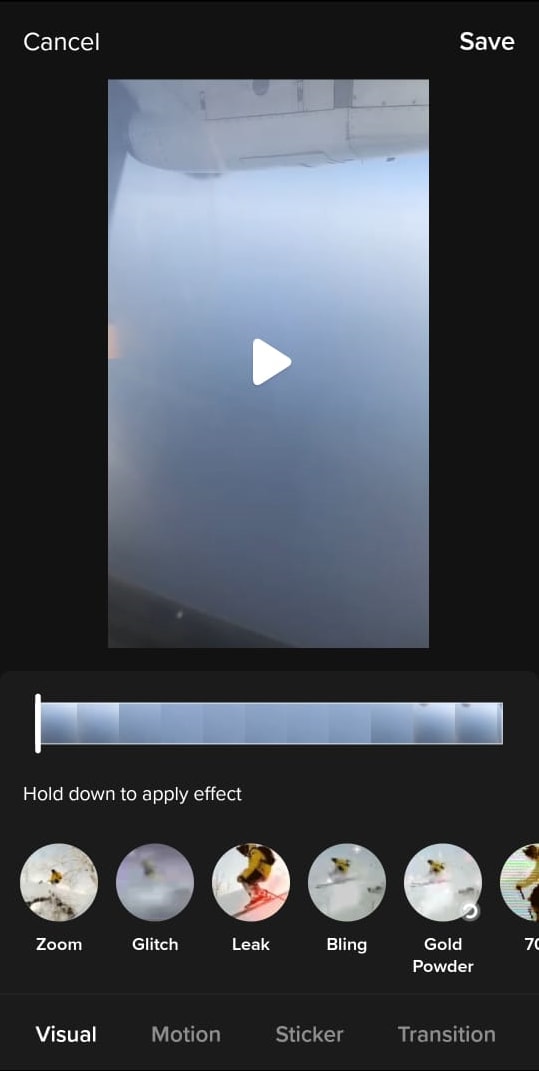
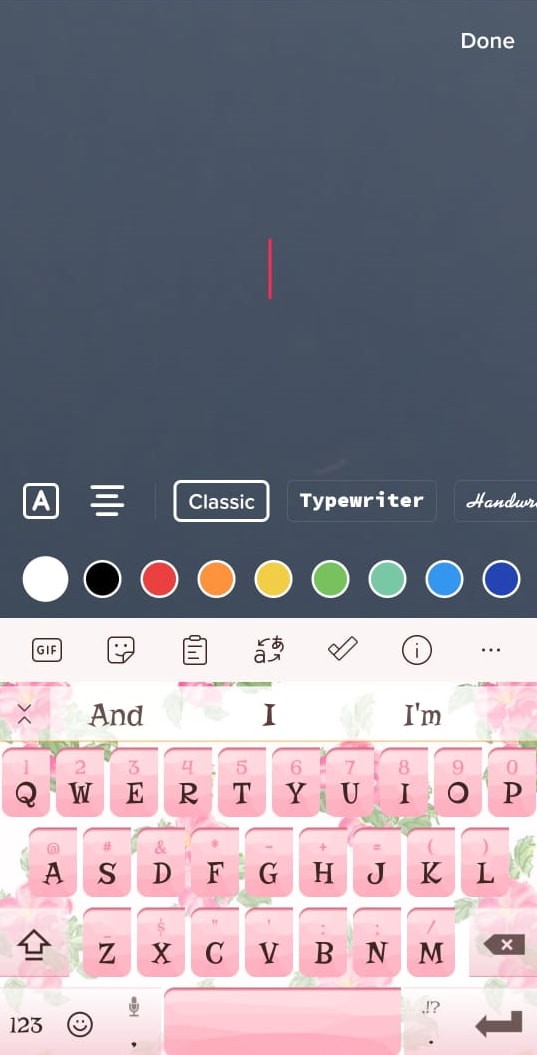
- To add text to your video, click on the “Text” button.
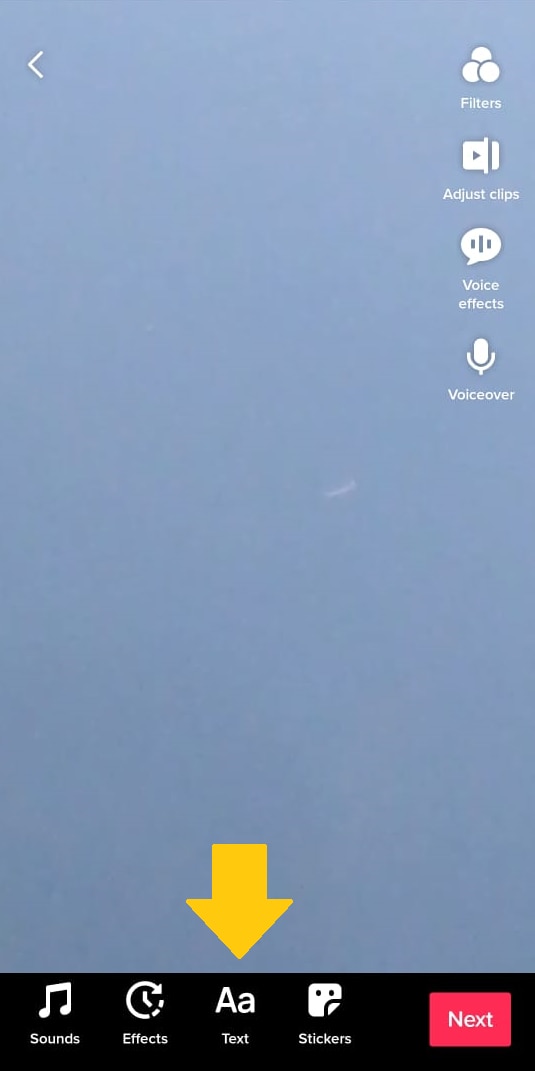
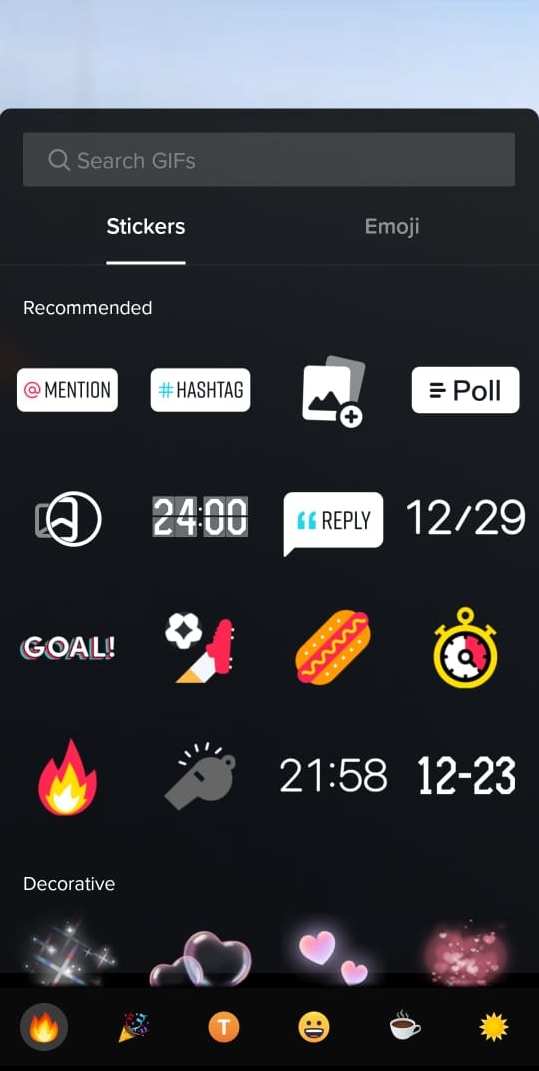
- Lastly, you can also add stickers to your videos by tapping on the “Stickers” icon.
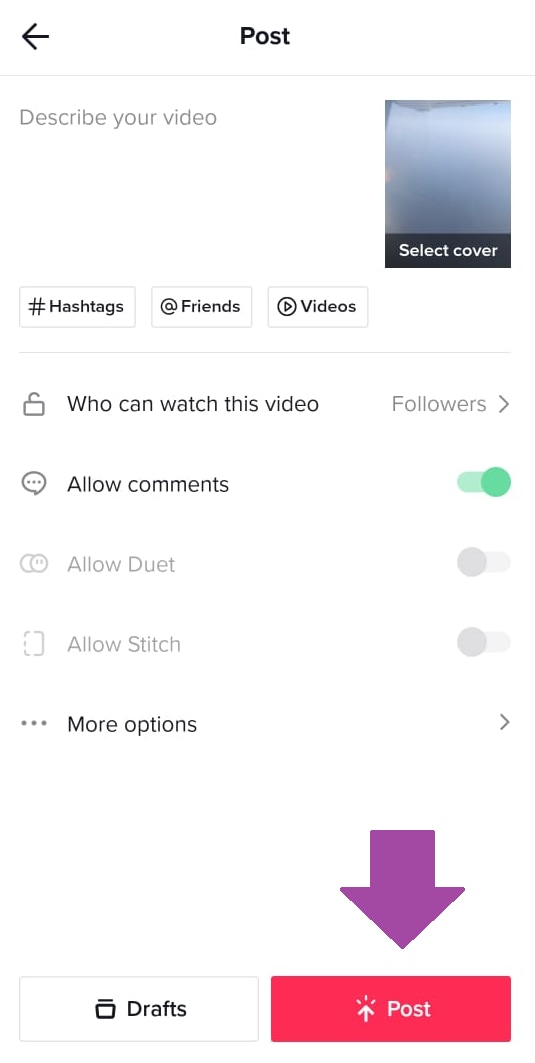
Step 6
Once you’ve edited the video, tap “Next” and adjust the settings for posting the video. You can add a description, hashtags, tag friends, etc. You can also customize the viewers, and allow or restrict comments and duets.
Click “Post” to upload your video to Tiktok!
You have now successfully uploaded your video on Tiktok via Android or iPhone.
Conclusion
Gone are the days when there were only a handful of social media options. Now, there are many platforms that you need, to have a distinct online presence. And, some of them are too famous to ignore, like Tiktok!
In this article we have gone over several ways on how to upload Tiktok videos on Chrome, Android, and iPhone. We hope it will help you learn the basics of refining your videos before you put them out there for the world to see!
Step 2
You will get a popup asking you to either sign up to Tiktok or log in using your email, Facebook, Twitter, Google, Apple, or Instagram. You can choose whichever option you find convenient.
Step 3
Click on the “Upload” option indicated by a cloud with an arrow.
Step 4
Click on “Select Video to Upload” and choose a video from your PC’s storage.
Step 5
Once the video is uploaded, add a caption with hashtags and select the cover for your video.
Step 6
The next step is to choose whether your video can be viewed by the public or your friends or whether you want to keep it private from everyone.
Step 7
You can also allow or restrict users to comment on your video, make duets, or stitch your video.
Step 8
Once you have adjusted all the settings, click on “Post” to upload the video to Tiktok.
Your video will be uploaded on Tiktok and ready to receive comments and likes!
Wasn’t that easy?
Now, if you want to upload a Tiktok video on Android or iPhone, we have a tutorial for that too!
Upload Tiktok Videos on Android/iPhone
Here are the steps to upload Tiktok videos on Android or iPhone.
Step 1
Launch the Tiktok app on your Android or iOS device, and sign up using any of the given methods or log in if you already have an account.
Step 2
Click on the “+” sign to go to the video recording page.
Step 3
Click on the “Upload” option at the bottom right of the screen. This will take you to your device’s gallery/photos.
Step 4
Tap on the video you want to upload to Tiktok and click “Next.”
Step 5
On the next page, you will see several different options to edit your video.
- You can add filters to your video by tapping on the “Filter” option at the top.
- To trim, rotate, and set the playback speed of your video, tap on “Adjust Clips.”
- You can also add voice effects to your videos by tapping on the “Voice Effects” button.
- If you want to explain something during the video, you can do so by adding a voiceover.
- To add effects to your video from Tiktok’s built-in effects library, tap on “Effects.”
- To add text to your video, click on the “Text” button.
- Lastly, you can also add stickers to your videos by tapping on the “Stickers” icon.
Step 6
Once you’ve edited the video, tap “Next” and adjust the settings for posting the video. You can add a description, hashtags, tag friends, etc. You can also customize the viewers, and allow or restrict comments and duets.
Click “Post” to upload your video to Tiktok!
You have now successfully uploaded your video on Tiktok via Android or iPhone.
Conclusion
Gone are the days when there were only a handful of social media options. Now, there are many platforms that you need, to have a distinct online presence. And, some of them are too famous to ignore, like Tiktok!
In this article we have gone over several ways on how to upload Tiktok videos on Chrome, Android, and iPhone. We hope it will help you learn the basics of refining your videos before you put them out there for the world to see!
Also read:
- [New] Unleashing Creativity A Guide to Music-Infused Videos for TikTok for 2024
- Chromatic Charisma Mastering Colorful Filters on Snapchat
- [Updated] Discover the Art of Unmarked TikTok Videos for iPhones for 2024
- 2024 Approved TikTok Groove Made Simple for Mac Users
- Capture Your Best Selfie on TikTok Essential Recording Techniques Explained
- In 2024, Explore the Best TikTok Data Analysis Instruments for Growth
- [New] Top 15 Must-Read TikTok Favorites for 2024
- [New] From Wardrobe to Webcam Your MacOOTD TikTok Adventure for 2024
- Elevate Your Content TikTok's Top 10 Filter Winners for 2024
- [Updated] Craze on, Be a Star! Viral TikTok Challenges You Can't Miss
- 2024 Approved Your Easy Route to TikTok Bliss on a MacBook
- [New] Maximizing TikTok Traffic Mastering Hashtag Strategies for 2024
- [Updated] Drafting an Emotional TikTok Conclusion
- [New] The Essence of PFP in the World of TikTok
- [Updated] Enhance VFX Quality Best TikTok Watermark Removers
- [Updated] Establishing a Unique Code for Your TikTok Presence
- [Updated] In 2024, How to Lock in Your Favorite TikTok Moments - Smartly
- Enhance Your TikTok Videos with These 5 Top Text Tools in '23
- [New] Leading 10 Customizable TikTok Filters for Personal Flair
- [New] 2024 Approved Craft Compelling Narratives Through TikTok Voiceovers
- [New] 2024 Approved From Wardrobe to Webcam Your MacOOTD TikTok Adventure
- [Updated] In 2024, Top 7 Affordable TikTok Video Editing Software (Mac)
- [New] In 2024, Extraordinary Escapades The Ultimate List of Strange TikTok Titles
- [Updated] Transform TikTok Videos with Our Select Best Font Tools for the Year '23 for 2024
- [Updated] Fearless Filmmakers and Fans on TikTok, The Most Viral Stars
- [New] In 2024, A Beginner’s Guide to Jujutsu Kaisen on TikTok
- [New] Top 20 Engaging TikTok Captions for Viral Success for 2024
- [New] In 2024, Secrets for Snatching Unmarked TikTok Content on iPhones
- [Updated] Your Pathway to TikTok Live Spectatorship for 2024
- [New] In 2024, Transforming Raw Footage to TikTok Hit with Mac Editing
- [New] Top Mark-Wiping Apps for Your TikTok Content for 2024
- [New] Key to Generating an Exclusive Tag on TikTok
- [New] Swift Success with TikTok Following Key Strategies Unleashed for 2024
- [New] Top-Notch Removers for Clearing Brand Identities on Phones
- [Updated] In 2024, Propel Your Passion Profits Joining the Elite of TikTok Creators
- In 2024, TikTok Titans 15 Who Spark Creativity and Change
- [Updated] Unveiling #Booktik's Must-Read Masterpieces A Reading Delight
- [Updated] Top 6 Offline Tools for TikTok Audio Conversion to MP3 (No Cost)
- [Updated] In 2024, Best Online MP3 Extractors From TikTok Videos - Top 6 Rankings
- [New] 2024 Approved Charting the Trends Popular TikTok Reaction Videos
- [New] 2024 Approved Proven Hashtag Hacks for Amplifying Your TikTok Presence
- [New] Viral Videos & Lawfulness Pre-Upload Copyright Verification
- In 2024, Top 10 Innovative TikFilters Transforming Creator's Feeds
- [Updated] 2024 Approved Top 6 TikTok Money Calculators [Earnings Estimator]
- In 2024, Elevate Your TikTok Game Essential Tools & Tricks
- [Updated] 2024 Approved Giggle-O-Meter Rising Top TikTok Joke Threads for Laughter
- [New] IPhone Mastery Seamless TikTok Video Acquisition
- [Updated] In 2024, Top 10 Viral Eats on TikTok
- Easy-Peasy Guide to Crafting and Tweaking Multiple Snaps in Snapchat
- In 2024, How to Cast Nokia XR21 Screen to PC Using WiFi | Dr.fone
- In 2024, How to Transfer Contacts from Poco M6 Pro 5G to Other Android Devices Using Bluetooth? | Dr.fone
- [Updated] 2024 Approved Inside Out Comprehensive Understanding of Stardew’s Fascinating Ginger Island
- How To Create an Apple Developer Account On Apple iPhone 13
- Mastering Android Device Manager The Ultimate Guide to Unlocking Your Vivo V27 Pro Device
- [New] Leveraging Instagram's Video Features A How-To Guide
- [New] 2024 Approved The Ultimate 5-Star Fluids and Flows in Video Games
- Restore Missing App Icon on Tecno Camon 20 Pro 5G Step-by-Step Solutions | Dr.fone
- Why Is My Infinix Note 30 5G Offline? Troubleshooting Guide | Dr.fone
- [Updated] In 2024, Keep Track Who Dropped Off My Insta Feed?
- [Updated] 2024 Approved Developer's Dream Selecting Optimal Android Emulators for Mac/PC
- 4 Most-Known Ways to Find Someone on Tinder For Samsung Galaxy M34 5G by Name | Dr.fone
- Downloading SamFw FRP Tool 3.0 for Infinix Smart 7
- What Does Enter PUK Code Mean And Why Did The Sim Get PUK Blocked On OnePlus Ace 2 Device
- [Updated] Best Practices Choosing the Top iOS Video Downloaders on FB
- [New] Winscreening Prospects A Comprehensively Ranked Recorder List
- What To Do if Your Nokia C32 Auto Does Not Work | Dr.fone
- [New] Discover Everything in Stardew's Hidden Gem, Ginger Isle
- [Updated] In 2024, Mastering Steam's Switch Pro Controllers
- Top 9 Oppo A38 Monitoring Apps for Parental Controls | Dr.fone
- New 2024 Approved Meme Mastery 10 Essential Apps for Android and iOS
- [Updated] 2024 Approved Master the Art of Playing GB Classics on a Windows PC
- 2024 Approved SplitCam Reviewed Topping in Video Recording Technology?
- 3 Ways for Android Pokemon Go Spoofing On Infinix Hot 40i | Dr.fone
- Updated Best 8 Light Video Editing Software for 2024
- In 2024, How to Successfully Bypass iCloud Activation Lock from iPhone 15 Pro Max
- Updated 2024 Approved The Ultimate Guide to Choosing the Best Audio Converter
- Issues playing MKV video on Motorola
- Screen to Air Assessing OBS and Twitch Studio's Features
- In 2024, 3 Ways for Android Pokemon Go Spoofing On Asus ROG Phone 7 | Dr.fone
- [New] 2024 Approved Effortless Background Management for Cohesive Remote Collaborations
- In 2024, Top 10 Password Cracking Tools For Realme
- How to Recover FaceTime Call History on iPhone 6s | Stellar
- Title: [New] In 2024, A Beginner’s Blueprint to Crafting Engaging TikTok Reaction Videos with Filmora
- Author: Stephen
- Created at : 2024-05-23 03:30:08
- Updated at : 2024-05-24 03:30:08
- Link: https://tiktok-video-recordings.techidaily.com/new-in-2024-a-beginners-blueprint-to-crafting-engaging-tiktok-reaction-videos-with-filmora/
- License: This work is licensed under CC BY-NC-SA 4.0.
