
![[New] In 2024, Filmmaker’s Playbook for Dynamic TikTok Video Reactions via Filmora](https://www.lifewire.com/thmb/koSaGJ5iVSnQrrvXh53lyy1rSZM=/400x300/filters:no_upscale():max_bytes(150000):strip_icc():format(webp)/podcasts-safeforkids-5b2f3dd4eb97de0036d9f87b.jpg)
[New] In 2024, Filmmaker’s Playbook for Dynamic TikTok Video Reactions via Filmora
Filmmaker’s Playbook for Dynamic TikTok Video Reactions via Filmora
How to Make TikTok Reaction Videos Easily in 2 Ways

Shanoon Cox
Mar 27, 2024• Proven solutions
With all the videos of different moods and categories available on the platform, TikTok’s reaction is something that makes the footage more engaging. Available for both iOS and Android platforms, TikTok allows you to record, edit , and compile a video of up to 60 seconds, and apply a plethora of filters and animation effects to them along with adding relevant music to awe your audience.
Considering this, here you will learn how to make TikTok reaction videos with ease from within the app itself, and if that’s not enough, using one of the best and most efficient programs available in the market that can even allow you to add unique effects to the reactions you create.
- Part 1: How to Make React Videos on TikTok
- Part 2: How to Use Snap Filmora to Make TikTok Reaction Videos
Bonus: Create A More Attractive Video with Human Segmentation Effect
The human segmentation effect under AI Portrait allows you to isolate people from video background even without a green screen, and then you can composite it to make a reaction video easily. Watch the video tutorial below to find out more details.


Want to read the texts instead of watching videos? Check the complete guide to making a reaction video in 3 ways .
Part 1: How to React to a TikTok Video
After being equipped with all the worldly knowledge about TikTok reaction videos, you can follow the steps given below to learn how to react to the footage created by other people:
1. Tap Share and Record Your Reaction
Start TikTok, play the video you want to react on, tap the Share icon from the lower-right area, and tap the React option from the Share to menu. Tap Flip from the top-right corner of the Camera screen to switch between the front and rear camera as needed, optionally tap the Mic icon to disable or enable voice and system audio capture, drag and reposition React window according to the source footage, and tap the Record button from the bottom to start shooting your TikTok reaction. Wait while the source clip and your recording process are complete successfully before moving forward to the next step.

2. Apply Filters
Tap the Filters icon from the top-right corner, tap to pick a filter from those available at the bottom, and tap anywhere on the screen to accept the one you selected and to get back to the previous window.

3. Manage Audio
Tap the Mixer icon from the upper-right corner of the screen, drag the My Voice and Soundtrack Volume sliders to manage your voice recording and the internal audio respectively, and tap Done to save the changes once you’re through with the modifications. Back on the previous window, tap Next from the bottom-right corner.

4. Publish the Video
Tap the Who can view this video option to manage your reaction’s visibility settings (optional). Tap the Save to device toggle switch to prevent TikTok reaction from being stored on your mobile’s storage (optional). Next, tap the Post button from the bottom-right corner to publish the video to TikTok.

More creative tricks about TikTok video: Clone Yourself in TikTok
Part 2: How to Make Reaction Videos with Filmora
Even though you can make TikTok reaction videos using its own filters and audio mixing tools that work pretty well under ideal conditions, if you are a perfectionist and like precision in anything you do or create, you need a dedicated program that has been designed specifically for the purpose.
Although several such tools are available in the market and can be easily downloaded and used, the best among them is Filmora by Wondershare. Wondershare Filmora is an industry-standard production and post-production tool for both Mac and Windows PCs that the majority of users prefer over its competitors such as Adobe Premiere Pro, Final Cut Pro X, etc. This is because Filmora offers simple UI, is less resource-intensive, and is able to render the outputs significantly faster.
You can learn how to make TikTok reaction videos using Wondershare Filmora by following the steps given below:
Note: Before proceeding, make sure that you have already copied the source (and the reaction) video(s) from your smartphone to your computer.
1. Create New Project and Set Preferences
Start Wondershare Filmora on your Windows or Mac PC, go to File > New Project and click 9:16 (Portrait) from the submenu that appears.
Click Split Screen from the standard toolbar at the top, hover mouse to the screen type preset you want to use, click the + ( Add to Project ) icon that appears at the bottom-right corner of the thumbnail, and click OK from the bottom-right corner once the preset is added to the Timeline.

2. Import and Add Video(s) Preview/Timeline
Click the Media button from the standard toolbar, click anywhere inside the Media window at the upper-left corner, and when the Open box comes up, select and import the video file(s) you want to participate in the TikTok reaction. Alternatively, you can also click Record from below the standard toolbar, and choose any of the options to record your own video or voice right from within Wondershare Filmora itself.
Next, click and drag each of the imported videos to their corresponding screen sections in the Preview window in the upper-right area. Notice how the files are automatically added to the Timeline at the bottom.
3. Add Elements and Titles
Click Elements from the standard toolbar, hover mouse to the element you want to add to the reaction, click the + icon that appears at the center of the thumbnail, and reposition the element in the Timeline to match the duration with that of the reaction you are creating.

4. Export the Reaction

Click EXPORT from the top-middle section of the interface, go to the Local tab from the top of the Export box that appears next, select your preferred format from the left bar, optionally choose a destination folder from the right window, optionally click SETTINGS to fine-tune the output preferences as needed, and click EXPORT from the bottom-right corner to export the TikTok reaction. Or, you can save it in the settings perfect for iPhone or another device.
Below is a sample reaction video made with Filmora, you can do much better than that for your TikTok account:
Besides using Filmora to edit reaction videos with the split-screen presets, you can also use some other video editing software to create a reaction video . Filmora can empower your video creation with more creativity, watch the video below and download Filmora to try.
Conclusion
A TikTok reaction enables you to make the source videos more fun and entertaining. Luckily the app itself has a “React” button that helps you create TikTok reaction videos with merely a few simple taps. However, if you feel that the built-in options are not as robust as they should be, a third-party program like Wondershare Filmora is something you would definitely love to try your hands on as the software is not only easy to use, it is also lightweight, and doesn’t put any overhead on your computer hardware.
Shanoon Cox
Shanoon Cox is a writer and a lover of all things video.
Follow @Shanoon Cox
Shanoon Cox
Mar 27, 2024• Proven solutions
With all the videos of different moods and categories available on the platform, TikTok’s reaction is something that makes the footage more engaging. Available for both iOS and Android platforms, TikTok allows you to record, edit , and compile a video of up to 60 seconds, and apply a plethora of filters and animation effects to them along with adding relevant music to awe your audience.
Considering this, here you will learn how to make TikTok reaction videos with ease from within the app itself, and if that’s not enough, using one of the best and most efficient programs available in the market that can even allow you to add unique effects to the reactions you create.
- Part 1: How to Make React Videos on TikTok
- Part 2: How to Use Snap Filmora to Make TikTok Reaction Videos
Bonus: Create A More Attractive Video with Human Segmentation Effect
The human segmentation effect under AI Portrait allows you to isolate people from video background even without a green screen, and then you can composite it to make a reaction video easily. Watch the video tutorial below to find out more details.
Want to read the texts instead of watching videos? Check the complete guide to making a reaction video in 3 ways .
Part 1: How to React to a TikTok Video
After being equipped with all the worldly knowledge about TikTok reaction videos, you can follow the steps given below to learn how to react to the footage created by other people:
1. Tap Share and Record Your Reaction
Start TikTok, play the video you want to react on, tap the Share icon from the lower-right area, and tap the React option from the Share to menu. Tap Flip from the top-right corner of the Camera screen to switch between the front and rear camera as needed, optionally tap the Mic icon to disable or enable voice and system audio capture, drag and reposition React window according to the source footage, and tap the Record button from the bottom to start shooting your TikTok reaction. Wait while the source clip and your recording process are complete successfully before moving forward to the next step.
2. Apply Filters
Tap the Filters icon from the top-right corner, tap to pick a filter from those available at the bottom, and tap anywhere on the screen to accept the one you selected and to get back to the previous window.
3. Manage Audio
Tap the Mixer icon from the upper-right corner of the screen, drag the My Voice and Soundtrack Volume sliders to manage your voice recording and the internal audio respectively, and tap Done to save the changes once you’re through with the modifications. Back on the previous window, tap Next from the bottom-right corner.
4. Publish the Video
Tap the Who can view this video option to manage your reaction’s visibility settings (optional). Tap the Save to device toggle switch to prevent TikTok reaction from being stored on your mobile’s storage (optional). Next, tap the Post button from the bottom-right corner to publish the video to TikTok.
More creative tricks about TikTok video: Clone Yourself in TikTok
Part 2: How to Make Reaction Videos with Filmora
Even though you can make TikTok reaction videos using its own filters and audio mixing tools that work pretty well under ideal conditions, if you are a perfectionist and like precision in anything you do or create, you need a dedicated program that has been designed specifically for the purpose.
Although several such tools are available in the market and can be easily downloaded and used, the best among them is Filmora by Wondershare. Wondershare Filmora is an industry-standard production and post-production tool for both Mac and Windows PCs that the majority of users prefer over its competitors such as Adobe Premiere Pro, Final Cut Pro X, etc. This is because Filmora offers simple UI, is less resource-intensive, and is able to render the outputs significantly faster.
You can learn how to make TikTok reaction videos using Wondershare Filmora by following the steps given below:
Note: Before proceeding, make sure that you have already copied the source (and the reaction) video(s) from your smartphone to your computer.
1. Create New Project and Set Preferences
Start Wondershare Filmora on your Windows or Mac PC, go to File > New Project and click 9:16 (Portrait) from the submenu that appears.
Click Split Screen from the standard toolbar at the top, hover mouse to the screen type preset you want to use, click the + ( Add to Project ) icon that appears at the bottom-right corner of the thumbnail, and click OK from the bottom-right corner once the preset is added to the Timeline.
2. Import and Add Video(s) Preview/Timeline
Click the Media button from the standard toolbar, click anywhere inside the Media window at the upper-left corner, and when the Open box comes up, select and import the video file(s) you want to participate in the TikTok reaction. Alternatively, you can also click Record from below the standard toolbar, and choose any of the options to record your own video or voice right from within Wondershare Filmora itself.
Next, click and drag each of the imported videos to their corresponding screen sections in the Preview window in the upper-right area. Notice how the files are automatically added to the Timeline at the bottom.
3. Add Elements and Titles
Click Elements from the standard toolbar, hover mouse to the element you want to add to the reaction, click the + icon that appears at the center of the thumbnail, and reposition the element in the Timeline to match the duration with that of the reaction you are creating.
4. Export the Reaction
Click EXPORT from the top-middle section of the interface, go to the Local tab from the top of the Export box that appears next, select your preferred format from the left bar, optionally choose a destination folder from the right window, optionally click SETTINGS to fine-tune the output preferences as needed, and click EXPORT from the bottom-right corner to export the TikTok reaction. Or, you can save it in the settings perfect for iPhone or another device.
Below is a sample reaction video made with Filmora, you can do much better than that for your TikTok account:
Besides using Filmora to edit reaction videos with the split-screen presets, you can also use some other video editing software to create a reaction video . Filmora can empower your video creation with more creativity, watch the video below and download Filmora to try.
Conclusion
A TikTok reaction enables you to make the source videos more fun and entertaining. Luckily the app itself has a “React” button that helps you create TikTok reaction videos with merely a few simple taps. However, if you feel that the built-in options are not as robust as they should be, a third-party program like Wondershare Filmora is something you would definitely love to try your hands on as the software is not only easy to use, it is also lightweight, and doesn’t put any overhead on your computer hardware.
Shanoon Cox
Shanoon Cox is a writer and a lover of all things video.
Follow @Shanoon Cox
Unlock Creative Potential with Customizable Vocal Effects on TikTok
Edit TikTok Videos with Filmora
Wondershare Filmora is one of the best video editors to level up your TikTok video with stunning effects. Download and have a try.
If you’ve been using TikTok for a while, you’ve probably seen excellent videos with unique voice-overs and sound effects. You might have imagined that you would also be famous and feature on some popular platform if you possessed these abilities.
We are going to talk about these audio effects on TikTok videos today. We’ll show you How to Change Voice on TikTok and apply voice modifications there, as well as on a popular and widely used third-party software. So, let’s get the ball rolling.
In this article
02 Record and Add Voice TikTok
03 Available Voice Effects in TikTok
04 Change Voice for TikTok Videos in Capcut
05 Change Voice from Female to Male in Filmora for TikTok Video
Part 1: What is Voice Effect?
Picture filters are widely used on Instagram and Snapchat, and we are all acquainted with them. Such filters enable us to add a subtle color change or any other type of modification to our filters. However, because TikTok is all about audio and video, you may utilize voice filters in your videos.
Speech filters are sound effects that enable us to alter our voices. It’s worth noting that users can only use the application to apply speech filters to their recorded voice. When you’re not using or uploading any recordings, you won’t utilize any voice effects.
Built-in voice effects in TikTok include chipmunk, baritone, mike, megaphone, robot, battery drain, shaking, electronic, echo, synth, elf, huge, and acoustic signals.
Part 2: How to Record and Add Voice TikTok?
Your video must feature your voice to apply Voice Effects. You can’t utilize Voice Effects in films created with built-in themes, including audio, for example.
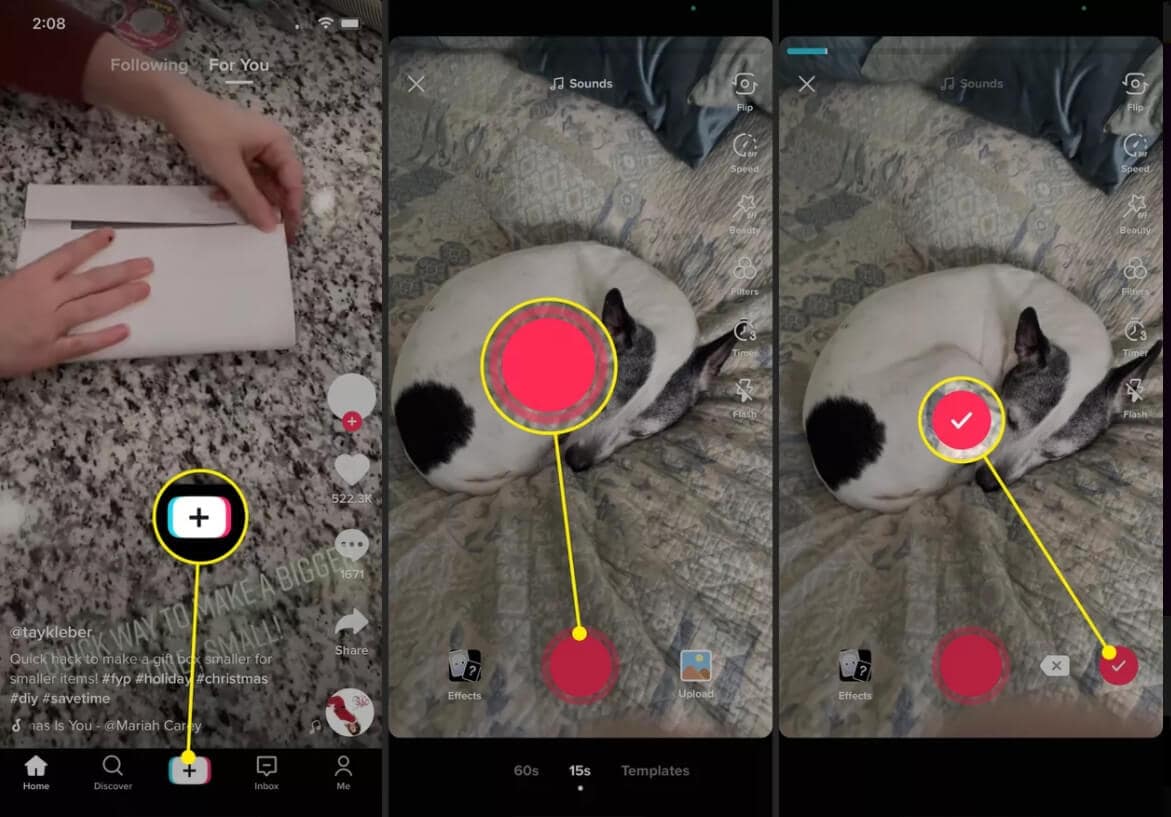
Step 1: To begin recording your clip, launch TikTok and hit the + (plus symbol) at the base.
Step 2: Press the Record button, record your video as usual, and tap it again to stop or end the recording. Once you’re done recording, tick the Checkmark.
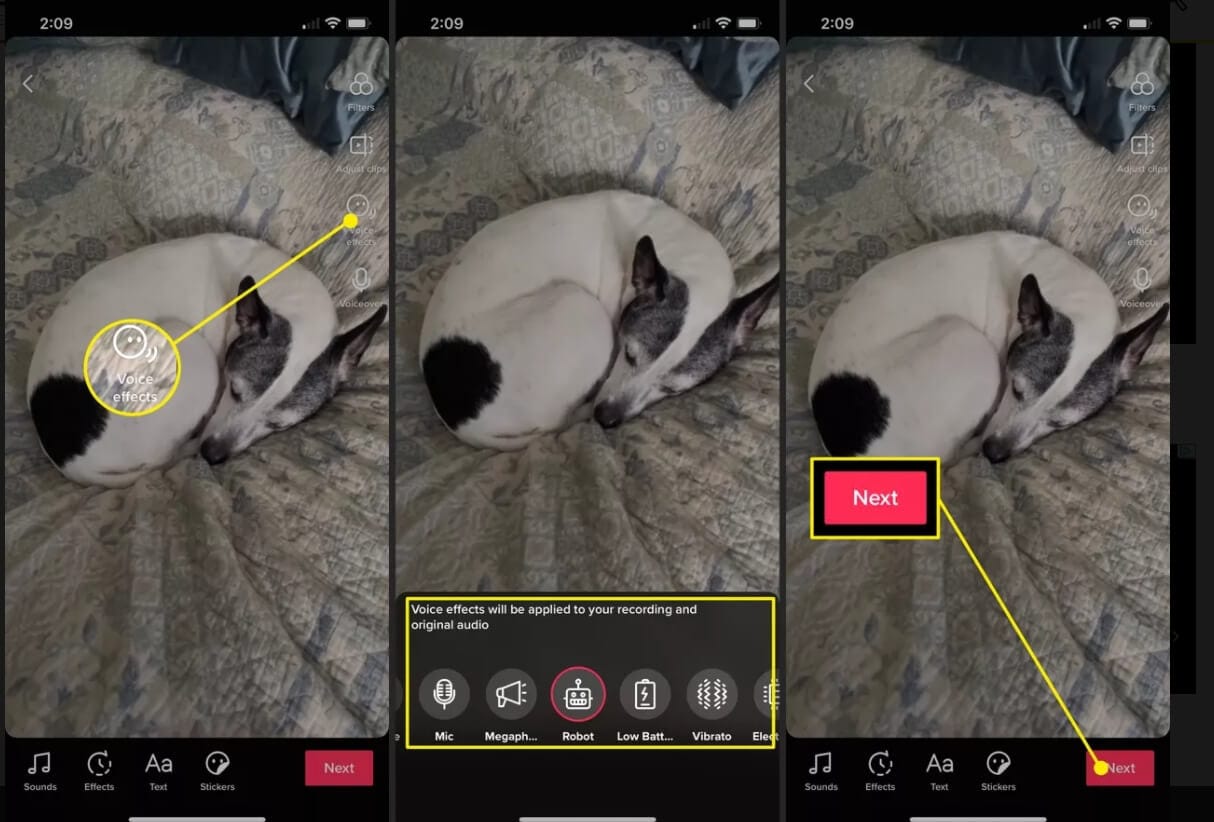
Step 3: Select Voice Effects from the drop-down menu on the upper right.
Step 4: Tap to hear every one of the effects as the window opens up from the bottom. When you wish to utilize one, pick it and move your finger away from the screen. Tap None on the far left when you don’t want to employ an voice effect.
Step 5: After that, you may add any extra effects to your movie, such as text stickers. When you’re finished, tap Next. Proceed to choose your Post choices, save the video, or touch Post as you would with any other video you’ve made.
Part 3: Available Voice Effects List in TikTok
TikTok has several Voice Effects that allow you to change your voice. You may explore something entertaining because you can listen to each one before deciding to utilize it.
- Sound waves: Synth-like in tone, but with a more digital edge.
- Giant: Like a large, joyful monster, heavier than baritone.
- Helium: Chipmunk’s voice is louder pitched.
- Synth: Imagine 80s music with a synthesizer added to your voice.
- Echo: There is an echo in every word or statement.
- Electronic: Your comments were accompanied by a smattering of electronic noises.
- Vibrato: A vibrating tone, as if your voice were trembling.
- Low Battery: Slow and deliberate, as though your battery is running low.
- Robot: You seem just like a robot, as you could expect.
- Megaphone: You sound as though you’re whispering into a megaphone.
- Mic: How you would appear if you were speaking into a real microphone.
- Baritone: Masculine and profound.
- Chipmunk: Like another one of Alvin’s Chipmunks, it’s high-pitched.
Check some popular and interesting TikTok voice effects compilation.
Part 4: How to Change Voice for TikTok Videos in Capcut?
The editing capabilities in TikTok are adequate yet rudimentary. You may upload and modify existing movies and photographs or record yourself for up to three minutes. Turn to CapCut’s ShortCut option if you want a simpler TikTok or Dubsmash-style editing experience.
CapCut will question you about the movies and photographs in your photo library that you’d want to import into the composition when you’re in this mode. After that, the program analyzes your video and recommends a variety of designs, which each alters the music, timing, and changes.
For instance, you may add a pop rhythm, disco groove, or urban funk flavor to your film. CapCut allows you to select from a licensed library of songs or import sounds you’ve recorded.
Here’s how to change the voice on TikTok using Capcut:
Step 1: Open the Capcut application on your phone and Import a video/audio file or record a short sample.
Step 2: Now tap on Add Audio to record a Voiceover.
Step 3: After recording, now press on the Checkmark to save the sample.
Step 4: Now tap on the recorded area on the Timeline to enable the Voice Effects.
Step 5: Select the Voice Effects according to your liking from the given options and press on the Checkmark to save the video.
Part 5: How to Change Voice from Female to Male in Filmora for TikTok Video?
Filmora is among the finest video editing software for the novice as well as professional editors since it has powerful and effective video and audio production features. There would be no watermark or limits when exporting audio from Wondershare Filmora for trial version customers.
As a result, you may download it for free and try out the audio editing tools. Let’s look at how to add and adjust the voice in Filmora with this step-by-step guide.
Step 1: For starters, Import the video/audio files. Then, drag the imported video to the Timeline.
Step 2: Double-click on the audio in the timeline. Use the Pitch option to alter the voice of the video or recorded voice-over. By increasing the pitch, you can make it sound like a female’s voice and vice versa. You can further customize the recording using Fade in, Volume, Speed, Fade out, etc.

Step 3: When done with the modifications, click on Export and select Format to save the audio/video in the desired format.

Click to find out more voice changer and how to change voice in video with Filmora :
Frequently Asked Questions About Changing Voice in TikTok
1. Why Don’t I Have Voice Effects on TikTok?
There can be several reasons behind why you don’t have voice effects on TikTok presently. One of the foremost is that you have old software in either your iPhone or Android. Other reasons include giving the modification permission to TikTok, not clearing cache, updating TikTok, etc.
2. How Many Voice Effects in TikTok?
There are 13 voice effects that you can try in TikTok. These include a chipmunk, baritone, mike, megaphone, robot, battery drain, shaking, electronic, echo, synth, elf, huge, and acoustic signals. Hence, TikTok offers an endless and diverse range of effects
Conclusion
Overall, how to Change on TikTok is a simple process. For the required minor modifications, we believe the app’s built-in editor is sufficient. Filmora, on the other hand, is ideal if you would like to go professional and do unique transitions and edits. We believe we’ve provided some necessary knowledge on the TikTok application’s voice change. We hope you can include fantastic audio effects into your next TikTok video to make it engaging.
Note: All screenshots are from the Internet. If there is any infringement, please contact us to delete it.
If you’ve been using TikTok for a while, you’ve probably seen excellent videos with unique voice-overs and sound effects. You might have imagined that you would also be famous and feature on some popular platform if you possessed these abilities.
We are going to talk about these audio effects on TikTok videos today. We’ll show you How to Change Voice on TikTok and apply voice modifications there, as well as on a popular and widely used third-party software. So, let’s get the ball rolling.
In this article
02 Record and Add Voice TikTok
03 Available Voice Effects in TikTok
04 Change Voice for TikTok Videos in Capcut
05 Change Voice from Female to Male in Filmora for TikTok Video
Part 1: What is Voice Effect?
Picture filters are widely used on Instagram and Snapchat, and we are all acquainted with them. Such filters enable us to add a subtle color change or any other type of modification to our filters. However, because TikTok is all about audio and video, you may utilize voice filters in your videos.
Speech filters are sound effects that enable us to alter our voices. It’s worth noting that users can only use the application to apply speech filters to their recorded voice. When you’re not using or uploading any recordings, you won’t utilize any voice effects.
Built-in voice effects in TikTok include chipmunk, baritone, mike, megaphone, robot, battery drain, shaking, electronic, echo, synth, elf, huge, and acoustic signals.
Part 2: How to Record and Add Voice TikTok?
Your video must feature your voice to apply Voice Effects. You can’t utilize Voice Effects in films created with built-in themes, including audio, for example.
Step 1: To begin recording your clip, launch TikTok and hit the + (plus symbol) at the base.
Step 2: Press the Record button, record your video as usual, and tap it again to stop or end the recording. Once you’re done recording, tick the Checkmark.
Step 3: Select Voice Effects from the drop-down menu on the upper right.
Step 4: Tap to hear every one of the effects as the window opens up from the bottom. When you wish to utilize one, pick it and move your finger away from the screen. Tap None on the far left when you don’t want to employ an voice effect.
Step 5: After that, you may add any extra effects to your movie, such as text stickers. When you’re finished, tap Next. Proceed to choose your Post choices, save the video, or touch Post as you would with any other video you’ve made.
Part 3: Available Voice Effects List in TikTok
TikTok has several Voice Effects that allow you to change your voice. You may explore something entertaining because you can listen to each one before deciding to utilize it.
- Sound waves: Synth-like in tone, but with a more digital edge.
- Giant: Like a large, joyful monster, heavier than baritone.
- Helium: Chipmunk’s voice is louder pitched.
- Synth: Imagine 80s music with a synthesizer added to your voice.
- Echo: There is an echo in every word or statement.
- Electronic: Your comments were accompanied by a smattering of electronic noises.
- Vibrato: A vibrating tone, as if your voice were trembling.
- Low Battery: Slow and deliberate, as though your battery is running low.
- Robot: You seem just like a robot, as you could expect.
- Megaphone: You sound as though you’re whispering into a megaphone.
- Mic: How you would appear if you were speaking into a real microphone.
- Baritone: Masculine and profound.
- Chipmunk: Like another one of Alvin’s Chipmunks, it’s high-pitched.
Check some popular and interesting TikTok voice effects compilation.
Part 4: How to Change Voice for TikTok Videos in Capcut?
The editing capabilities in TikTok are adequate yet rudimentary. You may upload and modify existing movies and photographs or record yourself for up to three minutes. Turn to CapCut’s ShortCut option if you want a simpler TikTok or Dubsmash-style editing experience.
CapCut will question you about the movies and photographs in your photo library that you’d want to import into the composition when you’re in this mode. After that, the program analyzes your video and recommends a variety of designs, which each alters the music, timing, and changes.
For instance, you may add a pop rhythm, disco groove, or urban funk flavor to your film. CapCut allows you to select from a licensed library of songs or import sounds you’ve recorded.
Here’s how to change the voice on TikTok using Capcut:
Step 1: Open the Capcut application on your phone and Import a video/audio file or record a short sample.
Step 2: Now tap on Add Audio to record a Voiceover.
Step 3: After recording, now press on the Checkmark to save the sample.
Step 4: Now tap on the recorded area on the Timeline to enable the Voice Effects.
Step 5: Select the Voice Effects according to your liking from the given options and press on the Checkmark to save the video.
Part 5: How to Change Voice from Female to Male in Filmora for TikTok Video?
Filmora is among the finest video editing software for the novice as well as professional editors since it has powerful and effective video and audio production features. There would be no watermark or limits when exporting audio from Wondershare Filmora for trial version customers.
As a result, you may download it for free and try out the audio editing tools. Let’s look at how to add and adjust the voice in Filmora with this step-by-step guide.
Step 1: For starters, Import the video/audio files. Then, drag the imported video to the Timeline.
Step 2: Double-click on the audio in the timeline. Use the Pitch option to alter the voice of the video or recorded voice-over. By increasing the pitch, you can make it sound like a female’s voice and vice versa. You can further customize the recording using Fade in, Volume, Speed, Fade out, etc.
Step 3: When done with the modifications, click on Export and select Format to save the audio/video in the desired format.
Click to find out more voice changer and how to change voice in video with Filmora :
Frequently Asked Questions About Changing Voice in TikTok
1. Why Don’t I Have Voice Effects on TikTok?
There can be several reasons behind why you don’t have voice effects on TikTok presently. One of the foremost is that you have old software in either your iPhone or Android. Other reasons include giving the modification permission to TikTok, not clearing cache, updating TikTok, etc.
2. How Many Voice Effects in TikTok?
There are 13 voice effects that you can try in TikTok. These include a chipmunk, baritone, mike, megaphone, robot, battery drain, shaking, electronic, echo, synth, elf, huge, and acoustic signals. Hence, TikTok offers an endless and diverse range of effects
Conclusion
Overall, how to Change on TikTok is a simple process. For the required minor modifications, we believe the app’s built-in editor is sufficient. Filmora, on the other hand, is ideal if you would like to go professional and do unique transitions and edits. We believe we’ve provided some necessary knowledge on the TikTok application’s voice change. We hope you can include fantastic audio effects into your next TikTok video to make it engaging.
Note: All screenshots are from the Internet. If there is any infringement, please contact us to delete it.
Also read:
- [Updated] 2024 Approved The Newest Viral Content on TikTok Today
- In 2024, Preserve Your TikTok Videos Easily - Android & iOS Methods
- From Needle to Narrative Tales of Textiles on TikTok
- [New] In 2024, Ultimate TikTok Essentials Handbook 2023
- [Updated] Planning a Dynamic TikTok Outro Experience
- 2024 Approved Can't Ignore These Hit TikTok Challenges
- Your Essential List of Hot TikTok Items Now on Amazon
- [Updated] Essential Moves for Every Aspiring TikToker
- [Updated] In 2024, Incor Written a Master Level Story in English, Containing at Least 5 Sentences, About How Adding Text to Videos on TikTok Can Enhance User Engagement and Communication. Title Should Not Exceed 156 Characters
- [New] Amplify TikTok Fame in Just a Minute - Crucial Steps Unveiled
- [Updated] 2024 Approved Digital Domains Stitch-Based Content Creation
- Crafting a Unique Identity with Creative TikTok PFPs
- [New] Top 50+ Powerful TikToks Quotes for Creativity & Virality for 2024
- [New] Country Grooves for Calmness Top 20 TikTok Anthems for 2024
- Essential TikTok Emoji Encyclopedia for 2024
- Mastering TikTok A Template-Based Guide to Outstanding Video Creation for 2024
- [New] 2024 Approved Lightning Snag Techniques to Download TikTok Shorts
- [Updated] Beat-O-Vision Your Guide to the Year's Most Shared Rap Tracks for 2024
- Get Pure Video Streams From TikTok Directly Online
- [Updated] Unlocking the Mystery of 'PFP' A TikTok Perspective
- [Updated] Mastering TikTok Top Video Editing Tools Released for 2024
- Engineering a Touching TikTok Conclusion for 2024
- In 2024, A Step-by-Step Guide to Dominating TikTok Markets
- [Updated] In 2024, Eye-Catching TikTok Profiles with Innovative PFP Concepts
- 2024 Approved Bold Profile Features for Captivating Your TikTok Audience
- Essential Techniques for Making & Tweaking Multi-Snap Chats
- [Updated] 2024 Approved Disrupting the Norms Standing Out From Mass-Market TikToks
- [Updated] In 2024, Most Popular Raps on TikTok for Everyone
- [Updated] In 2024, The Ultimate Blueprint for a Thriving TikTok Advertisement
- [Updated] TikTok Feasts Current Favorites Explored for 2024
- 2024 Approved How to Voice Your Imagery A TikTok Breakdown
- [Updated] The Path to Success in TikTok Promotion Essential Methods with Real-World Campaigns
- [Updated] Step-by-Step Guide to Creating Viral TikTok Videos at Home for 2024
- [Updated] 2024 Approved Swipe Right on Watermark-Free TikTok Videos
- In 2024, A Guide Nokia C12 Plus Wireless and Wired Screen Mirroring | Dr.fone
- In 2024, Essential Tips for Recording PS4 Games with OBS
- New The Future of Remote Work Unveiling the Best Vocal Manipulation Apps for Google Meet Users for 2024
- In 2024, Is GSM Flasher ADB Legit? Full Review To Bypass Your Vivo V29FRP Lock
- [Updated] 2024 Approved VisionCapture X High-Quality Edition
- Premium Video Capture Without Extras for 2024
- 2024 Approved Streamline and Stand Out Twitter's Video Directive
- Sims 4 Immersion How to Record Successfully for 2024
- How to Unlock Apple ID On your iPhone 6s without Security Questions?
- How To Restore Missing Call Logs from Honor X7b
- How To Check if Your Nokia 150 (2023) Is Unlocked
- In 2024, No-Cost Split Screen Video Editors Online and Offline Options Reviewed
- How to rescue lost call logs from Honor Magic 6
- [New] 2024 Approved The Top 5 Techniques for Quiet Filming Experiences
- Full Guide to Bypass Nubia Z50 Ultra FRP
- [Updated] Facebook's Ultimate Guide Selective Downloader Addons & Extensions for Firefox for 2024
- In 2024, How Can We Unlock Our Poco F5 5G Phone Screen?
- How to restore wiped videos on Realme 11 Pro
- How to Transfer Music from Realme Narzo N55 to iPod | Dr.fone
- Innovative Techniques for Flawless Voice Capture in FaceTime Calls
- In 2024, In-Depth Look at High-Quality Minecraft Recordings
- In 2024, How Can I Unlock My Apple iPhone 6 Plus After Forgetting my PIN Code?
- 3 Effective Methods to Fake GPS location on Android For your Huawei Nova Y71 | Dr.fone
- In 2024, The Instagram Edge Rotating Videos Like a Pro
- New Guide of 8 Photo Collage Apps for PC for 2024
- [Updated] In 2024, Insta Unfollow A Path Towards a Lasting Account Discontinuation
- In 2024, Mastering Lock Screen Settings How to Enable and Disable on Xiaomi Redmi Note 12 Pro 4G
- [Updated] In 2024, 29 How-To Record Free Webinars with Ease and Precision
- How to Repair a Damaged video file of Realme GT 5 Pro using Video Repair Utility on Windows?
- [Updated] In 2024, 6 Proven Strategies to Add Facebook Live Features
- Title: [New] In 2024, Filmmaker’s Playbook for Dynamic TikTok Video Reactions via Filmora
- Author: Stephen
- Created at : 2024-05-23 03:50:54
- Updated at : 2024-05-24 03:50:54
- Link: https://tiktok-video-recordings.techidaily.com/new-in-2024-filmmakers-playbook-for-dynamic-tiktok-video-reactions-via-filmora/
- License: This work is licensed under CC BY-NC-SA 4.0.
