
!["[New] In 2024, Innovative Techniques for Self-Duplication on Social Media's Star Platform, TikTok"](https://www.lifewire.com/thmb/AfexZ2-k2mQOT3K5CpxU6ZDxBBU=/400x300/filters:no_upscale():max_bytes(150000):strip_icc()/outlook-email-laptop-54a6bbf773ea4d67b3714ccbab66d8ed.jpg)
"[New] In 2024, Innovative Techniques for Self-Duplication on Social Media's Star Platform, TikTok"
Innovative Techniques for Self-Duplication on Social Media’s Star Platform, TikTok
How to Clone Yourself on TikTok

Shanoon Cox
Mar 27, 2024• Proven solutions
Every rising pop star needs music videos, but using professional video editing software may be too time-consuming if you want to quickly create a clone video you can share with your fans on TikTok.
Multiplying yourself in a video is a cool way of making sure that your video is going to get the kind of attention it deserves. The process of cloning yourself in a video is a simple one, but there are certain rules you have to follow while recording the footage that will help you avoid overlapping the figures you’re cloning. Here’s how you can make your first clone yourself video on TikTok.

Selecting the Song for your Clone Video
Before you start shooting the video you first need to select the song on TikTok you’re going to use in the video. Once you’ve found the perfect track simply record it and save it as a video to your camera roll. You can then import the video clip that contains the song into the Video Star app.
Here are 10 Popular TikTok Songs for you.

Using the Video Star App to Clone Yourself
1. Download Video Star App
Choosing a location, mounting your iPhone on a tripod, or picking the positions for each of your clones are all important steps you’ll need to take before you actually start recording. There are several apps that enable you to create clone videos easily, but in this article, we are going to show you how you can clone yourself with Video Star. The app can be downloaded from the App Store for free, but additional in-app purchases are necessary if you want to have access to all the power packs Video Star offers. You don’t have to record the video clips with this app since the iPhone’s native camera app is powerful enough to enable you to record high-quality footage.
2. Edit Multiple Video Clips
After you record all the positions for your next clone video with the iPhone’s native camera app, you should cut the video clips and keep only the parts where you are perfectly positioned, so your position in one clip doesn’t overlap with other positions. During the video recording process try to create as much separation between two positions in order to avoid any chance of overlapping. One of the best ways to achieve this is to shoot at a location that is spacious enough so you can make enough separation between two positions. Keep in mind that the maximum number of clips you can combine in the Video Star app is limited to just three, so if you want to have more than three clones in the shot you first have to piece together three clips, save them as a single file and then add more clips to the cloned video you created.
3. Level up Your Videos with Video Star
Video Star also enables you to shoot your videos from the app, and you can adjust the Countdown before the app starts recording or the Recording Speed. Make sure to enter the lowest Recording Speed value possible, because that way you’ll be recording like TikTok does on fast.
Tap the Record button, then select the Multiple options, and play the video that contains the song you previously selected. Once you reach the spot in the song where you want to introduce the clone simply tap Set, so the recording will stop at the designated point and you can move to another position. If at any point during recording you realize that your movements extend to your clone’s location, you can simply tap on the hamburger icon and select the Delete Last option.
To preview the video, you just have to tap on the Scissors icon, and the recorded video will automatically start playing. The Record New Clip in the Scissors menu lets you start from the beginning in case you’re not happy with the results or you can use this option to start recording the video with the second position of your clone.
When done, head back to the Scissors menu, and tap on the Multi-Layer Clip. This feature doesn’t come with the free version of the app, and you must purchase it in order to create a clone video. This action will enable you to select the back and front clips. After selecting the clips, the Mask Front menu will appear on the screen, choose the Shape option and use the hamburger icon on the right side of the screen to change the video’s shape to Rectangle. Drag the rectangle in the preview window so you can crop the first clip to match the demands of your video and press the Next icon to continue the video editing process.
Alternatively, you can use the Erase option to remove the unwanted parts of each video. You can find this option in the Mask Front or Mask Back menu, so just select it and use your finger to remove sections of the shot you don’t want to use.
The Add Effect menu will pop up on the screen so you can add different effects to your first video clip, and then repeat the entire process for the back clip. Once you’ve edited the second clip tap on the Create button to complete the process of making a multilayer clip. Tap Done to save the clip to your camera roll, and upload it to TikTok.
Conclusion
Cloning yourself in a video using the Video Star app is a simple process that can be mastered in a short period of time. The Video Star app lets you create as many clones of yourself as you want, so you just have to make sure that your video clips can be easily combined to feature two or more of your clones and have fun exploring the effects that can make your videos look even cooler. If you want to be a success on the TikTok platform, learning how to make clone videos is one of the best ways to do it, so choose your favorite songs and start producing clone yourself videos.
You can also use Wondershare Filmora to make a split-screen with ease. Check the tutorial below to figure out how to make a split-screen video to clone.


Shanoon Cox
Shanoon Cox is a writer and a lover of all things video.
Follow @Shanoon Cox
Shanoon Cox
Mar 27, 2024• Proven solutions
Every rising pop star needs music videos, but using professional video editing software may be too time-consuming if you want to quickly create a clone video you can share with your fans on TikTok.
Multiplying yourself in a video is a cool way of making sure that your video is going to get the kind of attention it deserves. The process of cloning yourself in a video is a simple one, but there are certain rules you have to follow while recording the footage that will help you avoid overlapping the figures you’re cloning. Here’s how you can make your first clone yourself video on TikTok.
Selecting the Song for your Clone Video
Before you start shooting the video you first need to select the song on TikTok you’re going to use in the video. Once you’ve found the perfect track simply record it and save it as a video to your camera roll. You can then import the video clip that contains the song into the Video Star app.
Here are 10 Popular TikTok Songs for you.
Using the Video Star App to Clone Yourself
1. Download Video Star App
Choosing a location, mounting your iPhone on a tripod, or picking the positions for each of your clones are all important steps you’ll need to take before you actually start recording. There are several apps that enable you to create clone videos easily, but in this article, we are going to show you how you can clone yourself with Video Star. The app can be downloaded from the App Store for free, but additional in-app purchases are necessary if you want to have access to all the power packs Video Star offers. You don’t have to record the video clips with this app since the iPhone’s native camera app is powerful enough to enable you to record high-quality footage.
2. Edit Multiple Video Clips
After you record all the positions for your next clone video with the iPhone’s native camera app, you should cut the video clips and keep only the parts where you are perfectly positioned, so your position in one clip doesn’t overlap with other positions. During the video recording process try to create as much separation between two positions in order to avoid any chance of overlapping. One of the best ways to achieve this is to shoot at a location that is spacious enough so you can make enough separation between two positions. Keep in mind that the maximum number of clips you can combine in the Video Star app is limited to just three, so if you want to have more than three clones in the shot you first have to piece together three clips, save them as a single file and then add more clips to the cloned video you created.
3. Level up Your Videos with Video Star
Video Star also enables you to shoot your videos from the app, and you can adjust the Countdown before the app starts recording or the Recording Speed. Make sure to enter the lowest Recording Speed value possible, because that way you’ll be recording like TikTok does on fast.
Tap the Record button, then select the Multiple options, and play the video that contains the song you previously selected. Once you reach the spot in the song where you want to introduce the clone simply tap Set, so the recording will stop at the designated point and you can move to another position. If at any point during recording you realize that your movements extend to your clone’s location, you can simply tap on the hamburger icon and select the Delete Last option.
To preview the video, you just have to tap on the Scissors icon, and the recorded video will automatically start playing. The Record New Clip in the Scissors menu lets you start from the beginning in case you’re not happy with the results or you can use this option to start recording the video with the second position of your clone.
When done, head back to the Scissors menu, and tap on the Multi-Layer Clip. This feature doesn’t come with the free version of the app, and you must purchase it in order to create a clone video. This action will enable you to select the back and front clips. After selecting the clips, the Mask Front menu will appear on the screen, choose the Shape option and use the hamburger icon on the right side of the screen to change the video’s shape to Rectangle. Drag the rectangle in the preview window so you can crop the first clip to match the demands of your video and press the Next icon to continue the video editing process.
Alternatively, you can use the Erase option to remove the unwanted parts of each video. You can find this option in the Mask Front or Mask Back menu, so just select it and use your finger to remove sections of the shot you don’t want to use.
The Add Effect menu will pop up on the screen so you can add different effects to your first video clip, and then repeat the entire process for the back clip. Once you’ve edited the second clip tap on the Create button to complete the process of making a multilayer clip. Tap Done to save the clip to your camera roll, and upload it to TikTok.
Conclusion
Cloning yourself in a video using the Video Star app is a simple process that can be mastered in a short period of time. The Video Star app lets you create as many clones of yourself as you want, so you just have to make sure that your video clips can be easily combined to feature two or more of your clones and have fun exploring the effects that can make your videos look even cooler. If you want to be a success on the TikTok platform, learning how to make clone videos is one of the best ways to do it, so choose your favorite songs and start producing clone yourself videos.
You can also use Wondershare Filmora to make a split-screen with ease. Check the tutorial below to figure out how to make a split-screen video to clone.
Shanoon Cox
Shanoon Cox is a writer and a lover of all things video.
Follow @Shanoon Cox
Mastering the Art of Voiceovers on the Popular Video Platform, TikTok
Edit TikTok Videos with Filmora
Wondershare Filmora is one of the best video editors to level up your TikTok video with stunning effects. Download and have a try.
TikTok is becoming increasingly popular among digital content creators. It has provided an opportunity to millions of content makers to produce captivating and creative digital stories. In addition, this app is also continuously upgrading its platform to help you create compelling content.
One such unique addition to its framework is the TikTok voice-over. Voiceovers are added to TikTok videos for narration purposes. So, if you are making a vlog, a voiceover is a must. Likewise, the TikTok voice-over also helps you add sounds and effects to the videos. If you want to know how to do voiceover on TikTok, the following article will explain everything in a step-by-step guide.
Part 1: How to Add Voiceover on TikTok When Recording Video?
TikTok helps you polish your content in a number of ways. Voiceover is one such method to add spice and life to your video content. TikTok allows in-app voiceover addition to the videos. This means you can directly add voiceover when recording video in TikTok. The process is pretty simple. Learn to add a voiceover in a step-by-step guide below.
Step 1: Open TikTok app, and add voice
Launch the TikTok application and click on the + button to open a new window. Tap the voiceover option at the top right corner of the screen.
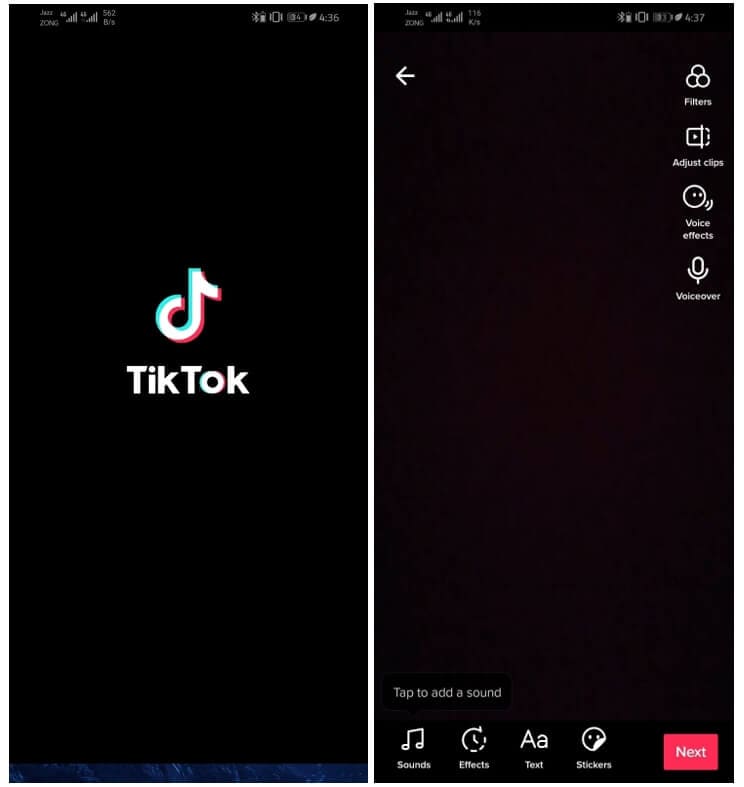
Step 2: Record video and Save
Long-press the record button to add the voice to the video. Click on the Save option at the top of the screen.
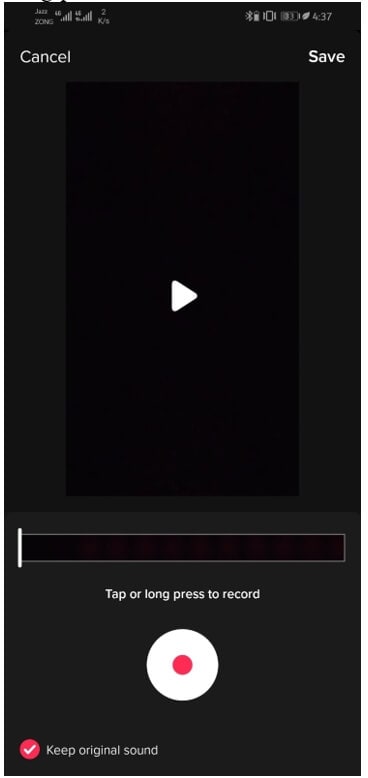
Note: The original sound of the video can also be removed when recording voiceover. However, if you want to keep the original video sound, tick the keep original sound box.
Part 2: How to Add Voiceover on TikTok After Video Recorded?
Videos can be imported to TikTok from your gallery or local files. This means you can use TikTok to edit the pre-recorded videos. Video content can be enhanced using filters, texts, and effects available in TikTok in-built library. Moreover, it also enables you to add voiceovers to videos already saved in your gallery. If you want to know how to do voiceover on TikTok, the process is summarized in the simple steps below.
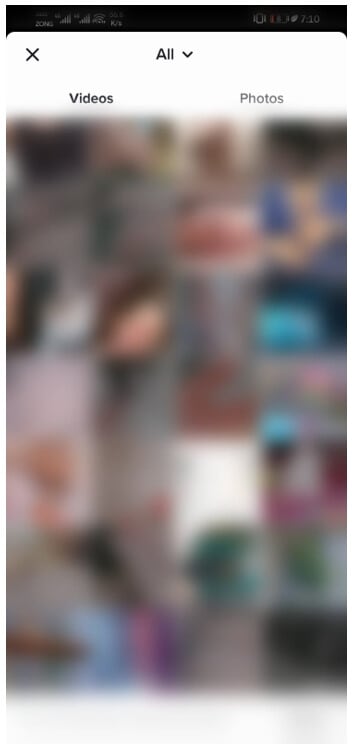
Step 1: launch TikTok and upload a video
Open the application and click the upload button after pressing the + option.
Note: Performing the above step will direct you to your gallery. Select the videos that you want to import to TikTok for adding a voiceover.
Step 2: Add Voiceover
Click on the voiceover option and keep the record button pressed. Select the save option after finishing the voiceover.
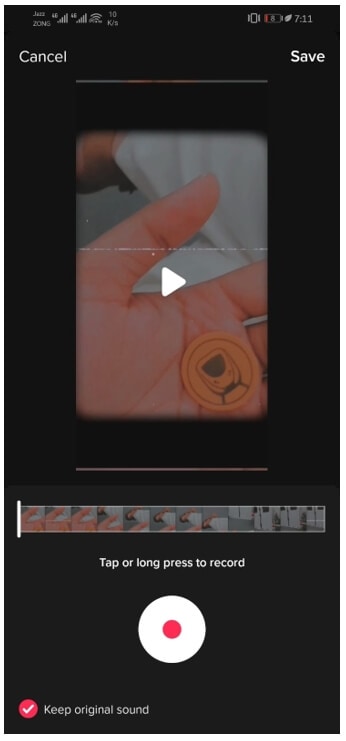
Note: The imported video can be trimmed before the voiceover is added. Trim the video to the desired size and click on the Next button.
Part 3: Why You Should Add a Voiceover to a TikTok Video
Using TikTok is fun. You can enjoy exciting features on TikTok, such as sharing your content, enhancing your videos using filters and effects, and much more. In addition to this, you may also create your own content using TikTok versatile tools. One of the state-of-the-art tools that TikTok has added to its toolkit is the voiceover facility. Voiceover plays an important role in making video content clear and compelling. TikTok videos are no exception. If you want to know about the benefits of TikTok voiceovers, we have got you covered in the following section. Let’s get started.
1. Connects content creators to their audience
Voiceover facilitates you to communicate with your audience. There are high chances that the idea you are trying to present in your video content might not be clear to the viewers. So, voiceovers are effective in adding clarity to your content.
2. Create impact
The primary objective of sharing video content is to influence your followers. However, sometimes visuals are not enough to create impact. Thus, you may need an explanation or narration to convey your message in TikTok videos. So, voiceover is the only way of translating your imagination.
3. Humor
In addition to instructional content and storytelling, TikTok is also known for adding humor. Humorous content can be enhanced further by adding a voiceover. So, the voiceover feature gives you a chance to show your humor skills in TikTok videos.
Part 4: How to Record Voiceover for TikTok on Desktop?
TikTok videos are commonly recorded using its smartphone application. However, this does not imply that you have to perform all the video editing on your phone. You can easily do it on your desktop too. But, what if you are in the middle of editing a TikTok video in some video editing tool on your desktop and want to add a voiceover to it? Don’t worry!! You can also record the voiceover for TikTok on the desktop as well.
Wondershare Filmora is one such advanced video editing tool that allows you to record a voiceover. Do you want to know how to do a voiceover on TikTok? If yes, follow the simple steps below.
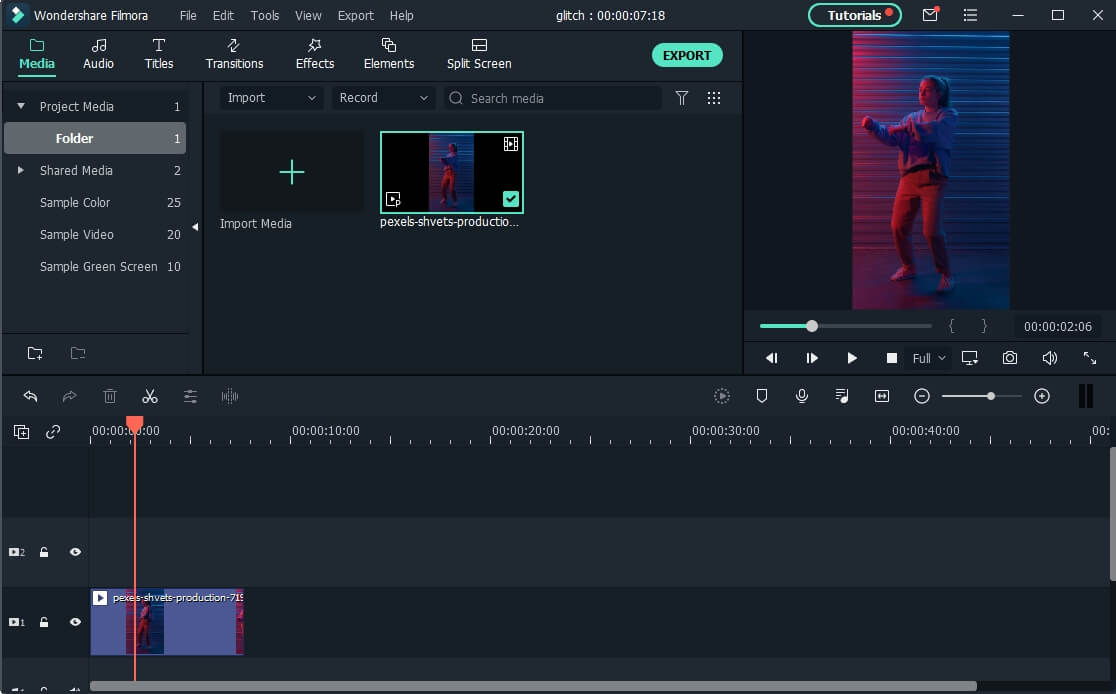
Step 1: Make a video for TikTok with Filmora
Launch Filmora, and then import the TikTok video to the timeline by dragging and dropping.
Note: Filmora also has the camera recording feature , if your computer has a camera, you can also record a video in Filmora.
Step 2: Record a voiceover
Open the Record tab and click on the record a voiceover from the list of options. Or click the microphone icon on the screen to start the voiceover recording.
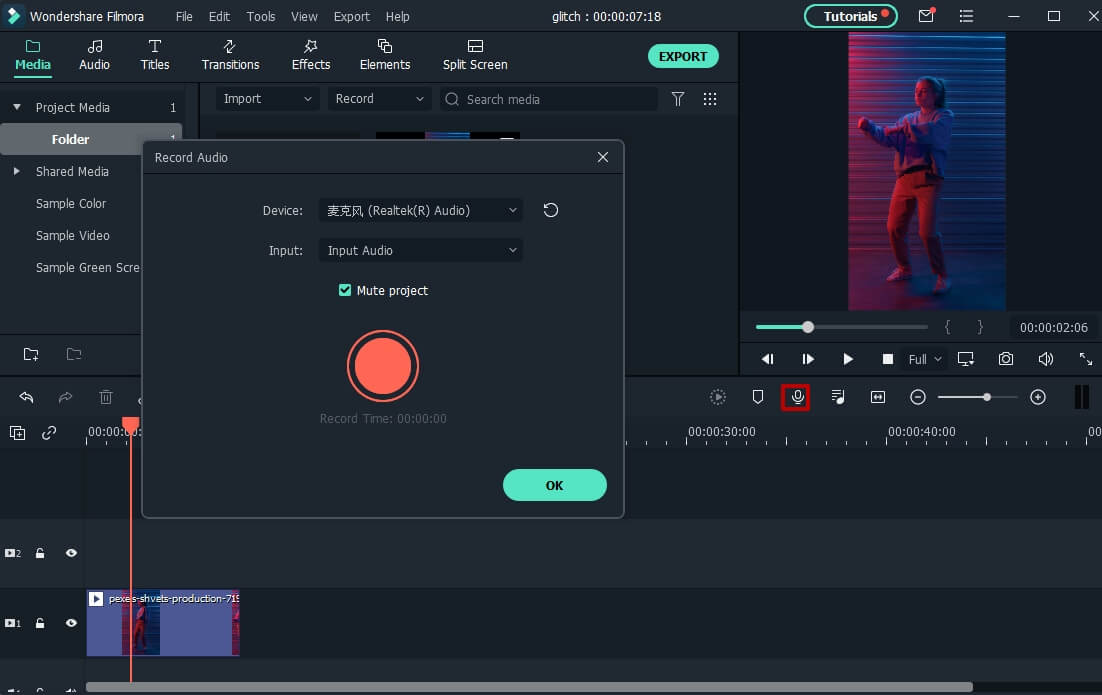
After recording, you can try the audio editing features to change the voice from a female to male, or adjust the speed of voiceover.
Step 3: Export the video
Sync the voiceover to the video and select the export button to save and share the video file.

Now, you can upload the edited video to your TikTok account on a desktop computer.
Step 1: Log in to your TikTok on desktop
Go to the official TikTok website and press the red Login button.
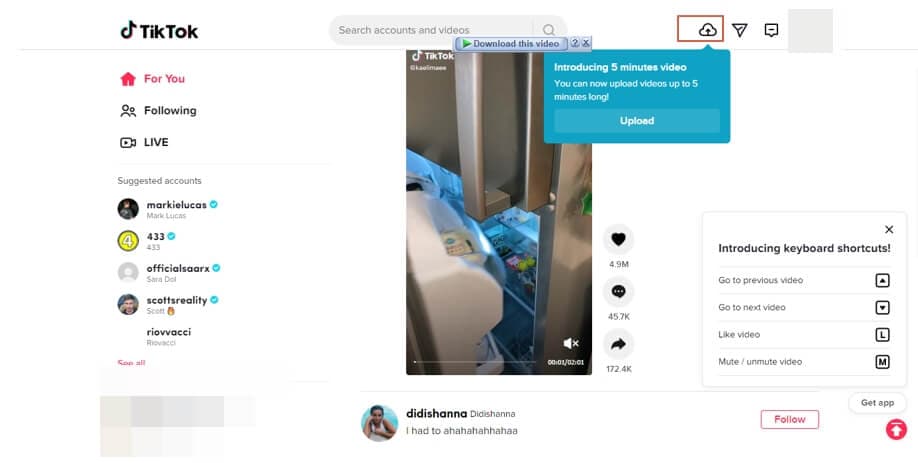
Step 2: Click on Upload video
Click on the cloud button at the top left corner to upload your edited video.
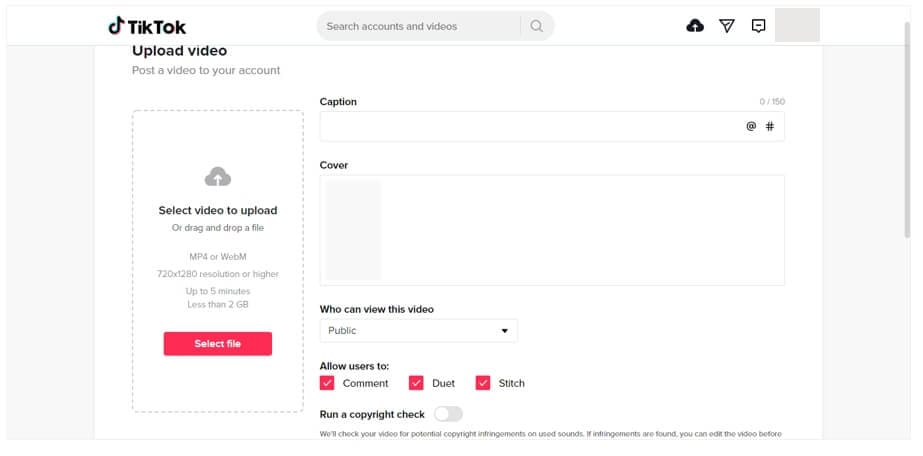
Step 3: Upload video
Select the video from your PC, add the caption and fill in other information before you upload the video.
FAQs about TikTok Voiceover
1. Where can I find the Voiceover Tool on TikTok?
The voiceover tool is incorporated in the TikTok video editing toolkit. The tool can be accessed by clicking the drop-down menu appearing on the right side of the editing window.
2. How to make voiceover louder on TikTok?
Volume can be enhanced using the volume tool in the same drop-down menu where voiceover is found. This allows you to make the voiceover louder on TikTok. So, you can adjust the volume as per your requirements.
Conclusion
TikTok has several features to make your content exciting. Voiceover is one of such features that can polish your video content and make storytelling easy for you. So, we have summarized all the relevant information to give you a detailed insight into how to do a voiceover on TikTok. Hopefully, all concerns will be addressed after reading this article.
TikTok is becoming increasingly popular among digital content creators. It has provided an opportunity to millions of content makers to produce captivating and creative digital stories. In addition, this app is also continuously upgrading its platform to help you create compelling content.
One such unique addition to its framework is the TikTok voice-over. Voiceovers are added to TikTok videos for narration purposes. So, if you are making a vlog, a voiceover is a must. Likewise, the TikTok voice-over also helps you add sounds and effects to the videos. If you want to know how to do voiceover on TikTok, the following article will explain everything in a step-by-step guide.
Part 1: How to Add Voiceover on TikTok When Recording Video?
TikTok helps you polish your content in a number of ways. Voiceover is one such method to add spice and life to your video content. TikTok allows in-app voiceover addition to the videos. This means you can directly add voiceover when recording video in TikTok. The process is pretty simple. Learn to add a voiceover in a step-by-step guide below.
Step 1: Open TikTok app, and add voice
Launch the TikTok application and click on the + button to open a new window. Tap the voiceover option at the top right corner of the screen.
Step 2: Record video and Save
Long-press the record button to add the voice to the video. Click on the Save option at the top of the screen.
Note: The original sound of the video can also be removed when recording voiceover. However, if you want to keep the original video sound, tick the keep original sound box.
Part 2: How to Add Voiceover on TikTok After Video Recorded?
Videos can be imported to TikTok from your gallery or local files. This means you can use TikTok to edit the pre-recorded videos. Video content can be enhanced using filters, texts, and effects available in TikTok in-built library. Moreover, it also enables you to add voiceovers to videos already saved in your gallery. If you want to know how to do voiceover on TikTok, the process is summarized in the simple steps below.
Step 1: launch TikTok and upload a video
Open the application and click the upload button after pressing the + option.
Note: Performing the above step will direct you to your gallery. Select the videos that you want to import to TikTok for adding a voiceover.
Step 2: Add Voiceover
Click on the voiceover option and keep the record button pressed. Select the save option after finishing the voiceover.
Note: The imported video can be trimmed before the voiceover is added. Trim the video to the desired size and click on the Next button.
Part 3: Why You Should Add a Voiceover to a TikTok Video
Using TikTok is fun. You can enjoy exciting features on TikTok, such as sharing your content, enhancing your videos using filters and effects, and much more. In addition to this, you may also create your own content using TikTok versatile tools. One of the state-of-the-art tools that TikTok has added to its toolkit is the voiceover facility. Voiceover plays an important role in making video content clear and compelling. TikTok videos are no exception. If you want to know about the benefits of TikTok voiceovers, we have got you covered in the following section. Let’s get started.
1. Connects content creators to their audience
Voiceover facilitates you to communicate with your audience. There are high chances that the idea you are trying to present in your video content might not be clear to the viewers. So, voiceovers are effective in adding clarity to your content.
2. Create impact
The primary objective of sharing video content is to influence your followers. However, sometimes visuals are not enough to create impact. Thus, you may need an explanation or narration to convey your message in TikTok videos. So, voiceover is the only way of translating your imagination.
3. Humor
In addition to instructional content and storytelling, TikTok is also known for adding humor. Humorous content can be enhanced further by adding a voiceover. So, the voiceover feature gives you a chance to show your humor skills in TikTok videos.
Part 4: How to Record Voiceover for TikTok on Desktop?
TikTok videos are commonly recorded using its smartphone application. However, this does not imply that you have to perform all the video editing on your phone. You can easily do it on your desktop too. But, what if you are in the middle of editing a TikTok video in some video editing tool on your desktop and want to add a voiceover to it? Don’t worry!! You can also record the voiceover for TikTok on the desktop as well.
Wondershare Filmora is one such advanced video editing tool that allows you to record a voiceover. Do you want to know how to do a voiceover on TikTok? If yes, follow the simple steps below.
Step 1: Make a video for TikTok with Filmora
Launch Filmora, and then import the TikTok video to the timeline by dragging and dropping.
Note: Filmora also has the camera recording feature , if your computer has a camera, you can also record a video in Filmora.
Step 2: Record a voiceover
Open the Record tab and click on the record a voiceover from the list of options. Or click the microphone icon on the screen to start the voiceover recording.
After recording, you can try the audio editing features to change the voice from a female to male, or adjust the speed of voiceover.
Step 3: Export the video
Sync the voiceover to the video and select the export button to save and share the video file.
Now, you can upload the edited video to your TikTok account on a desktop computer.
Step 1: Log in to your TikTok on desktop
Go to the official TikTok website and press the red Login button.
Step 2: Click on Upload video
Click on the cloud button at the top left corner to upload your edited video.
Step 3: Upload video
Select the video from your PC, add the caption and fill in other information before you upload the video.
FAQs about TikTok Voiceover
1. Where can I find the Voiceover Tool on TikTok?
The voiceover tool is incorporated in the TikTok video editing toolkit. The tool can be accessed by clicking the drop-down menu appearing on the right side of the editing window.
2. How to make voiceover louder on TikTok?
Volume can be enhanced using the volume tool in the same drop-down menu where voiceover is found. This allows you to make the voiceover louder on TikTok. So, you can adjust the volume as per your requirements.
Conclusion
TikTok has several features to make your content exciting. Voiceover is one of such features that can polish your video content and make storytelling easy for you. So, we have summarized all the relevant information to give you a detailed insight into how to do a voiceover on TikTok. Hopefully, all concerns will be addressed after reading this article.
Also read:
- 2024 Approved Taming the Roar Clearing Audio in Audacity
- [Updated] Originality in TikTok PFP Designs Boosting Visibility
- [Updated] In 2024, Navigating Non-Working TikTok Videos with Ease
- [Updated] In 2024, Crack-Up Compilation The Most Funny TikTok Joke Threads
- In 2024, Evading TikTok’s Covert Account Limitations
- Transform Your TikTok Avatar Instruction Manual for Change for 2024
- [Updated] 2024 Approved Anime Soundtracks Setting the Mood for Viral Shorts
- [Updated] In 2024, Hot 20 on TikTok The Tracks Dripping with Popularity
- [New] Premier Tools to Scrub TikTok Brand Images for 2024
- Most Popular Snapchat Filters and Lenses That You Want to Try
- [Updated] In 2024, The Professional’s Playbook Streaming Live Videos on TikTok From Computer
- Swipe Past Watermarks IPhones and TikTok Videos Downloads
- 2024 Approved Unveil TikTok's Most Effective Typefaces for Video Growth This Year
- [Updated] In 2024, Get Into a Friend's Live Showcase Effortlessly
- [Updated] 2024 Approved TikTok's Hottest Culinary Trends - Try These 15 Easy Delights
- [New] In 2024, The Most Influential Quotes List to Make Your TikTok Videos Shine
- The Echo Eradicator Recording Room Reduction for 2024
- [New] Top 15 Most Famous TikTokers in the World to Inspire You for 2024
- Increase Your Social Media Reach with These Top 30 TikTok Nicknames for 2024
- [Updated] 2024 Approved Discover the Best TikTok to MP3 Online, Costless Convertors
- [New] In 2024, Innovative TikTok Techniques to Change Backdrops in a Flash
- [Updated] The Definitive Tips for Capturing Spectaculux TikTok Videos for 2024
- [Updated] Fuel Growth Pioneering Biography Techniques for Filmora TikTok Enthusiasts
- Mastering the Art of Finding Lost Chats
- [New] Mastering TikTok Livestreams on Your Home Office Desktop
- [New] Maximizing Your TikTok Impact From Fans to Followers and Beyond for 2024
- The Most Popular Anime-Themed TikTok Videos of All Time for 2024
- [New] Spotlight on Top TikTok Gaming Pros for 2024
- [New] 2024 Approved Techniques for Effective Siri Voice Use in TikTok
- [Updated] Perfect Your Video Cropping Technique for Instagram Sharing
- In 2024, Tips and Tricks for Setting Up your Vivo Y78+ Phone Pattern Lock
- Updated In 2024, 7 Best Video Mergers Without Watermark
- [New] In 2024, Fix Chromium and YouTube Streams
- In 2024, Ultimate Guide from Vivo X Fold 2 FRP Bypass
- Free electronic signature for PDF v1.2 document
- In 2024, A Complete Guide To OEM Unlocking on Poco F5 5G
- [Updated] OBS Mastery Streaming Success on FB for 2024
- Updated 2024 Approved From Zero to Hero Creating Stunning Reaction Videos Using Filmora
- Updated The Art of Fashioning Slow Motions Has Remained Popular Ever Since. Read This Article to Learn How to Do Slow-Mo in CapCut and Other Powerful Tools
- [New] From Viewer to Victor Step-by-Step Windows PC Guide for High-Quality Live Recording for 2024
- [New] Mastering Facebook Cover Videos Essential Insights
- [New] Thriving on Instagram Strategies for Powerful Video Marketing
- New Advanced Mac Audio Division Toolkit - Latest 2024 Features
- In 2024, 4 solution to get rid of pokemon fail to detect location On Apple iPhone XS | Dr.fone
- A Complete Guide To OEM Unlocking on ZTE Axon 40 Lite
- How To Transfer Data From iPhone 14 Pro Max To Other iPhone 13 Pro devices? | Dr.fone
- New 2024 Approved Say Goodbye to Adobe 10 Best Linux Video Editors
- [New] Mastery Techniques for Embedding Social Media Live Videos for 2024
- Quickly Remove Google FRP Lock on Edge 40 Neo
- In 2024, How to use iSpoofer on Vivo S18? | Dr.fone
- In 2024, Best Pokemons for PVP Matches in Pokemon Go For Realme GT 5 (240W) | Dr.fone
- [New] 2024 Approved The Complete Guide to Twitter's Paid Reach and Impressions
- [New] VisualVault Review Highlighting the Best Recording Tools
- Title: "[New] In 2024, Innovative Techniques for Self-Duplication on Social Media's Star Platform, TikTok"
- Author: Stephen
- Created at : 2024-05-23 03:57:34
- Updated at : 2024-05-24 03:57:34
- Link: https://tiktok-video-recordings.techidaily.com/new-in-2024-innovative-techniques-for-self-duplication-on-social-medias-star-platform-tiktok/
- License: This work is licensed under CC BY-NC-SA 4.0.
