
![[New] In 2024, Seamless Storytelling in TikTok Through Strategic Stitching](https://www.lifewire.com/thmb/2gHaaXQ_kdz4PXOihSc2PV3WzwI=/400x300/filters:no_upscale():max_bytes(150000):strip_icc()/Delete-Photos-iOS-1e8f0abbb73442a0b00d242ff0bbc79a.jpg)
[New] In 2024, Seamless Storytelling in TikTok Through Strategic Stitching
Seamless Storytelling in TikTok Through Strategic Stitching
Best Video Editor for Beginners on Windows and Mac
Wondershare Filmora is one of the most popular video editing software among TikTokers , download and have a try.
TikTok’s collaborative nature is one of its most appealing features. Your video is not finished the moment you publish it. They can be responded to, remixed, and re-shared by anybody. TikTok is meant to allow users to construct on other’s films shared on the network, whether you’re utilizing audio from some other video or making a duet.
Thanks to the stitch tool, creators may remix, remake, and reply to videos with a couple of taps. This article will tell you what you need to know about stitching videos on TikTok. Continue reading to learn more about Stitching and how to stitch on TikTok. Let’s get started!
In this article
02 How to Turn Stitch On or Off?
04 How to Stitch Any TikTok Video withFilmora Video Editor ?
05 FAQs About TikTok Video Stitch
Part 1: What is Stitch on TikTok?
TikTok’s latest video editing tool ‘Stitch,’ lets people incorporate video snippets from other people into their own. Creators may use Stitch to provide a five-second snippet from a TikTok video out of their own. Unlike duets that play videos together, stitched videos play in the sequence they were stitched. Videos containing open-ended questions have gained in popularity with the advent of the stitch.
Whenever you Stitch a clip-on TikTok, you are essentially inserting your video after yet another video that has already been submitted. People frequently utilize this to remark on or reply to other videos. And, when done well, it can add a lot more context to your movies.
The one limitation of the Stitch tool is that you may only publish up to five seconds from some other video. So, if you’re focusing on a Stitch, you must select the five seconds which are most critical to highlight your message.
Part 2: How to Turn Stitch On or Off?
By enabling the Stitch feature, you make your material available to millions of prospective collaborators. Consider the possibilities – it might be a fantastic approach to enhance reach and virility.
If you aren’t comfortable exposing your films to the whole TikTok community, users can opt out of allowing others to Stitch their work. You may modify them under the Privacy Controls. Here’s how to do a Stitch on TikTok:
Step 1: Launch the TikTok app and then head to your profile by clicking on the Profile option at the bottom right. After that, select the three dots to open the settings.
Step 2: After entering the settings, select Privacy to proceed, and then tap on the Stitch option to open the Stitch settings.
Step 3: Now, you will see three options that are No-one, Everyone, and Friends. If you want to allow the Stitching, select either Everyone or Friends. However, to restrict the people from stitching your videos, choose No-one. After you are done selecting, click on the back arrow to save the applied changes.
Part 3: How to Stitch on TikTok?
TikTok keeps giving creators more reasons to continue producing, and fans like us are more committed to continuing to open it. Stitch, a new app functionality from the famous social networking platform, makes things more straightforward than ever for artists to interact with each other.
But, you might be wondering, how to do a stitch on TikTok? Don’t worry; you’ve come to the right place. Here’s how:
Step 1: Launch TikTok and then go to the video that you want to stitch. Select the Share icon, which resembles an arrow. Select the Stitch symbol from the menu that displays, and then wait a few seconds for the video to complete. The lengthier the video is, the more the loading time.

Step 2: When it’s finished, you’ll be sent to a screen where you may take five seconds of the film and use it on your own. To navigate through the movie, use the sliders and the red bars to choose the portion you want. When you’re finished, tap Next.

Step 3: You’ll be sent to TikTok’s normal recording screen. Record the remainder of your TikTok video with all of the features you’re accustomed to utilizing. You may use whatever effects, stickers, texts, voiceovers, or captions you desire. After that, press the Next button.

Step 4: Make a title and hashtags for your TikTok video. You could also choose whether or not these users may Stitch your movie here – hit the toggle switch beside Allow Stitch to turn it off. Following that, hit the Post option, and your stitched video will be uploaded.

Part 4: How to Stitch Any TikTok Video with Filmora Video Editor ?
Before getting started, understand why people opt for Filmora video editor for stitching videos on TikTok when this can be done through the official TikTok application. TikTok app only allows you to stitch a video for up to five seconds which is quite frustrating if you wish to stitch an entire video.
One more reason is that, with TikTok, you cannot stitch the already existing video from the camera roll, which restricts creators from adding the already edited content to the existing video. So, to avoid the above problems, Filmora is used for stitching TikTok videos.
For Win 7 or later (64-bit)
For macOS 10.12 or later
To begin, download the video that you wish to stitch with from TikTok. After, follow the below stepwise guide:
Step 1: Launch the Filmora software on your PC and import the video files by clicking on the File and then Import/Export Media. You can simply drag and drop the videos as well.
Step 2: Drag the clips from the media library to the Timeline’s video track. All video files will be stitched into a single video with no transitions.

Note: To add a transition to the video , go to the Transition tab and drop the desired transition to the junction of two clips.

Step 3: Now, preview the stitched video and, when finished, click the Export option to save numerous video segments to a single file. Choose any format from the Format tab’s list.
Part 5: FAQs About TikTok Video Stitch
1. Can you do a Stitch on TikTok with a video from your Camera Roll?
Unfortunately, you cannot utilize a video from your Camera Roll in a Stitch at the time of this writing. So, whatever your reaction to a Stitch is, you must record 100% unique footage shot with the TikTok camera. However, you may download the video first and then stitch it with some third-party software such as Filmora.
2. Can you stitch longer than 5 seconds?
No, it is not possible to stitch a video for longer than five seconds using the built-in Stitching feature of the TikTok app. But this can be done by stitching the videos using third-party applications and software.
3. How do I see TikTok stitches?
Users who want to view as many stitches as possible can do it by browsing for them on the app. You must first browse to Discover, and from there to the search box. Then type #Stitch @username, where the username is the name of the account from which you wish to view stitches.
4. TikTok Stitch option not showing. How to fix it?
Users may choose whether or not someone else can Stitch their work in their settings. The option may be found under the Settings and Privacy tab, where users can activate or uncheck Stitch for all videos. So, if the Stitch option is not showing, the user may have disabled the Stitch option.
Conclusion
The Stitch feature is an excellent way to continue the discussion with your videos. You may leave comments on popular content on the site. Most importantly, it may be a fun method to generate material different from what you usually publish. And since you know How to Stitch on TikTok after reading this article, stitch the videos today and create unique content!
TikTok’s collaborative nature is one of its most appealing features. Your video is not finished the moment you publish it. They can be responded to, remixed, and re-shared by anybody. TikTok is meant to allow users to construct on other’s films shared on the network, whether you’re utilizing audio from some other video or making a duet.
Thanks to the stitch tool, creators may remix, remake, and reply to videos with a couple of taps. This article will tell you what you need to know about stitching videos on TikTok. Continue reading to learn more about Stitching and how to stitch on TikTok. Let’s get started!
In this article
02 How to Turn Stitch On or Off?
04 How to Stitch Any TikTok Video withFilmora Video Editor ?
05 FAQs About TikTok Video Stitch
Part 1: What is Stitch on TikTok?
TikTok’s latest video editing tool ‘Stitch,’ lets people incorporate video snippets from other people into their own. Creators may use Stitch to provide a five-second snippet from a TikTok video out of their own. Unlike duets that play videos together, stitched videos play in the sequence they were stitched. Videos containing open-ended questions have gained in popularity with the advent of the stitch.
Whenever you Stitch a clip-on TikTok, you are essentially inserting your video after yet another video that has already been submitted. People frequently utilize this to remark on or reply to other videos. And, when done well, it can add a lot more context to your movies.
The one limitation of the Stitch tool is that you may only publish up to five seconds from some other video. So, if you’re focusing on a Stitch, you must select the five seconds which are most critical to highlight your message.
Part 2: How to Turn Stitch On or Off?
By enabling the Stitch feature, you make your material available to millions of prospective collaborators. Consider the possibilities – it might be a fantastic approach to enhance reach and virility.
If you aren’t comfortable exposing your films to the whole TikTok community, users can opt out of allowing others to Stitch their work. You may modify them under the Privacy Controls. Here’s how to do a Stitch on TikTok:
Step 1: Launch the TikTok app and then head to your profile by clicking on the Profile option at the bottom right. After that, select the three dots to open the settings.
Step 2: After entering the settings, select Privacy to proceed, and then tap on the Stitch option to open the Stitch settings.
Step 3: Now, you will see three options that are No-one, Everyone, and Friends. If you want to allow the Stitching, select either Everyone or Friends. However, to restrict the people from stitching your videos, choose No-one. After you are done selecting, click on the back arrow to save the applied changes.
Part 3: How to Stitch on TikTok?
TikTok keeps giving creators more reasons to continue producing, and fans like us are more committed to continuing to open it. Stitch, a new app functionality from the famous social networking platform, makes things more straightforward than ever for artists to interact with each other.
But, you might be wondering, how to do a stitch on TikTok? Don’t worry; you’ve come to the right place. Here’s how:
Step 1: Launch TikTok and then go to the video that you want to stitch. Select the Share icon, which resembles an arrow. Select the Stitch symbol from the menu that displays, and then wait a few seconds for the video to complete. The lengthier the video is, the more the loading time.
Step 2: When it’s finished, you’ll be sent to a screen where you may take five seconds of the film and use it on your own. To navigate through the movie, use the sliders and the red bars to choose the portion you want. When you’re finished, tap Next.
Step 3: You’ll be sent to TikTok’s normal recording screen. Record the remainder of your TikTok video with all of the features you’re accustomed to utilizing. You may use whatever effects, stickers, texts, voiceovers, or captions you desire. After that, press the Next button.
Step 4: Make a title and hashtags for your TikTok video. You could also choose whether or not these users may Stitch your movie here – hit the toggle switch beside Allow Stitch to turn it off. Following that, hit the Post option, and your stitched video will be uploaded.
Part 4: How to Stitch Any TikTok Video with Filmora Video Editor ?
Before getting started, understand why people opt for Filmora video editor for stitching videos on TikTok when this can be done through the official TikTok application. TikTok app only allows you to stitch a video for up to five seconds which is quite frustrating if you wish to stitch an entire video.
One more reason is that, with TikTok, you cannot stitch the already existing video from the camera roll, which restricts creators from adding the already edited content to the existing video. So, to avoid the above problems, Filmora is used for stitching TikTok videos.
For Win 7 or later (64-bit)
For macOS 10.12 or later
To begin, download the video that you wish to stitch with from TikTok. After, follow the below stepwise guide:
Step 1: Launch the Filmora software on your PC and import the video files by clicking on the File and then Import/Export Media. You can simply drag and drop the videos as well.
Step 2: Drag the clips from the media library to the Timeline’s video track. All video files will be stitched into a single video with no transitions.
Note: To add a transition to the video , go to the Transition tab and drop the desired transition to the junction of two clips.
Step 3: Now, preview the stitched video and, when finished, click the Export option to save numerous video segments to a single file. Choose any format from the Format tab’s list.
Part 5: FAQs About TikTok Video Stitch
1. Can you do a Stitch on TikTok with a video from your Camera Roll?
Unfortunately, you cannot utilize a video from your Camera Roll in a Stitch at the time of this writing. So, whatever your reaction to a Stitch is, you must record 100% unique footage shot with the TikTok camera. However, you may download the video first and then stitch it with some third-party software such as Filmora.
2. Can you stitch longer than 5 seconds?
No, it is not possible to stitch a video for longer than five seconds using the built-in Stitching feature of the TikTok app. But this can be done by stitching the videos using third-party applications and software.
3. How do I see TikTok stitches?
Users who want to view as many stitches as possible can do it by browsing for them on the app. You must first browse to Discover, and from there to the search box. Then type #Stitch @username, where the username is the name of the account from which you wish to view stitches.
4. TikTok Stitch option not showing. How to fix it?
Users may choose whether or not someone else can Stitch their work in their settings. The option may be found under the Settings and Privacy tab, where users can activate or uncheck Stitch for all videos. So, if the Stitch option is not showing, the user may have disabled the Stitch option.
Conclusion
The Stitch feature is an excellent way to continue the discussion with your videos. You may leave comments on popular content on the site. Most importantly, it may be a fun method to generate material different from what you usually publish. And since you know How to Stitch on TikTok after reading this article, stitch the videos today and create unique content!
Direct Download Wizardry: Turning TikTok to Perfect MP4s
Hovering through your TikTok For You page brings up an array of content to dive in. With a few of your finger swipes, you could find yourself seeing a confidence-boosting pep talk, going behind the fashion show behind the scenes, or assisting how to grow herbs in your kitchen.
With so much information to consume nowadays, it’s only natural that you might like to save a couple of TikTok content to watch at a later date and time, without even opening the TikTok app. In this guide, we’ll show you how to convert TikTok to MP4 via the best TikTok converters MP4 available.
In this article
01 Top 3 TikTok MP4 Converters in 2021
02 How to Convert TikTok Video to MP4 without Watermark?
03 How to Save TikTok without Watermark for Free?
Part 1: Top 3 TikTok MP4 Converters in 2021
1. ttdown.org
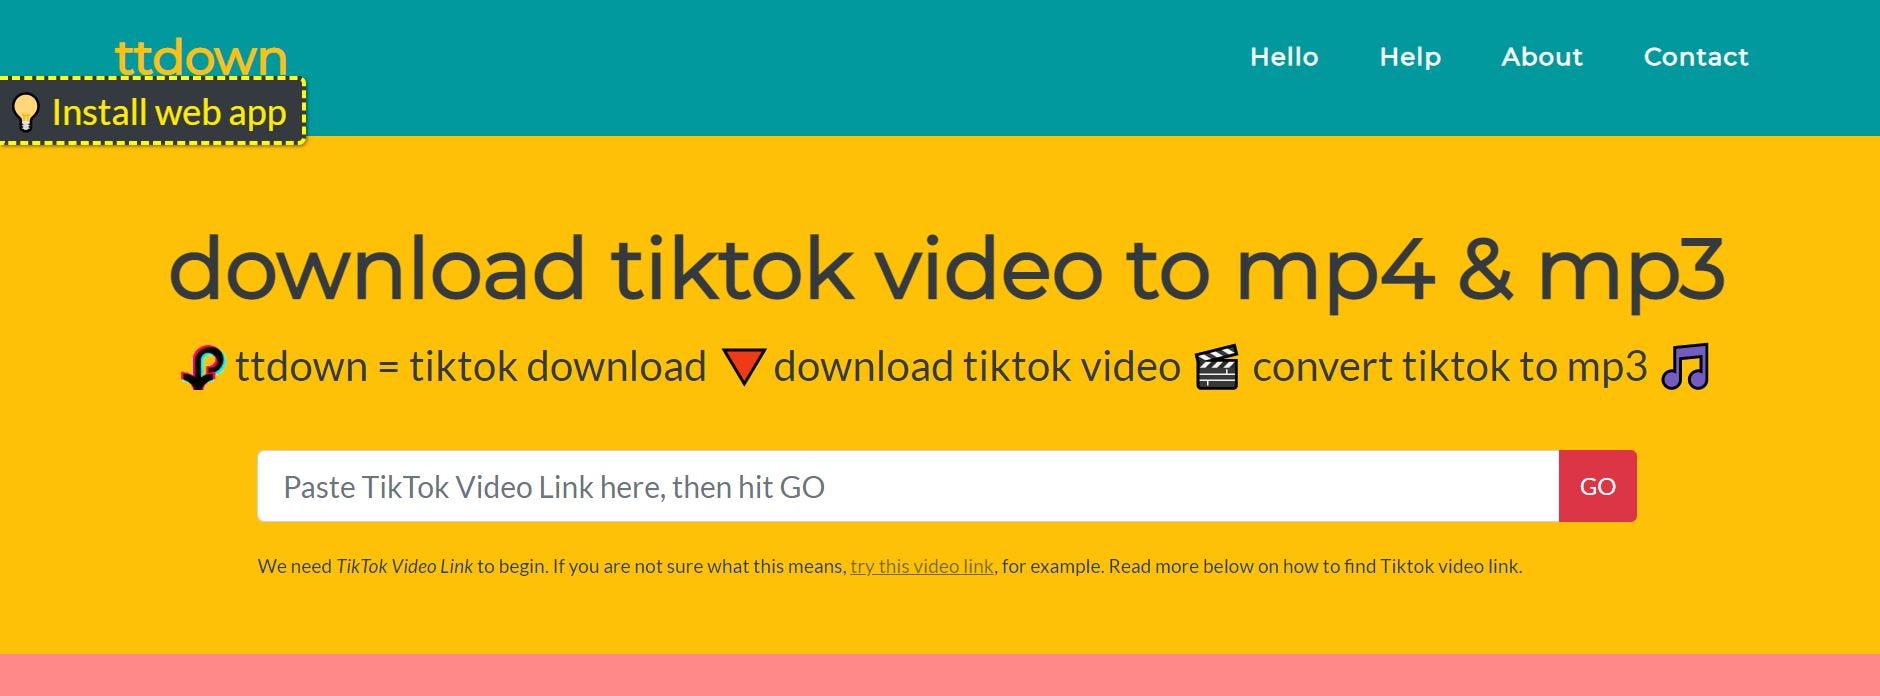
TTDown provides a colorful website to scroll through and learn about TikTok and a step-by-step tutorial on downloading TikTok MP4. In addition, TTDown brings you the most straightforward way to download TikTok MP4 videos by copy-pasting the video’s link on their website.
However, its Bookmarklet feature saves the users’ time from copy-pasting. They have provided their website link that you can drag into your browser’s bookmarks. Just hit the bookmark when you scroll through TikTok and wish to save a video.
Price: Free
2. Experts PHP
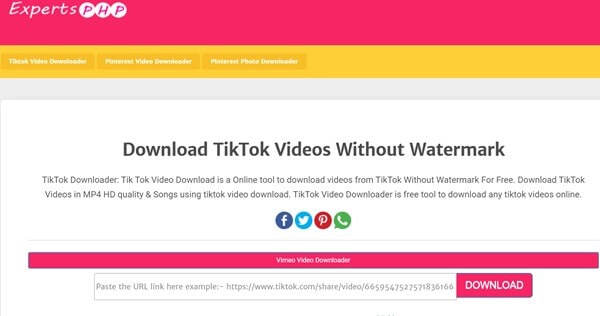
ExpertPHP TikTok converter MP4 lets you download TikTok files by pasting the file’s copied link to be downloaded into the text bar offered on the ExpertsPHP’s web page. It further enables us to download videos and images from platforms like Pinterest, TikTok, etc. Here, you can download videos freely without watermarks.
One downside of ExpertsPHP is that it does not provide other features, like converting videos into GIFs, as offered by its alternatives.
Price: Free
3. Qoob Clips
Qoob Clips lets us view and download unlimited TikTok and Instagram media files. You can even get access to the private accounts’ content through Qoob.
To proceed with the process, you are only required to install Qoob on your computer, enter your username, and begin viewing content downloaded automatically into your PC. Just by entering the username, you can even search for a private account’s content.
This MP4 TikTok downloader also lets you download unlimited highlights and stories. It further supports unlimited private accounts without displaying any ads.
Part 2: How to Convert TikTok Video to MP4 without Watermark?
Before proceeding further, it’s essential to consider whether any copyright infringement issues could arise from downloading a TikTok video. According to the Community Guidelines of TikTok, users cannot post, send, or share any content that violates someone else’s trademarks, copyrights, or intellectual property rights.
To prevent this, TikTok applies a watermark featuring both its account’s username and the logo that originally posted the content if someone downloads a TikTok video.
In other words, you have to ensure the watermark’s visibility or give full credit to the user in another way while reposting the user’s video on social media. And, this is where the job of the best TikTok converter MP4 comes in.
Cropping watermarks from your videos with Wondershare Filmora video editing software is a pretty straightforward process. You don’t need be a professional to finish these simple editing actions.
All you must do is choose a method that best suits your preferences and performs an easy action, though.
So, without any delay, let’s have a look at some editing techniques you can use to blur or crop watermarks from the downloaded videos of TikTok with Filmora.
Wondershare Filmora
Get started easily with Filmora’s powerful performance, intuitive interface, and countless effects!
Try It Free Try It Free Try It Free Learn More >

Note: the methods listed below won’t work perfectly if the watermark is in the middle of the screen. And you may need to subscribe to remove the watermark via Wondershare Filmora. In addition, you can fetch a special discount at Filmora Education Plan if you’re a student.
Method 1: Blurring the Watermark
The Filmora’s Mosaic feature will allow you to blur logos and all other on-screen graphics with just a few taps.
Hit the Effects tab at the top, select the Utility tab at left, and then hit the Mosaic option to preview the effect.
Click plus icon on the thumbnail on Mosaic or drag-and-drop it into the track above the video.
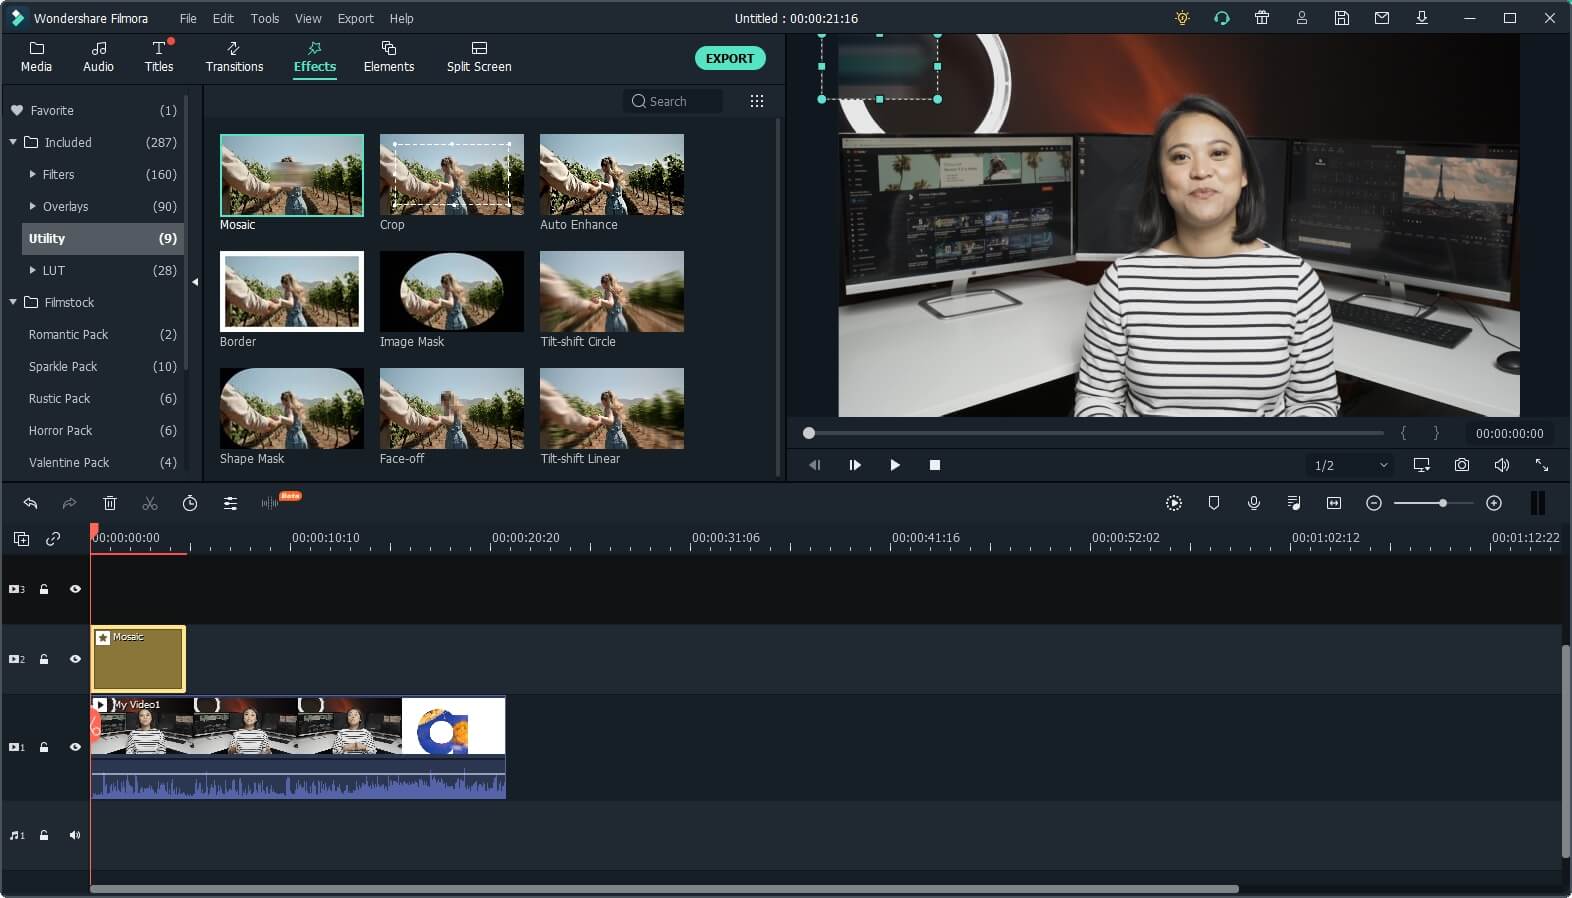
A mosaic square will appear after you apply it in the preview window by relocating it by simply dragging it to the preview window area or adjusting its size at the watermarked position.
If the downloaded video has more than one logo to hide, tapping the plus icon will introduce you to another mosaic square within the video
project.
In the timeline, double click those Mosaic effects; you can select Blur Amount and Type to adjust the shape and size of the mosaic. Hit the OK tab to apply the adjustment.

You can also consider using this Mosaic effect to blur other objects or even the face.
Method 2: Remove watermark by Cropping the video
This method will allow you to remove the watermark from your video entirely. Cropping the area where the watermark isn’t possible in any video editor, so if you select to crop the video, be prepared to lose a particular section of the picture.
Right-click the video and choose the Crop and Zoom option once the footage you wish to crop is on the video track in Filmora’s timeline.
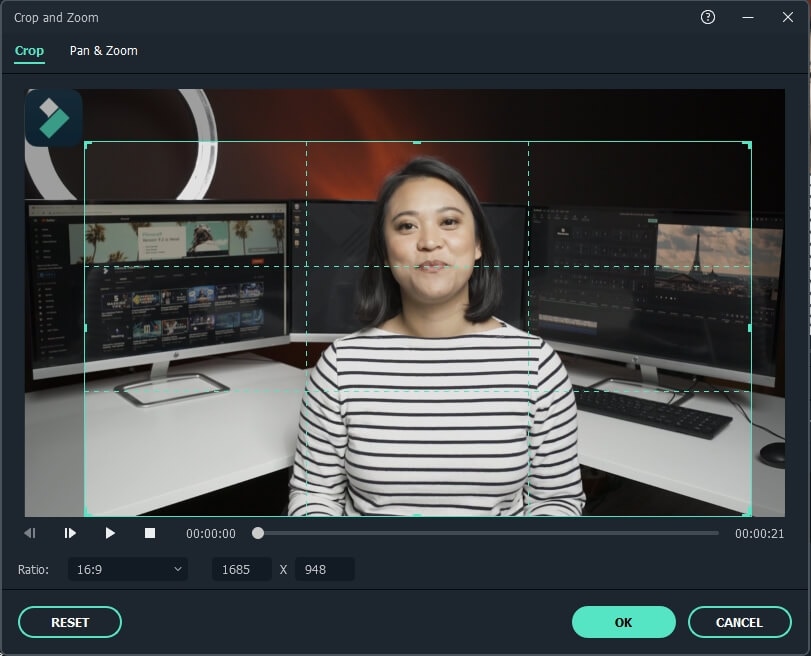
The crop window that enables you to use automatic aspect ratios or manually will appear on the screen. You can reposition the videos’ corners of the cropping rectangle from here by dragging it as much as essential to remove TikTok’s username watermark.
You can change the aspect ratios or keep them originally based on your needs. Hit the OK tab to apply the cropping effect, and you have successfully removed a watermark from your video.
So, it’s a worthy, reliable, and feature-rich TikTok watermark remover that you can easily use as the best TikTok MP4 converter.
Part 3: How to Save TikTok without Watermark for Free?
How to Save TikTok Without Watermark Online
When there is a need for the best TikTok video downloaders, you might get offers with various options. But the quantity of TikTok downloaders without watermarked videos is counted on the fingers of one hand.
We’ve founded SSSTikTok, an ideal online tool fit for the same.
We conducted the tutorial below on Windows 10’s Chrome browser, but it is almost the same on iOS, Android, and Mac.
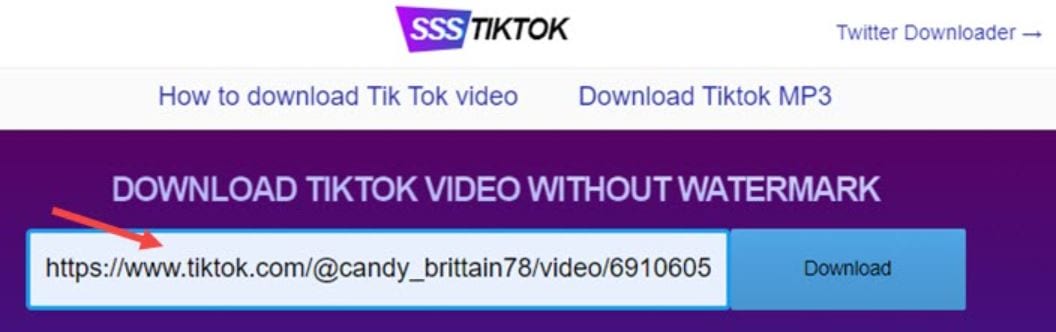
Step 1. Copy the TikTok video’s URL on the Pc or TikTok mobile app.
Step 2. Open the web browser, and visit the SSSTikTok official website. Paste the video link to the blank tab and select the download tab. And it will take only a few secs to analyze the URL.
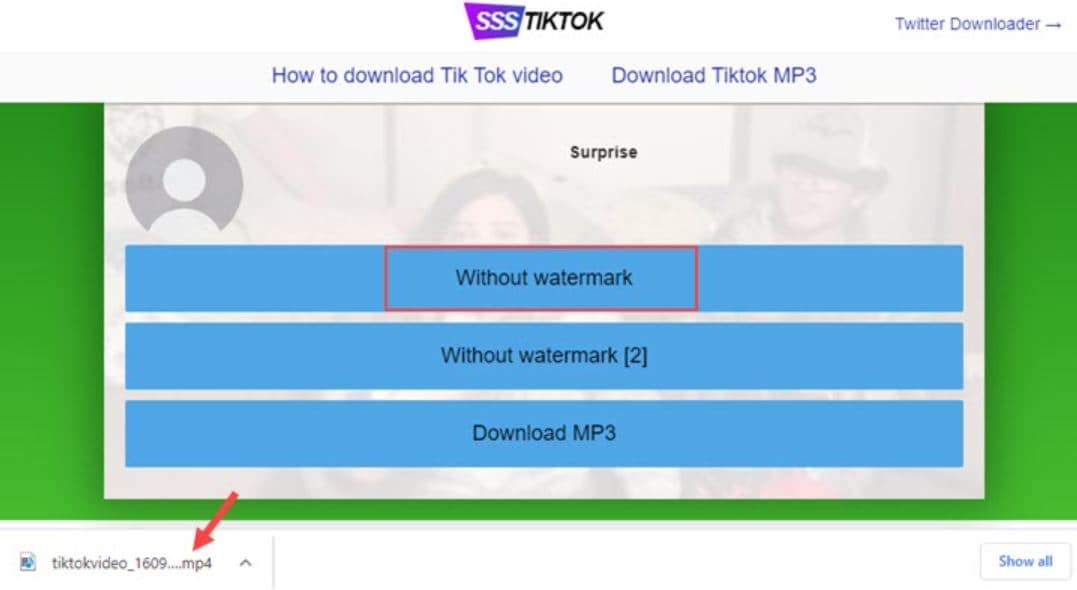
Step 3. Select the “Without Watermark“ option, and the video will be immediately get saved to the browser downloads folder.
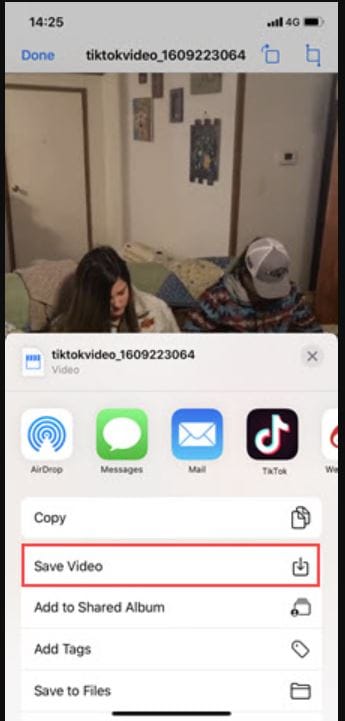
Tips for iPhone users: There’s one more step you should be aware of if you’re using this TikTok downloader. After downloading the video on iOS Safari, you can preview the video, hit the share icon, and select the “Save video “option.
Conclusion
Finally, we hope it won’t be that difficult to convert TikTok to MP4 via the best TikTok converters MP4 with the solution mentioned above. Ensure that you didn’t break the law whether you want to remove it with an online watermark remover or with a program for PC and Mac, or on iPhone or Android phones.
If you want to go for the straightforward and hassle-free option, check our video editing program Filmora and use it to blur or crop the watermarks of TikTok’s downloaded videos.
02 How to Convert TikTok Video to MP4 without Watermark?
03 How to Save TikTok without Watermark for Free?
Part 1: Top 3 TikTok MP4 Converters in 2021
1. ttdown.org
TTDown provides a colorful website to scroll through and learn about TikTok and a step-by-step tutorial on downloading TikTok MP4. In addition, TTDown brings you the most straightforward way to download TikTok MP4 videos by copy-pasting the video’s link on their website.
However, its Bookmarklet feature saves the users’ time from copy-pasting. They have provided their website link that you can drag into your browser’s bookmarks. Just hit the bookmark when you scroll through TikTok and wish to save a video.
Price: Free
2. Experts PHP
ExpertPHP TikTok converter MP4 lets you download TikTok files by pasting the file’s copied link to be downloaded into the text bar offered on the ExpertsPHP’s web page. It further enables us to download videos and images from platforms like Pinterest, TikTok, etc. Here, you can download videos freely without watermarks.
One downside of ExpertsPHP is that it does not provide other features, like converting videos into GIFs, as offered by its alternatives.
Price: Free
3. Qoob Clips
Qoob Clips lets us view and download unlimited TikTok and Instagram media files. You can even get access to the private accounts’ content through Qoob.
To proceed with the process, you are only required to install Qoob on your computer, enter your username, and begin viewing content downloaded automatically into your PC. Just by entering the username, you can even search for a private account’s content.
This MP4 TikTok downloader also lets you download unlimited highlights and stories. It further supports unlimited private accounts without displaying any ads.
Part 2: How to Convert TikTok Video to MP4 without Watermark?
Before proceeding further, it’s essential to consider whether any copyright infringement issues could arise from downloading a TikTok video. According to the Community Guidelines of TikTok, users cannot post, send, or share any content that violates someone else’s trademarks, copyrights, or intellectual property rights.
To prevent this, TikTok applies a watermark featuring both its account’s username and the logo that originally posted the content if someone downloads a TikTok video.
In other words, you have to ensure the watermark’s visibility or give full credit to the user in another way while reposting the user’s video on social media. And, this is where the job of the best TikTok converter MP4 comes in.
Cropping watermarks from your videos with Wondershare Filmora video editing software is a pretty straightforward process. You don’t need be a professional to finish these simple editing actions.
All you must do is choose a method that best suits your preferences and performs an easy action, though.
So, without any delay, let’s have a look at some editing techniques you can use to blur or crop watermarks from the downloaded videos of TikTok with Filmora.
Wondershare Filmora
Get started easily with Filmora’s powerful performance, intuitive interface, and countless effects!
Try It Free Try It Free Try It Free Learn More >
Note: the methods listed below won’t work perfectly if the watermark is in the middle of the screen. And you may need to subscribe to remove the watermark via Wondershare Filmora. In addition, you can fetch a special discount at Filmora Education Plan if you’re a student.
Method 1: Blurring the Watermark
The Filmora’s Mosaic feature will allow you to blur logos and all other on-screen graphics with just a few taps.
Hit the Effects tab at the top, select the Utility tab at left, and then hit the Mosaic option to preview the effect.
Click plus icon on the thumbnail on Mosaic or drag-and-drop it into the track above the video.
A mosaic square will appear after you apply it in the preview window by relocating it by simply dragging it to the preview window area or adjusting its size at the watermarked position.
If the downloaded video has more than one logo to hide, tapping the plus icon will introduce you to another mosaic square within the video
project.
In the timeline, double click those Mosaic effects; you can select Blur Amount and Type to adjust the shape and size of the mosaic. Hit the OK tab to apply the adjustment.
You can also consider using this Mosaic effect to blur other objects or even the face.
Method 2: Remove watermark by Cropping the video
This method will allow you to remove the watermark from your video entirely. Cropping the area where the watermark isn’t possible in any video editor, so if you select to crop the video, be prepared to lose a particular section of the picture.
Right-click the video and choose the Crop and Zoom option once the footage you wish to crop is on the video track in Filmora’s timeline.
The crop window that enables you to use automatic aspect ratios or manually will appear on the screen. You can reposition the videos’ corners of the cropping rectangle from here by dragging it as much as essential to remove TikTok’s username watermark.
You can change the aspect ratios or keep them originally based on your needs. Hit the OK tab to apply the cropping effect, and you have successfully removed a watermark from your video.
So, it’s a worthy, reliable, and feature-rich TikTok watermark remover that you can easily use as the best TikTok MP4 converter.
Part 3: How to Save TikTok without Watermark for Free?
How to Save TikTok Without Watermark Online
When there is a need for the best TikTok video downloaders, you might get offers with various options. But the quantity of TikTok downloaders without watermarked videos is counted on the fingers of one hand.
We’ve founded SSSTikTok, an ideal online tool fit for the same.
We conducted the tutorial below on Windows 10’s Chrome browser, but it is almost the same on iOS, Android, and Mac.
Step 1. Copy the TikTok video’s URL on the Pc or TikTok mobile app.
Step 2. Open the web browser, and visit the SSSTikTok official website. Paste the video link to the blank tab and select the download tab. And it will take only a few secs to analyze the URL.
Step 3. Select the “Without Watermark“ option, and the video will be immediately get saved to the browser downloads folder.
Tips for iPhone users: There’s one more step you should be aware of if you’re using this TikTok downloader. After downloading the video on iOS Safari, you can preview the video, hit the share icon, and select the “Save video “option.
Conclusion
Finally, we hope it won’t be that difficult to convert TikTok to MP4 via the best TikTok converters MP4 with the solution mentioned above. Ensure that you didn’t break the law whether you want to remove it with an online watermark remover or with a program for PC and Mac, or on iPhone or Android phones.
If you want to go for the straightforward and hassle-free option, check our video editing program Filmora and use it to blur or crop the watermarks of TikTok’s downloaded videos.
Also read:
- In 2024, Stepping Into TikTok's Anime Universe The Harmony of Movement, Music & Visual Trends
- [Updated] 2024 Approved Accelerating Videos in TikTok Quick Tips
- In 2024, Exploring the Context and Importance of PFP on TikTok
- Smart Ways to Keep TikTok Memories on Your Mobile for 2024
- Essential Skills for Assembling TikToks for 2024
- [New] IPhone Users Unobstructed TikTok Video Access for 2024
- In 2024, Iconic PFP Ideas Make a Mark in the World of TikTok
- 2024 Approved Virtual Stage War Is Likee Poised to Overtake TikTok?
- [Updated] 2024 Approved Revolutionary Bio Blueprint Essential Strategies for Maximum Viewership on TikTok-Filmora Platforms
- [New] 2024 Approved Mastering Viral Content Top 50+ Creative Quotes for TikTok
- [New] 2024 Approved Unobtrusive Visuals TopiMarker for iPhone & Android
- 2024 Approved Mastering TikTok Promotion Strategies & Top Ad Samples
- Discover the Secrets to Effective Video Dissemination on Discord
- [Updated] TikTok Mayhem The Hottest 10 Unusual Game Picks for 2024
- Quick Tips for Unlocking Creativity with Stable TikTok Usage for 2024
- [New] Best Free and Easy TikTok Edits on a Mac Computer for 2024
- 2024 Approved Giggly Guide Navigating the Top Laugh Tracks in TikTok
- [New] In 2024, Crafters' Guide to Crafting a Unique TikTok Keyphrase
- [New] Immediate Harmony Videos on Youku Toujiang for 2024
- [New] Trending Triumphs Your Guide to the Top TikTok Game Frenzy for 2024
- How to Make Money on TikTok in 8 Ways for 2024
- [Updated] In 2024, Chuckle-Filled The Ultimate List of TikTok Jokes & Riddles
- [New] Transforming Your TikTok Presence A Detailed Walkthrough for 2024
- [New] 2024 Approved Cultivating Brand Visibility Effective TikTok Marketing for Growth
- [Updated] 2024 Approved Choreographed Chaos Blending Dance & Dissonance in TikToks
- [New] 2024 Approved Streamlined Mac TikTok Editing Tools (All Free)
- Triller Vs. TikTok A Comparative Analysis (Max 156 Chars)
- [New] How to Dominate TikTok's Trending Topics for More Engagement for 2024
- The Tasty Trail 10 Viral Eats on Social Media for 2024
- [Updated] In 2024, Efficient Video Exporting on Chrome to Enhance TikTok
- [Updated] Beatbox & Boogie Easy-to-Learn TikTok Dance Hits
- [New] 2024 Approved Mastering Clear Audio Silencing Distractions in Audacity
- Step-by-Step Setting Up TikTok on a Macbook
- [New] Troubleshooting Techniques for Troubled TikToks for 2024
- [Updated] Big Deals in TikTok Videos Oversized Character Techniques for 2024
- [Updated] In 2024, Top Picks From #Booktik Your Next Great Adventure Awaits
- 2024 Approved Top 5 Video Sharing Platforms to Watch Instead of TikTok
- [New] In 2024, Installing TikTok Made Easy for Mac Users
- [Updated] 2024 Approved Step Into Fame Crafting an Authentic TikTok Duplicate
- [New] In 2024, Launching Your Digital Dialogues in Google Meet
- In 2024, 6 Ways To Transfer Contacts From Vivo X100 to iPhone | Dr.fone
- Instagram Stories Harmonizing Photos for Maximum Impact for 2024
- In 2024, How To Broadcast Videos on Twitter without the 'Retweet' Step
- [Updated] 2024 Approved Step-by-Step to Stardom on Social Boost Your Instagram Fame at Warp Speed with Our 15 Must-Knows
- Remove FRP Lock on S17 Pro
- Detailed guide of ispoofer for pogo installation On Poco X6 | Dr.fone
- [New] 2024 Approved Instagram Growth Strategy - Top 15 Secure & FREE Apps for Social Networking
- In 2024, How I Transferred Messages from OnePlus Ace 2 to iPhone 12/XS (Max) in Seconds | Dr.fone
- How Can I Catch the Regional Pokémon without Traveling On Tecno Pova 6 Pro 5G | Dr.fone
- Updated 2024 Approved What Is AI Voice?
- Network Locked SIM Card Inserted On Your HTC Phone? Unlock It Now
- Wondering the Best Alternative to Hola On Honor X50i+? Here Is the Answer | Dr.fone
- [New] 2024 Approved Expediting the Engagement of Instagram Videos
- New 2024 Approved The FCPX Shortcut Bible 40 Essential Commands to Know
- [Updated] Advanced Audio Editing Apps Ranked by Users for 2024
- How to Transfer Data from Honor X50i+ to Any iOS Devices | Dr.fone
- Updated In 2024, The Top Reasons to Choose Mp3 Converter Windows for Your Audio Needs
- This Article Will Show You How to Make a Tattoo Disappear on Your Body Magically
- [New] Audience-Appealing Tips for Facecam Video Production for 2024
- Updated In 2024, 15 Free Video Editing Tools for Starters Simplified and User-Friendly
- In 2024, Why Your WhatsApp Live Location is Not Updating and How to Fix on your Realme C33 2023 | Dr.fone
- Updated Top 14 Free Video Editing Software without Watermark for 2024
- Podcast to MP3 Mastery Unlocking the Power of Three Conversion Techniques
- 2024 Approved Infinite Visual Fidelity Premium HDMI 2.1 Gaming Displays (PS5)
- In 2024, Enhance Presentations with Proper Screenshotting via Ezvid
- Updated Mastering the Art of Guitar Production A Compilation of the Best 7 Digital Audio Workstations for 2024
- New 2024 Approved How to Choose the Best FLAC Audio Converter for Your Needs
- In 2024, How to Unlock a Network Locked Nokia C22 Phone?
- How to Change Honor X9b Location on Skout | Dr.fone
- Top Picks for High-Quality Outdoor Audio Archives
- A Deep Dive Into Top Audio Production Tools Is MAGIX Samplitude Still King for 2024
- In 2024, AddROM Bypass An Android Tool to Unlock FRP Lock Screen For your Huawei P60
- How to recover deleted photos on OnePlus Nord 3 5G
- In 2024, Easy Video Joiner Not Cutting It? Explore These 10 Powerful Alternatives
- Innovative Videography for Sims Playtime
- Title: [New] In 2024, Seamless Storytelling in TikTok Through Strategic Stitching
- Author: Stephen
- Created at : 2024-05-23 04:11:12
- Updated at : 2024-05-24 04:11:12
- Link: https://tiktok-video-recordings.techidaily.com/new-in-2024-seamless-storytelling-in-tiktok-through-strategic-stitching/
- License: This work is licensed under CC BY-NC-SA 4.0.
