![[New] Mastering Live-Stream Entry TikTok Edition](https://thmb.techidaily.com/6b8b8cd944b78f2fca9befdc6ff94bcc8ad2bce093f59dcdf2b6479e3403f82d.jpg)
"[New] Mastering Live-Stream Entry TikTok Edition"
Mastering Live-Stream Entry: TikTok Edition
With the immense growth of TikTok, many people like to use this social app for various purposes. For example, content creators can build their personal community on TikTok to interact with their followers. You can also conduct a question-answer session with your followers on TikTok through a live stream.
Moreover, TikTok also allows you to join someone’s live stream as a guest. Through this feature, you can join the live streaming of your friend instantly. Through this article, you can learn how to join someone’s live on TikTok quickly.
Part 1: How to Join Someone’s Live on TikTok
Is your favorite celebrity live on TikTok? If your favorite celebrity is doing a live stream on TikTok, you may want to interact with him directly. TikTok allows you to join someone’s live on TikTok quickly by sending a guest request. To learn how to join live on TikTok, follow the below steps:
Step1 Select the Live Option
Open your TikTok app on your phone to access the “Discover” page, and type “Live” on the search bar. By doing so, you can find all the live streaming easily. Now select the live stream you want to join in order to proceed.

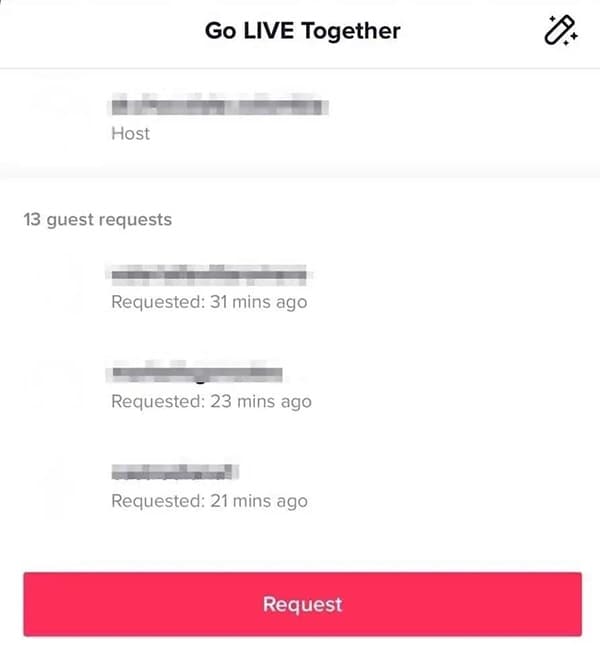
Step2 Send a Guest Request
Once you have found your desired live stream, tap on the “Pink Blue Circles” to send a guest request. Now tap on “Request” to give confirmation. By selecting this option, your guest request will be sent. After sending the guest request, wait for the host to accept it.
Part 2: How to Invite Others to Join Your Live on TikTok
Have you ever invited someone to join your live streaming on TikTok? Being a content creator or an influencer on TikTok, it’s essential to connect with your fans frequently. To communicate with your TikTok audience better, you should know how to invite others on your live stream. By inviting others, you can communicate with your fans directly.
Prerequisites of Going Live on TikTok
Before learning how to invite others on TikTok, let’s shed light on the requirements of going live on this social app. The reason is that not everyone can go for live streaming on TikTok, as there are certain restrictions you need to keep in your mind.
- To start live streaming on your TikTok, you should have at least 1000 followers.
- You should be 16 years old or above to access the live stream feature.
- To use virtual gifts during a live stream on TikTok, you should be 18 years old or above.
Steps to Invite Others to Join Your Live on TikTok Easily
Are you excited to invite your fan to your live stream on TikTok? Check the below steps to invite others to join your TikTok live:
Step1 Go to the Live Option
Open your TikTok app on your mobile phone. After opening it, tap on the “Live” option from the right side. Now you can add a title to your TikTok Live.
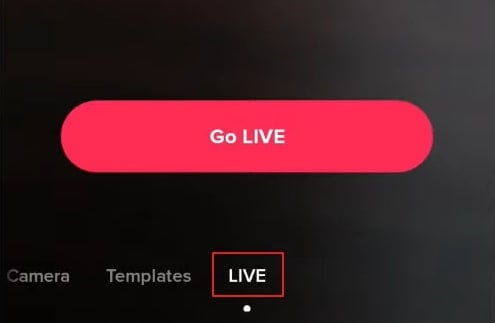
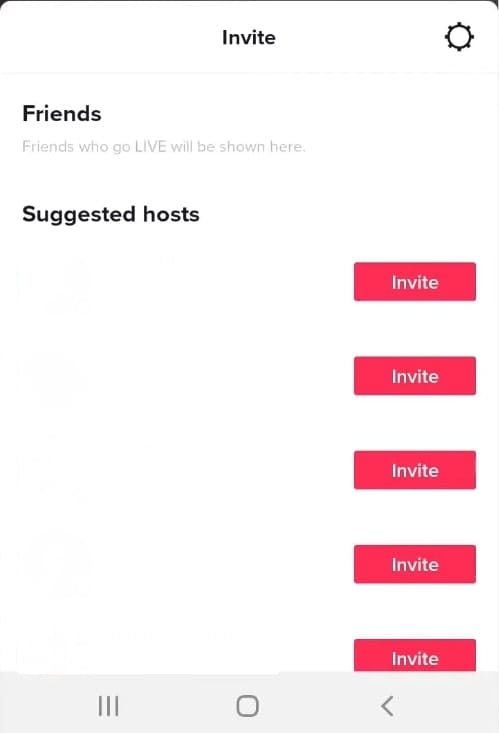
Step2 Invite your Desired User
After adding the title, tap on the “Go Live” button. Once the live streaming initiates, you have to press the “Pink Blue Circle” icon from the bottom left corner. It will open a list of the suggested users. Select the preferred user you want to invite and tap on the “Invite” button. Your selected user will have 20 seconds to accept or reject your request.
Bonus Tip: Easily Record and Edit Someone’s Stream with Filmora
Are you willing to record and edit a live stream on TikTok? If you want to efficiently screen record any live streaming session on TikTok, we highly recommend using Wondershare Filmora . This software provides a professional screen recorder that allows you to capture your desired window or screen. You can customize the settings to record a live stream in your preferred resolution. Thus, by using the screen recorder of Filmora, you can record any live streaming to access it anytime.
Free Download For Win 7 or later(64-bit)
Free Download For macOS 10.14 or later
Along with a screen recorder, Filmora also provides a video editor. If you find flaws in your recorded live stream, the editor of Filmora can help you. By using a video editor, you can enhance your recorded video by adding effects or modifying its speed. There are some advanced editing features that you can explore and use on Filmora. To learn about them, check the below points:
Key Editing Features of Wondershare Filmora
- Speech-to-Text : To increase your editing efficiency, Filmora offers a Speech-to-Text feature. This feature automatically converts your speech to subtitles. Through advanced speech recognition capabilities in this tool, you can generate subtitles in your video automatically and without any hassle. Also, this feature supports up to 16 different languages.
- Keyframing : Do you want to add a dynamic effect to your video? The keyframing feature allows you to add smooth and professional animated effects instantly. It provides 80 preset animation templates you can quickly apply to your video. Moreover, you can also modify the parameters by setting the transparency and view in every keyframe view.
- AI Portrait : Are you annoyed by the dull backgrounds in your video? Through the AI portrait feature, you can remove backgrounds from your video with great precision. This feature also offers more than 70 stickers and AI effects that you can apply. Furthermore, it also recognizes the faces in your video through AI technology. With face recognition, you can apply AI stickers easily.
Conclusion
TikTok has made a significant impact on the social media industry. Due to its high influencing power, many celebrities and famous personalities are now joining TikTok to increase their reach. If you want to invite someone to your TikTok live, this article will help you. We have also provided detailed instructions on how to join someone’s live on TikTok quickly. Also, in order to edit and screen record live streaming on TikTok, Wondershare Filmora is a highly compatible and functional tool.
Copying Safely on TikTok: A 2023 Guide to Rights Checks
So, you have successfully created an awesome TikTok video with the perfect dance moves and accurate lip-sync. But what’s this? Your video gets muted or taken down! What a bummer!
The reason?
Copyright infringement, or in simple words, using music without the permission of the singer!
This includes external sounds that are not a part of the TikTok library.
So, what should we do to avoid this, you ask?
To avoid this, you need to learn how to check TikTok video copyright before uploading.
And, in this article, we will tell you exactly why you need to follow TikTok copyright, and how to check it before posting a video.
Why Do You Need to Follow Tiktok Copyright?
To avoid getting banned!
You see, TikTok has a vast library of sounds with proper legal authorization that is available for the users to use in their videos. However, sometimes people use their own music in the videos.
The external sound may or may not be copyrighted.
If it does not have any copyrights on it, all is good. But in case you accidentally use a copyrighted video, TikTok automatically detects it, and either mutes your video or takes it down entirely. If the copyright is detected while posting, the platform will prevent you from uploading it in the first place.
To be on the safe side, we recommend using sounds already present in the TikTok library.
But, what if you want to use an external sound? Is there a way to check TikTok video copyright before uploading?
Yes, there is! And in the next section, we will tell you all about it.
Wondershare Filmora
Get started easily with Filmora’s powerful performance, intuitive interface, and countless effects!
Try It Free Try It Free Try It Free

Check Tiktok Video Copyright Before Uploading
Whenever you’re posting a video to TikTok, you get the option of running a copyright check on it. But this option is only available on desktop browsers.
Therefore, if you’re posting a sound other than one from TikTok’s library, you can check if it’s copyrighted or not from your PC.
Here’s how:
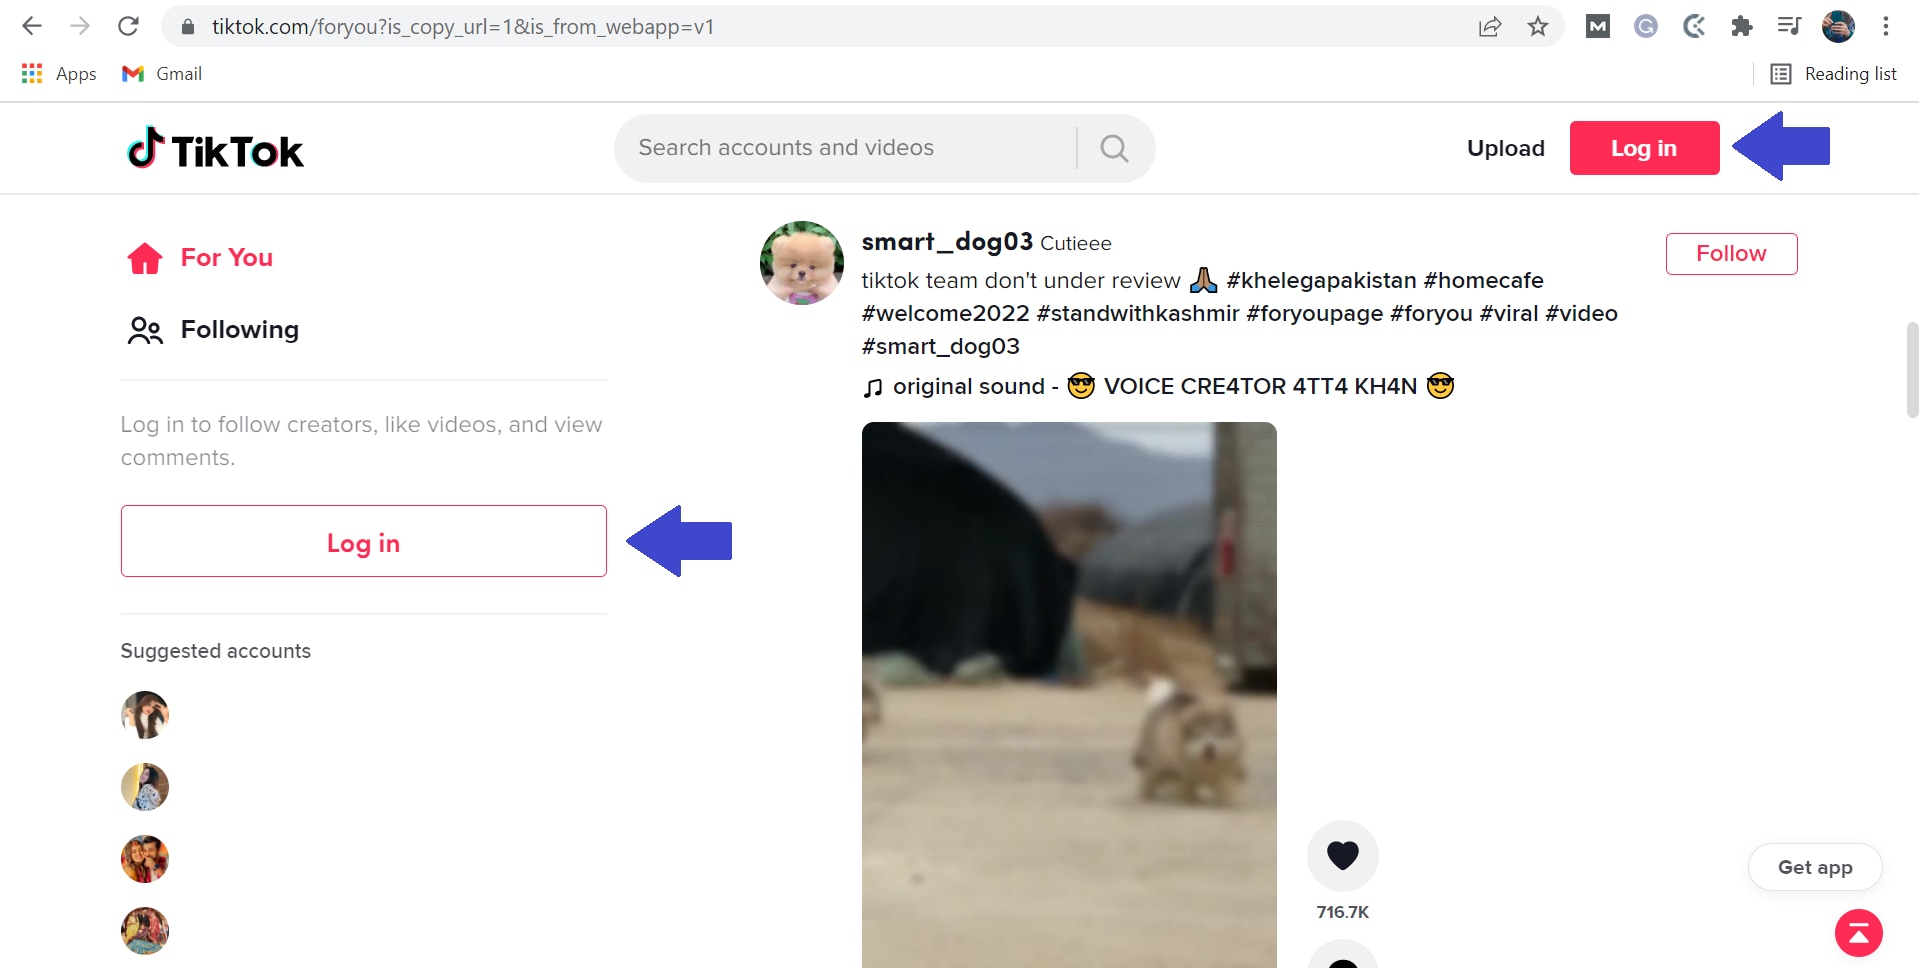
Step 1
Go to the website version of Tiktok from Chrome, and click on “Log In” at the top-right corner of the page. You can also click on “Log In” under the “Following” option on the left.
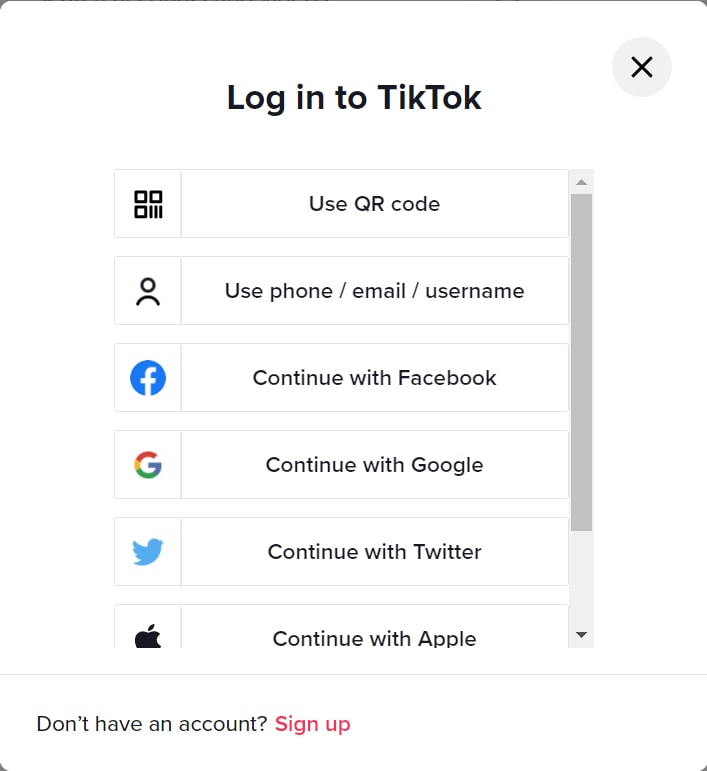
Step 2
You will get a popup asking you to either sign up to Tiktok or log in using your email, Facebook, Twitter, Google, Apple, or Instagram. You can choose whichever option you find convenient.
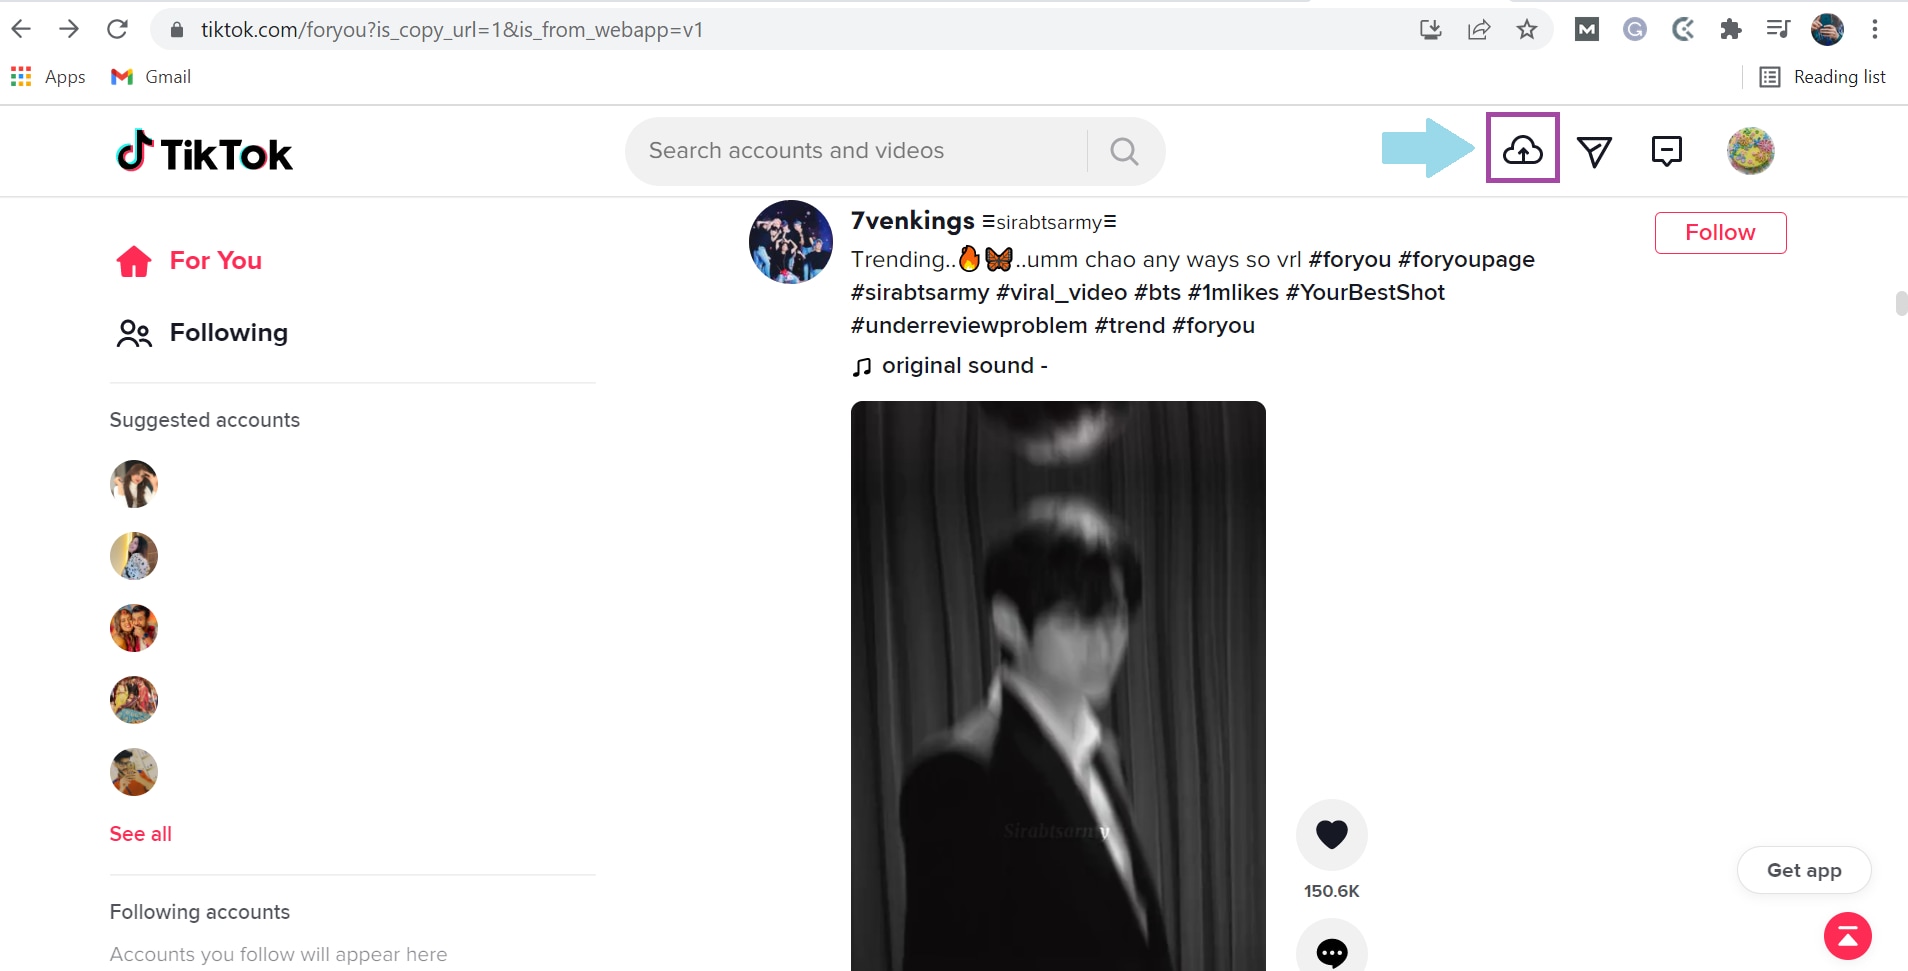
Step 3
Click on the “Upload” option indicated by a cloud with an arrow.
Step 4
Click on “Select Video to Upload” and choose a video from your PC’s storage.
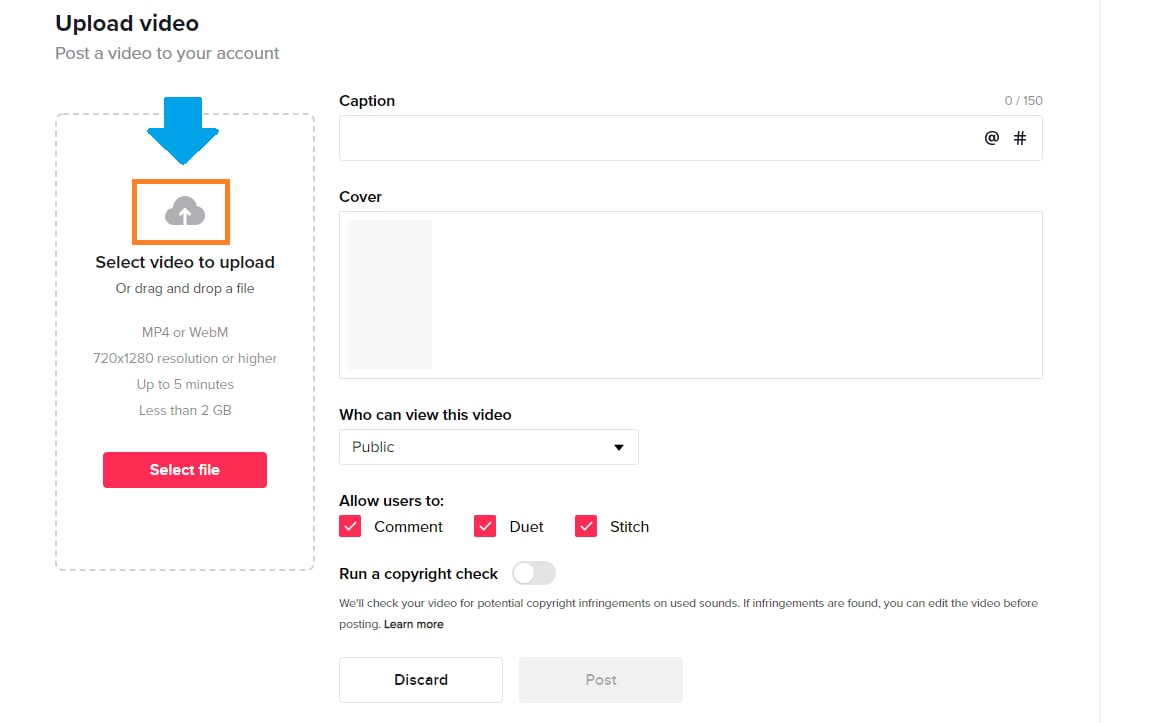
Step 5
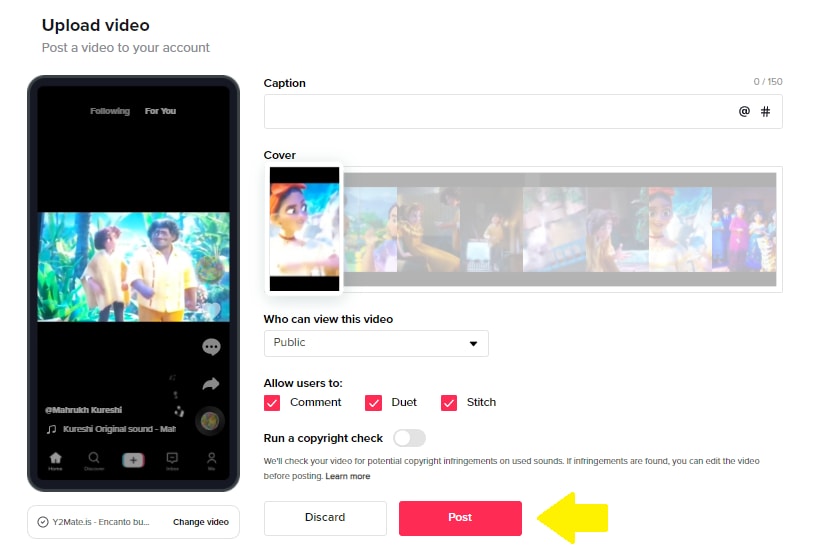
Once the video is uploaded, add a caption with hashtags and select the cover for your video.
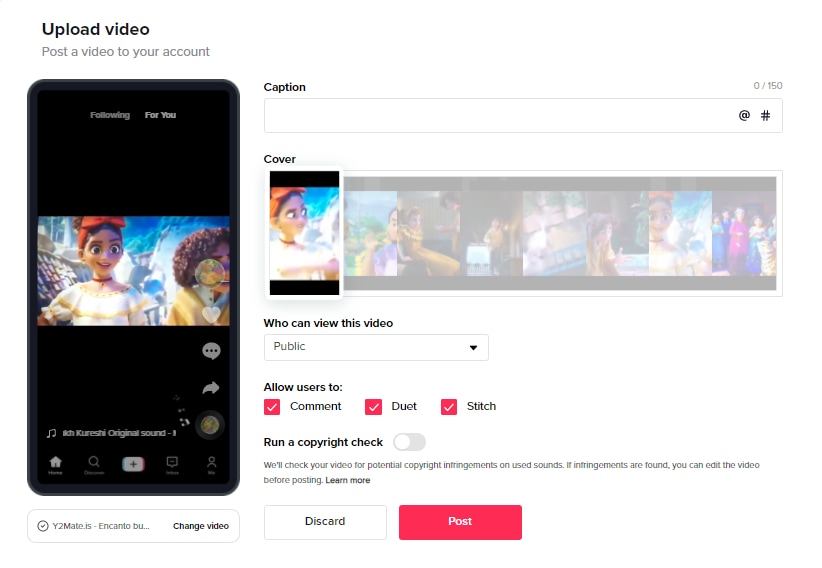
Step 6
The next step is to choose whether your video can be viewed by the public or your friends or whether you want to keep it private from everyone.
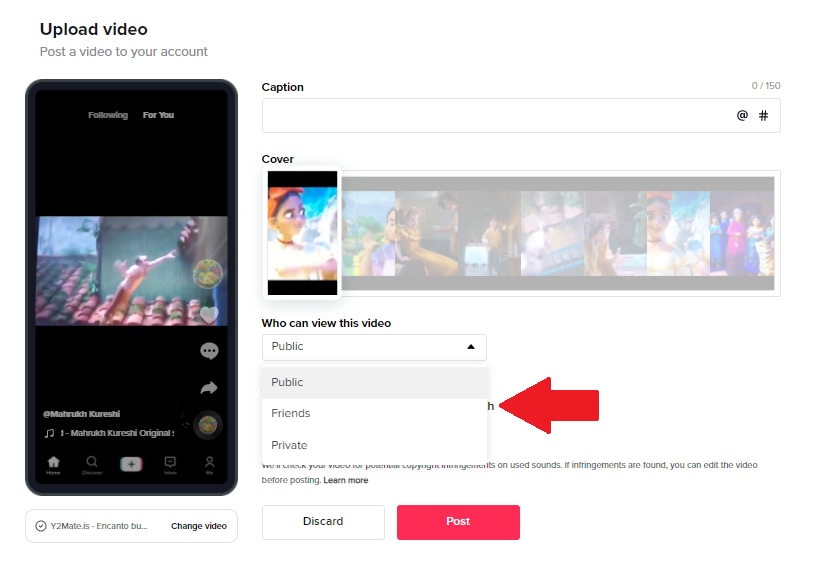
Step 7
You can also allow or restrict users to comment on your video, make duets, or stitch your video.
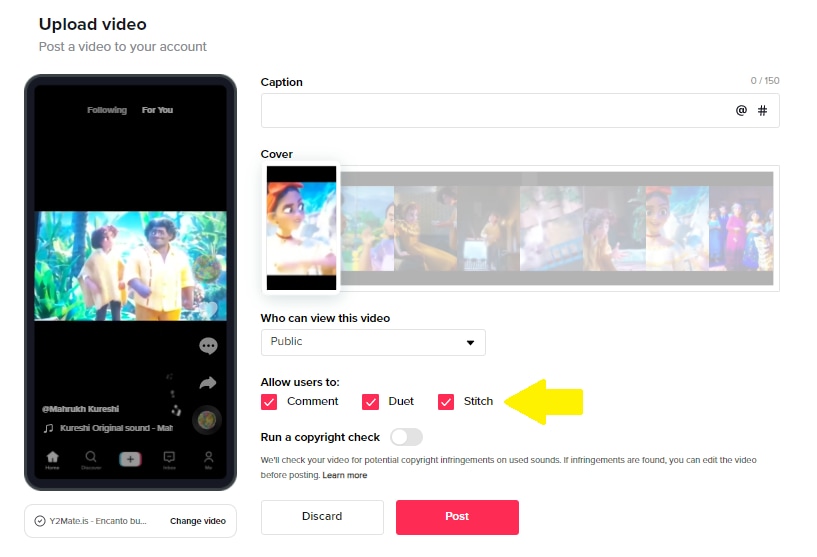
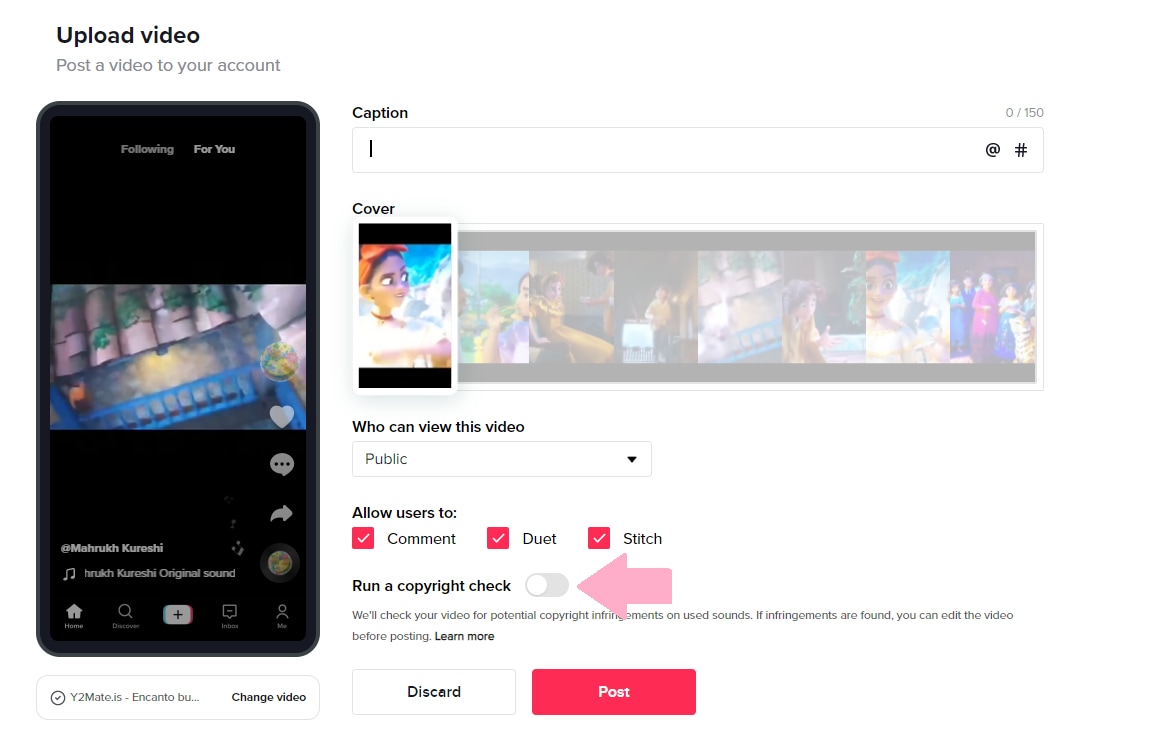
Step 8
Now comes the part where you run a copyright check on the video. Turn the toggle on for “Run a Copyright Check” and wait to see if any issues arise.
As you can see, this video does not have any copyright-related issues, so it is safe to post it.
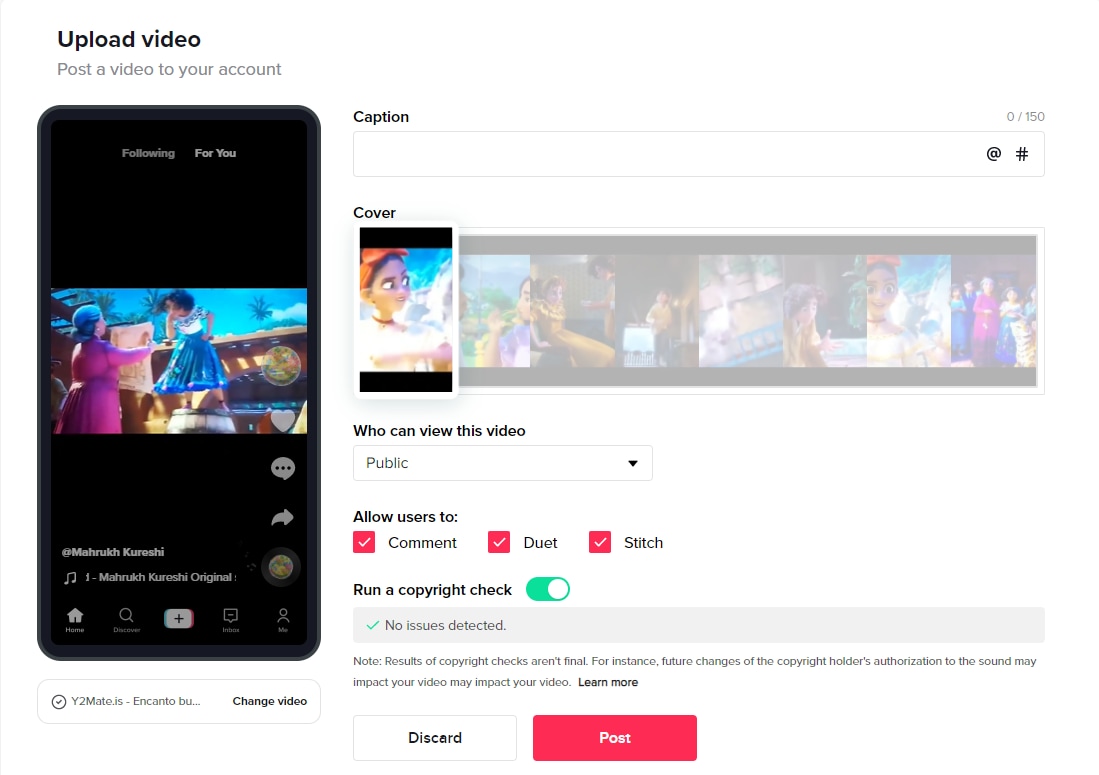
However, if your video comes up with an issue, you can try using a sound from TikTok’s built-in library and proceed to post your video without any fear.
Conclusion
While making TikTok videos is quite a fun activity, we have to follow the rules, especially those revolving around using copyrighted material. According to TikTok’s policies, if a video has copyrighted sound, it will be muted, and if the video itself is copyrighted, like a clip from a movie or song, it will be taken down.
However, if you continue posting copyrighted content even after receiving copyright infringement notices from TikTok, it can result in your getting shut down for good!
Therefore, it’s good to know how to check TikTok video copyright before uploading through the steps explained in the article.
So, run a copyright check, and play it safe!
Check Tiktok Video Copyright Before Uploading
Whenever you’re posting a video to TikTok, you get the option of running a copyright check on it. But this option is only available on desktop browsers.
Therefore, if you’re posting a sound other than one from TikTok’s library, you can check if it’s copyrighted or not from your PC.
Here’s how:
Step 1
Go to the website version of Tiktok from Chrome, and click on “Log In” at the top-right corner of the page. You can also click on “Log In” under the “Following” option on the left.
Step 2
You will get a popup asking you to either sign up to Tiktok or log in using your email, Facebook, Twitter, Google, Apple, or Instagram. You can choose whichever option you find convenient.
Step 3
Click on the “Upload” option indicated by a cloud with an arrow.
Step 4
Click on “Select Video to Upload” and choose a video from your PC’s storage.
Step 5
Once the video is uploaded, add a caption with hashtags and select the cover for your video.
Step 6
The next step is to choose whether your video can be viewed by the public or your friends or whether you want to keep it private from everyone.
Step 7
You can also allow or restrict users to comment on your video, make duets, or stitch your video.
Step 8
Now comes the part where you run a copyright check on the video. Turn the toggle on for “Run a Copyright Check” and wait to see if any issues arise.
As you can see, this video does not have any copyright-related issues, so it is safe to post it.
However, if your video comes up with an issue, you can try using a sound from TikTok’s built-in library and proceed to post your video without any fear.
Conclusion
While making TikTok videos is quite a fun activity, we have to follow the rules, especially those revolving around using copyrighted material. According to TikTok’s policies, if a video has copyrighted sound, it will be muted, and if the video itself is copyrighted, like a clip from a movie or song, it will be taken down.
However, if you continue posting copyrighted content even after receiving copyright infringement notices from TikTok, it can result in your getting shut down for good!
Therefore, it’s good to know how to check TikTok video copyright before uploading through the steps explained in the article.
So, run a copyright check, and play it safe!
Also read:
- [New] 2024 Approved Football Inscriptions Premier FIFA YouTube Insights
- [New] In 2024, Top 10 YouTube Makeup Gurus for Stunning Looks
- [New] Insider Take on TikTok’s 15 Hottest Tracks for 2024
- [New] Skyrocket to Success Mastering SEO for YouTubers and Beyond
- [New] The Essence of PFP in the World of TikTok
- [Updated] 2024 Approved Innovating with Ideas Constructing Your Unique TikTok Sequence
- [Updated] Capture the Rhythm Rapid Tap Into TikTok Videos
- [Updated] In 2024, Pioneering TikTok Creations with Foundational Tools
- 2024 Approved How to Add Instagram Filter to Existing Photos and Videos
- Affordable Free Options to Substitute SyncToy for Windows Users Across Various Versions
- ASUS Z370-E: Streamlined Driver Download and Easy Setup Process
- Crafting Perfect OOTD TikTok Videos on a Mac
- In 2024, Unlocking Top 6 Free Tools to Convert TikTok Videos Into MP3
- Resolving the Issue: MSI Afterburner Misses GPU Detection in Windows 10 and 11 Systems
- Troubleshooting and Repairing Problematic CD/DVD Drives: Expert Advice by YL Software
- Title: [New] Mastering Live-Stream Entry TikTok Edition
- Author: Stephen
- Created at : 2024-12-09 04:45:19
- Updated at : 2024-12-09 18:23:21
- Link: https://tiktok-video-recordings.techidaily.com/new-mastering-live-stream-entry-tiktok-edition/
- License: This work is licensed under CC BY-NC-SA 4.0.