
!["[New] Noise Reduction How to Remove Background Noise in Audacity?"](https://www.lifewire.com/thmb/s5h4EoJ_52pHEL0Rb3-J6tcXCEs=/400x300/filters:no_upscale():max_bytes(150000):strip_icc()/emoji-keyboard-57cc58a33df78c71b650ec86.jpg)
"[New] Noise Reduction How to Remove Background Noise in Audacity?"
Noise Reduction: How to Remove Background Noise in Audacity?
The most frequent request you’ll get from video makers is to eliminate irritating noises like rumbling or humming from an original clip. Almost all of the time, capturing high-quality audio during filming is challenging since the conversation is often hard to hear or is made unclear due to surrounding noises, such as the dreadful air conditioners or fans.
To get rid of all these awful noises, this Audacity Noise Reduction feature will serve you a significant purpose in removing unwanted background noise for your future videos. Without further ado, let’s get started!
In this article
01 Things You Need to Prepare for Background Noise Reduction
02 How to Remove Background Noise in Audacity?
03 Why is Audacity Noise Reduction Not Working?
04 How to Prevent Background Noise in Audio Recording?
05 How to Remove Background Noise in Filmora?
Part 1: Things You Need to Prepare for Background Noise Reduction
Here are few things that you need to consider before you apply the noise reduction to your clips:
1. Noise Sample
A decent sample of the noise you wish to eliminate is perhaps the most crucial aspect of the Audacity remove noise procedure.
This will be used by Audacity to understand the noise and build a noise profile. The noise recording should last for a fair amount of time and be devoid of any other noises.
2. Avoid Copy Pasting Tiny Noise Section in Your Spoken Phrases
When you have a tiny part of noise between your stated words on your audio, please don’t copy/paste it to make a more significant piece of sound for Audacity to examine.
You would not be supplying Audacity with any more information that will help it generate a decent noise profile. The noise profile is what enables Audacity to tell the difference between speech and noise.
3. Minimum 2048 Data Samples Required
To build a noise profile, the Noise Reduction function requires a minimum of 2048 sample data. An audio file with a sampling frequency of 44.1kHz is roughly five hundredths of a second.
Note that this is the minor sound level that Audacity needs to generate a noise profile; however, should you supply a larger sample of the noise, Audacity can typically perform a great job of producing a suitable noise profile. As a result, attempt to capture a few seconds of background noises wherever possible.
4. Establish Recording Level and Record “Silence”
Setting your audio volume and capturing some “quiet” prior to speaking is the best way to achieve this. Instead, when you’ve finished talking, keep your camera/recorder going for a few moments.
Don’t move or create any sounds while capturing the background noises, and keep an ear open for any other noises. You only need to capture the ambient noise for a few moments; two to five seconds will suffice.
Part 2: How to Remove Background Noise in Audacity on Windows and Mac?
Whether you are using Windows or macOS, we will show you a step-by-step process to achieve your results using both software in this part of Audacity remove background music guide.
Remove background noise in Audacity on Windows
Step 1: On your recording, select a few moments of sound. Any segment of noise that incorporates other noises should be avoided.

Step 2: From the Effect menu, select Noise Reduction.

Step 3: Select the Get Noise Profile option whenever the Noise Reduction effect screen appears.

Note: Choose whether to implement the noise removal to the entire waveforms or only a portion of it.
Step 4: To access the Noise Reduction effects window, go to Effects > Noise Reduction. Raise the level of noise reduction progressively while previewing the result.

Step 5: Head over to the File section to Export and Save the result. Audacity does not save sound clips when you select Save Project; instead, you must choose Export. Select the file type you want to store and the place wherever you can save it. Select Save after giving the File Name.

Remove background noise in Audacity on Mac
Step 1: Create a room tone-containing audio file. When you don’t have a separate track for room tone, use a recording with a few moments of quiet in it. Click-and-drag to select a segment with a few minutes of silence using the Selection Tool.

Step 2: Select Noise Reduction from the Effects tab. Select the Get Noise Profile tab in the new tab under Step 1. The screen will shut, and Audacity will take noise profile samples of the indicated area.

Step 3: Click-and-drag to select the whole file, which requires noise reduction with the Selection Tool. To re-open the function, go to the Effect tab and pick Noise Reduction. Make modifications to the following parameters under Step 2:
- Reduce and Residue
- Frequency Smoothing (bands)
- Sensitivity
- Noise Reduction

Step 4: To listen to how the chosen file will look with the selected parameters, select Preview. Re-adjust until you have a sound noise reduction with no interference. When you’re finished, select Reduce and click OK.
Part 3: Why is Audacity Noise Reduction Not Working?
It’s possible that the Noise Reduction function isn’t letting you mop up your recording since your audio isn’t appropriate for it. The disturbance must be continuous, not random or fluctuating, to work for Audacity’s Noise Reduction function.
For example, the Noise Reduction function will not assist if your audio was made in a busy environment with unique noises such as background chatter, random traffic noises, or in an exhibition space or museum. The Noise Reduction feature in Audacity isn’t meant to cope with that kind of distortion. You’ll need to alter your recording approach if you’re capturing voice in either of those situations.
Under the following situations, the Audacity Noise Reduction function might underperform.
- Particular noise in the background, including traffic or people.
- When the harmonics of the sound and voice are comparable.
- There is sound variance where there is fluctuation in the noise.
- The volume of the voice is comparable to or lower than that of the background noise.
- When the noise is irregular or changeable rather than continuous.
- The loudness is deafening.
- The sound is a single click or pop.
Part 4: How to Prevent Background Noise in Audio Recording?
Although Audacity allows eliminating noise very simply, it is still an additional level that takes time to refine your podcast production. These pointers can help you avoid the necessity for noise reduction and cut down on the amount of time you spend processing.
1. Reduce the Computer Fan Noise
Whenever computers become too heated, they can produce a lot of noise. You may limit the amount of software that runs and position your mic away from the keyboard to help lessen this impact and avoid the fan from coming on.
However, even if you observe all of these guidelines, undesired recording sounds may still appear in your program. Fortunately, contemporary software makes this problem quite simple to resolve.
2. Reduce the Gain and Get Close to the Mic
Reduce the gain (sensitivity of the microphone) and go nearer to it. Talking straight into the microphone won’t distort your audio if you reduce the gain, and that would assist your microphone in concentrating on scooping up your voice’s tone.
Bonus Tip: Set your recorder’s (or DAW’s) sensitivity such that your speech peaks between -12 and -10db.
3. Utilize a Versatile Microphone
Condenser and dynamic microphones are the two most common types of podcast microphones. Condenser microphones are significantly more sensitive instruments meant to take up average atmospheric noise, whereas dynamic microphones have a narrower frequency range, picking up fewer ambient noises.
4. Optimize Your Recording Environment
The most significant and most crucial aspect of your podcasts’ sound quality is where you capture it. To optimize your personal podcasting space, we recommend choosing a peaceful, compact area away from HVAC systems, vehicles, external hard drives, background sound, motors, and other distractions. You may also increase the tone of your room by using natural sound absorbents such as curtains, rugs, carpets, and sofas.
Part 5: How to Remove Background Noise in Filmora?
Although there is a lot of software available to eliminate ambient noise, we highly suggest Wondershare Filmora Video Editor to edit audio and video in one place.
In addition to the standard audio editing capabilities, the recently redesigned Filmora currently includes enhanced waveforms, volume Keyframing , peak metering, and audio transitions, giving you a better audio editing interface.
For Win 7 or later (64-bit)
For macOS 10.12 or later
Filmora Video Editor will quickly remove ambient sound from both sound/video. You may also remove the sound from the video with this simple video editor, use the Audio Equalizer or Audio Mixer functions to modify the audio further, and then Export and save the audio in an Mp3 file. Here are the detailed steps:
Step 1: In the Wondershare Filmora Timeline menu, Import your footage. Trim the footage after previewing it and deleting the sections you don’t want to retain.

Step 2: To eliminate the ambient noise immediately, double-click on the video file, and go to the Audio panel to select the Remove Background Noise option. You will find that the background noise is removed automatically.

Step 3: After checking the results, select Export to download the noise-reduced clip to your desktop or upload it immediately to YouTube or Vimeo.

Conclusion
Well, there you have it. In this Audacity Remove Background Noise guide, we have reviewed every possible method you can adopt to get rid of the unnecessary background noise in the Audacity. And if the desired results are still not achieved, we highly recommend using the Wondershare Filmora editing software. Not only will it help you remove the unwanted ambient noise, but it will also allow you to customize your audio or video file further.
02 How to Remove Background Noise in Audacity?
03 Why is Audacity Noise Reduction Not Working?
04 How to Prevent Background Noise in Audio Recording?
05 How to Remove Background Noise in Filmora?
Part 1: Things You Need to Prepare for Background Noise Reduction
Here are few things that you need to consider before you apply the noise reduction to your clips:
1. Noise Sample
A decent sample of the noise you wish to eliminate is perhaps the most crucial aspect of the Audacity remove noise procedure.
This will be used by Audacity to understand the noise and build a noise profile. The noise recording should last for a fair amount of time and be devoid of any other noises.
2. Avoid Copy Pasting Tiny Noise Section in Your Spoken Phrases
When you have a tiny part of noise between your stated words on your audio, please don’t copy/paste it to make a more significant piece of sound for Audacity to examine.
You would not be supplying Audacity with any more information that will help it generate a decent noise profile. The noise profile is what enables Audacity to tell the difference between speech and noise.
3. Minimum 2048 Data Samples Required
To build a noise profile, the Noise Reduction function requires a minimum of 2048 sample data. An audio file with a sampling frequency of 44.1kHz is roughly five hundredths of a second.
Note that this is the minor sound level that Audacity needs to generate a noise profile; however, should you supply a larger sample of the noise, Audacity can typically perform a great job of producing a suitable noise profile. As a result, attempt to capture a few seconds of background noises wherever possible.
4. Establish Recording Level and Record “Silence”
Setting your audio volume and capturing some “quiet” prior to speaking is the best way to achieve this. Instead, when you’ve finished talking, keep your camera/recorder going for a few moments.
Don’t move or create any sounds while capturing the background noises, and keep an ear open for any other noises. You only need to capture the ambient noise for a few moments; two to five seconds will suffice.
Part 2: How to Remove Background Noise in Audacity on Windows and Mac?
Whether you are using Windows or macOS, we will show you a step-by-step process to achieve your results using both software in this part of Audacity remove background music guide.
Remove background noise in Audacity on Windows
Step 1: On your recording, select a few moments of sound. Any segment of noise that incorporates other noises should be avoided.
Step 2: From the Effect menu, select Noise Reduction.
Step 3: Select the Get Noise Profile option whenever the Noise Reduction effect screen appears.
Note: Choose whether to implement the noise removal to the entire waveforms or only a portion of it.
Step 4: To access the Noise Reduction effects window, go to Effects > Noise Reduction. Raise the level of noise reduction progressively while previewing the result.
Step 5: Head over to the File section to Export and Save the result. Audacity does not save sound clips when you select Save Project; instead, you must choose Export. Select the file type you want to store and the place wherever you can save it. Select Save after giving the File Name.
Remove background noise in Audacity on Mac
Step 1: Create a room tone-containing audio file. When you don’t have a separate track for room tone, use a recording with a few moments of quiet in it. Click-and-drag to select a segment with a few minutes of silence using the Selection Tool.
Step 2: Select Noise Reduction from the Effects tab. Select the Get Noise Profile tab in the new tab under Step 1. The screen will shut, and Audacity will take noise profile samples of the indicated area.
Step 3: Click-and-drag to select the whole file, which requires noise reduction with the Selection Tool. To re-open the function, go to the Effect tab and pick Noise Reduction. Make modifications to the following parameters under Step 2:
- Reduce and Residue
- Frequency Smoothing (bands)
- Sensitivity
- Noise Reduction
Step 4: To listen to how the chosen file will look with the selected parameters, select Preview. Re-adjust until you have a sound noise reduction with no interference. When you’re finished, select Reduce and click OK.
Part 3: Why is Audacity Noise Reduction Not Working?
It’s possible that the Noise Reduction function isn’t letting you mop up your recording since your audio isn’t appropriate for it. The disturbance must be continuous, not random or fluctuating, to work for Audacity’s Noise Reduction function.
For example, the Noise Reduction function will not assist if your audio was made in a busy environment with unique noises such as background chatter, random traffic noises, or in an exhibition space or museum. The Noise Reduction feature in Audacity isn’t meant to cope with that kind of distortion. You’ll need to alter your recording approach if you’re capturing voice in either of those situations.
Under the following situations, the Audacity Noise Reduction function might underperform.
- Particular noise in the background, including traffic or people.
- When the harmonics of the sound and voice are comparable.
- There is sound variance where there is fluctuation in the noise.
- The volume of the voice is comparable to or lower than that of the background noise.
- When the noise is irregular or changeable rather than continuous.
- The loudness is deafening.
- The sound is a single click or pop.
Part 4: How to Prevent Background Noise in Audio Recording?
Although Audacity allows eliminating noise very simply, it is still an additional level that takes time to refine your podcast production. These pointers can help you avoid the necessity for noise reduction and cut down on the amount of time you spend processing.
1. Reduce the Computer Fan Noise
Whenever computers become too heated, they can produce a lot of noise. You may limit the amount of software that runs and position your mic away from the keyboard to help lessen this impact and avoid the fan from coming on.
However, even if you observe all of these guidelines, undesired recording sounds may still appear in your program. Fortunately, contemporary software makes this problem quite simple to resolve.
2. Reduce the Gain and Get Close to the Mic
Reduce the gain (sensitivity of the microphone) and go nearer to it. Talking straight into the microphone won’t distort your audio if you reduce the gain, and that would assist your microphone in concentrating on scooping up your voice’s tone.
Bonus Tip: Set your recorder’s (or DAW’s) sensitivity such that your speech peaks between -12 and -10db.
3. Utilize a Versatile Microphone
Condenser and dynamic microphones are the two most common types of podcast microphones. Condenser microphones are significantly more sensitive instruments meant to take up average atmospheric noise, whereas dynamic microphones have a narrower frequency range, picking up fewer ambient noises.
4. Optimize Your Recording Environment
The most significant and most crucial aspect of your podcasts’ sound quality is where you capture it. To optimize your personal podcasting space, we recommend choosing a peaceful, compact area away from HVAC systems, vehicles, external hard drives, background sound, motors, and other distractions. You may also increase the tone of your room by using natural sound absorbents such as curtains, rugs, carpets, and sofas.
Part 5: How to Remove Background Noise in Filmora?
Although there is a lot of software available to eliminate ambient noise, we highly suggest Wondershare Filmora Video Editor to edit audio and video in one place.
In addition to the standard audio editing capabilities, the recently redesigned Filmora currently includes enhanced waveforms, volume Keyframing , peak metering, and audio transitions, giving you a better audio editing interface.
For Win 7 or later (64-bit)
For macOS 10.12 or later
Filmora Video Editor will quickly remove ambient sound from both sound/video. You may also remove the sound from the video with this simple video editor, use the Audio Equalizer or Audio Mixer functions to modify the audio further, and then Export and save the audio in an Mp3 file. Here are the detailed steps:
Step 1: In the Wondershare Filmora Timeline menu, Import your footage. Trim the footage after previewing it and deleting the sections you don’t want to retain.
Step 2: To eliminate the ambient noise immediately, double-click on the video file, and go to the Audio panel to select the Remove Background Noise option. You will find that the background noise is removed automatically.
Step 3: After checking the results, select Export to download the noise-reduced clip to your desktop or upload it immediately to YouTube or Vimeo.
Conclusion
Well, there you have it. In this Audacity Remove Background Noise guide, we have reviewed every possible method you can adopt to get rid of the unnecessary background noise in the Audacity. And if the desired results are still not achieved, we highly recommend using the Wondershare Filmora editing software. Not only will it help you remove the unwanted ambient noise, but it will also allow you to customize your audio or video file further.
Culinary Challenges & Cheerful Plates: #Tiktok Feast Trends
Who doesn’t love finding a delicious-looking food recipe? Well, we have just the thing for you! Tiktok is a fantastic platform for people with similar interests to come together. Among other things, Tiktok has many food videos that have gone viral over the years.
During the pandemic, many people found comfort in food, baking, and cooking. This resulted in people experimenting with different recipes, which they then shared with the world.
Luckily for us, many users have shared their secrets with us on Tiktok. So, let’s take a look at the 10 most popular Tiktok food trends.
Top 10 Most Popular Tiktok Food Trends
Tiktok food trends are not only yummy looking but also tasty to eat, so do try them out!
1. Cloud Bread
Cloud bread is a high protein alternative for bread. It became a trend in the world of Tiktok when a user shared an extremely easy recipe for making it.
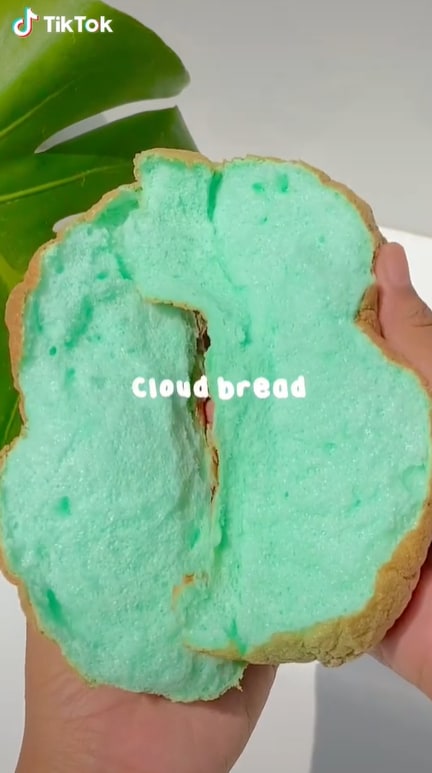
All you need is 4 ingredients and 25 minutes in the oven, and you will get the softest, fluffiest cloud bread. It literally looks like a cloud from the sky! It quickly became a trend for people to make cloud breads by using different colors. The hashtag #cloudbread has 3.3 billion views.
2. Beef Wellington
You’re talking about food, and Gordon Ramsey doesn’t come up? How is that even possible? Well, it’s not! Beef Wellington, Ramsey’s signature dish, also became a trend at one point.
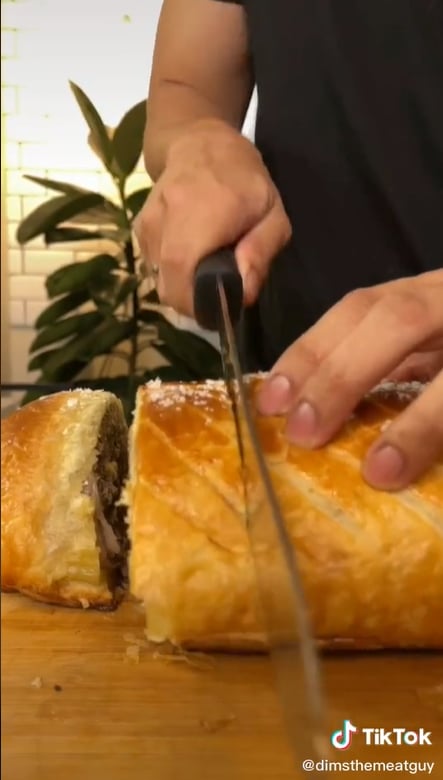
Figure 2: Beef Willington “Will Gordon Ramsey React to this?”
People from all around the world shared their versions of the dish, some of which Ramsey then duetted and reviewed. The hashtag #beefwellington has 332.8 million views.
3. Gigi Hadid’s Pasta
Well, Gigi Hadid might not have created the Spicy Vodka Pasta. Still, she surely made it into a trend after she posted a video on Instagram.

As soon as people saw how easy the recipe was, everyone started cooking it for themselves. And well, obviously, who wouldn’t want to eat what Gigi Hadid was eating?
4. Pasta Chips
Do you love pasta? Do you love chips? Well, how about you make your pasta into chips? As weird as it may sound, it is extremely delicious!
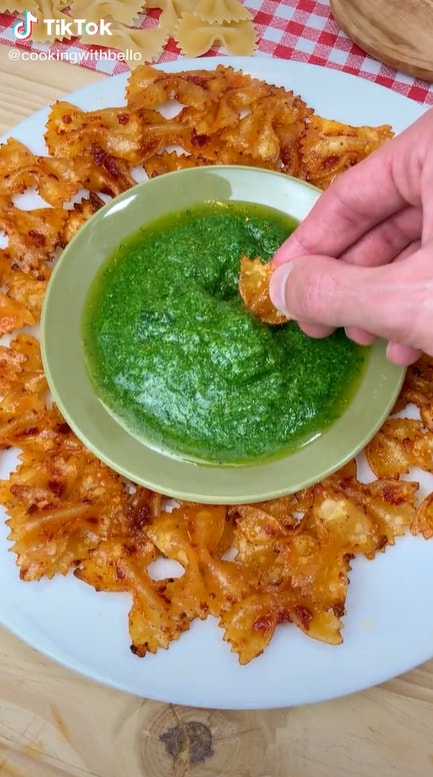
Tiktok discovered this hack where you spread your pasta noodles onto a baking sheet with olive oil and seasoning and bake it in the oven. Meanwhile, prepare a creamy sauce to go with the chips, and you’re all set to go!
5. Bell Pepper Sandwich
Another trend of Tiktok that gained about 160 million views is the Bell Pepper Sandwich trend. It is a snack recipe that is equally easy to make and enjoyable.

Figure 5: Bell Pepper Sandwich
All you have to do is take a bell pepper, cut it open, add some cream cheese and seasoning, and ta daaa! The easiness and unique combination of things made people try it out, and soon it was trending on Tiktok.
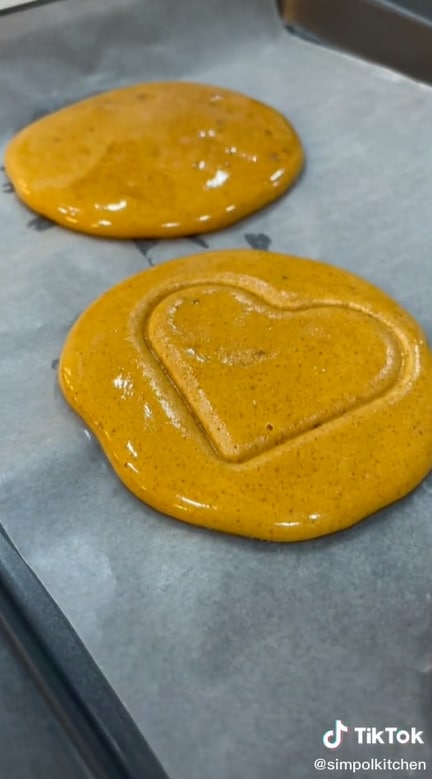
6. Pancake Cereal
Don’t we all love having pancakes for breakfast? Well, Tiktok introduced us to the next best thing, Pancake Cereals. These are made by piping small drops of batter onto a hot frying pan and making the smallest pancakes possible.
Then add all of these small pancakes into a bowl and add milk, and you have the most delicious breakfast meal.

Once a user posted this recipe, it immediately went viral, and people started making their own Tiktoks with the hashtag #pancakecereal leading to a total of 1.7 billion views of this hashtag.
7. Dalgona Candy
Dalgona Candy is a Korean street snack with a symbol carved into it. This became famous when Squid Games came out.
Everyone wanted to make their own Dalgona Candy and carve it out in a set time. The thrill of the game, as well as the delicious candy, double treat!
This trend had a total of 1.6 billion views.
8. Dalgona Coffee
Coffee is a great energizer and a must-have drink for most people. The Dalgona Coffee or, in other words, Whipped Coffee went viral on Tiktok.
This trend gained about 621.9 million views as everyone wanted to hop on the bandwagon and taste the deliciousness.

To make this heavenly drink, get some coffee powder, sugar, and hot water and whip it together. Then add it to hot or cold water, depending upon your preference.
9. Feta Pasta
Once you try the Tiktok’s viral Feta Pasta, you will surely add it to your dinner menu. This trend gained about 1.1 billion views.

To make this dish, take some cherry tomatoes in a baking dish. Then add a block of feta cheese to it. Bake it in the oven, then season it and give it a good mix. After that, add in the cooked pasta, and you are good to go.
10. Corn Ribs
17.2 billion views.
Last but not least, another popular Tiktok food trend was the corn ribs. Officially, it is a Mexican dish known as Elotes.

The recipe starts off by cutting an ear of corn into multiple pieces, then adding it to a mix of spices, frying it. Meanwhile, the video also gives a recipe for a creamy sauce that you can dip the corn ribs in. This recipe gained 17.2 billion views!
Conclusion
The food trends on Tiktok are useful as well as mouthwatering. You can learn so many hacks for cooking delicious meals for yourself and your family. It also makes bland food more interesting and enjoyable.
Furthermore, most of the recipes for snacks are extremely easy to make and take no time to cook. So, let’s get cooking and fill our homes with the aroma of good food!
All you need is 4 ingredients and 25 minutes in the oven, and you will get the softest, fluffiest cloud bread. It literally looks like a cloud from the sky! It quickly became a trend for people to make cloud breads by using different colors. The hashtag #cloudbread has 3.3 billion views.
2. Beef Wellington
You’re talking about food, and Gordon Ramsey doesn’t come up? How is that even possible? Well, it’s not! Beef Wellington, Ramsey’s signature dish, also became a trend at one point.
Figure 2: Beef Willington “Will Gordon Ramsey React to this?”
People from all around the world shared their versions of the dish, some of which Ramsey then duetted and reviewed. The hashtag #beefwellington has 332.8 million views.
3. Gigi Hadid’s Pasta
Well, Gigi Hadid might not have created the Spicy Vodka Pasta. Still, she surely made it into a trend after she posted a video on Instagram.
As soon as people saw how easy the recipe was, everyone started cooking it for themselves. And well, obviously, who wouldn’t want to eat what Gigi Hadid was eating?
4. Pasta Chips
Do you love pasta? Do you love chips? Well, how about you make your pasta into chips? As weird as it may sound, it is extremely delicious!
Tiktok discovered this hack where you spread your pasta noodles onto a baking sheet with olive oil and seasoning and bake it in the oven. Meanwhile, prepare a creamy sauce to go with the chips, and you’re all set to go!
5. Bell Pepper Sandwich
Another trend of Tiktok that gained about 160 million views is the Bell Pepper Sandwich trend. It is a snack recipe that is equally easy to make and enjoyable.
Figure 5: Bell Pepper Sandwich
All you have to do is take a bell pepper, cut it open, add some cream cheese and seasoning, and ta daaa! The easiness and unique combination of things made people try it out, and soon it was trending on Tiktok.
6. Pancake Cereal
Don’t we all love having pancakes for breakfast? Well, Tiktok introduced us to the next best thing, Pancake Cereals. These are made by piping small drops of batter onto a hot frying pan and making the smallest pancakes possible.
Then add all of these small pancakes into a bowl and add milk, and you have the most delicious breakfast meal.
Once a user posted this recipe, it immediately went viral, and people started making their own Tiktoks with the hashtag #pancakecereal leading to a total of 1.7 billion views of this hashtag.
7. Dalgona Candy
Dalgona Candy is a Korean street snack with a symbol carved into it. This became famous when Squid Games came out.
Everyone wanted to make their own Dalgona Candy and carve it out in a set time. The thrill of the game, as well as the delicious candy, double treat!
This trend had a total of 1.6 billion views.
8. Dalgona Coffee
Coffee is a great energizer and a must-have drink for most people. The Dalgona Coffee or, in other words, Whipped Coffee went viral on Tiktok.
This trend gained about 621.9 million views as everyone wanted to hop on the bandwagon and taste the deliciousness.
To make this heavenly drink, get some coffee powder, sugar, and hot water and whip it together. Then add it to hot or cold water, depending upon your preference.
9. Feta Pasta
Once you try the Tiktok’s viral Feta Pasta, you will surely add it to your dinner menu. This trend gained about 1.1 billion views.
To make this dish, take some cherry tomatoes in a baking dish. Then add a block of feta cheese to it. Bake it in the oven, then season it and give it a good mix. After that, add in the cooked pasta, and you are good to go.
10. Corn Ribs
17.2 billion views.
Last but not least, another popular Tiktok food trend was the corn ribs. Officially, it is a Mexican dish known as Elotes.
The recipe starts off by cutting an ear of corn into multiple pieces, then adding it to a mix of spices, frying it. Meanwhile, the video also gives a recipe for a creamy sauce that you can dip the corn ribs in. This recipe gained 17.2 billion views!
Conclusion
The food trends on Tiktok are useful as well as mouthwatering. You can learn so many hacks for cooking delicious meals for yourself and your family. It also makes bland food more interesting and enjoyable.
Furthermore, most of the recipes for snacks are extremely easy to make and take no time to cook. So, let’s get cooking and fill our homes with the aroma of good food!
Also read:
- [New] 2024 Approved Enhancing Post Discoverability via TikTok Hashtags
- [New] In 2024, Elevate Your Edits – The 2-Way Filmora Method to Top TikTok Reactions
- The Ultimate Guide to Creating Slow-Motion Content in TikTok for 2024
- The Exciting Spectrum of TikTok Music, Dance and Humor for 2024
- Planetary Palate Pleasures Iconic Dishes From Around the Globe for 2024
- In 2024, Streamline Your TikTok Experience 4 Desktop Broadcast Strategies
- [New] In 2024, TikTok Secrets Revealed – Unravel Top 7 Charms + Their Covert Counterparts
- [Updated] Navigating the World of TikTok Video Mastery with Mac Tools
- [Updated] 2024 Approved Seamlessly Integrate Text in Your TikTok Videos
- [Updated] 2024 Approved Maximizing Your TikTok Content with Advanced Voice Controls via Siri
- [New] Navigating the Hidden Paths of TikTok Unshrouding Techniques
- In 2024, Serene Strums and Steps TikTok's Best Country Melodies
- [New] Needlework Networking Sewing Skills in Social Spaces (TikTok)
- [New] Exploring the Significance of PFP on TikTok Platform for 2024
- Mastering Viral Content Top 50+ Creative Quotes for TikTok for 2024
- [Updated] In 2024, Quick and Reliable TikTok to MP4 File Transfer Software
- [Updated] Tips for Speeding Up Your TikTok Videos for 2024
- In 2024, Advanced TikTok Video to MP4 Maker
- [Updated] 2024 Approved Harmonizing in TikTok's Duo Videos
- 2024 Approved Mastering iPhone's Voice Control on TikTok An Intuitive Step-By-Step Process
- [New] In 2024, Perfecting the Aesthetic OOTD TikTok on a Mac
- [New] In 2024, Stitches & Scrolls A Guide to Textile Talent on the App
- Discover the Hottest TikTok Products at Amazon for 2024
- Unlocking the Secrets of TikTok Video Recording
- 2024 Approved Mastering TikTok's Best & Secret Emojis Guide
- [New] In 2024, The Key to Mastering TikTok A User-Friendly Manual for Apple/Windows Computers
- Stealthy iPhone Unwatermarked TikTok Video Downloads
- [Updated] In 2024, A Guide to Today's Most Popular TikTok Acts
- [Updated] Keep Your Content Safe Guidelines for Clearance of TikTok Videos
- [Updated] 2024 Approved Unlocking Viral Videos 2 Powerful Ways to Master TikTok React Creation in Filmora
- 2024 Approved Vivid PFP Designs, Unleash the Potential of Your TikTok Profile
- [Updated] 2024 Approved The Ease of Skipping Through TikTok Media
- [Updated] 2024 Approved Top 10 Trending TikTok Battles You Should Join In
- In 2024, Incorporating Textual Elements Into TikTok Media
- In 2024, Customize TikTok Vids A Step-by-Step Guide to BG Swap
- Unmask TikTok on Devices Best Watermark Apps for iPhone & Android for 2024
- [Updated] 2024 Approved The Art of Text Overlay in Short Form Video Content
- Read This Guide to Find a Reliable Alternative to Fake GPS On Oppo Reno 8T 5G | Dr.fone
- [Updated] Crafting an Uninterrupted Viewing Experience Set Up Youtube Autoplay on FB for 2024
- Updated Methods to Make Photo Motion Effect Online, In 2024
- How To Deal With the Poco X5 Pro Screen Black But Still Works? | Dr.fone
- [Updated] In 2024, How to Choose Between Filmora and Democreator?
- [Updated] In 2024, Mastering the Art of Backwards Videos on Instagram
- [New] In 2024, 10 TikTok Sensations Dominating Twitter
- In 2024, The Complete Guide to Xiaomi Redmi A2 FRP Bypass Everything You Need to Know
- New Compilation of Websites Offering Feline-Inspired MP3 Sounds for 2024
- [New] Expert Insight Screening Sweet Indulgences
- Title: "[New] Noise Reduction How to Remove Background Noise in Audacity?"
- Author: Stephen
- Created at : 2024-05-23 02:36:48
- Updated at : 2024-05-24 02:36:48
- Link: https://tiktok-video-recordings.techidaily.com/new-noise-reduction-how-to-remove-background-noise-in-audacity/
- License: This work is licensed under CC BY-NC-SA 4.0.
