
!["[New] Revolutionize Your TikTok Videos The Ultimate Filter List for 2024"](https://www.lifewire.com/thmb/NmUr_CUQe4MhD1o3QpyXYVxA7CE=/300x200/filters:no_upscale():max_bytes(150000):strip_icc()/LIFEWIRE-9-best-uninterrupted-power-supplies-4142625-dbe357e3a4f3419d89c9b0513dd466d1.jpg)
"[New] Revolutionize Your TikTok Videos The Ultimate Filter List for 2024"
Revolutionize Your TikTok Videos: The Ultimate Filter List
Versatile Video Editor - Wondershare Filmora
An easy yet powerful editor
Numerous effects to choose from
Detailed tutorials provided by official channel


TikTok is also known for its creative filters and effects. In fact, unlike Instagram, which offers a limited selection of filters and effects to test, TikTok has an extensive library of filters and effects to attempt.
TikTok filters alter the look and feel of your videos. You may, however, add stuff to your films using effects. You may entirely transform the look of your videos by applying TikTok filters. A green screen can transfer you to any location, change your hair color, transform yourself into an extraterrestrial, and much more.
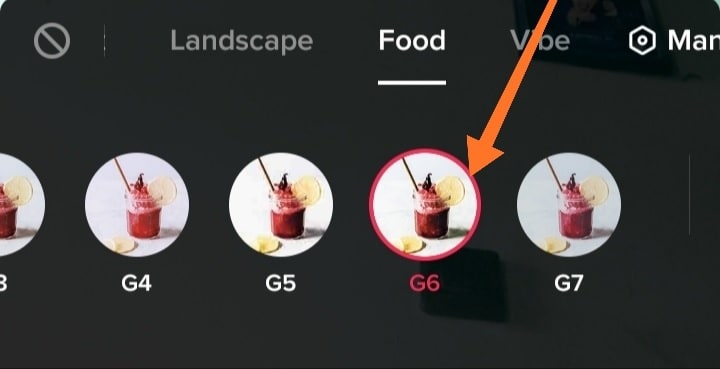
Trending, New, Interactive, Editing, Beauty, Funny, and World are the best TikTok filter categories. Before you begin recording, you must first decide the effects you wish to utilize. So, this is the time if you haven’t tried either the G6 filter or the Dog Face effect yet. Continue reading to know more about the TikTok filter trend.
In this article
01 10 Best TikTok Filters You’d Love to Use
02 How to Make Use of Filters for TikTok by Filmora?
Part 1: 10 Best TikTok Filters You’d Love to Use
We will look at some of the top TikTok filters that make your video stand out from the crowd.
1.TikTok’s G6 filter
On TikTok, filters are identified by a single maker and number. While G6 is labeled a food-related filter, it’s become increasingly popular due to its bright, colorful, and slightly retro feel.
2.TikTok’s Anime Filter
When individuals uploaded their Snapchat videos to TikTok, the anime filter became quite popular. This filter transforms you into an animated character, but you’ll need to download Snapchat first and get an account if you don’t already have one.

3.TikTok’s Invisible filter
Another outcome of viral videos is TikTok’s Invisible filter. This one gives you the ability to become invisible, which is fantastic if you’ve ever wanted to try out that superpower.

4.TikTok’s Bling Effect
The Bling effect is another effect that is likely to appear on your For You page. This effect imitates the flash of a diamond being struck by the sun in different locations across the film.

5.TikTok’s Disney Effect
The Disney TikTok filter gives you a chance to experience what it’s like to be a Disney princess or prince. This effect transforms your face into a Disney-inspired cartoon character.
This filter, like the anime filter, is available on Snapchat. So make sure you’ve downloaded that app first.

6.TikTok Dog Face
The Dog Face filter is another amusing face to experiment on. You get dog ears, a nose, and even a tongue with this one. However, you must record another filter in Snapchat before publishing it to TikTok.

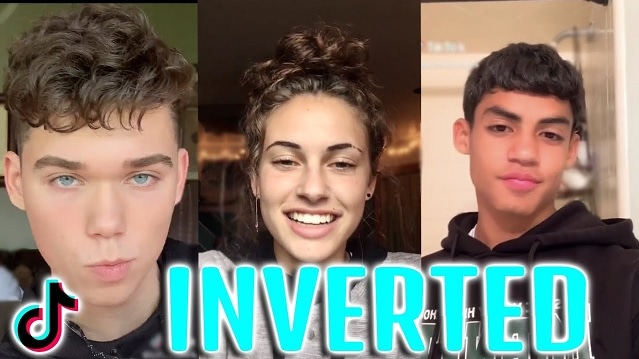
7.TikTok’s Inverted Filter
The Inverted filter is a little more divisive than the others. This filter flips any video you capture, and it’s famous for using the front-facing camera because it’s said to mimic how other people perceive you. So, what’s the big deal about it? On the other hand, the inverted filter has enraged some users, who don’t always appreciate their “true” reflection. However, the only way to see what all the fuss (or hysteria) is about is to give it a try.
8.TikTok’s Face Zoom effect
As the name suggests, the Face Zoom effect zooms-in on your face. Some people use it in group videos to see which face the filter lands on, while others use the same to compare how you look up close versus how you look from a distance.

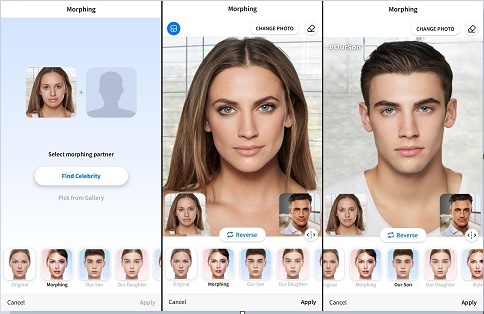
9.TikTok’s Face Morph
The Face Morph effect is another popular effect. This one lets you morph and transition between multiple images of someone else’s face. The effect may be under TikTok’s Templates area because it employs graphics rather than video.
10.TikTok’s Beauty Filter
For obvious reasons, the Beauty filter is popular on TikTok. It improves your appearance by evening out skin tone, adding color, and improving overall appearance. It’s commonly useful in conjunction with other filters and effects.

Part 2: How to Make Use of Filters for TikTok by Filmora?
Wondershare’s Filmora video editor features the standard overlays, transitions, editing, and effects that we’ve come to expect from enthusiast-level video editors. It has a clean, minimalistic, and black interface that is user-friendly. If that wasn’t enough, we’re confident you’ll be thrilled to learn that the Filmora application can be valuable in a variety of ways to make TikTok filters.
You may further personalize the celebrities look alike filter and other TikTok filter trends, with numerous Filmora effects using all of the features we’ve mentioned thus far. Here’s how to do it:
Wondershare Filmora
Get started easily with Filmora’s powerful performance, intuitive interface, and countless effects!
Try It Free Try It Free Learn More >

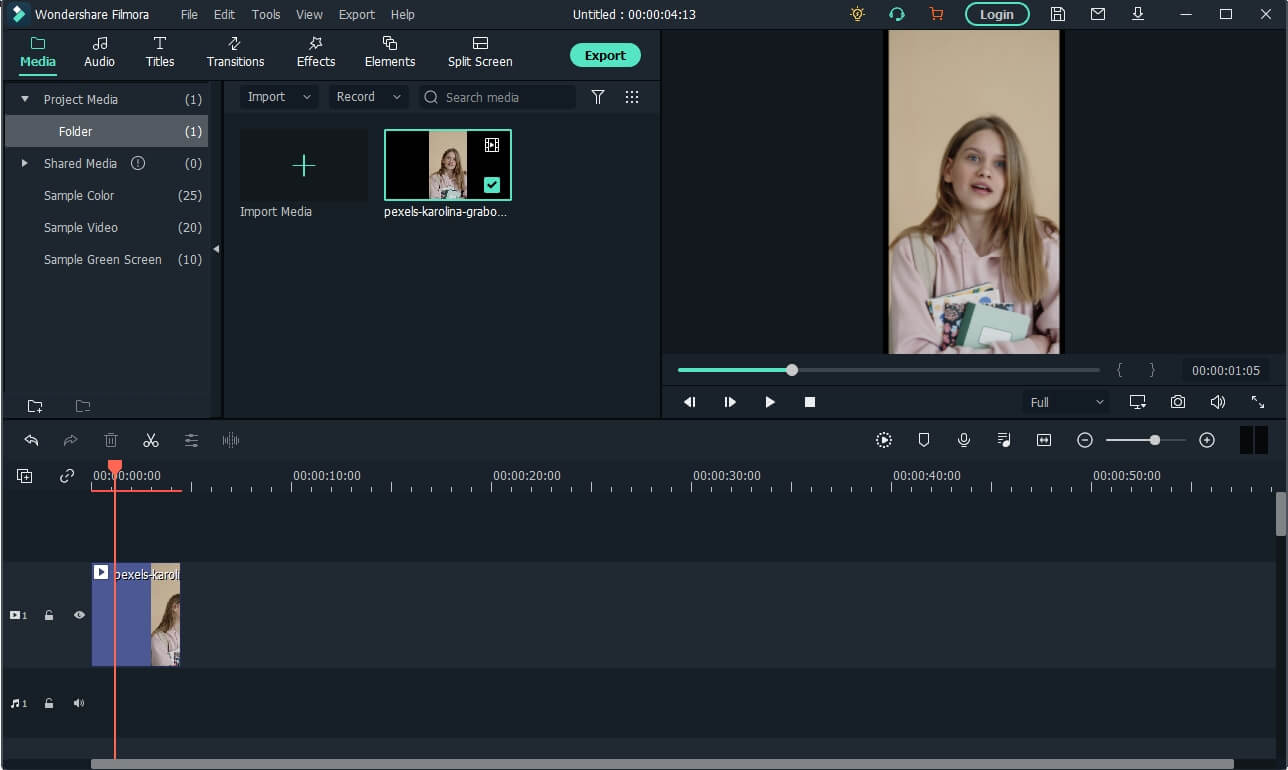
Step 1: Launch Filmora and select video
Launch Filmora and click on the Import option that will select the video file you want to edit. Now, drag and drop the imported media file to the timeline panel.
Step 2: Add effect on Filmora
Click on the effect options and select the AR sticker option to add effect. Type the TikTok filter you want on the search bar, then drag the effect to the portion of the video where you want it.
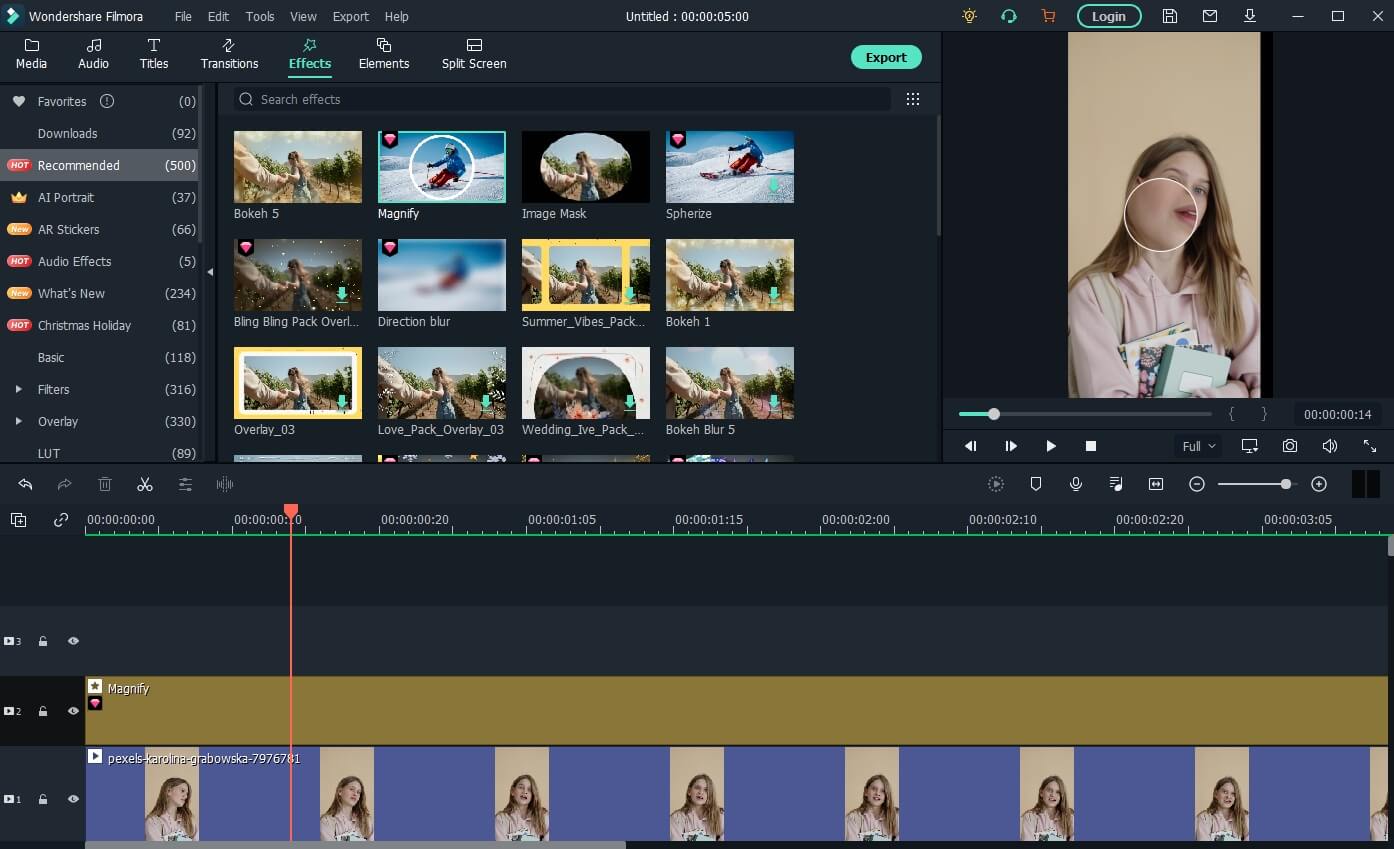
Step 3: Add effect with Filmora
Drag and Drop the video to video tracks 1 and 2 on Filmora. Then go to the effect tab, scroll down to the utility category, and place the image mask effect.
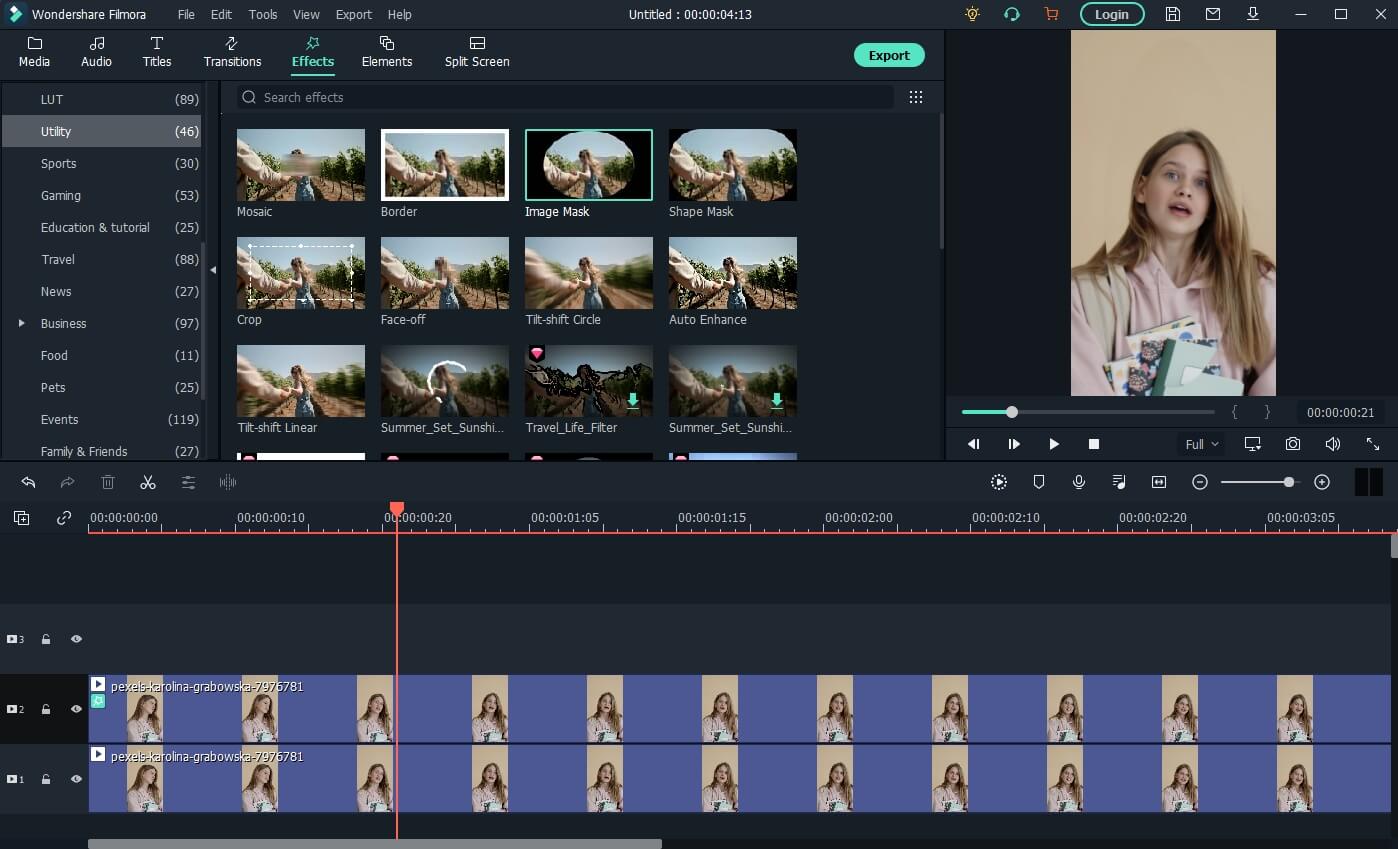
Step 4: Choose a Mask
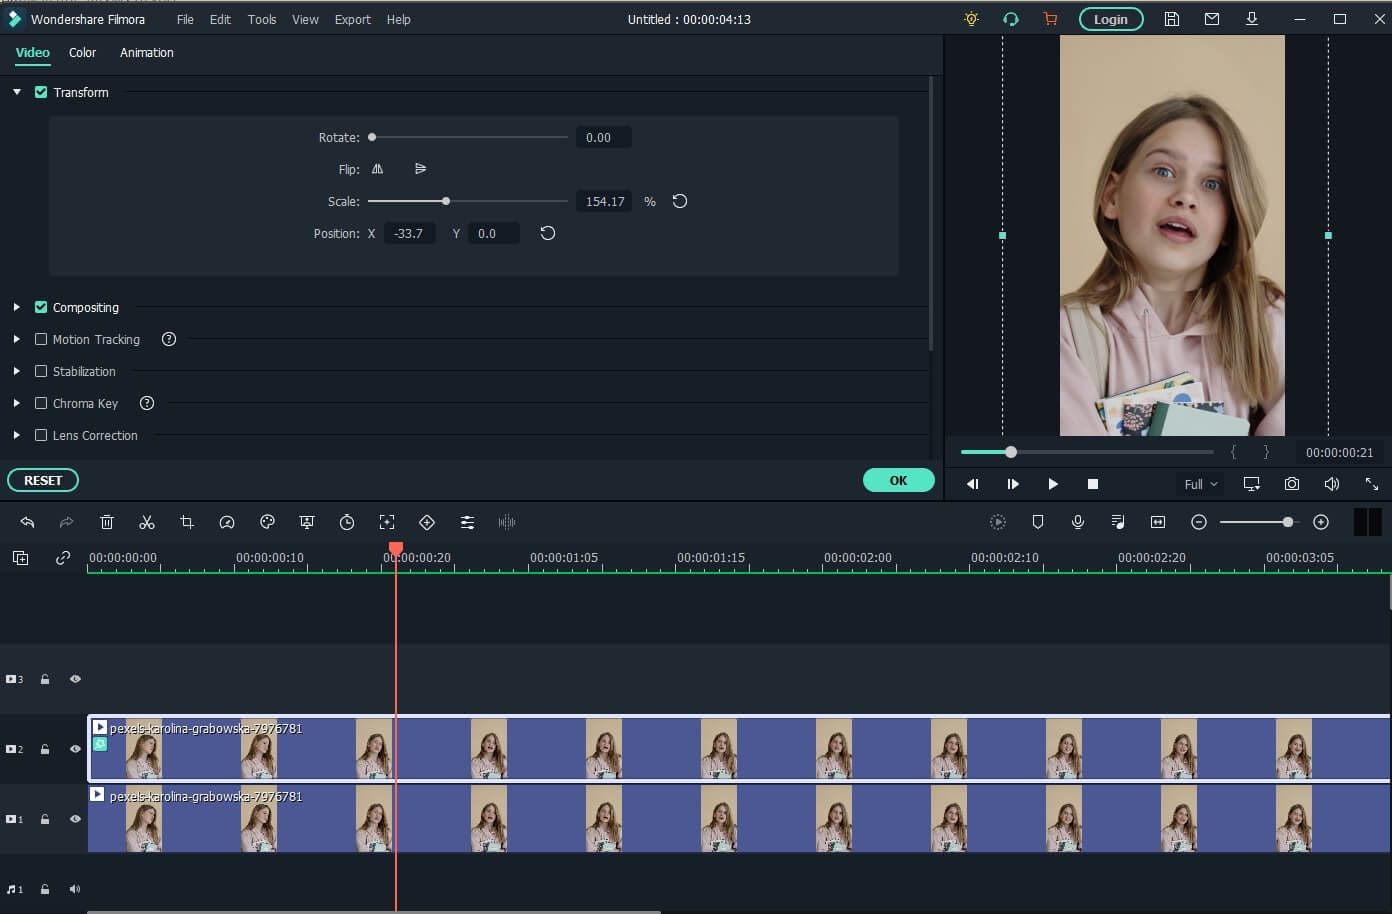
Double-click the video with the image mask. Then, please scroll down to the video effect field and choose a mask, adjusting its position and size to fit the video.
Now click on the video in track two and go to the “Transform” tab. Use the scaler slider to adjust the size of the video to fit the effect.
Conclusion
Filters and effects from TikTok can be applicable in a variety of ways. It’s all about enjoying a good time and putting your twist on TikTok videos that have gone viral. So, using our step-by-step tutorial, you may experiment with various filters on TikTok, such as the no beard filter TikTok. Now go ahead and experiment with these widespread effects and filters to see what kind of creative videos you can come up with.
TikTok is also known for its creative filters and effects. In fact, unlike Instagram, which offers a limited selection of filters and effects to test, TikTok has an extensive library of filters and effects to attempt.
TikTok filters alter the look and feel of your videos. You may, however, add stuff to your films using effects. You may entirely transform the look of your videos by applying TikTok filters. A green screen can transfer you to any location, change your hair color, transform yourself into an extraterrestrial, and much more.
Trending, New, Interactive, Editing, Beauty, Funny, and World are the best TikTok filter categories. Before you begin recording, you must first decide the effects you wish to utilize. So, this is the time if you haven’t tried either the G6 filter or the Dog Face effect yet. Continue reading to know more about the TikTok filter trend.
In this article
01 10 Best TikTok Filters You’d Love to Use
02 How to Make Use of Filters for TikTok by Filmora?
Part 1: 10 Best TikTok Filters You’d Love to Use
We will look at some of the top TikTok filters that make your video stand out from the crowd.
1.TikTok’s G6 filter
On TikTok, filters are identified by a single maker and number. While G6 is labeled a food-related filter, it’s become increasingly popular due to its bright, colorful, and slightly retro feel.
2.TikTok’s Anime Filter
When individuals uploaded their Snapchat videos to TikTok, the anime filter became quite popular. This filter transforms you into an animated character, but you’ll need to download Snapchat first and get an account if you don’t already have one.
3.TikTok’s Invisible filter
Another outcome of viral videos is TikTok’s Invisible filter. This one gives you the ability to become invisible, which is fantastic if you’ve ever wanted to try out that superpower.
4.TikTok’s Bling Effect
The Bling effect is another effect that is likely to appear on your For You page. This effect imitates the flash of a diamond being struck by the sun in different locations across the film.
5.TikTok’s Disney Effect
The Disney TikTok filter gives you a chance to experience what it’s like to be a Disney princess or prince. This effect transforms your face into a Disney-inspired cartoon character.
This filter, like the anime filter, is available on Snapchat. So make sure you’ve downloaded that app first.
6.TikTok Dog Face
The Dog Face filter is another amusing face to experiment on. You get dog ears, a nose, and even a tongue with this one. However, you must record another filter in Snapchat before publishing it to TikTok.
7.TikTok’s Inverted Filter
The Inverted filter is a little more divisive than the others. This filter flips any video you capture, and it’s famous for using the front-facing camera because it’s said to mimic how other people perceive you. So, what’s the big deal about it? On the other hand, the inverted filter has enraged some users, who don’t always appreciate their “true” reflection. However, the only way to see what all the fuss (or hysteria) is about is to give it a try.
8.TikTok’s Face Zoom effect
As the name suggests, the Face Zoom effect zooms-in on your face. Some people use it in group videos to see which face the filter lands on, while others use the same to compare how you look up close versus how you look from a distance.
9.TikTok’s Face Morph
The Face Morph effect is another popular effect. This one lets you morph and transition between multiple images of someone else’s face. The effect may be under TikTok’s Templates area because it employs graphics rather than video.
10.TikTok’s Beauty Filter
For obvious reasons, the Beauty filter is popular on TikTok. It improves your appearance by evening out skin tone, adding color, and improving overall appearance. It’s commonly useful in conjunction with other filters and effects.
Part 2: How to Make Use of Filters for TikTok by Filmora?
Wondershare’s Filmora video editor features the standard overlays, transitions, editing, and effects that we’ve come to expect from enthusiast-level video editors. It has a clean, minimalistic, and black interface that is user-friendly. If that wasn’t enough, we’re confident you’ll be thrilled to learn that the Filmora application can be valuable in a variety of ways to make TikTok filters.
You may further personalize the celebrities look alike filter and other TikTok filter trends, with numerous Filmora effects using all of the features we’ve mentioned thus far. Here’s how to do it:
Wondershare Filmora
Get started easily with Filmora’s powerful performance, intuitive interface, and countless effects!
Try It Free Try It Free Learn More >
Step 1: Launch Filmora and select video
Launch Filmora and click on the Import option that will select the video file you want to edit. Now, drag and drop the imported media file to the timeline panel.
Step 2: Add effect on Filmora
Click on the effect options and select the AR sticker option to add effect. Type the TikTok filter you want on the search bar, then drag the effect to the portion of the video where you want it.
Step 3: Add effect with Filmora
Drag and Drop the video to video tracks 1 and 2 on Filmora. Then go to the effect tab, scroll down to the utility category, and place the image mask effect.
Step 4: Choose a Mask
Double-click the video with the image mask. Then, please scroll down to the video effect field and choose a mask, adjusting its position and size to fit the video.
Now click on the video in track two and go to the “Transform” tab. Use the scaler slider to adjust the size of the video to fit the effect.
Conclusion
Filters and effects from TikTok can be applicable in a variety of ways. It’s all about enjoying a good time and putting your twist on TikTok videos that have gone viral. So, using our step-by-step tutorial, you may experiment with various filters on TikTok, such as the no beard filter TikTok. Now go ahead and experiment with these widespread effects and filters to see what kind of creative videos you can come up with.
Erase Background Noises with Ease Using Audacity Tools
The most frequent request you’ll get from video makers is to eliminate irritating noises like rumbling or humming from an original clip. Almost all of the time, capturing high-quality audio during filming is challenging since the conversation is often hard to hear or is made unclear due to surrounding noises, such as the dreadful air conditioners or fans.
To get rid of all these awful noises, this Audacity Noise Reduction feature will serve you a significant purpose in removing unwanted background noise for your future videos. Without further ado, let’s get started!
In this article
01 Things You Need to Prepare for Background Noise Reduction
02 How to Remove Background Noise in Audacity?
03 Why is Audacity Noise Reduction Not Working?
04 How to Prevent Background Noise in Audio Recording?
05 How to Remove Background Noise in Filmora?
Part 1: Things You Need to Prepare for Background Noise Reduction
Here are few things that you need to consider before you apply the noise reduction to your clips:
1. Noise Sample
A decent sample of the noise you wish to eliminate is perhaps the most crucial aspect of the Audacity remove noise procedure.
This will be used by Audacity to understand the noise and build a noise profile. The noise recording should last for a fair amount of time and be devoid of any other noises.
2. Avoid Copy Pasting Tiny Noise Section in Your Spoken Phrases
When you have a tiny part of noise between your stated words on your audio, please don’t copy/paste it to make a more significant piece of sound for Audacity to examine.
You would not be supplying Audacity with any more information that will help it generate a decent noise profile. The noise profile is what enables Audacity to tell the difference between speech and noise.
3. Minimum 2048 Data Samples Required
To build a noise profile, the Noise Reduction function requires a minimum of 2048 sample data. An audio file with a sampling frequency of 44.1kHz is roughly five hundredths of a second.
Note that this is the minor sound level that Audacity needs to generate a noise profile; however, should you supply a larger sample of the noise, Audacity can typically perform a great job of producing a suitable noise profile. As a result, attempt to capture a few seconds of background noises wherever possible.
4. Establish Recording Level and Record “Silence”
Setting your audio volume and capturing some “quiet” prior to speaking is the best way to achieve this. Instead, when you’ve finished talking, keep your camera/recorder going for a few moments.
Don’t move or create any sounds while capturing the background noises, and keep an ear open for any other noises. You only need to capture the ambient noise for a few moments; two to five seconds will suffice.
Part 2: How to Remove Background Noise in Audacity on Windows and Mac?
Whether you are using Windows or macOS, we will show you a step-by-step process to achieve your results using both software in this part of Audacity remove background music guide.
Remove background noise in Audacity on Windows
Step 1: On your recording, select a few moments of sound. Any segment of noise that incorporates other noises should be avoided.

Step 2: From the Effect menu, select Noise Reduction.

Step 3: Select the Get Noise Profile option whenever the Noise Reduction effect screen appears.

Note: Choose whether to implement the noise removal to the entire waveforms or only a portion of it.
Step 4: To access the Noise Reduction effects window, go to Effects > Noise Reduction. Raise the level of noise reduction progressively while previewing the result.

Step 5: Head over to the File section to Export and Save the result. Audacity does not save sound clips when you select Save Project; instead, you must choose Export. Select the file type you want to store and the place wherever you can save it. Select Save after giving the File Name.

Remove background noise in Audacity on Mac
Step 1: Create a room tone-containing audio file. When you don’t have a separate track for room tone, use a recording with a few moments of quiet in it. Click-and-drag to select a segment with a few minutes of silence using the Selection Tool.

Step 2: Select Noise Reduction from the Effects tab. Select the Get Noise Profile tab in the new tab under Step 1. The screen will shut, and Audacity will take noise profile samples of the indicated area.

Step 3: Click-and-drag to select the whole file, which requires noise reduction with the Selection Tool. To re-open the function, go to the Effect tab and pick Noise Reduction. Make modifications to the following parameters under Step 2:
- Reduce and Residue
- Frequency Smoothing (bands)
- Sensitivity
- Noise Reduction

Step 4: To listen to how the chosen file will look with the selected parameters, select Preview. Re-adjust until you have a sound noise reduction with no interference. When you’re finished, select Reduce and click OK.
Part 3: Why is Audacity Noise Reduction Not Working?
It’s possible that the Noise Reduction function isn’t letting you mop up your recording since your audio isn’t appropriate for it. The disturbance must be continuous, not random or fluctuating, to work for Audacity’s Noise Reduction function.
For example, the Noise Reduction function will not assist if your audio was made in a busy environment with unique noises such as background chatter, random traffic noises, or in an exhibition space or museum. The Noise Reduction feature in Audacity isn’t meant to cope with that kind of distortion. You’ll need to alter your recording approach if you’re capturing voice in either of those situations.
Under the following situations, the Audacity Noise Reduction function might underperform.
- Particular noise in the background, including traffic or people.
- When the harmonics of the sound and voice are comparable.
- There is sound variance where there is fluctuation in the noise.
- The volume of the voice is comparable to or lower than that of the background noise.
- When the noise is irregular or changeable rather than continuous.
- The loudness is deafening.
- The sound is a single click or pop.
Part 4: How to Prevent Background Noise in Audio Recording?
Although Audacity allows eliminating noise very simply, it is still an additional level that takes time to refine your podcast production. These pointers can help you avoid the necessity for noise reduction and cut down on the amount of time you spend processing.
1. Reduce the Computer Fan Noise
Whenever computers become too heated, they can produce a lot of noise. You may limit the amount of software that runs and position your mic away from the keyboard to help lessen this impact and avoid the fan from coming on.
However, even if you observe all of these guidelines, undesired recording sounds may still appear in your program. Fortunately, contemporary software makes this problem quite simple to resolve.
2. Reduce the Gain and Get Close to the Mic
Reduce the gain (sensitivity of the microphone) and go nearer to it. Talking straight into the microphone won’t distort your audio if you reduce the gain, and that would assist your microphone in concentrating on scooping up your voice’s tone.
Bonus Tip: Set your recorder’s (or DAW’s) sensitivity such that your speech peaks between -12 and -10db.
3. Utilize a Versatile Microphone
Condenser and dynamic microphones are the two most common types of podcast microphones. Condenser microphones are significantly more sensitive instruments meant to take up average atmospheric noise, whereas dynamic microphones have a narrower frequency range, picking up fewer ambient noises.
4. Optimize Your Recording Environment
The most significant and most crucial aspect of your podcasts’ sound quality is where you capture it. To optimize your personal podcasting space, we recommend choosing a peaceful, compact area away from HVAC systems, vehicles, external hard drives, background sound, motors, and other distractions. You may also increase the tone of your room by using natural sound absorbents such as curtains, rugs, carpets, and sofas.
Part 5: How to Remove Background Noise in Filmora?
Although there is a lot of software available to eliminate ambient noise, we highly suggest Wondershare Filmora Video Editor to edit audio and video in one place.
In addition to the standard audio editing capabilities, the recently redesigned Filmora currently includes enhanced waveforms, volume Keyframing , peak metering, and audio transitions, giving you a better audio editing interface.
For Win 7 or later (64-bit)
For macOS 10.12 or later
Filmora Video Editor will quickly remove ambient sound from both sound/video. You may also remove the sound from the video with this simple video editor, use the Audio Equalizer or Audio Mixer functions to modify the audio further, and then Export and save the audio in an Mp3 file. Here are the detailed steps:
Step 1: In the Wondershare Filmora Timeline menu, Import your footage. Trim the footage after previewing it and deleting the sections you don’t want to retain.

Step 2: To eliminate the ambient noise immediately, double-click on the video file, and go to the Audio panel to select the Remove Background Noise option. You will find that the background noise is removed automatically.

Step 3: After checking the results, select Export to download the noise-reduced clip to your desktop or upload it immediately to YouTube or Vimeo.

Conclusion
Well, there you have it. In this Audacity Remove Background Noise guide, we have reviewed every possible method you can adopt to get rid of the unnecessary background noise in the Audacity. And if the desired results are still not achieved, we highly recommend using the Wondershare Filmora editing software. Not only will it help you remove the unwanted ambient noise, but it will also allow you to customize your audio or video file further.
02 How to Remove Background Noise in Audacity?
03 Why is Audacity Noise Reduction Not Working?
04 How to Prevent Background Noise in Audio Recording?
05 How to Remove Background Noise in Filmora?
Part 1: Things You Need to Prepare for Background Noise Reduction
Here are few things that you need to consider before you apply the noise reduction to your clips:
1. Noise Sample
A decent sample of the noise you wish to eliminate is perhaps the most crucial aspect of the Audacity remove noise procedure.
This will be used by Audacity to understand the noise and build a noise profile. The noise recording should last for a fair amount of time and be devoid of any other noises.
2. Avoid Copy Pasting Tiny Noise Section in Your Spoken Phrases
When you have a tiny part of noise between your stated words on your audio, please don’t copy/paste it to make a more significant piece of sound for Audacity to examine.
You would not be supplying Audacity with any more information that will help it generate a decent noise profile. The noise profile is what enables Audacity to tell the difference between speech and noise.
3. Minimum 2048 Data Samples Required
To build a noise profile, the Noise Reduction function requires a minimum of 2048 sample data. An audio file with a sampling frequency of 44.1kHz is roughly five hundredths of a second.
Note that this is the minor sound level that Audacity needs to generate a noise profile; however, should you supply a larger sample of the noise, Audacity can typically perform a great job of producing a suitable noise profile. As a result, attempt to capture a few seconds of background noises wherever possible.
4. Establish Recording Level and Record “Silence”
Setting your audio volume and capturing some “quiet” prior to speaking is the best way to achieve this. Instead, when you’ve finished talking, keep your camera/recorder going for a few moments.
Don’t move or create any sounds while capturing the background noises, and keep an ear open for any other noises. You only need to capture the ambient noise for a few moments; two to five seconds will suffice.
Part 2: How to Remove Background Noise in Audacity on Windows and Mac?
Whether you are using Windows or macOS, we will show you a step-by-step process to achieve your results using both software in this part of Audacity remove background music guide.
Remove background noise in Audacity on Windows
Step 1: On your recording, select a few moments of sound. Any segment of noise that incorporates other noises should be avoided.
Step 2: From the Effect menu, select Noise Reduction.
Step 3: Select the Get Noise Profile option whenever the Noise Reduction effect screen appears.
Note: Choose whether to implement the noise removal to the entire waveforms or only a portion of it.
Step 4: To access the Noise Reduction effects window, go to Effects > Noise Reduction. Raise the level of noise reduction progressively while previewing the result.
Step 5: Head over to the File section to Export and Save the result. Audacity does not save sound clips when you select Save Project; instead, you must choose Export. Select the file type you want to store and the place wherever you can save it. Select Save after giving the File Name.
Remove background noise in Audacity on Mac
Step 1: Create a room tone-containing audio file. When you don’t have a separate track for room tone, use a recording with a few moments of quiet in it. Click-and-drag to select a segment with a few minutes of silence using the Selection Tool.
Step 2: Select Noise Reduction from the Effects tab. Select the Get Noise Profile tab in the new tab under Step 1. The screen will shut, and Audacity will take noise profile samples of the indicated area.
Step 3: Click-and-drag to select the whole file, which requires noise reduction with the Selection Tool. To re-open the function, go to the Effect tab and pick Noise Reduction. Make modifications to the following parameters under Step 2:
- Reduce and Residue
- Frequency Smoothing (bands)
- Sensitivity
- Noise Reduction
Step 4: To listen to how the chosen file will look with the selected parameters, select Preview. Re-adjust until you have a sound noise reduction with no interference. When you’re finished, select Reduce and click OK.
Part 3: Why is Audacity Noise Reduction Not Working?
It’s possible that the Noise Reduction function isn’t letting you mop up your recording since your audio isn’t appropriate for it. The disturbance must be continuous, not random or fluctuating, to work for Audacity’s Noise Reduction function.
For example, the Noise Reduction function will not assist if your audio was made in a busy environment with unique noises such as background chatter, random traffic noises, or in an exhibition space or museum. The Noise Reduction feature in Audacity isn’t meant to cope with that kind of distortion. You’ll need to alter your recording approach if you’re capturing voice in either of those situations.
Under the following situations, the Audacity Noise Reduction function might underperform.
- Particular noise in the background, including traffic or people.
- When the harmonics of the sound and voice are comparable.
- There is sound variance where there is fluctuation in the noise.
- The volume of the voice is comparable to or lower than that of the background noise.
- When the noise is irregular or changeable rather than continuous.
- The loudness is deafening.
- The sound is a single click or pop.
Part 4: How to Prevent Background Noise in Audio Recording?
Although Audacity allows eliminating noise very simply, it is still an additional level that takes time to refine your podcast production. These pointers can help you avoid the necessity for noise reduction and cut down on the amount of time you spend processing.
1. Reduce the Computer Fan Noise
Whenever computers become too heated, they can produce a lot of noise. You may limit the amount of software that runs and position your mic away from the keyboard to help lessen this impact and avoid the fan from coming on.
However, even if you observe all of these guidelines, undesired recording sounds may still appear in your program. Fortunately, contemporary software makes this problem quite simple to resolve.
2. Reduce the Gain and Get Close to the Mic
Reduce the gain (sensitivity of the microphone) and go nearer to it. Talking straight into the microphone won’t distort your audio if you reduce the gain, and that would assist your microphone in concentrating on scooping up your voice’s tone.
Bonus Tip: Set your recorder’s (or DAW’s) sensitivity such that your speech peaks between -12 and -10db.
3. Utilize a Versatile Microphone
Condenser and dynamic microphones are the two most common types of podcast microphones. Condenser microphones are significantly more sensitive instruments meant to take up average atmospheric noise, whereas dynamic microphones have a narrower frequency range, picking up fewer ambient noises.
4. Optimize Your Recording Environment
The most significant and most crucial aspect of your podcasts’ sound quality is where you capture it. To optimize your personal podcasting space, we recommend choosing a peaceful, compact area away from HVAC systems, vehicles, external hard drives, background sound, motors, and other distractions. You may also increase the tone of your room by using natural sound absorbents such as curtains, rugs, carpets, and sofas.
Part 5: How to Remove Background Noise in Filmora?
Although there is a lot of software available to eliminate ambient noise, we highly suggest Wondershare Filmora Video Editor to edit audio and video in one place.
In addition to the standard audio editing capabilities, the recently redesigned Filmora currently includes enhanced waveforms, volume Keyframing , peak metering, and audio transitions, giving you a better audio editing interface.
For Win 7 or later (64-bit)
For macOS 10.12 or later
Filmora Video Editor will quickly remove ambient sound from both sound/video. You may also remove the sound from the video with this simple video editor, use the Audio Equalizer or Audio Mixer functions to modify the audio further, and then Export and save the audio in an Mp3 file. Here are the detailed steps:
Step 1: In the Wondershare Filmora Timeline menu, Import your footage. Trim the footage after previewing it and deleting the sections you don’t want to retain.
Step 2: To eliminate the ambient noise immediately, double-click on the video file, and go to the Audio panel to select the Remove Background Noise option. You will find that the background noise is removed automatically.
Step 3: After checking the results, select Export to download the noise-reduced clip to your desktop or upload it immediately to YouTube or Vimeo.
Conclusion
Well, there you have it. In this Audacity Remove Background Noise guide, we have reviewed every possible method you can adopt to get rid of the unnecessary background noise in the Audacity. And if the desired results are still not achieved, we highly recommend using the Wondershare Filmora editing software. Not only will it help you remove the unwanted ambient noise, but it will also allow you to customize your audio or video file further.
Also read:
- The Ultimate Collection of Popular TikTok Reactions
- Flavors Unleashed Premier TikTok Food Creators for 2024
- Boost Your TikTok Game - Best Free Edits for Mac Users (Top 10) for 2024
- [New] The Ultimate Guide to Social Media Success Popular & Secret TikTok Emojis
- Ideal 10 Video Editing Software for Windows/PC TikToks
- 2024 Approved Master the Art of TikTok Sharing Across Chrome OS Devices
- [New] 2024 Approved Instant Melodic Broadcasts on Kuaishou
- [Updated] Techniques to Purify Your Recordings in Audacity
- Tips & Tricks Producing Viral TikTok Reactions for 2024
- Unmissable Fun with Today’s Viral TikTok Trials
- [Updated] Step-by-Step Revamping the Look of Your TikTok Screenshots
- One-Click Wonder Seamless Editing of Multisnap Videos
- [New] Accidental TikTok Overload – Regain Access
- Fostering Fandom Creating Jujutsu Kaisen Content for TikTok
- In 2024, Leap Into Virality with TikTok's Best-Kept Editing Techniques
- The Essence of PFP in the World of TikTok for 2024
- Android/iOS TikTok Editing Winners
- [New] In 2024, From Online Sensations to Graphic Gems Top Converters at Your Fingertits
- Creating Captivating TikTok Outro Sequences for 2024
- [New] In 2024, 20 Country Beats on TikTok to Dance & Unwind
- 2024 Approved Determining a Bespoke Keyword for Your TikTok Feed
- In 2024, 15 Newest TikTok Trends You Need to Pay Attention To
- [New] In 2024, Dominate TikTok's Marketplace with These 8 Financial Techniques
- [Updated] Hit TikTok Recipes Viral Culinary Delights for 2024
- Capturing Slow Motions in TikTok Videos - Tips & Tricks for 2024
- [New] Mastery of Content Validation Avoiding Copyright Issues on TikTok
- [Updated] Free TikTok Video Downloads No Watermarks Required for 2024
- 2024 Approved Pioneering Gigantic Appearance Tricks for TikTok Videos
- [New] Transforming Text Into Voice for TikTok Enthusiasts for 2024
- In 2024, Best 10 Filter Combos To Make Your TikTok Unique
- [Updated] In 2024, Viral Content Showdown Is the Time for Likee to Surpass TikTok Nearing?
- Mastering Snap Camera in MS Teams
- 2024 Approved Grasping the Essence An In-Depth Guide to TikTok Filters
- In 2024, Building A Stylish TikTok Closing Credits Bar
- [New] In 2024, Mellow Moves Discover Top 20 Serene Country Songs for Groovy Dancing (TikTok)
- Best Free Mac Apps for Professional TikTok Cuts
- [New] 2024 Approved Essential Steps for Crafting Stunning Slow Mo Videos on TikTok
- [New] Unraveling the Mystery What Does PFP Mean in TikTok?
- In 2024, Harnessing Potential How to Excel in Desktop TikTok Videos
- [Updated] Join the Party Your Guide to Active TikTok Streaming
- In 2024, From Observing to Involved The TikTok Life Journey
- [New] Join the Jamboree Top 10 Giggle-Worthy TikTok Challenges for 2024
- [Updated] 2024 Approved Scaling Up Integrating TikTok Into Your Brand's Strategy
- [New] 2024 Approved Riding the Viral Wave Transform Your Brand on TikTok
- Elevating Gameplay with Optimized Ram Assignment for Minecraft for 2024
- In 2024, iPhone Transfer Transfer Contact from Apple iPhone 15 Pro to iPhone without iCloud | Dr.fone
- New Free Video Stabilizer Roundup The Best Options for 2024
- New In 2024, The Ultimate Color Matching Guide for PowerDirector Users
- [Updated] FB Watch Icon Recovery - Tips and Tricks for 2024
- Universal Unlock Pattern for Infinix Smart 8 Plus
- New In 2024, Elevate Your Job Search The Best Video Resume Makers Free
- In 2024, How To Check if Your HTC U23 Pro Is Unlocked
- iPhone Is Disabled? Here Is The Way To Unlock Disabled Apple iPhone 11 Pro
- Top 4 Android System Repair Software for Xiaomi Civi 3 Disney 100th Anniversary Edition Bricked Devices | Dr.fone
- 2024 Approved A Spectrum of Screams The Best Places to Download Terrifying Tones Online
- Updated In 2024, What Apps Can You Use to Blur the Face or the Background on the Video? In This Article, I Will Share some of the Best Video Blur Apps that You Can Use to Blur Any Part of the Video on iPhone or Android Phones
- [New] RealTimeVid Recorder Overview
- In 2024, AddROM Bypass An Android Tool to Unlock FRP Lock Screen For your Honor Magic 5
- 2024 Approved Cut, Edit, and Share The Best Free WebM Video Editors
- In 2024, Transform Your Photos Into Engaging Mac Slideshows with Ezvid
- [New] Instagram Edge Adjusting FCPX to Vertical Footage for 2024
- New 2024 Approved Free and Fabulous Top MOV Movie Editors
- New Hands-On with Splice A Detailed Review of the Video Editing App for 2024
- The Art of Pure Audio Removing Unwanted Noise for Professional Soundtracks Using Filmora
- Mastering Acoustics for Visual Media The Most Innovative 8 Templates of Audio Patterns
- How to Lava Blaze 2 5G Get Deleted Phone Number Back with Ease and Safety
- In 2024, A Guide Vivo V30 Wireless and Wired Screen Mirroring | Dr.fone
- The Definitive Guide to Sound Sanctity Expert Approaches for Reducing Auditory Interference (On/Offline Methods)
- 8 Best Apps for Screen Mirroring Xiaomi 14 PC | Dr.fone
- How To Fix Unresponsive Phone Touchscreen Of Itel P55T | Dr.fone
- 2024 Approved How to Use Emojis on Windows 10 and Windows 11?
- New In 2024, Splice Video Editor A Thorough Exploration of Its Capabilities
- In 2024, Social Media Strategists' Guide Top 10 IG Video Editing Apps
- New Everything You Want To Know About Kapwing Video Translation
- In 2024, 3 Things You Must Know about Fake Snapchat Location On Oppo Reno 8T | Dr.fone
- How to sign a PDF v1.6 document with electronic signature tool
- How to fix videos not playing with my Honor ?
- How to remove Google FRP Lock on Google Pixel 8 Pro
- [Updated] 2024 Approved The Path to Prominence with Powerful Instagram Video Narratives
- [New] 2024 Approved Stay Ahead The Guide to Facebook's New Algorithm
- Title: "[New] Revolutionize Your TikTok Videos The Ultimate Filter List for 2024"
- Author: Stephen
- Created at : 2024-05-23 04:10:08
- Updated at : 2024-05-24 04:10:08
- Link: https://tiktok-video-recordings.techidaily.com/new-revolutionize-your-tiktok-videos-the-ultimate-filter-list-for-2024/
- License: This work is licensed under CC BY-NC-SA 4.0.
