
![[New] The Dos and Don'ts of Creating an Authentic TikTok Version of Ourselves for 2024](https://www.lifewire.com/thmb/36O6mR-32uZPQcZCa_oWmrz1kHY=/400x300/filters:no_upscale():max_bytes(150000):strip_icc():format(webp)/Childlearningonline_WillieBThomas_Getty-3e51600a64d742a0b5db4fadacead069.jpg)
[New] The Dos and Don'ts of Creating an Authentic TikTok Version of Ourselves for 2024
The Dos and Don’ts of Creating an Authentic TikTok Version of Ourselves
How to Clone Yourself on TikTok

Shanoon Cox
Mar 27, 2024• Proven solutions
Every rising pop star needs music videos, but using professional video editing software may be too time-consuming if you want to quickly create a clone video you can share with your fans on TikTok.
Multiplying yourself in a video is a cool way of making sure that your video is going to get the kind of attention it deserves. The process of cloning yourself in a video is a simple one, but there are certain rules you have to follow while recording the footage that will help you avoid overlapping the figures you’re cloning. Here’s how you can make your first clone yourself video on TikTok.

Selecting the Song for your Clone Video
Before you start shooting the video you first need to select the song on TikTok you’re going to use in the video. Once you’ve found the perfect track simply record it and save it as a video to your camera roll. You can then import the video clip that contains the song into the Video Star app.
Here are 10 Popular TikTok Songs for you.

Using the Video Star App to Clone Yourself
1. Download Video Star App
Choosing a location, mounting your iPhone on a tripod, or picking the positions for each of your clones are all important steps you’ll need to take before you actually start recording. There are several apps that enable you to create clone videos easily, but in this article, we are going to show you how you can clone yourself with Video Star. The app can be downloaded from the App Store for free, but additional in-app purchases are necessary if you want to have access to all the power packs Video Star offers. You don’t have to record the video clips with this app since the iPhone’s native camera app is powerful enough to enable you to record high-quality footage.
2. Edit Multiple Video Clips
After you record all the positions for your next clone video with the iPhone’s native camera app, you should cut the video clips and keep only the parts where you are perfectly positioned, so your position in one clip doesn’t overlap with other positions. During the video recording process try to create as much separation between two positions in order to avoid any chance of overlapping. One of the best ways to achieve this is to shoot at a location that is spacious enough so you can make enough separation between two positions. Keep in mind that the maximum number of clips you can combine in the Video Star app is limited to just three, so if you want to have more than three clones in the shot you first have to piece together three clips, save them as a single file and then add more clips to the cloned video you created.
3. Level up Your Videos with Video Star
Video Star also enables you to shoot your videos from the app, and you can adjust the Countdown before the app starts recording or the Recording Speed. Make sure to enter the lowest Recording Speed value possible, because that way you’ll be recording like TikTok does on fast.
Tap the Record button, then select the Multiple options, and play the video that contains the song you previously selected. Once you reach the spot in the song where you want to introduce the clone simply tap Set, so the recording will stop at the designated point and you can move to another position. If at any point during recording you realize that your movements extend to your clone’s location, you can simply tap on the hamburger icon and select the Delete Last option.
To preview the video, you just have to tap on the Scissors icon, and the recorded video will automatically start playing. The Record New Clip in the Scissors menu lets you start from the beginning in case you’re not happy with the results or you can use this option to start recording the video with the second position of your clone.
When done, head back to the Scissors menu, and tap on the Multi-Layer Clip. This feature doesn’t come with the free version of the app, and you must purchase it in order to create a clone video. This action will enable you to select the back and front clips. After selecting the clips, the Mask Front menu will appear on the screen, choose the Shape option and use the hamburger icon on the right side of the screen to change the video’s shape to Rectangle. Drag the rectangle in the preview window so you can crop the first clip to match the demands of your video and press the Next icon to continue the video editing process.
Alternatively, you can use the Erase option to remove the unwanted parts of each video. You can find this option in the Mask Front or Mask Back menu, so just select it and use your finger to remove sections of the shot you don’t want to use.
The Add Effect menu will pop up on the screen so you can add different effects to your first video clip, and then repeat the entire process for the back clip. Once you’ve edited the second clip tap on the Create button to complete the process of making a multilayer clip. Tap Done to save the clip to your camera roll, and upload it to TikTok.
Conclusion
Cloning yourself in a video using the Video Star app is a simple process that can be mastered in a short period of time. The Video Star app lets you create as many clones of yourself as you want, so you just have to make sure that your video clips can be easily combined to feature two or more of your clones and have fun exploring the effects that can make your videos look even cooler. If you want to be a success on the TikTok platform, learning how to make clone videos is one of the best ways to do it, so choose your favorite songs and start producing clone yourself videos.
You can also use Wondershare Filmora to make a split-screen with ease. Check the tutorial below to figure out how to make a split-screen video to clone.


Shanoon Cox
Shanoon Cox is a writer and a lover of all things video.
Follow @Shanoon Cox
Shanoon Cox
Mar 27, 2024• Proven solutions
Every rising pop star needs music videos, but using professional video editing software may be too time-consuming if you want to quickly create a clone video you can share with your fans on TikTok.
Multiplying yourself in a video is a cool way of making sure that your video is going to get the kind of attention it deserves. The process of cloning yourself in a video is a simple one, but there are certain rules you have to follow while recording the footage that will help you avoid overlapping the figures you’re cloning. Here’s how you can make your first clone yourself video on TikTok.
Selecting the Song for your Clone Video
Before you start shooting the video you first need to select the song on TikTok you’re going to use in the video. Once you’ve found the perfect track simply record it and save it as a video to your camera roll. You can then import the video clip that contains the song into the Video Star app.
Here are 10 Popular TikTok Songs for you.
Using the Video Star App to Clone Yourself
1. Download Video Star App
Choosing a location, mounting your iPhone on a tripod, or picking the positions for each of your clones are all important steps you’ll need to take before you actually start recording. There are several apps that enable you to create clone videos easily, but in this article, we are going to show you how you can clone yourself with Video Star. The app can be downloaded from the App Store for free, but additional in-app purchases are necessary if you want to have access to all the power packs Video Star offers. You don’t have to record the video clips with this app since the iPhone’s native camera app is powerful enough to enable you to record high-quality footage.
2. Edit Multiple Video Clips
After you record all the positions for your next clone video with the iPhone’s native camera app, you should cut the video clips and keep only the parts where you are perfectly positioned, so your position in one clip doesn’t overlap with other positions. During the video recording process try to create as much separation between two positions in order to avoid any chance of overlapping. One of the best ways to achieve this is to shoot at a location that is spacious enough so you can make enough separation between two positions. Keep in mind that the maximum number of clips you can combine in the Video Star app is limited to just three, so if you want to have more than three clones in the shot you first have to piece together three clips, save them as a single file and then add more clips to the cloned video you created.
3. Level up Your Videos with Video Star
Video Star also enables you to shoot your videos from the app, and you can adjust the Countdown before the app starts recording or the Recording Speed. Make sure to enter the lowest Recording Speed value possible, because that way you’ll be recording like TikTok does on fast.
Tap the Record button, then select the Multiple options, and play the video that contains the song you previously selected. Once you reach the spot in the song where you want to introduce the clone simply tap Set, so the recording will stop at the designated point and you can move to another position. If at any point during recording you realize that your movements extend to your clone’s location, you can simply tap on the hamburger icon and select the Delete Last option.
To preview the video, you just have to tap on the Scissors icon, and the recorded video will automatically start playing. The Record New Clip in the Scissors menu lets you start from the beginning in case you’re not happy with the results or you can use this option to start recording the video with the second position of your clone.
When done, head back to the Scissors menu, and tap on the Multi-Layer Clip. This feature doesn’t come with the free version of the app, and you must purchase it in order to create a clone video. This action will enable you to select the back and front clips. After selecting the clips, the Mask Front menu will appear on the screen, choose the Shape option and use the hamburger icon on the right side of the screen to change the video’s shape to Rectangle. Drag the rectangle in the preview window so you can crop the first clip to match the demands of your video and press the Next icon to continue the video editing process.
Alternatively, you can use the Erase option to remove the unwanted parts of each video. You can find this option in the Mask Front or Mask Back menu, so just select it and use your finger to remove sections of the shot you don’t want to use.
The Add Effect menu will pop up on the screen so you can add different effects to your first video clip, and then repeat the entire process for the back clip. Once you’ve edited the second clip tap on the Create button to complete the process of making a multilayer clip. Tap Done to save the clip to your camera roll, and upload it to TikTok.
Conclusion
Cloning yourself in a video using the Video Star app is a simple process that can be mastered in a short period of time. The Video Star app lets you create as many clones of yourself as you want, so you just have to make sure that your video clips can be easily combined to feature two or more of your clones and have fun exploring the effects that can make your videos look even cooler. If you want to be a success on the TikTok platform, learning how to make clone videos is one of the best ways to do it, so choose your favorite songs and start producing clone yourself videos.
You can also use Wondershare Filmora to make a split-screen with ease. Check the tutorial below to figure out how to make a split-screen video to clone.
Shanoon Cox
Shanoon Cox is a writer and a lover of all things video.
Follow @Shanoon Cox
The Essential Handbook for TikTok Vocal Effects
How to Use Text to Speech on TikTok - A Complete Guide
Shanoon Cox
Mar 27, 2024• Proven solutions
Ever since its arrival, TikTok has been a dominant force in the world of social media. A mix of lip sync videos, music, and micro-video content, TikTok is extremely popular with Gen Z. Over the years, TikTok has continued to enhance the user experience by adding new features, effects, and guidelines.
Text-to-speech is one of the newest features to be added to the popular platform and it provides an additional way to add something innovative to the video uploads. Announced in December 2020, text to speech on TikTok lets creators put their text over their videos and have a Siri-like voice read it out loud.
TikTok’s text-to-speech feature was added to make the platform accessible to more people by providing an easy way for text to be heard as well as read. Consequently, using this option in video creation is one way that content creators can ensure their videos appeal to a larger number of viewers, while also offering a more comprehensive experience in general.
Since its launch, the feature has been going viral. Many find the automated voice to be a selling point in itself and something that adds a different element to the content. Also, it is a great way to get a message across without actually speaking during the video. No matter the reason it is used, the fact that many are turning to text-to-speech makes it a great addition to TikTok.
Wondering how to get the text to speech on TikTok for your next video? Here’s a detailed insight into this new feature.
- Part 1: What is the Text-To-Speech Feature On TikTok?
- Part 2: What Happened to TikTok Text-To-Speech?
- Part 3: How to Use Text-To-Speech On TikTok?
- Part 4: How to Customize the Text-To-Speech Voice On TikTok?
Part 1: What is the Text-To-Speech Feature On TikTok?
In December 2020, TikTok began rolling out a new text-to-speech feature that automatically turns text into a voiceover as users watch videos that have the feature enabled. The popular social media platform included the new option as an accessibility feature for users with impaired vision, a growing trend for apps integrating voice technology.
Simply put, text to speech on TikTok allows video content creators to convert any piece of text they put on top of their video into a Siri-sounding voice. This means that whatever you type will be read out loud in a robotic tone, eliminating the need for you to narrate. It is a useful way to explain your videos to add context, describe what’s happening, or serve the purpose you see fit.
Source: dexerto.com
There are numerous reasons why you might decide to use this option. Firstly, it’s a great alternative for users who can’t or don’t want to use their own voice in videos. Perhaps you’re shy or just wish to keep an air of anonymity. Or, you might have a speech impediment, or communicate non-vocally or non-verbally. Either way, this feature offers a great alternative way to narrate to viewers.
Also, there are several benefits this feature provides to the audience. Some of your viewers may have poor eye-sight, might struggle to read, or are blind. Using text to speech on TikTok will help you make sure that they can still interact with your video.
Making your video more accessible means that you will get better engagement, which is a win-win situation for you. Lastly, many TikTokers use the text-to-speech option for comedic or dramatic effects.
Part 2: What Happened to TikTok Text-To-Speech?
Recently, TikTok changed the voice on its text-to-speech feature to a new, more energetic, and upbeat voice. This is because of a lawsuit filed by professional voice actor Beverley Standing against ByteDance – the parent company of TikTok. Standing had sued ByteDance in mid-May for using her voice in the text-to-speech setting without her permission.
The lawsuit of the voice actor states that she was hired to work in 2018 for the state-backed Chinese Institute Of Acoustics research body to use in translations and that TikTok has used them without paying her and it has caused damage. She said she hadn’t authorized the use of her voice beyond the use for translations.
The lawsuit concerns the English-language voice used in North America. TikTok videos made prior to the change still feature the old tone. Although TikTok is yet to comment on the new voice or Standing’s lawsuit, the timing of the changes is very suggestive.
Part 3: How to Use Text-To-Speech On TikTok?
Are you puzzled about how to get text to speech on TikTok? Check out the step-by-step guide below without any further ado!
Step 1: Update Your TikTok to The Latest Version
First things first, ensure your TikTok is updated to the latest version so that you have the TikTok text-to-speech function. Many people have the natural human tendency to push updates as far as technologically possible. But, if you are perplexed about how to do text to speech on TikTok, ensure you have the latest version of this social media app before anything else.

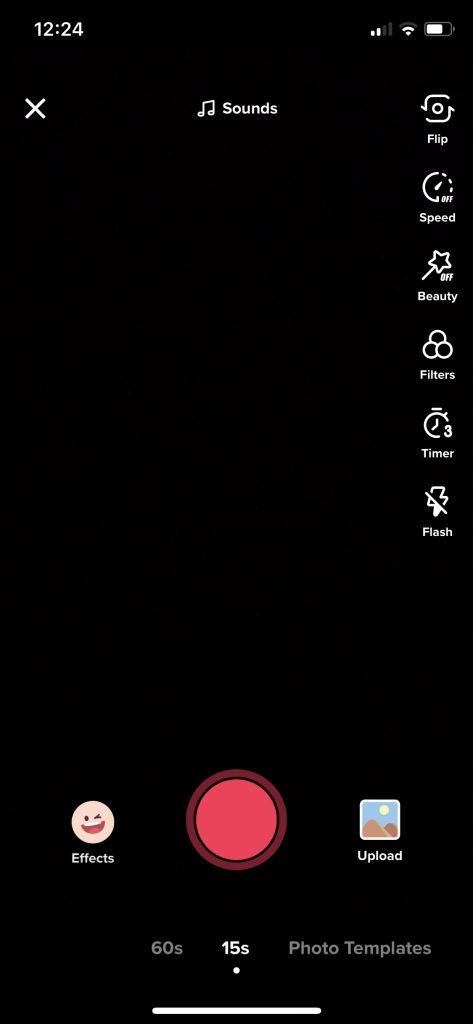
Step 2: Start Recording a Video
Take into account what you wish to say beforehand and have a rough idea of how quickly you want it to be read as the text to speech entry can be as long as your video. After you have the video recording you want to add the text over, press the checkmark on the lower right-hand corner of your app’s screen.
Step 3: Enter Your Text
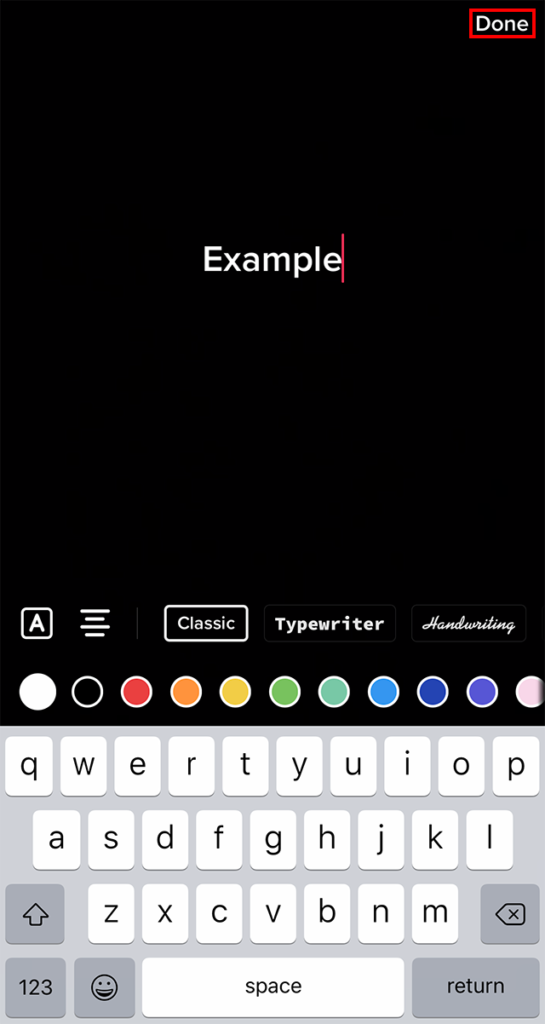
Next, tap the text icon at the bottom of your screen and type the text you’d like to be read aloud. Ensure you keep in mind the length. Once you have entered the text, tap ‘Done’ in the upper right-hand corner of the screen. This will insert a customizable text box over your video.
Step 4: Tap On the Text, Choose Text-To-Speech
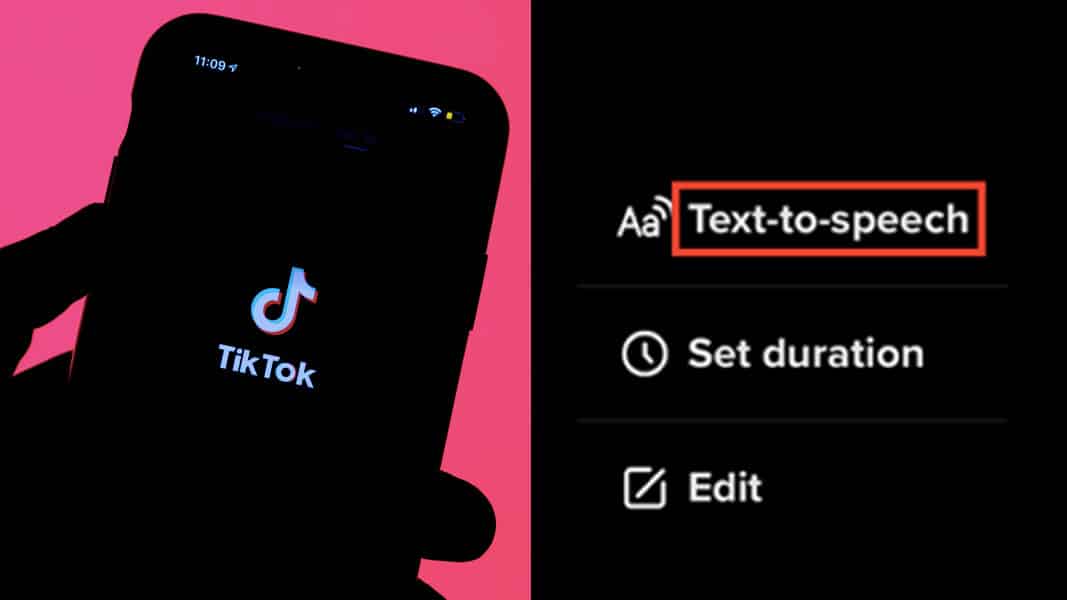
When it comes to using text to speech on TikTok, this is another crucial step.Once you enter the text into the TikTok video, tap the Textbox and you will have three options: Text-to-Speech, Set Duration, and Edit. Select Text-to-Speech and the inbuilt text-to-speech AI of TikTok will read your text over the video.

Step 5: Save the Video Locally
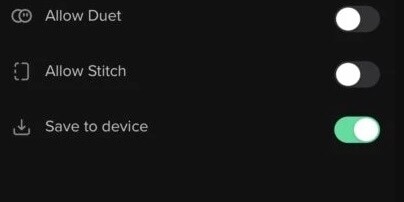
It is here that you will venture outside TikTok to change the text-to-speech voice. Once your video is ready in every other way, consider saving it locally on your device and not post it for everyone to see. Ensure the “Save to Device” option is active and you can post it privately.
Step 6: Download A Video Editor with Voice Modifiers
Next, you have to download a video editor – ideally for your smartphone – with voice modifiers. Adding ‘video’ into the search keywords alongside ‘Voice Modifier’ or ‘Voice Changer’ will bring up a list of options. Remember; many voice changers or free editors will either block the option to save edited videos onto the device behind a paywall or leave a watermark.
Step 7: Edit the Video and Resave
Once you have chosen your video editor, launch it and import your saved TikTok video. Here, you can edit the audio just like any other video, and voice modifiers can be applied if the video editing tool you choose has them. Apply different effects you’d like and resave your new and modified TikTok video to your device.
Step 8: Upload as A New Video to TikTok
Open the TikTok app and upload the new, edited TikTok as a singular video directly, without any further edits. You will get a TikTok video with a customized text-to-speech voice for all intents and purposes.
Part 4: How to Customize the Text-To-Speech Voice On TikTok?
Filmora is the powerful and easy-to-use video editing software that lets content creators empower the story and be amazed at results, no matter the skill level. It enables users to create stunning videos effortlessly using a range of editing tools. Filmora offers users a range of video effects like filters, animated elements, graphic overlays, etc.
Some of the key audio editing features of Wondershare Filmora are:
- Add background music
- Audio ducking
- Music beat detection
- Trim audio clips
- Adjust audio
- Split audio
- Fade audio in or out
- Adjust audio volume
- Adjust audio speed
Do you not like the in-built text-to-speech voice? Here’re a few useful tips on how to change the text to speech voice on TikTok:
- Head to the website Uberduck.ai
- Type your desired text into the “speech to synthesize” box
- Select a voice
- Download it as an MP3 file
- Upload the MP3 file to any video editing tool you have and let the video align
- Save and upload this video to TikTok.
Also, other text-to-speech websites like voicegenerator.io and tts.mp3.com are available too.
Conclusion
The text-to-speech on TikTok is one of the longest-running trends on this platform. The possibilities to get innovative with this effect are endless.
When it comes to using this feature on your content, the ultimate thing you will require is a video editor since the inbuilt text to speech isn’t adjustable as per your voice or text. And, if you are on the lookout for the best video editor, Filmora can be the best companion.
Shanoon Cox
Shanoon Cox is a writer and a lover of all things video.
Follow @Shanoon Cox
Shanoon Cox
Mar 27, 2024• Proven solutions
Ever since its arrival, TikTok has been a dominant force in the world of social media. A mix of lip sync videos, music, and micro-video content, TikTok is extremely popular with Gen Z. Over the years, TikTok has continued to enhance the user experience by adding new features, effects, and guidelines.
Text-to-speech is one of the newest features to be added to the popular platform and it provides an additional way to add something innovative to the video uploads. Announced in December 2020, text to speech on TikTok lets creators put their text over their videos and have a Siri-like voice read it out loud.
TikTok’s text-to-speech feature was added to make the platform accessible to more people by providing an easy way for text to be heard as well as read. Consequently, using this option in video creation is one way that content creators can ensure their videos appeal to a larger number of viewers, while also offering a more comprehensive experience in general.
Since its launch, the feature has been going viral. Many find the automated voice to be a selling point in itself and something that adds a different element to the content. Also, it is a great way to get a message across without actually speaking during the video. No matter the reason it is used, the fact that many are turning to text-to-speech makes it a great addition to TikTok.
Wondering how to get the text to speech on TikTok for your next video? Here’s a detailed insight into this new feature.
- Part 1: What is the Text-To-Speech Feature On TikTok?
- Part 2: What Happened to TikTok Text-To-Speech?
- Part 3: How to Use Text-To-Speech On TikTok?
- Part 4: How to Customize the Text-To-Speech Voice On TikTok?
Part 1: What is the Text-To-Speech Feature On TikTok?
In December 2020, TikTok began rolling out a new text-to-speech feature that automatically turns text into a voiceover as users watch videos that have the feature enabled. The popular social media platform included the new option as an accessibility feature for users with impaired vision, a growing trend for apps integrating voice technology.
Simply put, text to speech on TikTok allows video content creators to convert any piece of text they put on top of their video into a Siri-sounding voice. This means that whatever you type will be read out loud in a robotic tone, eliminating the need for you to narrate. It is a useful way to explain your videos to add context, describe what’s happening, or serve the purpose you see fit.
Source: dexerto.com
There are numerous reasons why you might decide to use this option. Firstly, it’s a great alternative for users who can’t or don’t want to use their own voice in videos. Perhaps you’re shy or just wish to keep an air of anonymity. Or, you might have a speech impediment, or communicate non-vocally or non-verbally. Either way, this feature offers a great alternative way to narrate to viewers.
Also, there are several benefits this feature provides to the audience. Some of your viewers may have poor eye-sight, might struggle to read, or are blind. Using text to speech on TikTok will help you make sure that they can still interact with your video.
Making your video more accessible means that you will get better engagement, which is a win-win situation for you. Lastly, many TikTokers use the text-to-speech option for comedic or dramatic effects.
Part 2: What Happened to TikTok Text-To-Speech?
Recently, TikTok changed the voice on its text-to-speech feature to a new, more energetic, and upbeat voice. This is because of a lawsuit filed by professional voice actor Beverley Standing against ByteDance – the parent company of TikTok. Standing had sued ByteDance in mid-May for using her voice in the text-to-speech setting without her permission.
The lawsuit of the voice actor states that she was hired to work in 2018 for the state-backed Chinese Institute Of Acoustics research body to use in translations and that TikTok has used them without paying her and it has caused damage. She said she hadn’t authorized the use of her voice beyond the use for translations.
The lawsuit concerns the English-language voice used in North America. TikTok videos made prior to the change still feature the old tone. Although TikTok is yet to comment on the new voice or Standing’s lawsuit, the timing of the changes is very suggestive.
Part 3: How to Use Text-To-Speech On TikTok?
Are you puzzled about how to get text to speech on TikTok? Check out the step-by-step guide below without any further ado!
Step 1: Update Your TikTok to The Latest Version
First things first, ensure your TikTok is updated to the latest version so that you have the TikTok text-to-speech function. Many people have the natural human tendency to push updates as far as technologically possible. But, if you are perplexed about how to do text to speech on TikTok, ensure you have the latest version of this social media app before anything else.
Step 2: Start Recording a Video
Take into account what you wish to say beforehand and have a rough idea of how quickly you want it to be read as the text to speech entry can be as long as your video. After you have the video recording you want to add the text over, press the checkmark on the lower right-hand corner of your app’s screen.
Step 3: Enter Your Text
Next, tap the text icon at the bottom of your screen and type the text you’d like to be read aloud. Ensure you keep in mind the length. Once you have entered the text, tap ‘Done’ in the upper right-hand corner of the screen. This will insert a customizable text box over your video.
Step 4: Tap On the Text, Choose Text-To-Speech
When it comes to using text to speech on TikTok, this is another crucial step.Once you enter the text into the TikTok video, tap the Textbox and you will have three options: Text-to-Speech, Set Duration, and Edit. Select Text-to-Speech and the inbuilt text-to-speech AI of TikTok will read your text over the video.
Step 5: Save the Video Locally
It is here that you will venture outside TikTok to change the text-to-speech voice. Once your video is ready in every other way, consider saving it locally on your device and not post it for everyone to see. Ensure the “Save to Device” option is active and you can post it privately.
Step 6: Download A Video Editor with Voice Modifiers
Next, you have to download a video editor – ideally for your smartphone – with voice modifiers. Adding ‘video’ into the search keywords alongside ‘Voice Modifier’ or ‘Voice Changer’ will bring up a list of options. Remember; many voice changers or free editors will either block the option to save edited videos onto the device behind a paywall or leave a watermark.
Step 7: Edit the Video and Resave
Once you have chosen your video editor, launch it and import your saved TikTok video. Here, you can edit the audio just like any other video, and voice modifiers can be applied if the video editing tool you choose has them. Apply different effects you’d like and resave your new and modified TikTok video to your device.
Step 8: Upload as A New Video to TikTok
Open the TikTok app and upload the new, edited TikTok as a singular video directly, without any further edits. You will get a TikTok video with a customized text-to-speech voice for all intents and purposes.
Part 4: How to Customize the Text-To-Speech Voice On TikTok?
Filmora is the powerful and easy-to-use video editing software that lets content creators empower the story and be amazed at results, no matter the skill level. It enables users to create stunning videos effortlessly using a range of editing tools. Filmora offers users a range of video effects like filters, animated elements, graphic overlays, etc.
Some of the key audio editing features of Wondershare Filmora are:
- Add background music
- Audio ducking
- Music beat detection
- Trim audio clips
- Adjust audio
- Split audio
- Fade audio in or out
- Adjust audio volume
- Adjust audio speed
Do you not like the in-built text-to-speech voice? Here’re a few useful tips on how to change the text to speech voice on TikTok:
- Head to the website Uberduck.ai
- Type your desired text into the “speech to synthesize” box
- Select a voice
- Download it as an MP3 file
- Upload the MP3 file to any video editing tool you have and let the video align
- Save and upload this video to TikTok.
Also, other text-to-speech websites like voicegenerator.io and tts.mp3.com are available too.
Conclusion
The text-to-speech on TikTok is one of the longest-running trends on this platform. The possibilities to get innovative with this effect are endless.
When it comes to using this feature on your content, the ultimate thing you will require is a video editor since the inbuilt text to speech isn’t adjustable as per your voice or text. And, if you are on the lookout for the best video editor, Filmora can be the best companion.
Shanoon Cox
Shanoon Cox is a writer and a lover of all things video.
Follow @Shanoon Cox
Also read:
- Revolutionary No-Cost Online Convertors for TikTop to MP3 for 2024
- [Updated] Scaling Up Integrating TikTok Into Your Brand's Strategy
- [Updated] In 2024, Unveil the Art of Intrigue with Our Handpicked TikTok Themes
- [Updated] Leveraging Content for Maximum Impact Growing View Count on TikTok
- [Updated] Perfect Your TikTok Presence - Mastering Siri Commands for Video Creation for 2024
- In 2024, The Filmmaker’s Formula for Unbeatable TikTok Reaction Content Using Filmora
- [Updated] 2024 Approved Integrating Words in TikTok Videos Made Simple
- [Updated] The Complete TikTok Text-to-Speech Guidebook
- [Updated] In 2024, Dive Into TikTok's Trending Reaction Videos
- [Updated] Unleash Your Editing Skills Changing Backdrops in 3 Ways on TikTok
- [New] In 2024, 20 Country Beats on TikTok to Dance & Unwind
- In 2024, Captivating Visual Narratives The Best PFP Techniques for TikTok Profiles
- [New] Culinary Quests TikTok's Best Food Content for 2024
- [Updated] Unveiling the Best TikTok to GIF Converter Software for 2024
- [New] The Secret Sauce of Compelling TikTok Footage on Mac
- Reclaim Your Spotlight Evading TikTok Shadowbans
- [Updated] Venturing Through TikTok’s Anime Landscape Choreographies, Melodic Intrigues and Visual Delights
- [New] In 2024, The Complete Visual Vocabulary of TikTok Emojis & Icons
- [New] Discover Amazon's Best The Hottest TikTok Items You Must Know for 2024
- [Updated] In 2024, Proven Methods to Grow Your Followers The Power of TikTok Hashtags
- [New] In 2024, Beats & Bars Top 20 Rap Tracks Soaring on TikTok
- 2024 Approved Instant Melodic Broadcasts on Kuaishou
- The Essential Blueprint for Updating Your TikTok Presence for 2024
- [New] Elevate Your TikTok Presence 50+ Trending Tags for 2024
- Visual Enthusiasts' List Top 10 Must-Have TikTok Filters
- [New] Boost Your TikTok Visibility A List of Popular Username Choices
- [New] 2024 Approved Fuel Growth Pioneering Biography Techniques for Filmora TikTok Enthusiasts
- [Updated] In 2024, Rhythmic Rendezvous Combining Beat and Visuals on TikTok
- [Updated] In 2024, Boost Creativity & Connectivity Best 50+ TikTok Quotes
- 2024 Approved The Ultimate Guide to TikTok Marketing Best Practices and Success Stories
- [New] Increase Your Social Media Reach with These Top 30 TikTok Nicknames for 2024
- [New] Leading Earnings Estimation Tools for TikTok Pros
- [Updated] Making Voice Overhaul Easy The Ultimate TikTok Guide
- [Updated] 2024 Approved Top 6 Web-Based TikTok to Audio Converter Free
- [New] In 2024, Engage with Panache The Best 20 Creative TikTok Captions to Try
- In 2024, Deciphering TikTok's Anime Mosaic A Confluence of Dance, Melodies and Visual Trends
- New In 2024, Looking for Love Animated GIFs? Here Are 5 Free Sources For You
- [Updated] Premier Low-Carbon Screen Recording Solutions for 2024
- In 2024, How to Remove and Reset Face ID on iPhone X
- In 2024, How to Unlock iPhone 8 with/without SIM Card
- New In 2024, Demystifying Jazz Understanding Its Core Concepts and Styles
- [New] Effective Methods to Document FaceTime Calls for 2024
- [New] Professional Screenshot & Recorder, Win10 Edition
- In 2024, How To Remove Passcode From Apple iPhone 12? Complete Guide
- Updated Trim, Cut, and Split AVI Files Like a Pro Updated
- How To Repair Apple iPhone 13 Pro Max System Issues? | Dr.fone
- Title: [New] The Dos and Don'ts of Creating an Authentic TikTok Version of Ourselves for 2024
- Author: Stephen
- Created at : 2024-05-23 04:18:12
- Updated at : 2024-05-24 04:18:12
- Link: https://tiktok-video-recordings.techidaily.com/new-the-dos-and-donts-of-creating-an-authentic-tiktok-version-of-ourselves-for-2024/
- License: This work is licensed under CC BY-NC-SA 4.0.
