
:max_bytes(150000):strip_icc()/GettyImages-5020748141-5baa853cc9e77c005034be23.jpg)
Recover Lost Photos on Snapchat
Recover Lost Photos on Snapchat
Snapchat Recovery: Quickly Recover Photos/Videos

Ollie Mattison
Mar 27, 2024• Proven solutions


On Snapchat, you can pick between 1 to 10 seconds for viewing the shared content. As soon as the receiver opens the content, it gets deleted automatically within the time specified by you for viewing.
But, do wish to recover Snapchat photos/videos? You wish to see the same funny content again but it’s deleted automatically. What to do now? Don’t worry Snapchat recovery is possible and in this article, we discuss how to quickly recover Snapchat photos and videos from Android and iPhone separately.
- Part1: How To Recover Snapchat Photos/Videos From Android Phone
- Part2: How To Recover Snapchat Photos/Videos From iPhone
- Part3: Free Snapchat Recovery Tools
Part 1: How To Recover Snapchat Photos/Videos From Android Phone
Are you seeking help to recover Snapchat photos and videos from your Android phone? There are possibilities that your photos and videos are saved in some folder on your Android phone itself. Although one of the best ways to keep your Snapshot photos saved is by taking screenshots. But, you often forget to do that. Isn’t it? Not to worry. The data is at times stored in a specific folder on your Android phone. The files you receive usually ends with .nomedia. It is an extension which makes the videos and photos invisible.
When you use your phone quite often, the chances of saving the deleted content in a particular data location becomes high.
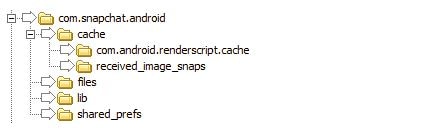
- You can search for com.snapchat.android folder
- Reach the cache folder
- Next search for two other folders in Cache that are -com.android.renderscript.cache and receive_image_snaps
If you are unable to recover Snapchat photos/videos from the specific folder on your Android phone, you also can use Snapchat recovery to retrieve them on Android phone. The steps to retrieving the deleted content are-
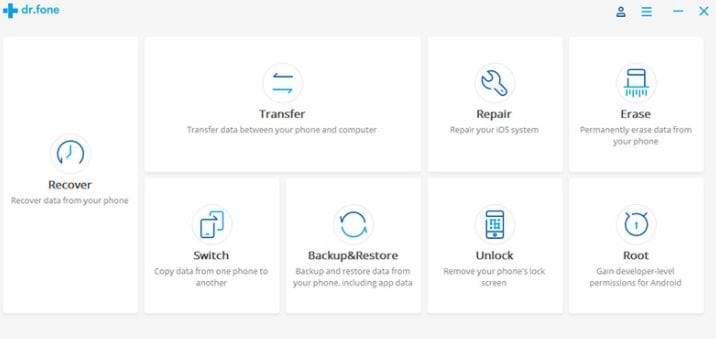
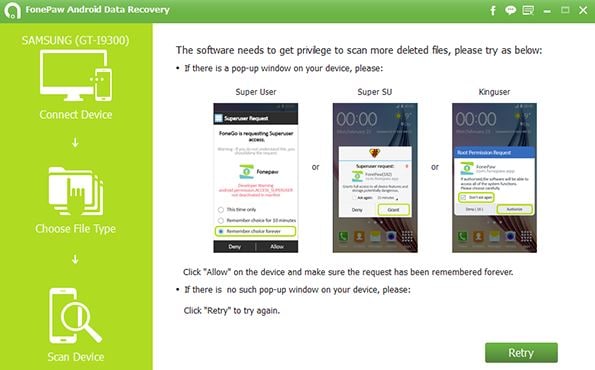
- Firstly, connect your Android phone to the Android Data Recovery app by downloading, installing, and launching it on your PC. Once done, go to the Recover option. Next, use a USB cable for connecting the Android phone to your PC. Always ensure USB debugging is enabled on the phone.
- You receive a pop-up when your Android phone’s operating software is 4.2.2 or higher version, you just need to tap the OK button to allow the USB debugging on your Andoird phone. As soon as your Android phone is connected to the PC, you can see a screen showing Contacts, Call History, Messaging, Videos, Audio, Gallery, etc.These file types are supported for Snapchat recovery by the Android Data Recovery tool.
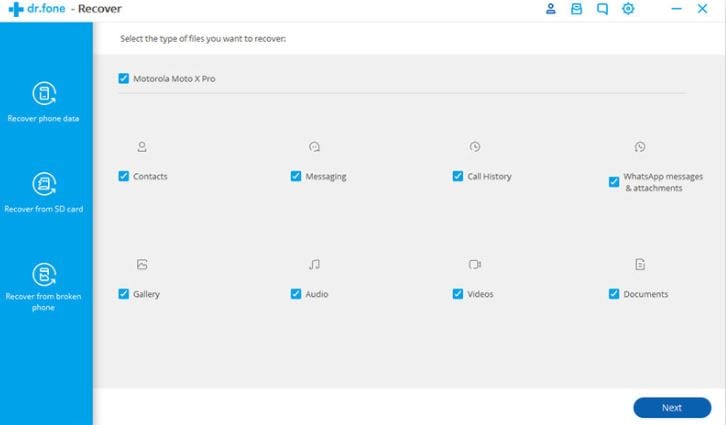
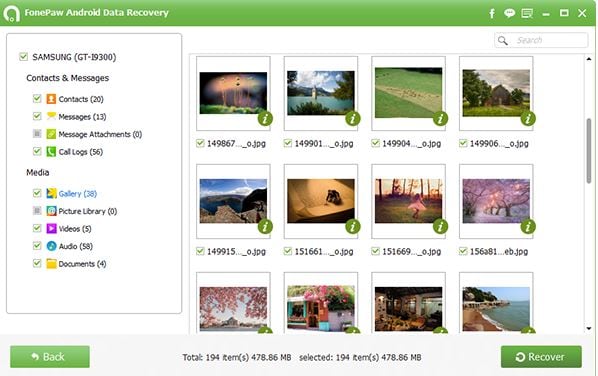
- By default, all the file types are marked checked by the software. In order to recover Snapchat photos/videos, you need to click on the file type you wish to recover and then click on next. The non-rooted devices get 2 options- Scan for deleted files and Scan for all files. You can select Scan for all files, though it will take quite long to scan, it’s worth as your phone is checked thoroughly. Click Next.
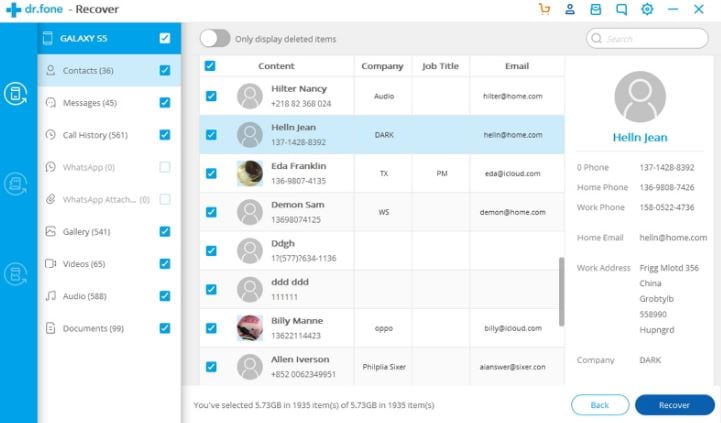
- The Android Data Recovery software analyzes your device and then, scan it to recover the lost data. After the scan process ends, you get a preview of the recoverable files. Just select the files you wish to recover and click on the Recover button to save the files on your PC.
Part 2: How To Recover Snapchat Photos/Videos From iPhone
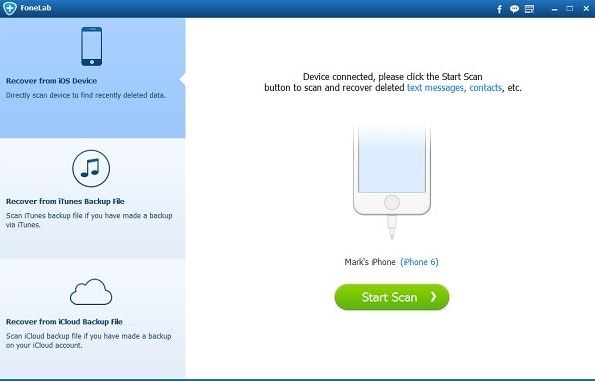
Unlike Snapchat recovery on Android, there are no other ways than apps to recover Snapchat photos/videos on iPhone. The FonePaw iPhone Data Recovery software can be used to recover Snapchat photos. The steps to Snapchat recovery are-
- Download the free version of the FonePaw iPhone Data Recovery on the PC to connect your iPhone to it. Once the computer detects your iPhone, click on the Start Scan button in blue color. As soon as you click on it, the program starts scanning all your iPhone data.
- With the end of the scanning process, on the left-hand side of the screen, you can find the App Photos. Click on it and try searching the deleted Snapchat photos and videos. If you find the Snapchats, click on Recover for Snapchat recovery.
- If not, then, you may disconnect the iPhone from your PC to try other 2 modes of recovery that are Recover from iTunes backup file and Recover from the iCloud backup file. These two modes to recover Snapchat photos/videos also have trial versions so you can always give it a try.
Part 3: Free Snapchat Recovery Tools
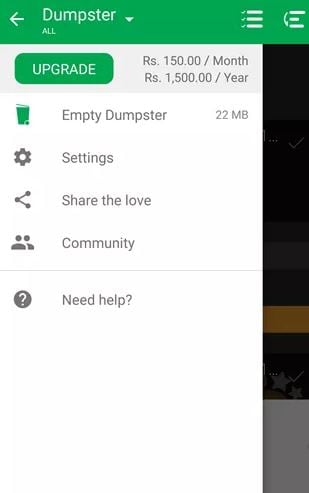
1. Dumpster
Retrieving the data from your Android becomes easy with Dumpster, which is an Android recycle bin. It saves the deleted data on Android automatically and is restored in your device. The features of Dumpster include-
- Easy back up to your Android device
- Videos, images, and files are easily retrievable
- In premium version, you get cloud storage
- 14 language support
- Automatic clean feature available
2. iPhone Data Recovery
You can easily recover Snapchat photos/videos on iPhone with 3 modes offered by iPhone Data Recovery program. Now, recover the lost data from iOS devices, iCloud, iTunes Backup easily. The features include-
- Restore the deleted messages, videos, photos, photostream, camera roll
- Encoded iTunes backup files access
- Retrieve iCloud backup files
- Recover lost Snapchat data
Conclusion
If you deleted your data by mistake or whether the data gets automatically deleted, there are ways to recover Snapchat photos/videos and other files and data on Android and iPhone. Follow the above steps and ensure the protection of your data at all times without worrying about the lost data.
Ollie Mattison
Ollie Mattison is a writer and a lover of all things video.
Follow @Ollie Mattison
Ollie Mattison
Mar 27, 2024• Proven solutions
On Snapchat, you can pick between 1 to 10 seconds for viewing the shared content. As soon as the receiver opens the content, it gets deleted automatically within the time specified by you for viewing.
But, do wish to recover Snapchat photos/videos? You wish to see the same funny content again but it’s deleted automatically. What to do now? Don’t worry Snapchat recovery is possible and in this article, we discuss how to quickly recover Snapchat photos and videos from Android and iPhone separately.
- Part1: How To Recover Snapchat Photos/Videos From Android Phone
- Part2: How To Recover Snapchat Photos/Videos From iPhone
- Part3: Free Snapchat Recovery Tools
Part 1: How To Recover Snapchat Photos/Videos From Android Phone
Are you seeking help to recover Snapchat photos and videos from your Android phone? There are possibilities that your photos and videos are saved in some folder on your Android phone itself. Although one of the best ways to keep your Snapshot photos saved is by taking screenshots. But, you often forget to do that. Isn’t it? Not to worry. The data is at times stored in a specific folder on your Android phone. The files you receive usually ends with .nomedia. It is an extension which makes the videos and photos invisible.
When you use your phone quite often, the chances of saving the deleted content in a particular data location becomes high.
- You can search for com.snapchat.android folder
- Reach the cache folder
- Next search for two other folders in Cache that are -com.android.renderscript.cache and receive_image_snaps
If you are unable to recover Snapchat photos/videos from the specific folder on your Android phone, you also can use Snapchat recovery to retrieve them on Android phone. The steps to retrieving the deleted content are-
- Firstly, connect your Android phone to the Android Data Recovery app by downloading, installing, and launching it on your PC. Once done, go to the Recover option. Next, use a USB cable for connecting the Android phone to your PC. Always ensure USB debugging is enabled on the phone.
- You receive a pop-up when your Android phone’s operating software is 4.2.2 or higher version, you just need to tap the OK button to allow the USB debugging on your Andoird phone. As soon as your Android phone is connected to the PC, you can see a screen showing Contacts, Call History, Messaging, Videos, Audio, Gallery, etc.These file types are supported for Snapchat recovery by the Android Data Recovery tool.
- By default, all the file types are marked checked by the software. In order to recover Snapchat photos/videos, you need to click on the file type you wish to recover and then click on next. The non-rooted devices get 2 options- Scan for deleted files and Scan for all files. You can select Scan for all files, though it will take quite long to scan, it’s worth as your phone is checked thoroughly. Click Next.
- The Android Data Recovery software analyzes your device and then, scan it to recover the lost data. After the scan process ends, you get a preview of the recoverable files. Just select the files you wish to recover and click on the Recover button to save the files on your PC.
Part 2: How To Recover Snapchat Photos/Videos From iPhone
Unlike Snapchat recovery on Android, there are no other ways than apps to recover Snapchat photos/videos on iPhone. The FonePaw iPhone Data Recovery software can be used to recover Snapchat photos. The steps to Snapchat recovery are-
- Download the free version of the FonePaw iPhone Data Recovery on the PC to connect your iPhone to it. Once the computer detects your iPhone, click on the Start Scan button in blue color. As soon as you click on it, the program starts scanning all your iPhone data.
- With the end of the scanning process, on the left-hand side of the screen, you can find the App Photos. Click on it and try searching the deleted Snapchat photos and videos. If you find the Snapchats, click on Recover for Snapchat recovery.
- If not, then, you may disconnect the iPhone from your PC to try other 2 modes of recovery that are Recover from iTunes backup file and Recover from the iCloud backup file. These two modes to recover Snapchat photos/videos also have trial versions so you can always give it a try.
Part 3: Free Snapchat Recovery Tools
1. Dumpster
Retrieving the data from your Android becomes easy with Dumpster, which is an Android recycle bin. It saves the deleted data on Android automatically and is restored in your device. The features of Dumpster include-
- Easy back up to your Android device
- Videos, images, and files are easily retrievable
- In premium version, you get cloud storage
- 14 language support
- Automatic clean feature available
2. iPhone Data Recovery
You can easily recover Snapchat photos/videos on iPhone with 3 modes offered by iPhone Data Recovery program. Now, recover the lost data from iOS devices, iCloud, iTunes Backup easily. The features include-
- Restore the deleted messages, videos, photos, photostream, camera roll
- Encoded iTunes backup files access
- Retrieve iCloud backup files
- Recover lost Snapchat data
Conclusion
If you deleted your data by mistake or whether the data gets automatically deleted, there are ways to recover Snapchat photos/videos and other files and data on Android and iPhone. Follow the above steps and ensure the protection of your data at all times without worrying about the lost data.
Ollie Mattison
Ollie Mattison is a writer and a lover of all things video.
Follow @Ollie Mattison
Quick Guide to Achieving Video Freeze Effects on Snapchat
Snapchat is an instant messaging app that allows you to share your pictures and videos with your family members, friends, and colleagues. In addition, you can even create your stories in the form of movie clips and share them on the app. These stories remain available for the next 24 hours, after which they are automatically removed from the platform.
While sharing the videos, you can apply several filters that are already present in the app, and Slow Motion is one of them. You may want to learn how to slow down a video on Snapchat when you want to emphasize and draw viewers’ attention toward the scene, or wish to make the audience see your actions closely and in detail.
That said, in the following sections, you will see how to slow down videos on Snapchat, and what other methods you can use to reduce the playback speed more professionally.
In this article
01 How to Add Slow Motion Effects to Video Using the Snapchat App
02 How to Record a Slo-Mo Video and Upload to Snapchat
03 How to Make Flash and Smooth Slo Mo Video for Snapchat
04 FAQs about Slowing Down Snapchat Video
Part 1: How to Add Slow Motion Effects to Video Using the Snapchat App
Snapchat has a built-in Slow Motion filter that reduces the playback speed of a video when applied. You can learn how to slow down on Snapchat by following the instructions that are given below:
Step 1: Record a Video
Launch Snapchat on your smartphone (iPhone 13 Pro Max is used here for illustrations), make sure that the Camera section is selected from the bottom, tap and hold down the Capture button that is present at the lower part of the interface, and let go of it when you are done recording.

Step 2: Apply the Slow Motion Filter
Once the video is recorded, swipe the screen from left to right. Repeat this process until you see the Snail (Slow Motion) icon on the screen. This will reduce the playback speed of the clip.

Step 3: Decorate the Video (Optional)
Use the options present on the upper-right area of the screen to further decorate the video and/or add annotations to it.

Step 4: Share or Publish the Video
Once everything is done, tap Send To from the bottom-right corner to share the video with your family, friends, and colleagues, or publish it as a story that remains available for the next 24 hours.
Related: How to Record Slo-Mo videos on iPhone .
Part 2: How to Record a Slo-Mo Video and Upload to Snapchat
With Snapchat, even though you don’t require any third-party tool to reduce the playback speed of a video, the app has certain limitations. For example, it doesn’t allow you to set a zoom level, you are stuck with the framerate that the app has to offer, etc.
Because of this, many people prefer to use different methods to record a video in slow motion with their preferences, and then upload it to Snapchat. This approach also eliminates the need to swipe the screen several times merely to use a single slow-motion filter.
Fortunately, iPhone has a built-in SLO-MO mode in its Camera app that allows you to capture the videos in slow motion. To learn how to do slow mo on Snapchat with the iPhone’s Camera app, you can follow the instructions that are given below:
Step 1: Get to the iPhone’s SLO-MO Mode
Launch the Camera app on your iPhone (iPhone 13 Pro Max is used here for illustrations), and swipe the screen from left to right until you get to the SLO-MO mode.

Step 2: Set Recording Preferences
Tap the number that is present at the top-right corner (240 here) to toggle between different framerates, tap 1x from the lower-center area, swipe slightly up, and then use the wheel that appears next to define your preferred zoom level.

Step 3: Start and Stop the Recording
Tap the Record button to start the recording, and tap Stop when you’re done.
Note: Make sure that the duration of the recorded video doesn’t exceed 60 seconds.
Step 4: Upload the Slow-Motion Video to Snapchat
After the video is recorded in slow motion, close the Camera app, launch Snapchat, and tap the Gallery icon from the left side of the Capture button on the Camera section. From the Memories screen, go to the Camera Roll tab, and tap to select the video that you recorded in the previous step.
Next, optionally, tap the Edit icon from the bottom-left corner to decorate the video and/or add annotations to it, and follow the process as explained in the previous section to share the clip with your family, friends, or colleagues, or publish it as your story.

Part 3: How to Make Flash and Smooth Slo Mo Video for Snapchat
Although iPhone has the built-in SLO-MO mode that even enables you to set your preferred framerate and zoom level before recording, it still doesn’t allow you to slow down different parts of a video in different speed at your convenience. You can either record the entire video in slow motion or at a normal speed.
This is where a third-party app comes into play. While there are several video editing programs available online, the one of the best slow motion apps that helps you slow down the portions of a video with precision is CapCut.
Downloading and installing CapCut on your iPhone or Android phone is simple, and once it is done, you can follow the process given below to learn how to slow things down on Snapchat:
With CapCut, you can either slow down the whole clip or manage the speed for different segments. This section explains both methods.
Method 1: Slow Down the Whole Clip with CapCut
Step 1: Get to the Speed Panel
Launch CapCut, import the video that you want to slow down, and tap the imported media in the Timeline. Next, tap Speed from the bottom of the interface to get to the next window.

Step 2: Reduce the Speed of the Video
Tap Normal from the bottom of the screen that appears next, and drag the Speed slider to the left to reduce the playback speed. Tap OK from the bottom-right corner to save the changes.

Step 3: Upload the Video to Snapchat
Back on the previous interface, optionally tap Volume from the bottom and reduce the slider to 0 to mute the audio of the footage as it may get distorted due to the reduction in the speed.
Next, tap Share from the top-right corner to save the video on your iPhone, and then use the method explained in the previous section to access the clip from the Gallery within Snapchat for uploading.
Method 2: Reduce the Playback Speed of Different Parts of a Video
Step 1: Get to the Speed Panel
Use the process described in the previous method to get to the Speed panel.
Step 2: Reduce the Speed of Different Parts of the Video
Tap Curve from the bottom of the interface. On the next screen, tap Custom from the lower area, and then tap Edit. From the next panel, drag the beat points down to reduce the speed (or drag them above the line to increase).

Notice that each beat point represents a particular section of the video, and dragging it down reduces the playback speed of that segment. You can even tap anywhere on the line to add a new beat point and drag it down as needed for more precise speed management. Once done, tap OK from the bottom-right corner to save the modifications.

Optionally, you can also tap any of the available presets on the Curve screen to reduce the playback speed of the video accordingly.
Step 3: Upload the Video to Snapchat
Use the method explained in the previous method to export the video, upload it to Snapchat, and share the clip with your family, friends, and colleagues, or publish it as your story.
Part 4: FAQs about Slowing Down Snapchat Video
1. Can I record a slow mo video in Snapchat?
Technically speaking, no, you cannot. However, once you have recorded a video at a normal speed in Snapchat, you can apply the built-in Slow Motion filter to it by swiping the screen from left to right until you see the Snail icon at the center. The Snail icon represents the Slow Motion filter that reduces the playback speed when applied.
2. Besides slow-motion, which speed filters does Snapchat have?
In addition to slow motion Snapchat also has Forward and Fast Forward filters that increase the playback speed. While the Forward filter increases the speed slightly, the Fast Forward one enhances it drastically.
Conclusion
When using an iPhone, even though the SLO-MO mode enables you to record footage in slow motion, you don’t get many options. Therefore, it would be safe to say that it is easy to slow down the speed of a video if you have a dedicated third-party post-production app. However, if you want to go for a convenient method, learning how to slow down a video on Snapchat is an extremely simple and straightforward process.
02 How to Record a Slo-Mo Video and Upload to Snapchat
03 How to Make Flash and Smooth Slo Mo Video for Snapchat
04 FAQs about Slowing Down Snapchat Video
Part 1: How to Add Slow Motion Effects to Video Using the Snapchat App
Snapchat has a built-in Slow Motion filter that reduces the playback speed of a video when applied. You can learn how to slow down on Snapchat by following the instructions that are given below:
Step 1: Record a Video
Launch Snapchat on your smartphone (iPhone 13 Pro Max is used here for illustrations), make sure that the Camera section is selected from the bottom, tap and hold down the Capture button that is present at the lower part of the interface, and let go of it when you are done recording.
Step 2: Apply the Slow Motion Filter
Once the video is recorded, swipe the screen from left to right. Repeat this process until you see the Snail (Slow Motion) icon on the screen. This will reduce the playback speed of the clip.
Step 3: Decorate the Video (Optional)
Use the options present on the upper-right area of the screen to further decorate the video and/or add annotations to it.
Step 4: Share or Publish the Video
Once everything is done, tap Send To from the bottom-right corner to share the video with your family, friends, and colleagues, or publish it as a story that remains available for the next 24 hours.
Related: How to Record Slo-Mo videos on iPhone .
Part 2: How to Record a Slo-Mo Video and Upload to Snapchat
With Snapchat, even though you don’t require any third-party tool to reduce the playback speed of a video, the app has certain limitations. For example, it doesn’t allow you to set a zoom level, you are stuck with the framerate that the app has to offer, etc.
Because of this, many people prefer to use different methods to record a video in slow motion with their preferences, and then upload it to Snapchat. This approach also eliminates the need to swipe the screen several times merely to use a single slow-motion filter.
Fortunately, iPhone has a built-in SLO-MO mode in its Camera app that allows you to capture the videos in slow motion. To learn how to do slow mo on Snapchat with the iPhone’s Camera app, you can follow the instructions that are given below:
Step 1: Get to the iPhone’s SLO-MO Mode
Launch the Camera app on your iPhone (iPhone 13 Pro Max is used here for illustrations), and swipe the screen from left to right until you get to the SLO-MO mode.
Step 2: Set Recording Preferences
Tap the number that is present at the top-right corner (240 here) to toggle between different framerates, tap 1x from the lower-center area, swipe slightly up, and then use the wheel that appears next to define your preferred zoom level.
Step 3: Start and Stop the Recording
Tap the Record button to start the recording, and tap Stop when you’re done.
Note: Make sure that the duration of the recorded video doesn’t exceed 60 seconds.
Step 4: Upload the Slow-Motion Video to Snapchat
After the video is recorded in slow motion, close the Camera app, launch Snapchat, and tap the Gallery icon from the left side of the Capture button on the Camera section. From the Memories screen, go to the Camera Roll tab, and tap to select the video that you recorded in the previous step.
Next, optionally, tap the Edit icon from the bottom-left corner to decorate the video and/or add annotations to it, and follow the process as explained in the previous section to share the clip with your family, friends, or colleagues, or publish it as your story.
Part 3: How to Make Flash and Smooth Slo Mo Video for Snapchat
Although iPhone has the built-in SLO-MO mode that even enables you to set your preferred framerate and zoom level before recording, it still doesn’t allow you to slow down different parts of a video in different speed at your convenience. You can either record the entire video in slow motion or at a normal speed.
This is where a third-party app comes into play. While there are several video editing programs available online, the one of the best slow motion apps that helps you slow down the portions of a video with precision is CapCut.
Downloading and installing CapCut on your iPhone or Android phone is simple, and once it is done, you can follow the process given below to learn how to slow things down on Snapchat:
With CapCut, you can either slow down the whole clip or manage the speed for different segments. This section explains both methods.
Method 1: Slow Down the Whole Clip with CapCut
Step 1: Get to the Speed Panel
Launch CapCut, import the video that you want to slow down, and tap the imported media in the Timeline. Next, tap Speed from the bottom of the interface to get to the next window.
Step 2: Reduce the Speed of the Video
Tap Normal from the bottom of the screen that appears next, and drag the Speed slider to the left to reduce the playback speed. Tap OK from the bottom-right corner to save the changes.
Step 3: Upload the Video to Snapchat
Back on the previous interface, optionally tap Volume from the bottom and reduce the slider to 0 to mute the audio of the footage as it may get distorted due to the reduction in the speed.
Next, tap Share from the top-right corner to save the video on your iPhone, and then use the method explained in the previous section to access the clip from the Gallery within Snapchat for uploading.
Method 2: Reduce the Playback Speed of Different Parts of a Video
Step 1: Get to the Speed Panel
Use the process described in the previous method to get to the Speed panel.
Step 2: Reduce the Speed of Different Parts of the Video
Tap Curve from the bottom of the interface. On the next screen, tap Custom from the lower area, and then tap Edit. From the next panel, drag the beat points down to reduce the speed (or drag them above the line to increase).
Notice that each beat point represents a particular section of the video, and dragging it down reduces the playback speed of that segment. You can even tap anywhere on the line to add a new beat point and drag it down as needed for more precise speed management. Once done, tap OK from the bottom-right corner to save the modifications.
Optionally, you can also tap any of the available presets on the Curve screen to reduce the playback speed of the video accordingly.
Step 3: Upload the Video to Snapchat
Use the method explained in the previous method to export the video, upload it to Snapchat, and share the clip with your family, friends, and colleagues, or publish it as your story.
Part 4: FAQs about Slowing Down Snapchat Video
1. Can I record a slow mo video in Snapchat?
Technically speaking, no, you cannot. However, once you have recorded a video at a normal speed in Snapchat, you can apply the built-in Slow Motion filter to it by swiping the screen from left to right until you see the Snail icon at the center. The Snail icon represents the Slow Motion filter that reduces the playback speed when applied.
2. Besides slow-motion, which speed filters does Snapchat have?
In addition to slow motion Snapchat also has Forward and Fast Forward filters that increase the playback speed. While the Forward filter increases the speed slightly, the Fast Forward one enhances it drastically.
Conclusion
When using an iPhone, even though the SLO-MO mode enables you to record footage in slow motion, you don’t get many options. Therefore, it would be safe to say that it is easy to slow down the speed of a video if you have a dedicated third-party post-production app. However, if you want to go for a convenient method, learning how to slow down a video on Snapchat is an extremely simple and straightforward process.
Also read:
- [Updated] 2024 Approved Refresh Your TikTok Storytelling with Dynamic Backgrounds
- [Updated] 2024 Approved Secure Your iPhone Unwatermarked TikTok Video Downloads
- [New] Step-by-Step Guide to Effective Use of TikTok Icons
- [Updated] Dominate the Digital Domain with TikTok Marketing Strategies & Noteworthy Examples for 2024
- [Updated] 2024 Approved Unveiling Pro Slow Motion Filming Techniques for Stellar TikTok Videos
- In 2024, Jest Journal Celebrating Funniest TikTok Talents
- [New] The Top 5 Must-Know for macOS TikTok Users
- [New] Taking Control of Your TikTok Experience, PC & Mac Style
- [New] 2024 Approved The Most Engaging TikTok Stars for Your Drive
- Reworking Your TikTok Persona The Step-by-Step Explanation for 2024
- [New] 2024 Approved Capture Attention with Influential Tags on Social Media's TikTok
- Flavorful Feeds Top TikTok Food Influencers for 2024
- [Updated] 2024 Approved Mastering Slow Motion on TikTok A Step-by-Step Guide
- [New] Leap Into the Spotlight with TikTok Lives for 2024
- [New] In 2024, The Beat Drops Essential TikTok Rap Playlists
- [New] The Essential Guide to Exceptional TikTok Recordings in Under 156 Characters for 2024
- [Updated] Engaging Enthusiasts 30+ Revolutionary Bio Strategies for Maximum Popularity on Filmora's TikTok Platform
- [New] 2024 Approved Secrets to Successful TikTok Creation Using Android, PC
- [New] In 2024, Mastering Your TikTok Identity Comprehensive Adjustment Instructions
- 2024 Approved Needlework Networking Sewing Skills in Social Spaces (TikTok)
- [New] Top 10 Effortless Yet Striking TikFilters for All
- [Updated] 2024 Approved Text Integration in TikTok Creations, Step by Step
- [New] Most Affordable Webcam Recording Devices Ranked
- [Updated] Online TV Downloading A Complete Recording Blueprint
- [Updated] QuickQuip QuarterMotion Grip for 2024
- In 2024, How to Transfer Data from Asus ROG Phone 7 Ultimate to BlackBerry | Dr.fone
- [Updated] 2024 Approved Discovering Instagram De-Follows Quickly
- A Detailed VPNa Fake GPS Location Free Review On Tecno Spark 20C | Dr.fone
- Updated In 2024, Composing for Cinema Adding Musical Layers to Video Content
- [New] Premier Imagery Capture Insight for 2024
- Updated Liberating Content Free Techniques for Transforming Videos Into Auditory Experiences for 2024
- Top 7 Phone Number Locators To Track Lava Storm 5G Location | Dr.fone
- In 2024, How Can Vivo Y02TMirror Share to PC? | Dr.fone
- Title: Recover Lost Photos on Snapchat
- Author: Stephen
- Created at : 2024-05-23 02:20:27
- Updated at : 2024-05-24 02:20:27
- Link: https://tiktok-video-recordings.techidaily.com/recover-lost-photos-on-snapchat/
- License: This work is licensed under CC BY-NC-SA 4.0.
