"Step-by-Step Guide to Masterful Snapchat Editing"
Step-by-Step Guide to Masterful Snapchat Editing
Since its inception in 2011, Snapchat has steadily evolved into one of the best social media platforms over time, with over 347 million daily active users today. And it’s not just millennials who are using the app - Snapchat is popular with people of all ages.
But have you ever wondered and thought about how people get those amazing images on Snapchat? Well, wonder no more! In this article, we’re going to show you how to edit photos on Snapchat so that you can make them look even better!

Therefore, without any further delay, let’s dive in!
Part 1. What are Snapchat’s Image Editing Tools?
If you desire to add some extra flair to your photos, Snapchat’s image editing tools are a great way to do it. These tools let you add filters, stickers, and other effects to your photos and videos.
Snapchat photo editing tools are easy-to-use and can help you turn dull pictures into something fun and interesting. You can even edit images that were not originally taken on Snapchat.
Want to know how? Keep reading to find out what is behind the curtain!
Part 2. How to Edit Pictures Taken from the Camera Roll
Have you taken a photo but don’t think it’s worth sharing with the public and want to edit it? Don’t worry; Snapchat has got you covered!
A Quick Guide:
- How to Add Pictures from Your Camera Roll to Snapchat
- How To Edit Photos On Snapchat
- How To Add Stickers To Your Images?
- How to Use the Snapchat Text Tool
- How to Draw on your Images
- How To Add A Theme
- How To Attach A URL
- How To Crop Images On Snapchat
- How to Set a Time Limit
How to Add Pictures from Your Camera Roll to Snapchat
Here’s a quick rundown of how to add pictures from your camera roll to Snapchat:
Step1 Open the Snapchat app on your device and tap the “Two Overlayed Pictures” icon beside the Camera button.

Step2 This will take you to Memories. Click the Camera Roll tab, scroll the pictures to add the one you want, and tap it.

Step3 Now, you can send the picture to your friends, add it to your story, or edit it to create a masterpiece.
How To Edit Photos On Snapchat
Now that you’ve added your picture from the Camera roll, follow the steps below to edit it using the Snapchat image editing tools:
Step1 Click the Edit icon at the bottom-right of the selected picture. To add text, click the T icons, type whatever you want, select color by dragging the icon in the color pane and add the text style.

Step2 If you want to draw something on your picture, use the pencil icon. The draw function offers color panes, an emojis pen, and a color picker.
Step3 You can also use the Scissor icon to cut a portion of your picture and create a sticker or add a URL to your image using the paperclip icon.
Step4 To set a time limit on your snap, click the Clock icon and set the limit. Finally, tap the Done icon to save a copy of the photo, or use the Export icon to share your picture on other social media platforms.
How To Add Stickers To Your Images?
To create your own or add a premade sticker to your picture, do the following steps in sequence:
Step1 Tap the paper icon to the right side of your selected picture. This will take you to the Snapchat stickers library.
Step2 Since the stickers are placed in different categories, including recently used, popular, Bitmojis, etc., swipe right/left to get to the desired page.
Step3 Next, swipe up and down to find the sticker you want and tap it to add to your picture. To know more about Snapchat filters, read “Top 20 Snapchat Filters & Lenses to Make Your Snaps Special .”

How to Use the Snapchat Text Tool
Want to add a caption or something interesting to your picture? With the following steps, you can easily add any text to your photos while editing them on Snapchat:
Step1 Tap the “T” icons at the top-right side of the screen to open the Text tool.
Step2 Type your text and use the font gallery to change the text style. Tap the Align option to set the alignment of your text.
Step3 Next, use the color meter to change the font color. Tap the white icon on the color bar and drag it to select your preferred color. Finally, tap the Back icon at the top-left of the screen to apply the text.

How to Draw on your Images
Snapchat comes with a drawing tool that you can use to add a personal touch to your photos or create fun and unique designs in the following way:
Step1 On your selected picture, tap the Pencil icon to open the drawing tool. Drag your finger on the Color meter to select the color.
Step2 Tap the Color wheel to change the color palette and then choose the color you want. To draw emojis on your picture, tap the Emoji icon and select the one you want to use.
Step3 Finally, use your finger to draw on the picture. You can use the Undo icon to take back any action that goes wrong.

How To Add A Theme
Adding a theme to your images on Snapchat is a great way to add some personality and style. Here’s how you can do this:
Step1 Tap the Paintbrush icon from the Snapchat editing tools at the left of your picture.
Step2 Search for the theme using the Search box or scroll up and down to find the one you like.
Step3 Select the theme you want and tap on it to add to your photo. Keep in mind that Snapchat only adds themes to the original images, not from the Camera Roll.
How To Attach A URL
Do you want to share a clickable website URL on your story to help your audience know the true meaning and concept behind the image? The Snapchat URL tool can help you!
Here’s a quick and easy breakdown of the steps to attach a URL to your pictures:
Step1 On your selected picture, click the Paperclip icon to launch the URL tool.
Step2 Type your URL in the search field, and tap Enter on your keyboard.
Step3 Snapchat will open the website for your review. Tap the “Attach to Snap” option and adjust the link on your picture.
How To Crop Images On Snapchat
The following steps can help your crop images on Snapchat:
Step1 Tap the Crop icon below the Paperclip option on your selected picture.
Step2 Use your fingers to adjust the picture size and remove unwanted areas. You can also use the Rotation icon to rotate your image.
Step3 Finally, tap the blue Check icon to save your cropped image.

If you want to learn how to zoom your videos or images on Snapchat, click here to find out!
How to Set a Time Limit
You can set a time limit on your photo to limit their visibility while editing it on Snapchat. To do so, follow the below instructions step-by-step:
Step1 To set the time limit on your picture, tap the Clock icon from the Snapchat photo editing tools on the right side of the screen.
Step2 Swipe up and down to select the time limit and tap it.
Step3 Finally, tap the Clock icon at the top right side of the screen to apply the time limit.

Part 3. How to Save Snaps for Later Sharing
When you take a Snap, you can directly send it to your friends. But sometimes, you want to keep a Snap around for a while before sharing it. Maybe you want to edit it first, or you want to wait for the perfect moment to share it.
Whatever the reason, there are two scenarios in which you can save your Snaps for later sharing:
A Quick Guide:
Saving the Original Snapchat Pictures
Here’s how you can save the original Snaps as a Snapchat user:
Step1 Launch the Snapchat app and take a picture.
Step2 Tap the Save icon in the lower left-hand corner of the screen.
Step3 Tap the “Save image.”

Saving the Edited Camera Roll’s Pictures
Follow the instructions below to save your edited Camera Roll pictures on Snapchat:
Step1 Once you’ve edited your picture, tap the Done option.
Step2 Tap “Save as Copy,” and your picture will be saved to your gallery.
Step3 Alternatively, you can tap the Export option and select “Download” to save the image to your phone’s Gallery.
A Bonus Tips: How to Save Snapchat Videos with Apps on Android and Mac
Do you want to record your Snapchat stories like a movie or slideshow on Android or Mac? Well, you can save your Snapchat videos using apps or software programs.
For your Mac system, we recommend using Filmora - an easy-to-use video editing software with an excellent recording feature. With this tool, you can record the full screen, part of it, or a specific window on your system.
Free Download For Win 7 or later(64-bit)
Free Download For macOS 10.14 or later
For Android, download the AZ video recorder - an app that does not require any root access and lets you record your screen with a high resolution and frame rate. To learn more, click here!
Conclusion
In this article, we’ve explained how to edit photos on Snapchat with simple and easy-to-follow instructions. We’ve discussed adding stickers, text, URL, time limit, theme, and cropping the image to remove unwanted sections from it.
Hopefully, you’ll find this step-by-step guide helpful and can now use Snapchat photo editing tools without any issues.
Expressive Artistry on Snapchat: Simplified Lenses Methods
How to Create Snapchat Lenses Easily: 2 Methods

Ollie Mattison
Mar 27, 2024• Proven solutions
Are you feeling like creating your own Snapchat lens, so you can have an even better experience with the app? The good news is that two new Snapchat tools have been released – the Lens Studio and Create Your Own Lens applications.
If you are a regular Snapchat user, you may want to learn about the Snapchat lens and how it can help you. We will help you get started. Here is our step by step guide on how to make Snapchat lenses.
- Part1: Comparing Lens Studio and Creating Your Own Lens
- Part2: How to Use Lens Studio
- Part3: How to Create Snapchat Lenses Using Create Your Own Lens
Part 1: Comparing Lens Studio and Creating Your Own Lens
The two programs that we are highlighting today are Lens Studio and Create Your Own Lens. These are both fantastic programs for creating your own Snapchat lens, but they do have slightly different uses. If you are the type of person who wants to design a professional Snapchat lens, you are going to prefer Lens Studio.
But if you are hoping to come up with something creative that you can share with your friends and family, then you may love Create Your Own Lens. It is a very easy program to use, and it offers a ton of features that you may be surprised to see.
Snapchat lenses is for fun
The beauty of Snapchat lenses is that you can now create your own environment, which you can use each time you are taking photos or videos. Sure, you can always use the filters that are already available in the application, but not everyone would find those enough.
If you want some customization, or you just want to mess around until you get the filter that makes sense for you, Snapchat lenses are the way to go.

Lens Studio is for business
Lens Studio is perfect for businesses that may want to create unique environments for their clients, or the times when they are releasing company Snapchat posts. Say the company is hosting an event. They may want a custom graphic for that event, which is used for all the pictures and videos posted to Snapchat about the event. Using Lens Studio lets them do that with ease.
Create Your Own Lens is great when you are going to a special event, birthday party or graduating, and you want a special graphic that comes up in all your snaps. It is very intuitive to use, and is available through the App Store as a download.
Part 2: How to Use Lens Studio
1. Download Lens Studio
The first step involves downloading Lens Studio, which you can do from your computer. It is compatible with both Windows and Mac computers, and will run on any semi-modern system. According to the Snapchat team, Lens Studio is similar to the program used by their AR teams to create lenses. That means you are getting similar functionality, but with an easier to manage interface.
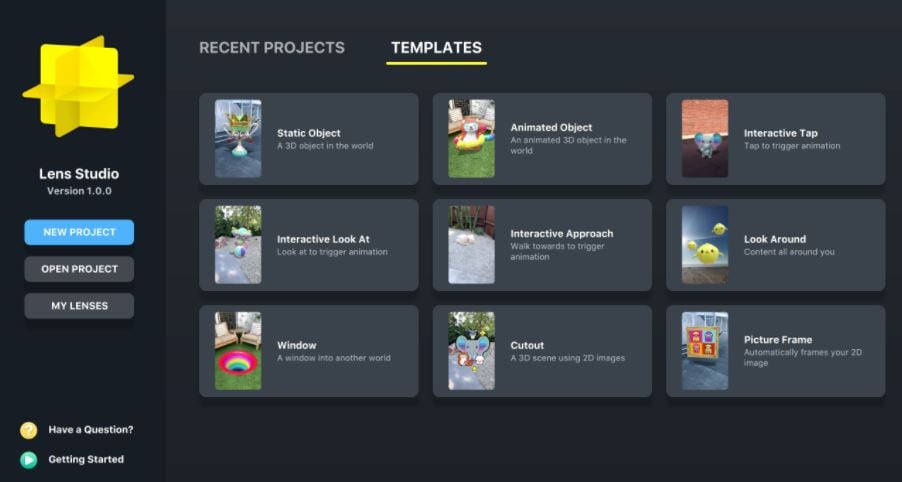
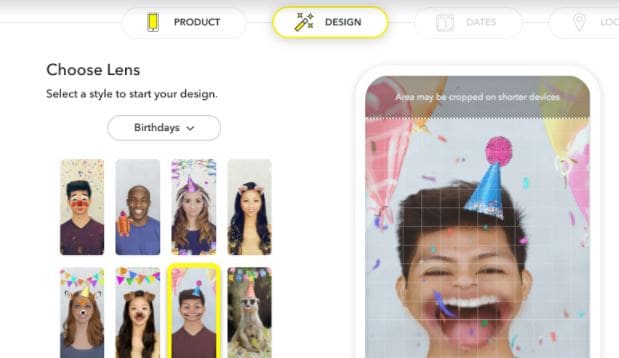
2. Choose Templates Page
It is normal to feel a little overwhelmed the first time you try and use this program. But that is why the templates page is so great. You can select from templates depending on the type of lens that you are hoping to create. You can just use a template, or you can incorporate your own ideas to customize the template.
There is also a Lens Studio Overview guide that you can access online, which will help you get acquainted with the program’s various features and quirks.
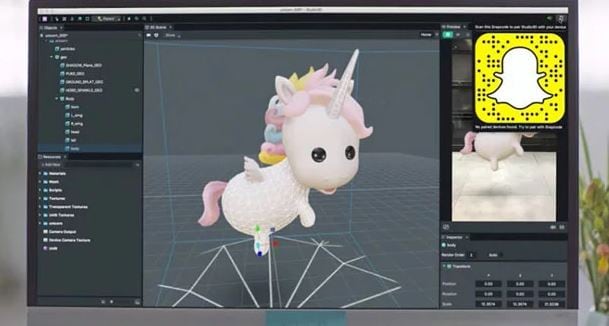
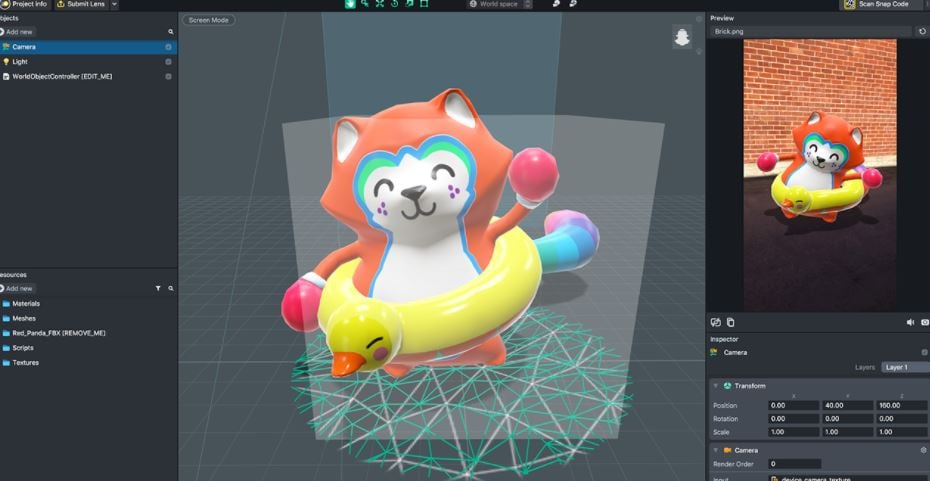
3. Use Studio Panels
Are you ready to create your own custom Snapchat lens? It is time to head over to Studio Panels on the application. This is the area where you can add your own 2D or 3D objects, and you can visualize how they would look as a Snapchat filter. You can add, remove, resize and drag objects to specific areas of the screen.
There are other tools accessible from the Resources panel. You can use these tools to ensure that your Snapchat lens is exactly as you want.
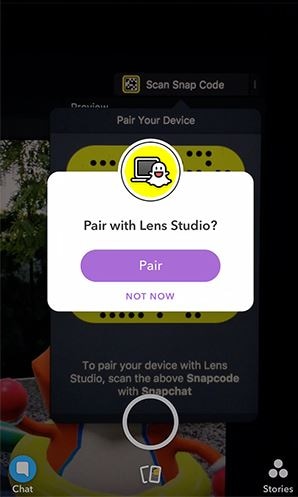
4. Preview the Snapchat Lens You Create
The great thing about this application is that you can preview the lens before you send it out to your phone. When you are satisfied with the image on the preview, you can pair your phone with the application, and you will be able to send that Snapchat lens onto your phone through your Snapcode. It is that simple!
Part 3: How to Create Snapchat Lenses Using Create Your Own Lens
- There are two ways that you can access the tool for creating fun Snapchat lenses. You can either visit the website snapchat.com/create, or you can go on the “filters and lenses” section on your iOS device. If you are using Snapchat on an Android device, you will only have the option for the website. But the feature is coming to the Android version of Snapchat very soon.
- When you are in the application or on the website, you may start to look at the different templates for Snapchat lenses. Now you can add other items into the templates, such as photographs, text or graphics.
It is all up to your imagination. You can create the perfect Snapchat lens, which you can then send into your Snapchat account through your Snapcode. Of course, if you are using your iOS device to create the lens, it is already linked to your account.
Another cool feature is how you can set the location for where the Snapchat lens is available. Say you are hosting a party. You can have the Snapchat lens available to everyone who uses Snapchat within a set square footage of your home. That is an amazing way to let everyone share social media pictures and photos of your party, through the lens you created.
Conclusion
Creating Snapchat lenses has never been easier. Whether you are a business looking to add a custom lens, or you just want to create a fun lens for a graduation or party, there are tools that make the job very easy. Using these tools will allow you to create the perfect Snapchat lens for any occasion.
Ollie Mattison
Ollie Mattison is a writer and a lover of all things video.
Follow @Ollie Mattison
Ollie Mattison
Mar 27, 2024• Proven solutions
Are you feeling like creating your own Snapchat lens, so you can have an even better experience with the app? The good news is that two new Snapchat tools have been released – the Lens Studio and Create Your Own Lens applications.
If you are a regular Snapchat user, you may want to learn about the Snapchat lens and how it can help you. We will help you get started. Here is our step by step guide on how to make Snapchat lenses.
- Part1: Comparing Lens Studio and Creating Your Own Lens
- Part2: How to Use Lens Studio
- Part3: How to Create Snapchat Lenses Using Create Your Own Lens
Part 1: Comparing Lens Studio and Creating Your Own Lens
The two programs that we are highlighting today are Lens Studio and Create Your Own Lens. These are both fantastic programs for creating your own Snapchat lens, but they do have slightly different uses. If you are the type of person who wants to design a professional Snapchat lens, you are going to prefer Lens Studio.
But if you are hoping to come up with something creative that you can share with your friends and family, then you may love Create Your Own Lens. It is a very easy program to use, and it offers a ton of features that you may be surprised to see.
Snapchat lenses is for fun
The beauty of Snapchat lenses is that you can now create your own environment, which you can use each time you are taking photos or videos. Sure, you can always use the filters that are already available in the application, but not everyone would find those enough.
If you want some customization, or you just want to mess around until you get the filter that makes sense for you, Snapchat lenses are the way to go.
Lens Studio is for business
Lens Studio is perfect for businesses that may want to create unique environments for their clients, or the times when they are releasing company Snapchat posts. Say the company is hosting an event. They may want a custom graphic for that event, which is used for all the pictures and videos posted to Snapchat about the event. Using Lens Studio lets them do that with ease.
Create Your Own Lens is great when you are going to a special event, birthday party or graduating, and you want a special graphic that comes up in all your snaps. It is very intuitive to use, and is available through the App Store as a download.
Part 2: How to Use Lens Studio
1. Download Lens Studio
The first step involves downloading Lens Studio, which you can do from your computer. It is compatible with both Windows and Mac computers, and will run on any semi-modern system. According to the Snapchat team, Lens Studio is similar to the program used by their AR teams to create lenses. That means you are getting similar functionality, but with an easier to manage interface.
2. Choose Templates Page
It is normal to feel a little overwhelmed the first time you try and use this program. But that is why the templates page is so great. You can select from templates depending on the type of lens that you are hoping to create. You can just use a template, or you can incorporate your own ideas to customize the template.
There is also a Lens Studio Overview guide that you can access online, which will help you get acquainted with the program’s various features and quirks.
3. Use Studio Panels
Are you ready to create your own custom Snapchat lens? It is time to head over to Studio Panels on the application. This is the area where you can add your own 2D or 3D objects, and you can visualize how they would look as a Snapchat filter. You can add, remove, resize and drag objects to specific areas of the screen.
There are other tools accessible from the Resources panel. You can use these tools to ensure that your Snapchat lens is exactly as you want.
4. Preview the Snapchat Lens You Create
The great thing about this application is that you can preview the lens before you send it out to your phone. When you are satisfied with the image on the preview, you can pair your phone with the application, and you will be able to send that Snapchat lens onto your phone through your Snapcode. It is that simple!
Part 3: How to Create Snapchat Lenses Using Create Your Own Lens
- There are two ways that you can access the tool for creating fun Snapchat lenses. You can either visit the website snapchat.com/create, or you can go on the “filters and lenses” section on your iOS device. If you are using Snapchat on an Android device, you will only have the option for the website. But the feature is coming to the Android version of Snapchat very soon.
- When you are in the application or on the website, you may start to look at the different templates for Snapchat lenses. Now you can add other items into the templates, such as photographs, text or graphics.
It is all up to your imagination. You can create the perfect Snapchat lens, which you can then send into your Snapchat account through your Snapcode. Of course, if you are using your iOS device to create the lens, it is already linked to your account.
Another cool feature is how you can set the location for where the Snapchat lens is available. Say you are hosting a party. You can have the Snapchat lens available to everyone who uses Snapchat within a set square footage of your home. That is an amazing way to let everyone share social media pictures and photos of your party, through the lens you created.
Conclusion
Creating Snapchat lenses has never been easier. Whether you are a business looking to add a custom lens, or you just want to create a fun lens for a graduation or party, there are tools that make the job very easy. Using these tools will allow you to create the perfect Snapchat lens for any occasion.
Ollie Mattison
Ollie Mattison is a writer and a lover of all things video.
Follow @Ollie Mattison
Also read:
- [New] Demystifying Absence No Recommended Video Content on Facebook for 2024
- [Updated] 2024 Approved Maximizing Your TikTok Intro A Mac Guide
- [Updated] In 2024, Best Free Mac Apps for Professional TikTok Cuts
- [Updated] In 2024, Sparking Interest in TikToks Best 50+ Motivational Quotes
- [Updated] In 2024, Top TikTok Patterns You Can’t Miss This Year
- [Updated] TikTok Voiceover Techniques Guide for 2024
- [Updated] Top Tagging Techniques for High View Counts on TikTok
- 2024 Approved Easy and Affordable Video Editing Software (Mac & TikTok)
- Eliminate Risk of Data Loss with Steam Backups
- In 2024, Process of Screen Sharing Oppo Reno 8T to PC- Detailed Steps | Dr.fone
- In 2024, The Ultimate Guide to Unlocking Apple Watch Or iPhone 12 from iCloud
- In 2024, Weaving a Captivating TikTok Closure Narrative
- Master the Art of Removing PS5 Saves Safely
- Masterful Video Chats Best Webcams for Zoom #6 for 2024
- Speedy Insights: Discovering Your Graphics Card Type, Window 11
- Updated Best Free AVI Video Rotation Apps for Windows, MAC, Android, and iPhone Devices for 2024
- Which is the Best Fake GPS Joystick App On Infinix Hot 40? | Dr.fone
- Title: Step-by-Step Guide to Masterful Snapchat Editing
- Author: Stephen
- Created at : 2025-01-04 18:53:00
- Updated at : 2025-01-09 22:29:49
- Link: https://tiktok-video-recordings.techidaily.com/step-by-step-guide-to-masterful-snapchat-editing/
- License: This work is licensed under CC BY-NC-SA 4.0.