
Telltale Signs Your Chat Is Hidden
Telltale Signs Your Chat Is Hidden
In this article, we will talk about how to know if someone blocked you on Snapchat? This article will provide extensive details about how to know if someone blocked you on Snapchat, so, please read it till the end and do not miss any point. So let’s start.
Introduction of how to know if someone blocked you on Snapchat?
It’s a real shame when your social media accounts are permanently disabled. Everyone in the modern world depends on social media to remain in touch. As a result, being blocked may be a devastating experience for a person’s mental health. In this guide, we are going to discuss how to know if someone blocked you on Snapchat?
Snapchat and other similar applications fail to inform you if your account has been blocked. I will let you know how to know if someone blocked you on Snapchat. So, you can keep your attention on the good things in life instead of the bad.
However, if you discover that how to know if someone blocked you on Snapchat, consider why this would be the case. If you’re having trouble messaging someone, don’t attempt to use several accounts. If you approach the situation calmly, you may learn why you were banned on Snapchat. Alternatively, the individual may have canceled your account or removed you from their list of Friends or Contacts.
A deleted account differs from a banned account in that it is no longer accessible.
Blocked vs. removed: What’s the difference?
Snapchat’s blocking system differs from those other social media sites. The individual who is blocked won’t know if they’ve been blocked since they won’t know how to find out. Even if they are no longer friends, the guy who blocked them will seem to be. They’ll remain in your chat list and in your friend’s list, but they won’t be able to see any messages you send. You won’t even be able to access their blogs or other online information.
Being blocked on Snapchat, on the other hand, is a very other matter. This indicates that another person has unfriended you. Your most recent conversations with this individual may be hidden from view. You won’t see them on your buddy list, but you may search for them if you know the username.
How can you know if someone on Snapchat has banned you?
1.Check your recent chats with them
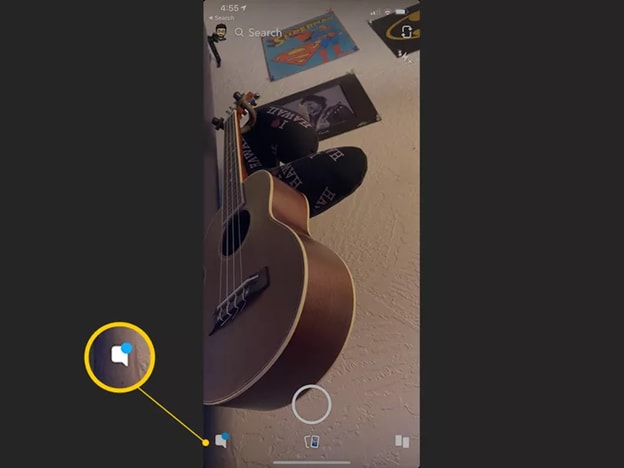
It’s possible that the other user deleted their account or was barred if your recent conversations don’t appear despite being preserved.
2.Send them a message if you can
You can snap someone you’ve spoken to in the past if you’ve previously interacted with them. If you notice a pending or grey indicator after sending it, they may have removed you from the contact list. ‘Failed to send a message - Tap to try again’ may indicate that you have been blocked. Snapchat, on the other hand, will display all of your messages as ‘delivered,’ even if you have been banned.
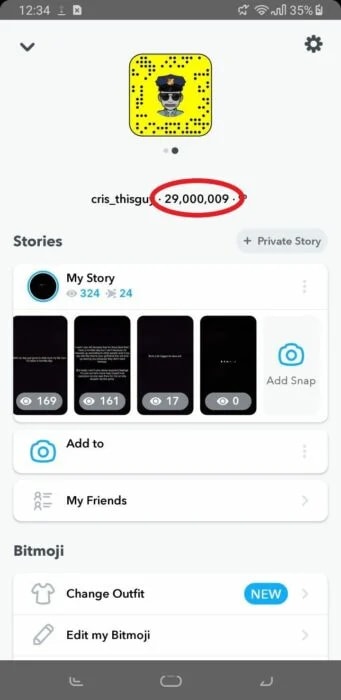
3.Check your list of Friends to see whether they’re there
To see this list, just go to your profile & click on My Friends. If they don’t show up, they may have blocked you. They might have canceled their account or disabled you from their Friends list.
4.Verify whether or not you can view their tales on the internet
Searching for someone active on Instagram may need you to read their recent stories first. If you’re unable to, you’ve probably been blocked.
5. Verify whether you can see their Snapchat rating
Snapchat scores are only visible to friends. Otherwise, your Snapchat account has been suspended or terminated.
6. Use a separate account to do a name search
It’s possible they deactivated their account to ensure you can use a different account to search for their username if you don’t find them there. If they do appear, you may be sure they blocked you after removing you.
Snapchat hides the fact that someone has banned you from view. I really hope this information was useful to you in some manner. Approaching the individual who has obstructed you should be done with caution. Keep in mind why you were first barred, and attempt to avoid making the same error repeatedly.
7. Look for the person’s username and full name
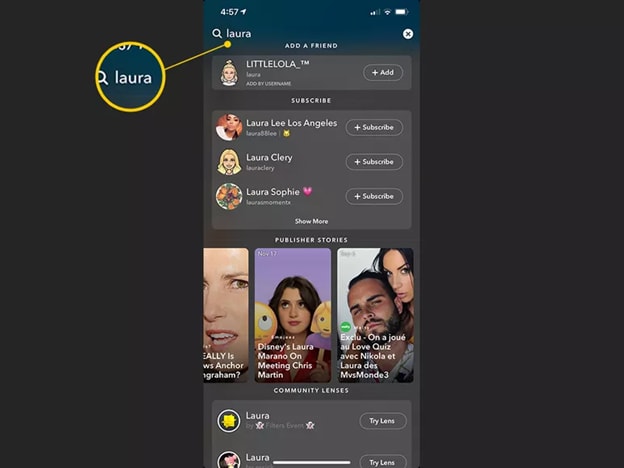
When you search for someone on Snapchat and they’ve banned you, you won’t be able to find them. Searching for them should bring them up even if they’ve unfriended you on Facebook.
It’s critical to know the difference between Snapchat’s blocking and deleting features. If someone has banned your account, you won’t be able to locate it anywhere and you won’t be able to communicate with it from the blocked account either.
Even if someone removes you from the Friends list, you’ll still be able to send them snaps since they’ll appear on your Friends list. It’s possible, though, that they won’t get them if they only let their friends contact them because of their privacy settings.
Use the magnifying glass icon just at top of the screen just on the chats or snaps tab to look for the individual who you believe blocked you. If you wish to find a certain person, start by inputting their username or last name.
Tip!
If you are wondering how to know if someone blocked you on Snapchat, using their username is your best bet. This is due to the fact that user names are distinct from complete names.
• Efficient workflow and easy-to-understand videos.
• Even beginners can benefit from these tutorials.
For Win 7 or later (64-bit)
For macOS 10.12 or later
Introduction of how to know if someone blocked you on Snapchat?
It’s a real shame when your social media accounts are permanently disabled. Everyone in the modern world depends on social media to remain in touch. As a result, being blocked may be a devastating experience for a person’s mental health. In this guide, we are going to discuss how to know if someone blocked you on Snapchat?
Snapchat and other similar applications fail to inform you if your account has been blocked. I will let you know how to know if someone blocked you on Snapchat. So, you can keep your attention on the good things in life instead of the bad.
However, if you discover that how to know if someone blocked you on Snapchat, consider why this would be the case. If you’re having trouble messaging someone, don’t attempt to use several accounts. If you approach the situation calmly, you may learn why you were banned on Snapchat. Alternatively, the individual may have canceled your account or removed you from their list of Friends or Contacts.
A deleted account differs from a banned account in that it is no longer accessible.
Blocked vs. removed: What’s the difference?
Snapchat’s blocking system differs from those other social media sites. The individual who is blocked won’t know if they’ve been blocked since they won’t know how to find out. Even if they are no longer friends, the guy who blocked them will seem to be. They’ll remain in your chat list and in your friend’s list, but they won’t be able to see any messages you send. You won’t even be able to access their blogs or other online information.
Being blocked on Snapchat, on the other hand, is a very other matter. This indicates that another person has unfriended you. Your most recent conversations with this individual may be hidden from view. You won’t see them on your buddy list, but you may search for them if you know the username.
How can you know if someone on Snapchat has banned you?
1.Check your recent chats with them
It’s possible that the other user deleted their account or was barred if your recent conversations don’t appear despite being preserved.
2.Send them a message if you can
You can snap someone you’ve spoken to in the past if you’ve previously interacted with them. If you notice a pending or grey indicator after sending it, they may have removed you from the contact list. ‘Failed to send a message - Tap to try again’ may indicate that you have been blocked. Snapchat, on the other hand, will display all of your messages as ‘delivered,’ even if you have been banned.
3.Check your list of Friends to see whether they’re there
To see this list, just go to your profile & click on My Friends. If they don’t show up, they may have blocked you. They might have canceled their account or disabled you from their Friends list.
4.Verify whether or not you can view their tales on the internet
Searching for someone active on Instagram may need you to read their recent stories first. If you’re unable to, you’ve probably been blocked.
5. Verify whether you can see their Snapchat rating
Snapchat scores are only visible to friends. Otherwise, your Snapchat account has been suspended or terminated.
6. Use a separate account to do a name search
It’s possible they deactivated their account to ensure you can use a different account to search for their username if you don’t find them there. If they do appear, you may be sure they blocked you after removing you.
Snapchat hides the fact that someone has banned you from view. I really hope this information was useful to you in some manner. Approaching the individual who has obstructed you should be done with caution. Keep in mind why you were first barred, and attempt to avoid making the same error repeatedly.
7. Look for the person’s username and full name
When you search for someone on Snapchat and they’ve banned you, you won’t be able to find them. Searching for them should bring them up even if they’ve unfriended you on Facebook.
It’s critical to know the difference between Snapchat’s blocking and deleting features. If someone has banned your account, you won’t be able to locate it anywhere and you won’t be able to communicate with it from the blocked account either.
Even if someone removes you from the Friends list, you’ll still be able to send them snaps since they’ll appear on your Friends list. It’s possible, though, that they won’t get them if they only let their friends contact them because of their privacy settings.
Use the magnifying glass icon just at top of the screen just on the chats or snaps tab to look for the individual who you believe blocked you. If you wish to find a certain person, start by inputting their username or last name.
Tip!
If you are wondering how to know if someone blocked you on Snapchat, using their username is your best bet. This is due to the fact that user names are distinct from complete names.
• Efficient workflow and easy-to-understand videos.
• Even beginners can benefit from these tutorials.
For Win 7 or later (64-bit)
For macOS 10.12 or later
Simplified Steps for Snapchat Lens Design
How to Create Snapchat Lenses Easily: 2 Methods

Ollie Mattison
Mar 27, 2024• Proven solutions
Are you feeling like creating your own Snapchat lens, so you can have an even better experience with the app? The good news is that two new Snapchat tools have been released – the Lens Studio and Create Your Own Lens applications.
If you are a regular Snapchat user, you may want to learn about the Snapchat lens and how it can help you. We will help you get started. Here is our step by step guide on how to make Snapchat lenses.
- Part1: Comparing Lens Studio and Creating Your Own Lens
- Part2: How to Use Lens Studio
- Part3: How to Create Snapchat Lenses Using Create Your Own Lens
Part 1: Comparing Lens Studio and Creating Your Own Lens
The two programs that we are highlighting today are Lens Studio and Create Your Own Lens. These are both fantastic programs for creating your own Snapchat lens, but they do have slightly different uses. If you are the type of person who wants to design a professional Snapchat lens, you are going to prefer Lens Studio.
But if you are hoping to come up with something creative that you can share with your friends and family, then you may love Create Your Own Lens. It is a very easy program to use, and it offers a ton of features that you may be surprised to see.
Snapchat lenses is for fun
The beauty of Snapchat lenses is that you can now create your own environment, which you can use each time you are taking photos or videos. Sure, you can always use the filters that are already available in the application, but not everyone would find those enough.
If you want some customization, or you just want to mess around until you get the filter that makes sense for you, Snapchat lenses are the way to go.

Lens Studio is for business
Lens Studio is perfect for businesses that may want to create unique environments for their clients, or the times when they are releasing company Snapchat posts. Say the company is hosting an event. They may want a custom graphic for that event, which is used for all the pictures and videos posted to Snapchat about the event. Using Lens Studio lets them do that with ease.
Create Your Own Lens is great when you are going to a special event, birthday party or graduating, and you want a special graphic that comes up in all your snaps. It is very intuitive to use, and is available through the App Store as a download.
Part 2: How to Use Lens Studio
1. Download Lens Studio
The first step involves downloading Lens Studio, which you can do from your computer. It is compatible with both Windows and Mac computers, and will run on any semi-modern system. According to the Snapchat team, Lens Studio is similar to the program used by their AR teams to create lenses. That means you are getting similar functionality, but with an easier to manage interface.
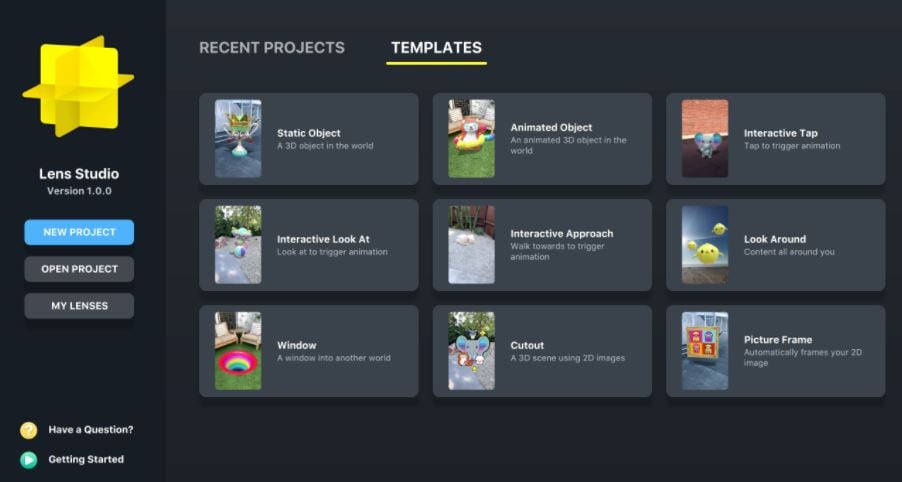
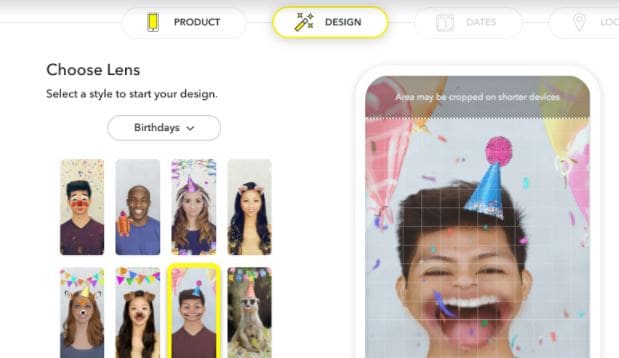
2. Choose Templates Page
It is normal to feel a little overwhelmed the first time you try and use this program. But that is why the templates page is so great. You can select from templates depending on the type of lens that you are hoping to create. You can just use a template, or you can incorporate your own ideas to customize the template.
There is also a Lens Studio Overview guide that you can access online, which will help you get acquainted with the program’s various features and quirks.
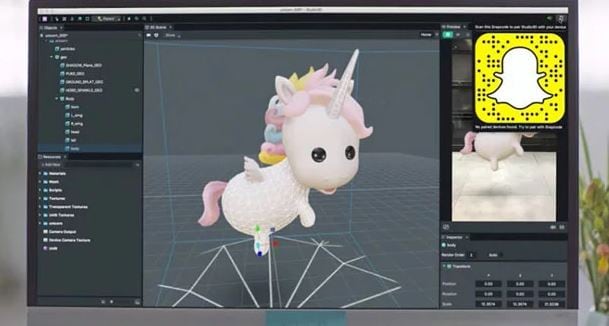
3. Use Studio Panels
Are you ready to create your own custom Snapchat lens? It is time to head over to Studio Panels on the application. This is the area where you can add your own 2D or 3D objects, and you can visualize how they would look as a Snapchat filter. You can add, remove, resize and drag objects to specific areas of the screen.
There are other tools accessible from the Resources panel. You can use these tools to ensure that your Snapchat lens is exactly as you want.
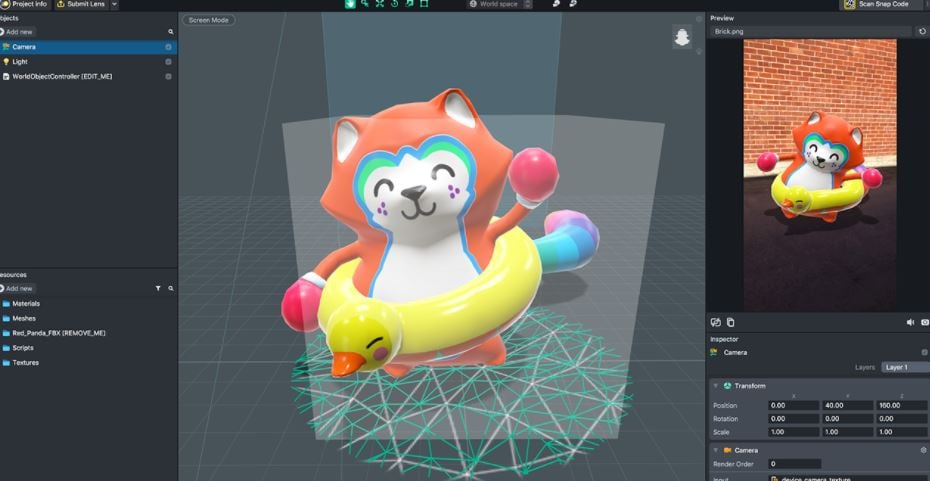
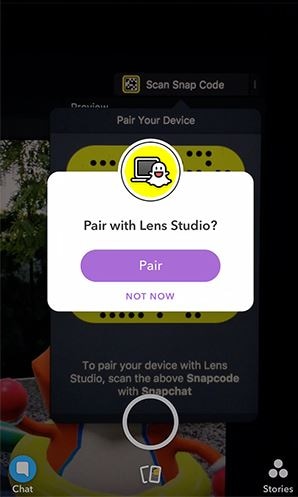
4. Preview the Snapchat Lens You Create
The great thing about this application is that you can preview the lens before you send it out to your phone. When you are satisfied with the image on the preview, you can pair your phone with the application, and you will be able to send that Snapchat lens onto your phone through your Snapcode. It is that simple!
Part 3: How to Create Snapchat Lenses Using Create Your Own Lens
- There are two ways that you can access the tool for creating fun Snapchat lenses. You can either visit the website snapchat.com/create, or you can go on the “filters and lenses” section on your iOS device. If you are using Snapchat on an Android device, you will only have the option for the website. But the feature is coming to the Android version of Snapchat very soon.
- When you are in the application or on the website, you may start to look at the different templates for Snapchat lenses. Now you can add other items into the templates, such as photographs, text or graphics.
It is all up to your imagination. You can create the perfect Snapchat lens, which you can then send into your Snapchat account through your Snapcode. Of course, if you are using your iOS device to create the lens, it is already linked to your account.
Another cool feature is how you can set the location for where the Snapchat lens is available. Say you are hosting a party. You can have the Snapchat lens available to everyone who uses Snapchat within a set square footage of your home. That is an amazing way to let everyone share social media pictures and photos of your party, through the lens you created.
Conclusion
Creating Snapchat lenses has never been easier. Whether you are a business looking to add a custom lens, or you just want to create a fun lens for a graduation or party, there are tools that make the job very easy. Using these tools will allow you to create the perfect Snapchat lens for any occasion.
Ollie Mattison
Ollie Mattison is a writer and a lover of all things video.
Follow @Ollie Mattison
Ollie Mattison
Mar 27, 2024• Proven solutions
Are you feeling like creating your own Snapchat lens, so you can have an even better experience with the app? The good news is that two new Snapchat tools have been released – the Lens Studio and Create Your Own Lens applications.
If you are a regular Snapchat user, you may want to learn about the Snapchat lens and how it can help you. We will help you get started. Here is our step by step guide on how to make Snapchat lenses.
- Part1: Comparing Lens Studio and Creating Your Own Lens
- Part2: How to Use Lens Studio
- Part3: How to Create Snapchat Lenses Using Create Your Own Lens
Part 1: Comparing Lens Studio and Creating Your Own Lens
The two programs that we are highlighting today are Lens Studio and Create Your Own Lens. These are both fantastic programs for creating your own Snapchat lens, but they do have slightly different uses. If you are the type of person who wants to design a professional Snapchat lens, you are going to prefer Lens Studio.
But if you are hoping to come up with something creative that you can share with your friends and family, then you may love Create Your Own Lens. It is a very easy program to use, and it offers a ton of features that you may be surprised to see.
Snapchat lenses is for fun
The beauty of Snapchat lenses is that you can now create your own environment, which you can use each time you are taking photos or videos. Sure, you can always use the filters that are already available in the application, but not everyone would find those enough.
If you want some customization, or you just want to mess around until you get the filter that makes sense for you, Snapchat lenses are the way to go.
Lens Studio is for business
Lens Studio is perfect for businesses that may want to create unique environments for their clients, or the times when they are releasing company Snapchat posts. Say the company is hosting an event. They may want a custom graphic for that event, which is used for all the pictures and videos posted to Snapchat about the event. Using Lens Studio lets them do that with ease.
Create Your Own Lens is great when you are going to a special event, birthday party or graduating, and you want a special graphic that comes up in all your snaps. It is very intuitive to use, and is available through the App Store as a download.
Part 2: How to Use Lens Studio
1. Download Lens Studio
The first step involves downloading Lens Studio, which you can do from your computer. It is compatible with both Windows and Mac computers, and will run on any semi-modern system. According to the Snapchat team, Lens Studio is similar to the program used by their AR teams to create lenses. That means you are getting similar functionality, but with an easier to manage interface.
2. Choose Templates Page
It is normal to feel a little overwhelmed the first time you try and use this program. But that is why the templates page is so great. You can select from templates depending on the type of lens that you are hoping to create. You can just use a template, or you can incorporate your own ideas to customize the template.
There is also a Lens Studio Overview guide that you can access online, which will help you get acquainted with the program’s various features and quirks.
3. Use Studio Panels
Are you ready to create your own custom Snapchat lens? It is time to head over to Studio Panels on the application. This is the area where you can add your own 2D or 3D objects, and you can visualize how they would look as a Snapchat filter. You can add, remove, resize and drag objects to specific areas of the screen.
There are other tools accessible from the Resources panel. You can use these tools to ensure that your Snapchat lens is exactly as you want.
4. Preview the Snapchat Lens You Create
The great thing about this application is that you can preview the lens before you send it out to your phone. When you are satisfied with the image on the preview, you can pair your phone with the application, and you will be able to send that Snapchat lens onto your phone through your Snapcode. It is that simple!
Part 3: How to Create Snapchat Lenses Using Create Your Own Lens
- There are two ways that you can access the tool for creating fun Snapchat lenses. You can either visit the website snapchat.com/create, or you can go on the “filters and lenses” section on your iOS device. If you are using Snapchat on an Android device, you will only have the option for the website. But the feature is coming to the Android version of Snapchat very soon.
- When you are in the application or on the website, you may start to look at the different templates for Snapchat lenses. Now you can add other items into the templates, such as photographs, text or graphics.
It is all up to your imagination. You can create the perfect Snapchat lens, which you can then send into your Snapchat account through your Snapcode. Of course, if you are using your iOS device to create the lens, it is already linked to your account.
Another cool feature is how you can set the location for where the Snapchat lens is available. Say you are hosting a party. You can have the Snapchat lens available to everyone who uses Snapchat within a set square footage of your home. That is an amazing way to let everyone share social media pictures and photos of your party, through the lens you created.
Conclusion
Creating Snapchat lenses has never been easier. Whether you are a business looking to add a custom lens, or you just want to create a fun lens for a graduation or party, there are tools that make the job very easy. Using these tools will allow you to create the perfect Snapchat lens for any occasion.
Ollie Mattison
Ollie Mattison is a writer and a lover of all things video.
Follow @Ollie Mattison
Also read:
- [New] In 2024, Harmonizing Chrome, Android, iOS for TikTok Sharing
- [New] Revolutionize Your Talking Skills with These No-Cost Audio Modifications for 2024
- [Updated] 2024 Approved Unlocking the Potential of PC-Based TikTok Live Shows
- [Updated] Streamlining FB Message Transcription with Expert Tips
- [Updated] Unveiling the Ultimate Top 10 TikTok Gaming Squad
- [Updated] Vive's Ultimate Virtual Journey Unparalleled Immersion
- 2024 Approved Navigating Video Posts on TikTok From a Computer
- Behind-the-Scenes of TikTok's Most Favorite Charms - #7 and Hidden Symbols
- Budget-Friendly AIs on Par with Sora's Capabilities
- How to Stop My Spouse from Spying on My Tecno Pova 5 Pro | Dr.fone
- In 2024, Enhance Your TikTok Presence Voice Personalization 101
- Perfecting the Aesthetic OOTD TikTok on a Mac
- Transformez Vos Fichiers AIFF en Format WMA Sans Frais Sur Movavi en Ligne
- Tutorial: Transferring Restored EDB Mailboxes From Backup to Active Exchange Server via Video Guide
- Windows 11 Enthusiasts: Optimize Your Display with These Graphic Driver Update Steps
- Title: Telltale Signs Your Chat Is Hidden
- Author: Stephen
- Created at : 2025-01-05 06:28:51
- Updated at : 2025-01-10 03:57:39
- Link: https://tiktok-video-recordings.techidaily.com/telltale-signs-your-chat-is-hidden/
- License: This work is licensed under CC BY-NC-SA 4.0.