
!["[Updated] 2024 Approved Mastering Media Mosaics for Maximum Impact on TikToks"](https://thmb.techidaily.com/d31e8723e03acf63385b6b2673e7168286d60ba0c51b363448b469a8ffe4640d.jpg)
"[Updated] 2024 Approved Mastering Media Mosaics for Maximum Impact on TikToks"
Mastering Media Mosaics for Maximum Impact on TikToks
Best Video Editor for Beginners on Windows and Mac
Wondershare Filmora is one of the most popular video editing software among TikTokers , download and have a try.
TikTok’s collaborative nature is one of its most appealing features. Your video is not finished the moment you publish it. They can be responded to, remixed, and re-shared by anybody. TikTok is meant to allow users to construct on other’s films shared on the network, whether you’re utilizing audio from some other video or making a duet.
Thanks to the stitch tool, creators may remix, remake, and reply to videos with a couple of taps. This article will tell you what you need to know about stitching videos on TikTok. Continue reading to learn more about Stitching and how to stitch on TikTok. Let’s get started!
In this article
02 How to Turn Stitch On or Off?
04 How to Stitch Any TikTok Video withFilmora Video Editor ?
05 FAQs About TikTok Video Stitch
Part 1: What is Stitch on TikTok?
TikTok’s latest video editing tool ‘Stitch,’ lets people incorporate video snippets from other people into their own. Creators may use Stitch to provide a five-second snippet from a TikTok video out of their own. Unlike duets that play videos together, stitched videos play in the sequence they were stitched. Videos containing open-ended questions have gained in popularity with the advent of the stitch.
Whenever you Stitch a clip-on TikTok, you are essentially inserting your video after yet another video that has already been submitted. People frequently utilize this to remark on or reply to other videos. And, when done well, it can add a lot more context to your movies.
The one limitation of the Stitch tool is that you may only publish up to five seconds from some other video. So, if you’re focusing on a Stitch, you must select the five seconds which are most critical to highlight your message.
Part 2: How to Turn Stitch On or Off?
By enabling the Stitch feature, you make your material available to millions of prospective collaborators. Consider the possibilities – it might be a fantastic approach to enhance reach and virility.
If you aren’t comfortable exposing your films to the whole TikTok community, users can opt out of allowing others to Stitch their work. You may modify them under the Privacy Controls. Here’s how to do a Stitch on TikTok:
Step 1: Launch the TikTok app and then head to your profile by clicking on the Profile option at the bottom right. After that, select the three dots to open the settings.
Step 2: After entering the settings, select Privacy to proceed, and then tap on the Stitch option to open the Stitch settings.
Step 3: Now, you will see three options that are No-one, Everyone, and Friends. If you want to allow the Stitching, select either Everyone or Friends. However, to restrict the people from stitching your videos, choose No-one. After you are done selecting, click on the back arrow to save the applied changes.
Part 3: How to Stitch on TikTok?
TikTok keeps giving creators more reasons to continue producing, and fans like us are more committed to continuing to open it. Stitch, a new app functionality from the famous social networking platform, makes things more straightforward than ever for artists to interact with each other.
But, you might be wondering, how to do a stitch on TikTok? Don’t worry; you’ve come to the right place. Here’s how:
Step 1: Launch TikTok and then go to the video that you want to stitch. Select the Share icon, which resembles an arrow. Select the Stitch symbol from the menu that displays, and then wait a few seconds for the video to complete. The lengthier the video is, the more the loading time.

Step 2: When it’s finished, you’ll be sent to a screen where you may take five seconds of the film and use it on your own. To navigate through the movie, use the sliders and the red bars to choose the portion you want. When you’re finished, tap Next.

Step 3: You’ll be sent to TikTok’s normal recording screen. Record the remainder of your TikTok video with all of the features you’re accustomed to utilizing. You may use whatever effects, stickers, texts, voiceovers, or captions you desire. After that, press the Next button.

Step 4: Make a title and hashtags for your TikTok video. You could also choose whether or not these users may Stitch your movie here – hit the toggle switch beside Allow Stitch to turn it off. Following that, hit the Post option, and your stitched video will be uploaded.

Part 4: How to Stitch Any TikTok Video with Filmora Video Editor
Before getting started, understand why people opt for Filmora video editor for stitching videos on TikTok when this can be done through the official TikTok application. TikTok app only allows you to stitch a video for up to five seconds which is quite frustrating if you wish to stitch an entire video.
One more reason is that, with TikTok, you cannot stitch the already existing video from the camera roll, which restricts creators from adding the already edited content to the existing video. So, to avoid the above problems, Filmora is used for stitching TikTok videos.
For Win 7 or later (64-bit)
For macOS 10.12 or later
To begin, download the video that you wish to stitch with from TikTok. After, follow the below stepwise guide:
Step 1: Launch the Filmora software on your PC and import the video files by clicking on the File and then Import/Export Media. You can simply drag and drop the videos as well.
Step 2: Drag the clips from the media library to the Timeline’s video track. All video files will be stitched into a single video with no transitions.

Note: To add a transition to the video , go to the Transition tab and drop the desired transition to the junction of two clips.

Step 3: Now, preview the stitched video and, when finished, click the Export option to save numerous video segments to a single file. Choose any format from the Format tab’s list.
Part 5: FAQs About TikTok Video Stitch
1. Can you do a Stitch on TikTok with a video from your Camera Roll?
Unfortunately, you cannot utilize a video from your Camera Roll in a Stitch at the time of this writing. So, whatever your reaction to a Stitch is, you must record 100% unique footage shot with the TikTok camera. However, you may download the video first and then stitch it with some third-party software such as Filmora.
2. Can you stitch longer than 5 seconds?
No, it is not possible to stitch a video for longer than five seconds using the built-in Stitching feature of the TikTok app. But this can be done by stitching the videos using third-party applications and software.
3. How do I see TikTok stitches?
Users who want to view as many stitches as possible can do it by browsing for them on the app. You must first browse to Discover, and from there to the search box. Then type #Stitch @username, where the username is the name of the account from which you wish to view stitches.
4. TikTok Stitch option not showing. How to fix it?
Users may choose whether or not someone else can Stitch their work in their settings. The option may be found under the Settings and Privacy tab, where users can activate or uncheck Stitch for all videos. So, if the Stitch option is not showing, the user may have disabled the Stitch option.
Conclusion
The Stitch feature is an excellent way to continue the discussion with your videos. You may leave comments on popular content on the site. Most importantly, it may be a fun method to generate material different from what you usually publish. And since you know How to Stitch on TikTok after reading this article, stitch the videos today and create unique content  Try It Free
TikTok’s collaborative nature is one of its most appealing features. Your video is not finished the moment you publish it. They can be responded to, remixed, and re-shared by anybody. TikTok is meant to allow users to construct on other’s films shared on the network, whether you’re utilizing audio from some other video or making a duet.
Thanks to the stitch tool, creators may remix, remake, and reply to videos with a couple of taps. This article will tell you what you need to know about stitching videos on TikTok. Continue reading to learn more about Stitching and how to stitch on TikTok. Let’s get started!
In this article
02 How to Turn Stitch On or Off?
04 How to Stitch Any TikTok Video withFilmora Video Editor ?
05 FAQs About TikTok Video Stitch
Part 1: What is Stitch on TikTok?
TikTok’s latest video editing tool ‘Stitch,’ lets people incorporate video snippets from other people into their own. Creators may use Stitch to provide a five-second snippet from a TikTok video out of their own. Unlike duets that play videos together, stitched videos play in the sequence they were stitched. Videos containing open-ended questions have gained in popularity with the advent of the stitch.
Whenever you Stitch a clip-on TikTok, you are essentially inserting your video after yet another video that has already been submitted. People frequently utilize this to remark on or reply to other videos. And, when done well, it can add a lot more context to your movies.
The one limitation of the Stitch tool is that you may only publish up to five seconds from some other video. So, if you’re focusing on a Stitch, you must select the five seconds which are most critical to highlight your message.
Part 2: How to Turn Stitch On or Off?
By enabling the Stitch feature, you make your material available to millions of prospective collaborators. Consider the possibilities – it might be a fantastic approach to enhance reach and virility.
If you aren’t comfortable exposing your films to the whole TikTok community, users can opt out of allowing others to Stitch their work. You may modify them under the Privacy Controls. Here’s how to do a Stitch on TikTok:
Step 1: Launch the TikTok app and then head to your profile by clicking on the Profile option at the bottom right. After that, select the three dots to open the settings.
Step 2: After entering the settings, select Privacy to proceed, and then tap on the Stitch option to open the Stitch settings.
Step 3: Now, you will see three options that are No-one, Everyone, and Friends. If you want to allow the Stitching, select either Everyone or Friends. However, to restrict the people from stitching your videos, choose No-one. After you are done selecting, click on the back arrow to save the applied changes.
Part 3: How to Stitch on TikTok?
TikTok keeps giving creators more reasons to continue producing, and fans like us are more committed to continuing to open it. Stitch, a new app functionality from the famous social networking platform, makes things more straightforward than ever for artists to interact with each other.
But, you might be wondering, how to do a stitch on TikTok? Don’t worry; you’ve come to the right place. Here’s how:
Step 1: Launch TikTok and then go to the video that you want to stitch. Select the Share icon, which resembles an arrow. Select the Stitch symbol from the menu that displays, and then wait a few seconds for the video to complete. The lengthier the video is, the more the loading time.
Step 2: When it’s finished, you’ll be sent to a screen where you may take five seconds of the film and use it on your own. To navigate through the movie, use the sliders and the red bars to choose the portion you want. When you’re finished, tap Next.
Step 3: You’ll be sent to TikTok’s normal recording screen. Record the remainder of your TikTok video with all of the features you’re accustomed to utilizing. You may use whatever effects, stickers, texts, voiceovers, or captions you desire. After that, press the Next button.
Step 4: Make a title and hashtags for your TikTok video. You could also choose whether or not these users may Stitch your movie here – hit the toggle switch beside Allow Stitch to turn it off. Following that, hit the Post option, and your stitched video will be uploaded.
Part 4: How to Stitch Any TikTok Video with Filmora Video Editor
Before getting started, understand why people opt for Filmora video editor for stitching videos on TikTok when this can be done through the official TikTok application. TikTok app only allows you to stitch a video for up to five seconds which is quite frustrating if you wish to stitch an entire video.
One more reason is that, with TikTok, you cannot stitch the already existing video from the camera roll, which restricts creators from adding the already edited content to the existing video. So, to avoid the above problems, Filmora is used for stitching TikTok videos.
For Win 7 or later (64-bit)
For macOS 10.12 or later
To begin, download the video that you wish to stitch with from TikTok. After, follow the below stepwise guide:
Step 1: Launch the Filmora software on your PC and import the video files by clicking on the File and then Import/Export Media. You can simply drag and drop the videos as well.
Step 2: Drag the clips from the media library to the Timeline’s video track. All video files will be stitched into a single video with no transitions.
Note: To add a transition to the video , go to the Transition tab and drop the desired transition to the junction of two clips.
Step 3: Now, preview the stitched video and, when finished, click the Export option to save numerous video segments to a single file. Choose any format from the Format tab’s list.
Part 5: FAQs About TikTok Video Stitch
1. Can you do a Stitch on TikTok with a video from your Camera Roll?
Unfortunately, you cannot utilize a video from your Camera Roll in a Stitch at the time of this writing. So, whatever your reaction to a Stitch is, you must record 100% unique footage shot with the TikTok camera. However, you may download the video first and then stitch it with some third-party software such as Filmora.
2. Can you stitch longer than 5 seconds?
No, it is not possible to stitch a video for longer than five seconds using the built-in Stitching feature of the TikTok app. But this can be done by stitching the videos using third-party applications and software.
3. How do I see TikTok stitches?
Users who want to view as many stitches as possible can do it by browsing for them on the app. You must first browse to Discover, and from there to the search box. Then type #Stitch @username, where the username is the name of the account from which you wish to view stitches.
4. TikTok Stitch option not showing. How to fix it?
Users may choose whether or not someone else can Stitch their work in their settings. The option may be found under the Settings and Privacy tab, where users can activate or uncheck Stitch for all videos. So, if the Stitch option is not showing, the user may have disabled the Stitch option.
Conclusion
The Stitch feature is an excellent way to continue the discussion with your videos. You may leave comments on popular content on the site. Most importantly, it may be a fun method to generate material different from what you usually publish. And since you know How to Stitch on TikTok after reading this article, stitch the videos today and create unique content Try It Free
TikTok’s collaborative nature is one of its most appealing features. Your video is not finished the moment you publish it. They can be responded to, remixed, and re-shared by anybody. TikTok is meant to allow users to construct on other’s films shared on the network, whether you’re utilizing audio from some other video or making a duet.
Thanks to the stitch tool, creators may remix, remake, and reply to videos with a couple of taps. This article will tell you what you need to know about stitching videos on TikTok. Continue reading to learn more about Stitching and how to stitch on TikTok. Let’s get started!
In this article
02 How to Turn Stitch On or Off?
04 How to Stitch Any TikTok Video withFilmora Video Editor ?
05 FAQs About TikTok Video Stitch
Part 1: What is Stitch on TikTok?
TikTok’s latest video editing tool ‘Stitch,’ lets people incorporate video snippets from other people into their own. Creators may use Stitch to provide a five-second snippet from a TikTok video out of their own. Unlike duets that play videos together, stitched videos play in the sequence they were stitched. Videos containing open-ended questions have gained in popularity with the advent of the stitch.
Whenever you Stitch a clip-on TikTok, you are essentially inserting your video after yet another video that has already been submitted. People frequently utilize this to remark on or reply to other videos. And, when done well, it can add a lot more context to your movies.
The one limitation of the Stitch tool is that you may only publish up to five seconds from some other video. So, if you’re focusing on a Stitch, you must select the five seconds which are most critical to highlight your message.
Part 2: How to Turn Stitch On or Off?
By enabling the Stitch feature, you make your material available to millions of prospective collaborators. Consider the possibilities – it might be a fantastic approach to enhance reach and virility.
If you aren’t comfortable exposing your films to the whole TikTok community, users can opt out of allowing others to Stitch their work. You may modify them under the Privacy Controls. Here’s how to do a Stitch on TikTok:
Step 1: Launch the TikTok app and then head to your profile by clicking on the Profile option at the bottom right. After that, select the three dots to open the settings.
Step 2: After entering the settings, select Privacy to proceed, and then tap on the Stitch option to open the Stitch settings.
Step 3: Now, you will see three options that are No-one, Everyone, and Friends. If you want to allow the Stitching, select either Everyone or Friends. However, to restrict the people from stitching your videos, choose No-one. After you are done selecting, click on the back arrow to save the applied changes.
Part 3: How to Stitch on TikTok?
TikTok keeps giving creators more reasons to continue producing, and fans like us are more committed to continuing to open it. Stitch, a new app functionality from the famous social networking platform, makes things more straightforward than ever for artists to interact with each other.
But, you might be wondering, how to do a stitch on TikTok? Don’t worry; you’ve come to the right place. Here’s how:
Step 1: Launch TikTok and then go to the video that you want to stitch. Select the Share icon, which resembles an arrow. Select the Stitch symbol from the menu that displays, and then wait a few seconds for the video to complete. The lengthier the video is, the more the loading time.
Step 2: When it’s finished, you’ll be sent to a screen where you may take five seconds of the film and use it on your own. To navigate through the movie, use the sliders and the red bars to choose the portion you want. When you’re finished, tap Next.
Step 3: You’ll be sent to TikTok’s normal recording screen. Record the remainder of your TikTok video with all of the features you’re accustomed to utilizing. You may use whatever effects, stickers, texts, voiceovers, or captions you desire. After that, press the Next button.
Step 4: Make a title and hashtags for your TikTok video. You could also choose whether or not these users may Stitch your movie here – hit the toggle switch beside Allow Stitch to turn it off. Following that, hit the Post option, and your stitched video will be uploaded.
Part 4: How to Stitch Any TikTok Video with Filmora Video Editor
Before getting started, understand why people opt for Filmora video editor for stitching videos on TikTok when this can be done through the official TikTok application. TikTok app only allows you to stitch a video for up to five seconds which is quite frustrating if you wish to stitch an entire video.
One more reason is that, with TikTok, you cannot stitch the already existing video from the camera roll, which restricts creators from adding the already edited content to the existing video. So, to avoid the above problems, Filmora is used for stitching TikTok videos.
For Win 7 or later (64-bit)
For macOS 10.12 or later
To begin, download the video that you wish to stitch with from TikTok. After, follow the below stepwise guide:
Step 1: Launch the Filmora software on your PC and import the video files by clicking on the File and then Import/Export Media. You can simply drag and drop the videos as well.
Step 2: Drag the clips from the media library to the Timeline’s video track. All video files will be stitched into a single video with no transitions.
Note: To add a transition to the video , go to the Transition tab and drop the desired transition to the junction of two clips.
Step 3: Now, preview the stitched video and, when finished, click the Export option to save numerous video segments to a single file. Choose any format from the Format tab’s list.
Part 5: FAQs About TikTok Video Stitch
1. Can you do a Stitch on TikTok with a video from your Camera Roll?
Unfortunately, you cannot utilize a video from your Camera Roll in a Stitch at the time of this writing. So, whatever your reaction to a Stitch is, you must record 100% unique footage shot with the TikTok camera. However, you may download the video first and then stitch it with some third-party software such as Filmora.
2. Can you stitch longer than 5 seconds?
No, it is not possible to stitch a video for longer than five seconds using the built-in Stitching feature of the TikTok app. But this can be done by stitching the videos using third-party applications and software.
3. How do I see TikTok stitches?
Users who want to view as many stitches as possible can do it by browsing for them on the app. You must first browse to Discover, and from there to the search box. Then type #Stitch @username, where the username is the name of the account from which you wish to view stitches.
4. TikTok Stitch option not showing. How to fix it?
Users may choose whether or not someone else can Stitch their work in their settings. The option may be found under the Settings and Privacy tab, where users can activate or uncheck Stitch for all videos. So, if the Stitch option is not showing, the user may have disabled the Stitch option.
Conclusion
The Stitch feature is an excellent way to continue the discussion with your videos. You may leave comments on popular content on the site. Most importantly, it may be a fun method to generate material different from what you usually publish. And since you know How to Stitch on TikTok after reading this article, stitch the videos today and create unique content!
2023’S Best Practices for Thriving in Desktop TikTok Scene
With the increasing trend of using Tiktok to make viral videos, every other person out there is trying their hand at this video-sharing platform. However, while Tiktok itself has many effects and editing options, there are some limitations. For instance, you cannot use the time-lapse effect on Tiktok, or you cannot make a video exceeding 60 seconds.
It becomes difficult to go all out with your videos with these limitations. Therefore, a third-party or external video editor is necessary to make better and different videos.
In this article, we will go over different ways how to create successful Tiktok videos on Desktop, Android, and iPhone.
Create Engaging Tiktok Videos on Desktop
If you want to create amazing Tiktok videos that might go viral on your desktop, you need a third-party video editor, like Wondershare Filmora.
Filmora is a video creating and editing software with plenty of tools, visual effects, and templates that help you create watch-worthy videos for video sharing platforms like YouTube, Facebook, and of course, Tiktok.
So, how do you create engaging Tiktok videos on desktop using Filmora? Here’s a step-by-step guide.
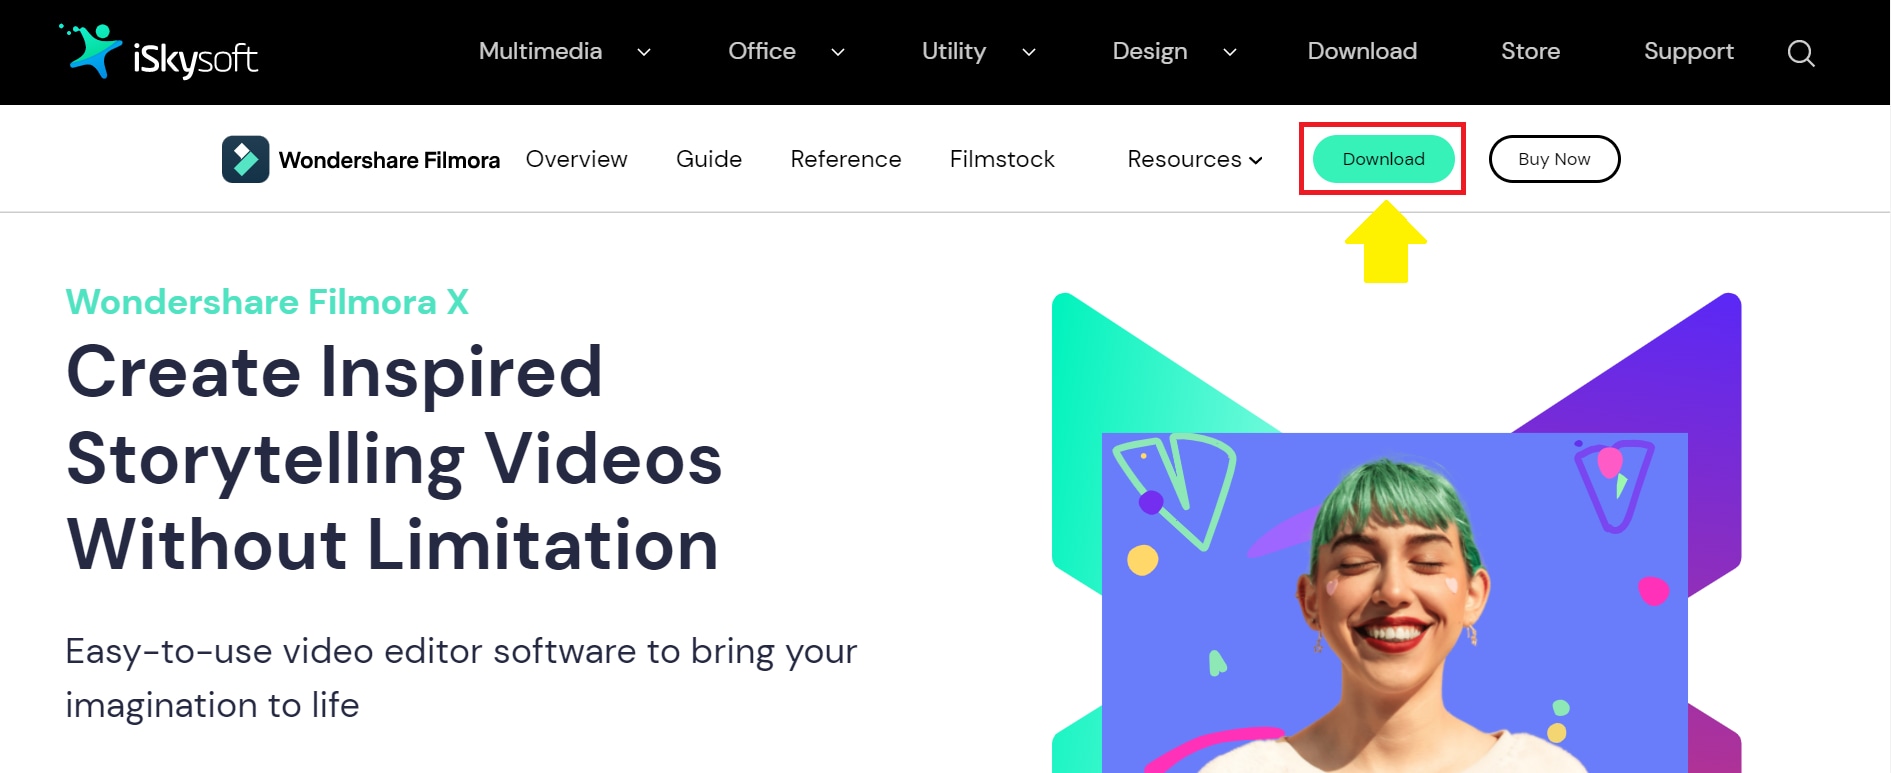
Step 1
Visit the official website of Wondershare Filmora and download the software by clicking on the “Download” button at the top-right corner.
Step 2
Launch the tool, and click on the “+” sign to import the Tiktok video you want to edit.
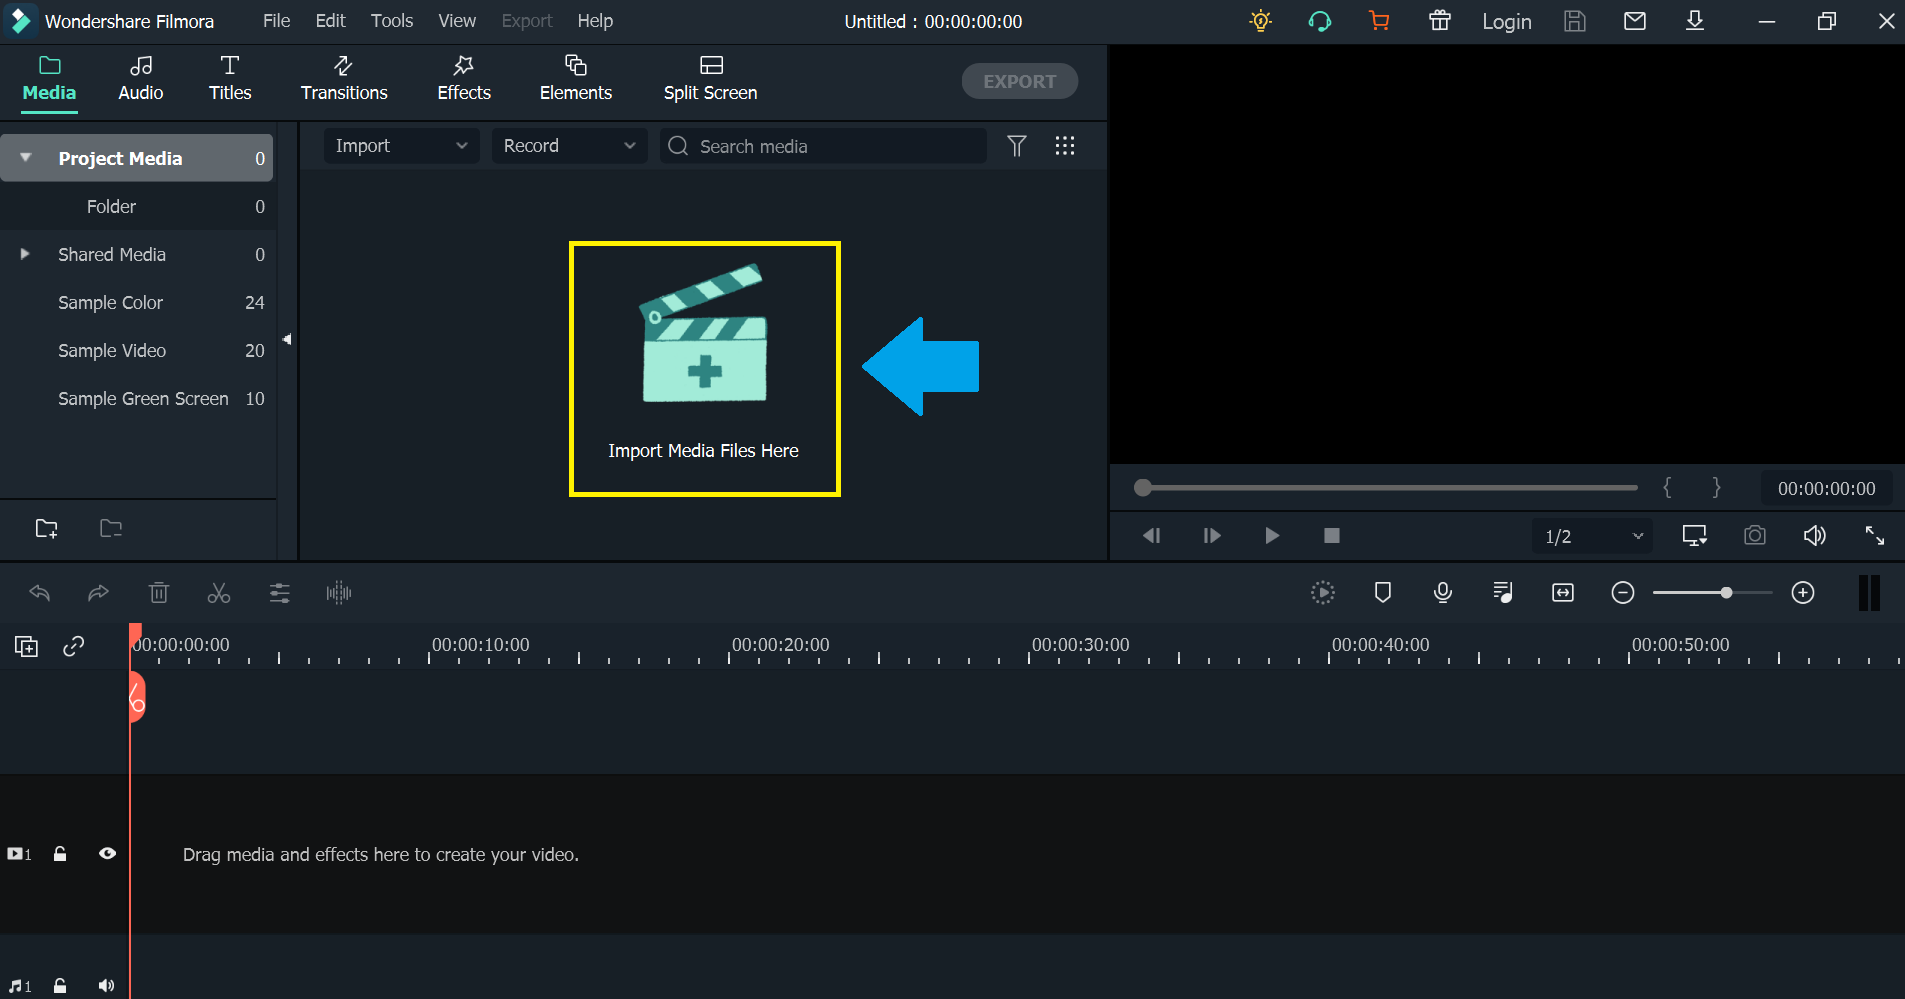
Step 3
Once your video clip is successfully imported to the timeline, it’s time to get editing! Filmora offers many basic and advanced editing tools to give a professional touch to your Tiktok videos.
For example, you can:
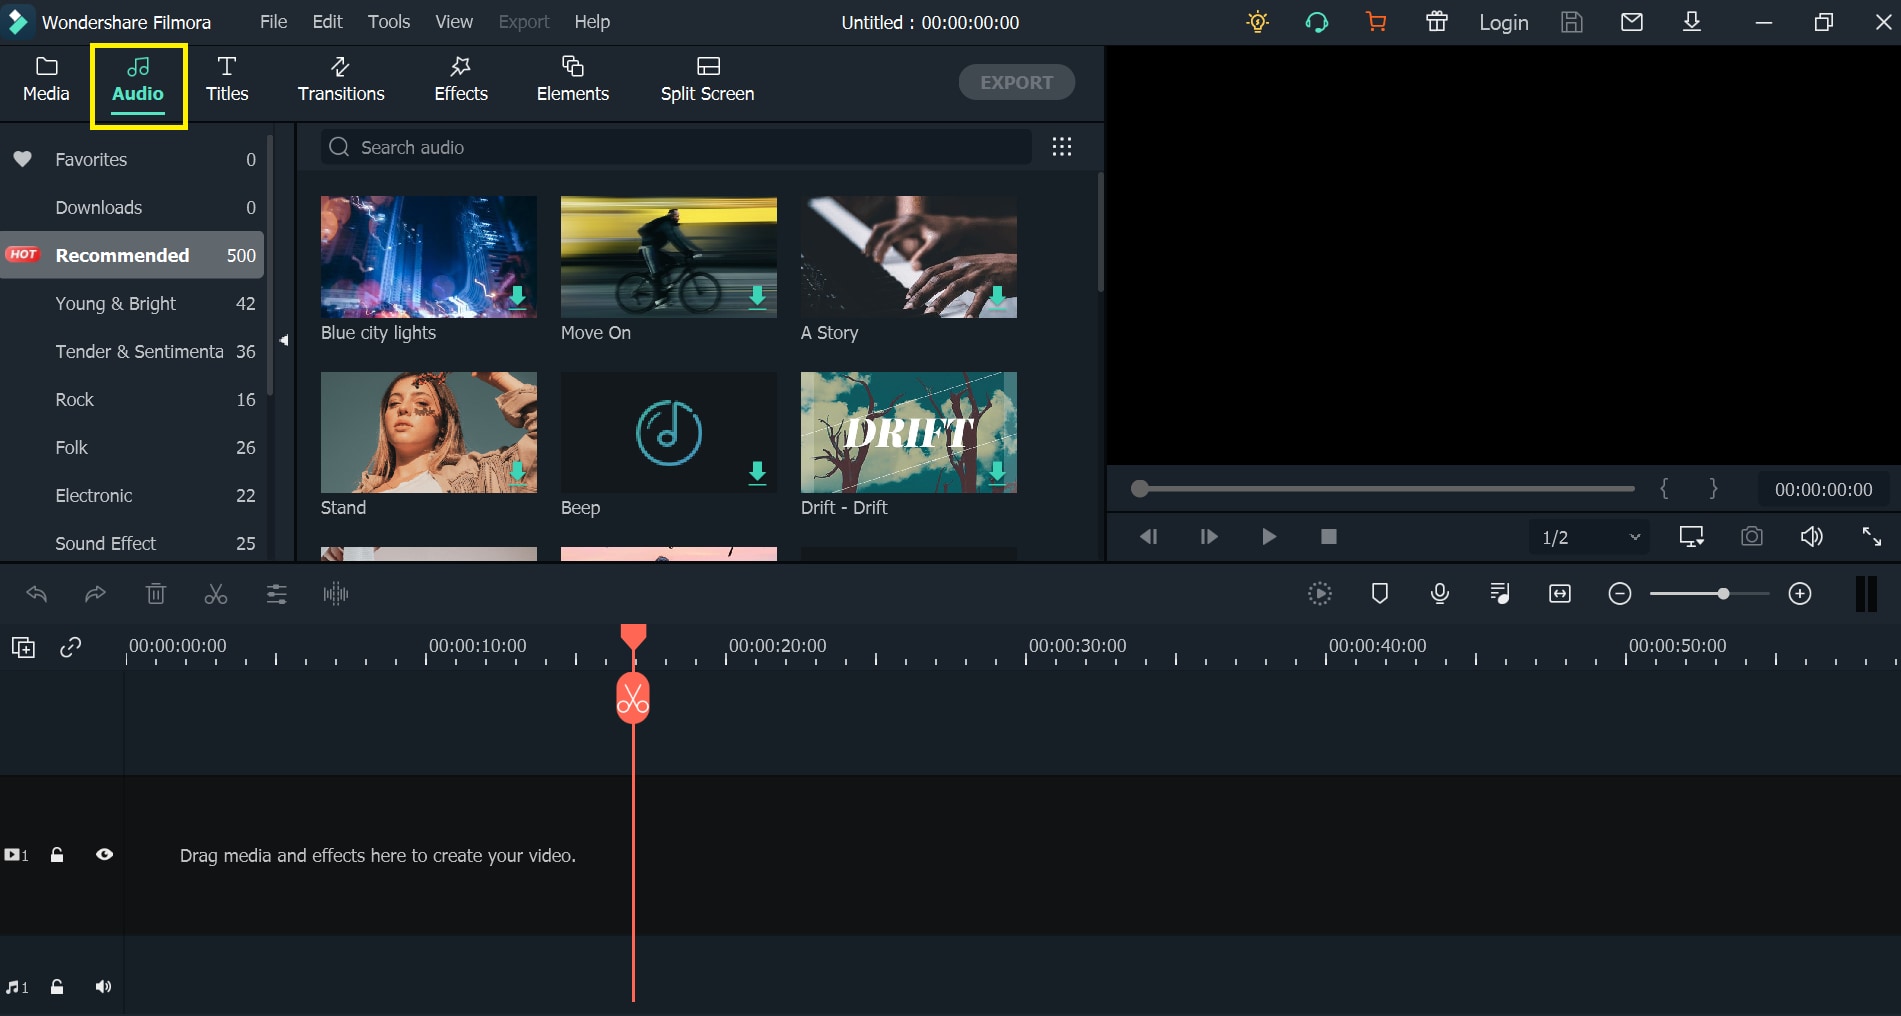
- Add audio to your videos from a vast library of tracks for all occasions.
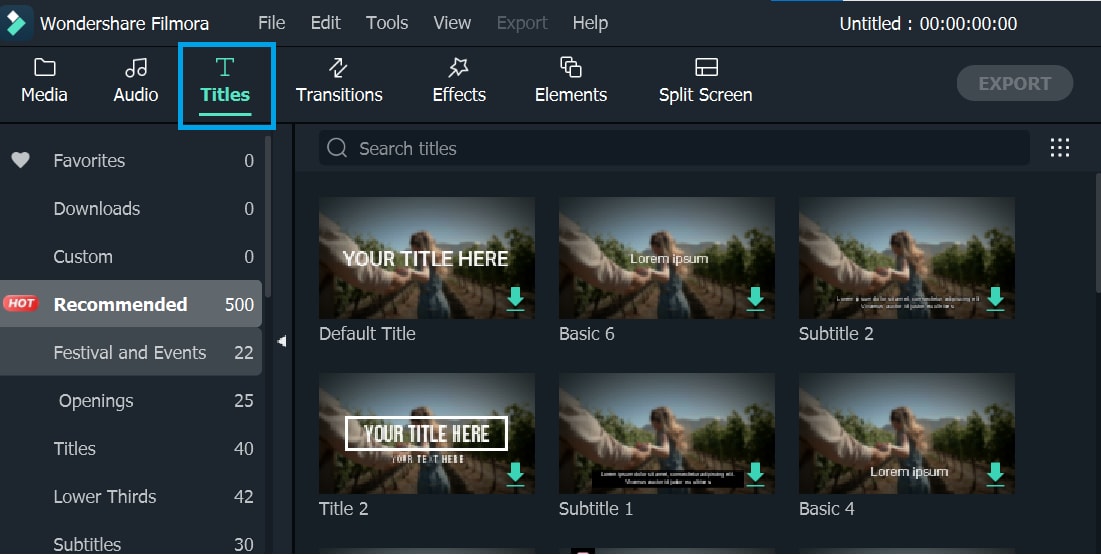
- Add titles and subtitles in different fonts and styles.
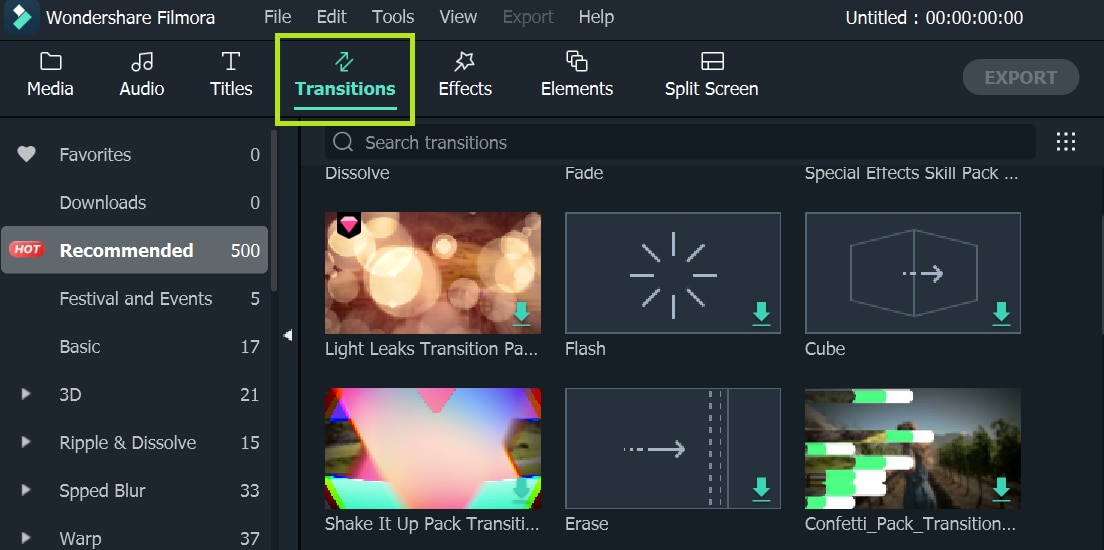
- Add unique transitions to make your videos enjoyable.
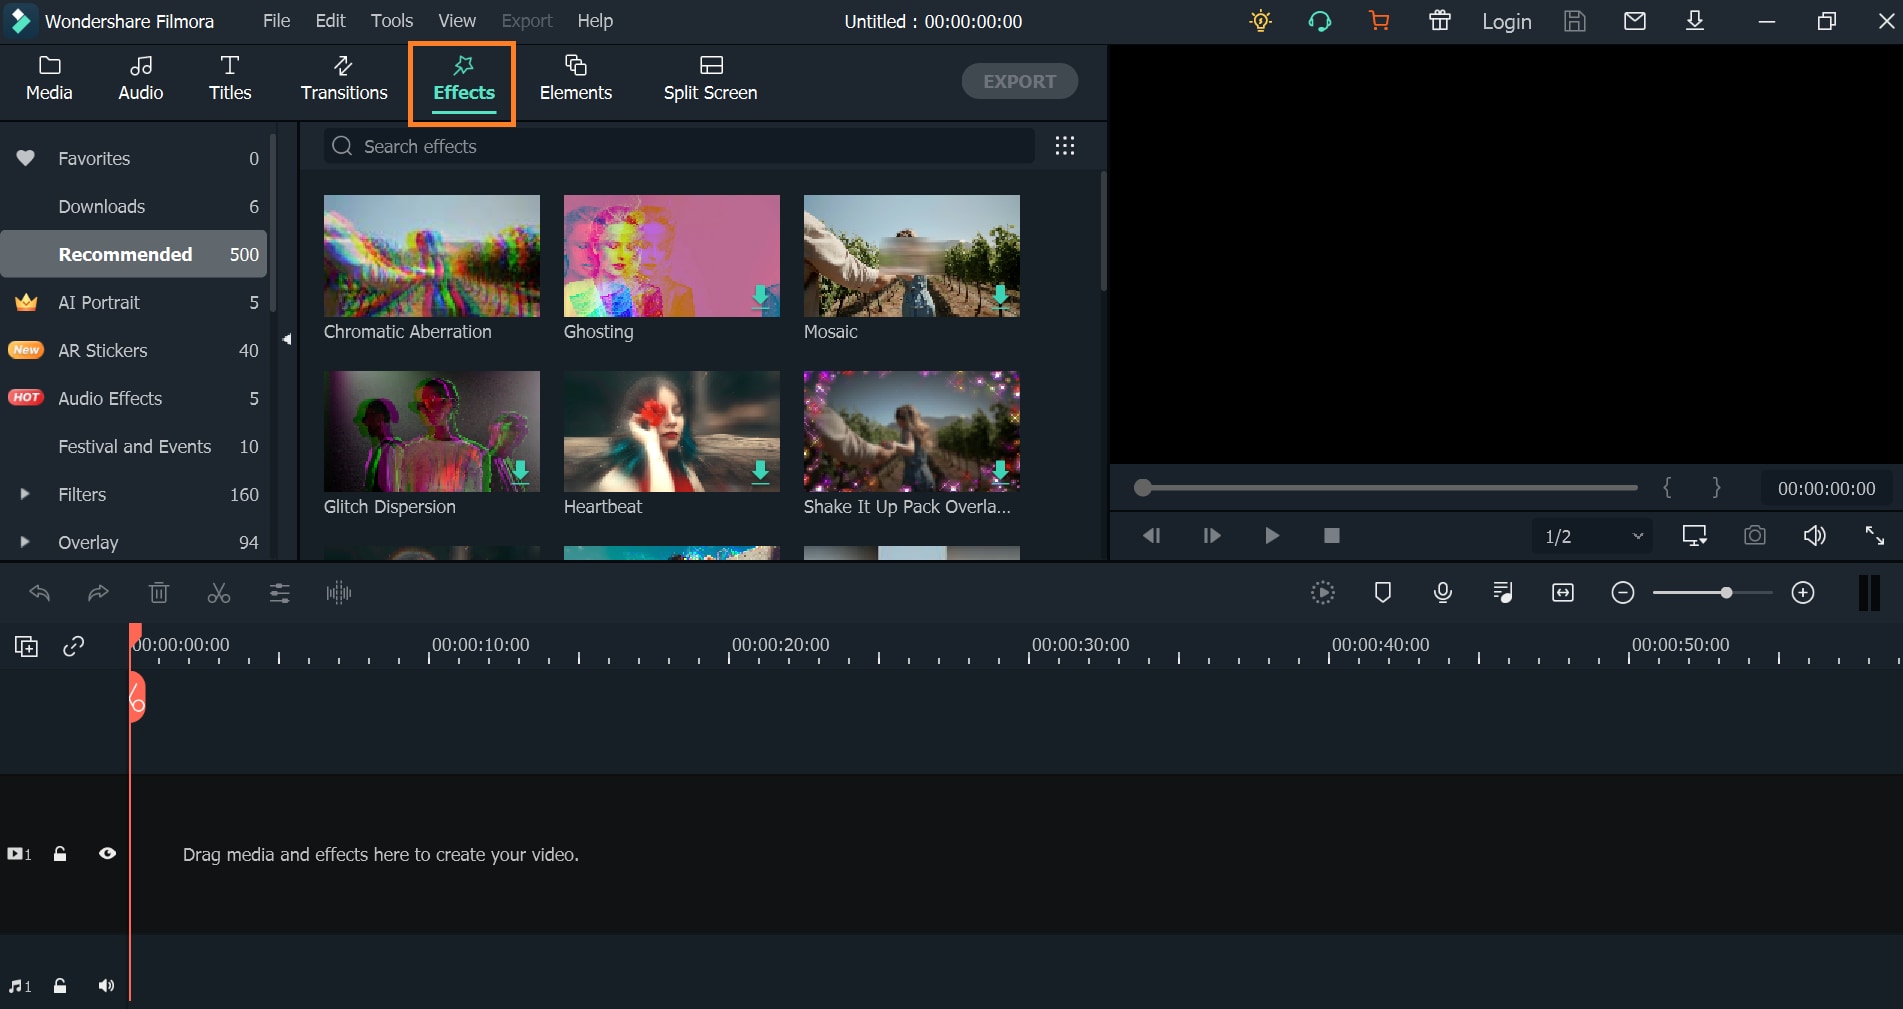
- Add various audio and visual effects to your videos.
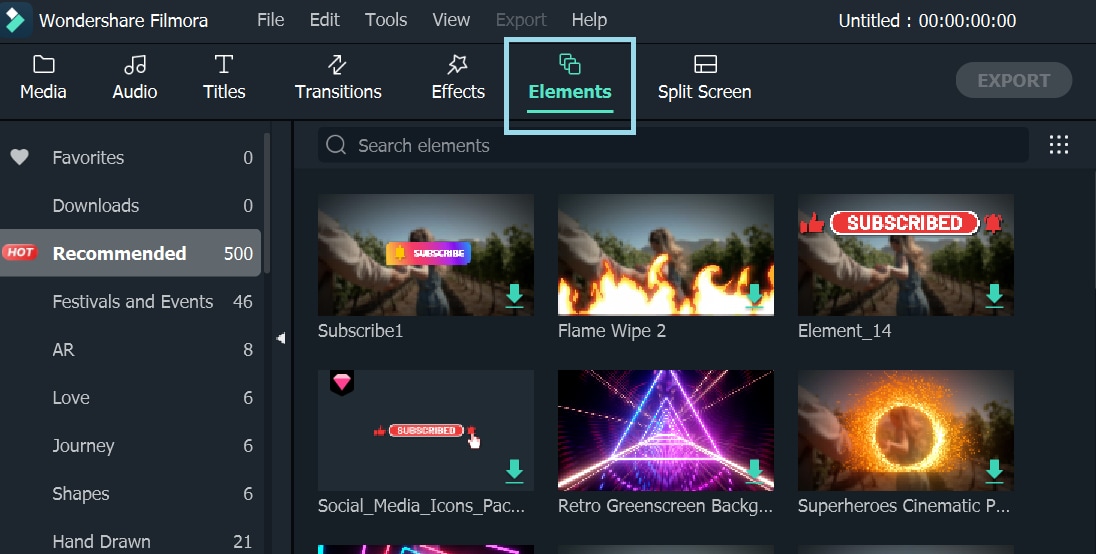
- Add different elements in the video for a thrilling effect.
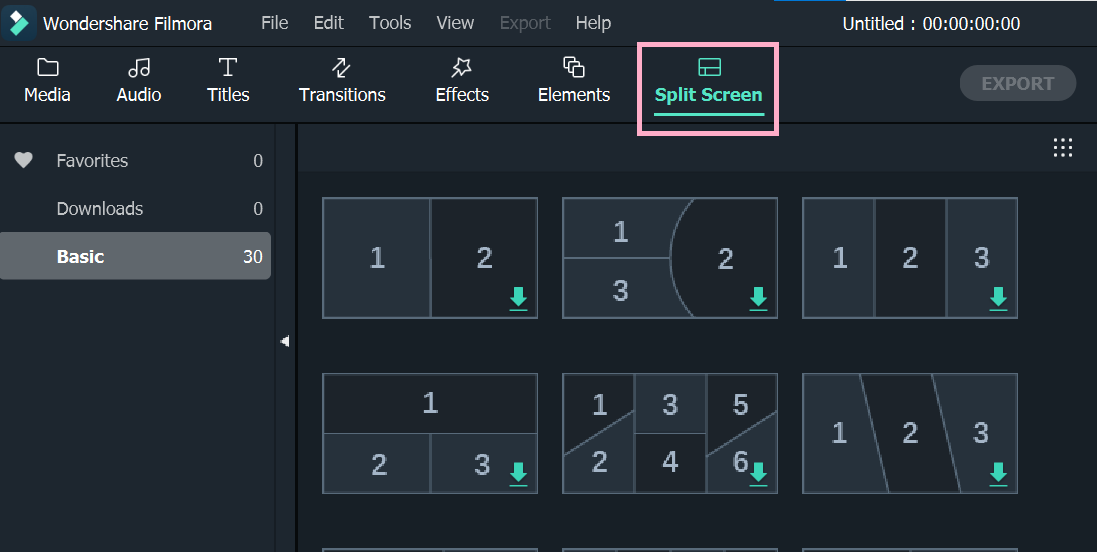
- Split the screen into several different shapes and styles.
Apart from this, you can also add the slo-mo effect and play the video backward for added fun.
Step 4
Once you have edited the Tiktok video to your heart’s content, you can preview it to see if any further changes are required. After that, you can export it to your Android or iOS device to upload directly from the Tiktok app.
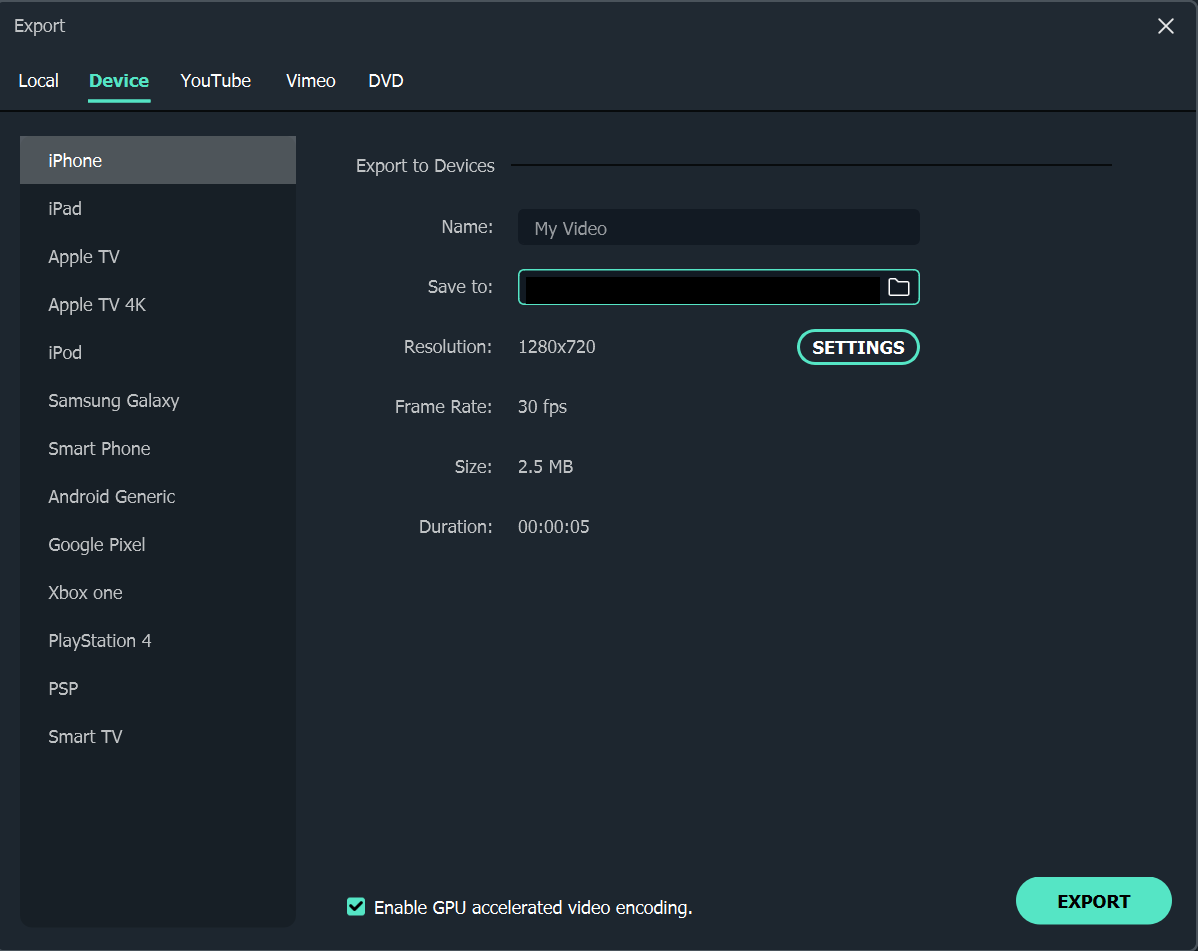
And that’s how you edit a Tiktok video on a desktop.
Now, if you want to create successful Tiktok videos right from the palm of your hands, here is a tutorial for both Android and iPhone.
Create Successful Tiktok Videos on Android/iPhone
The steps to create an engaging Tiktok video using Android or iPhone are almost the same. So, follow the steps below to edit and record a Tiktok video on both devices:
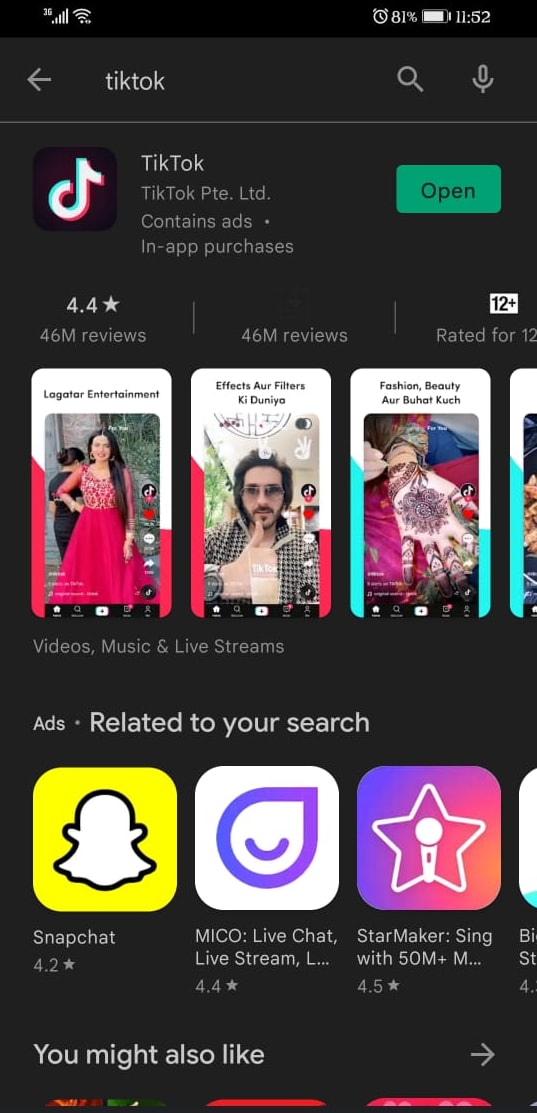
Step 1
Download the Tiktok app from the Play Store for Android and App Store for iPhone.
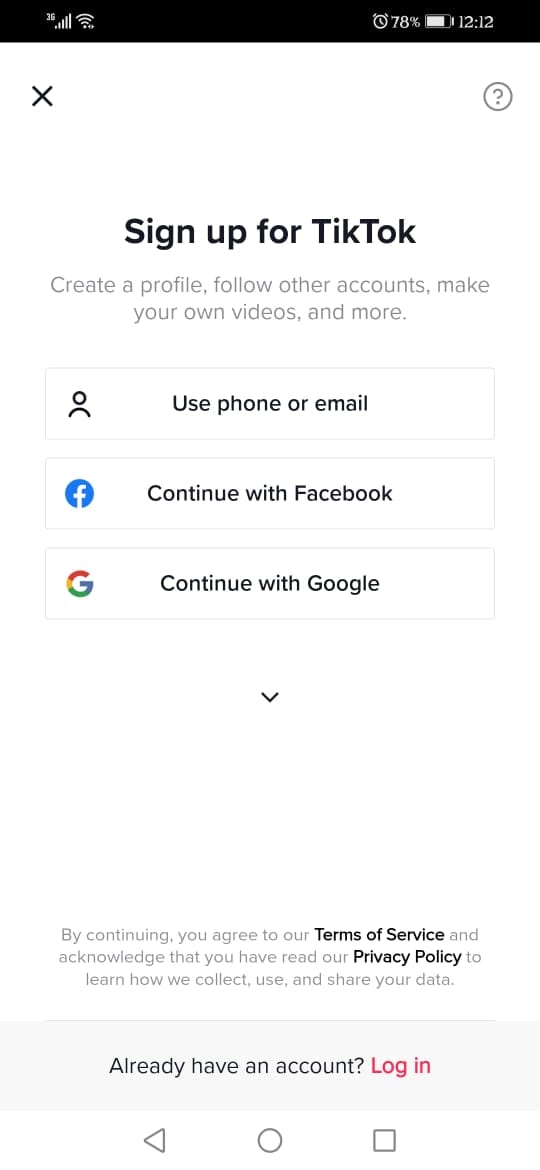
Step 2
Launch the app and sign up using your phone number, Facebook or Gmail. If you already have an account, click on “Sign in” and enter the details.
Step 3
Tap on the “+” to record a video.

Step 4
Tap on “Add Sound” to add audio to your video. This will open a gallery of sounds available on Tiktok. Additionally, you can also click on “My Sound” to add audio from your device.
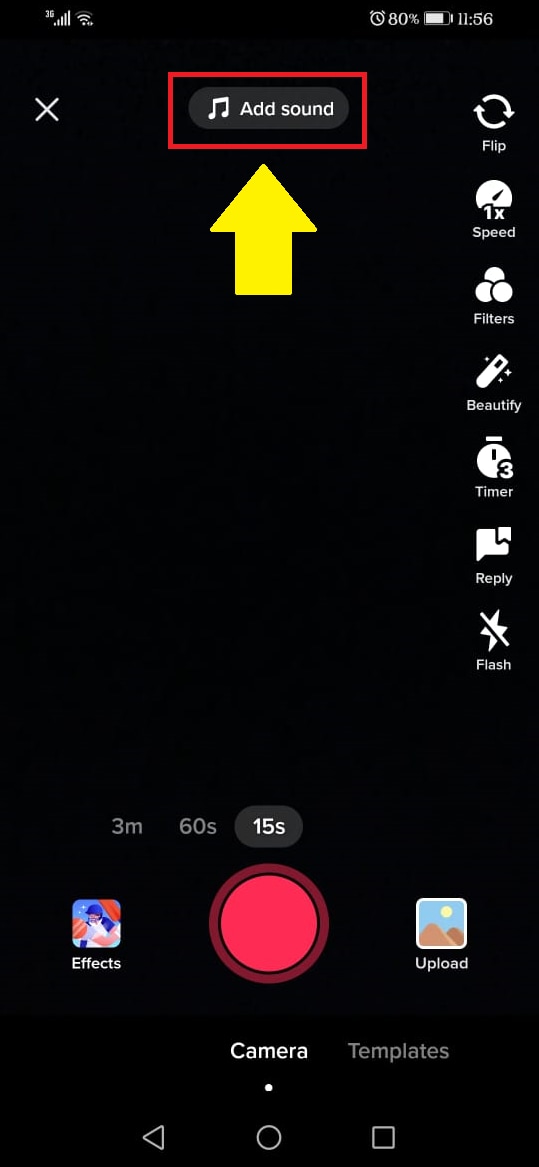

Step 5
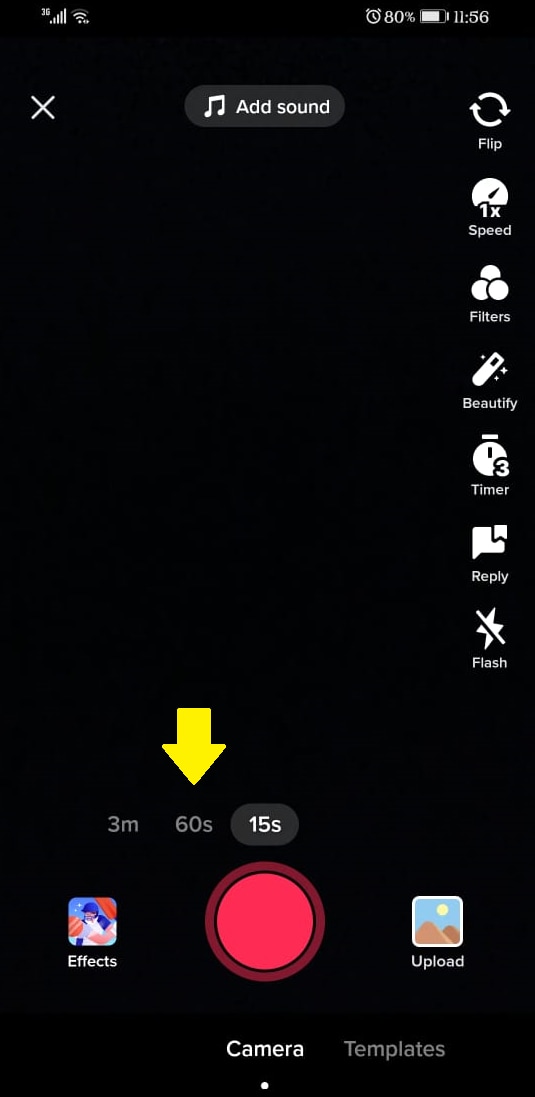
You can select the duration of your video by tapping on the 3 timer options.
Step 6
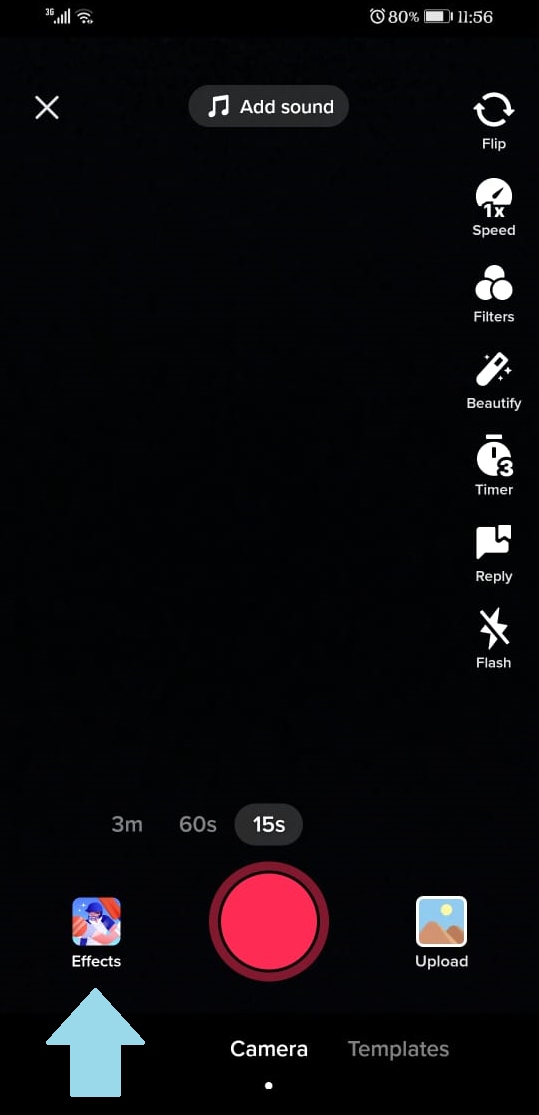
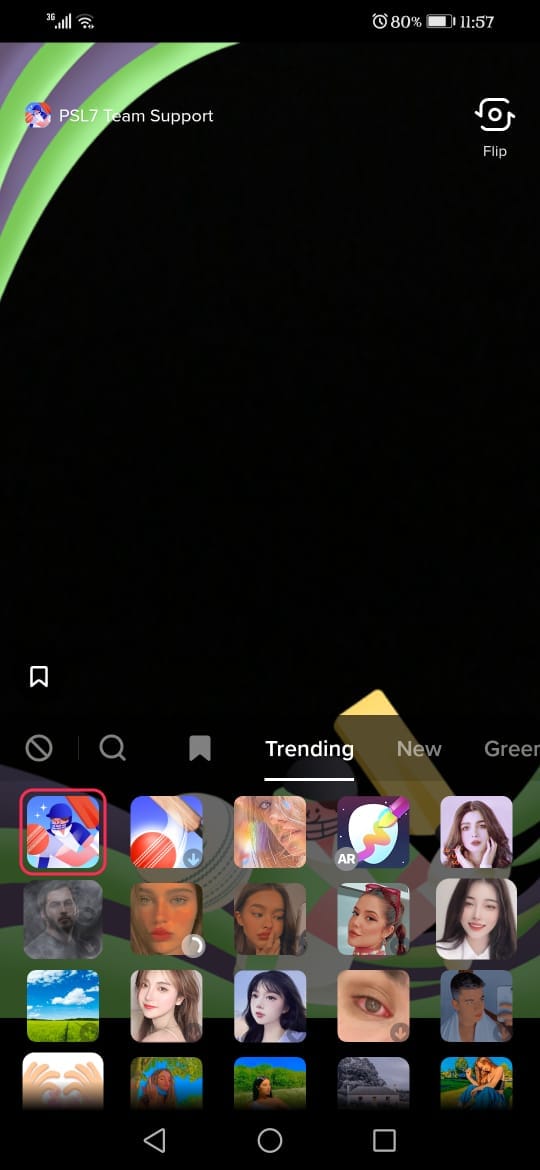
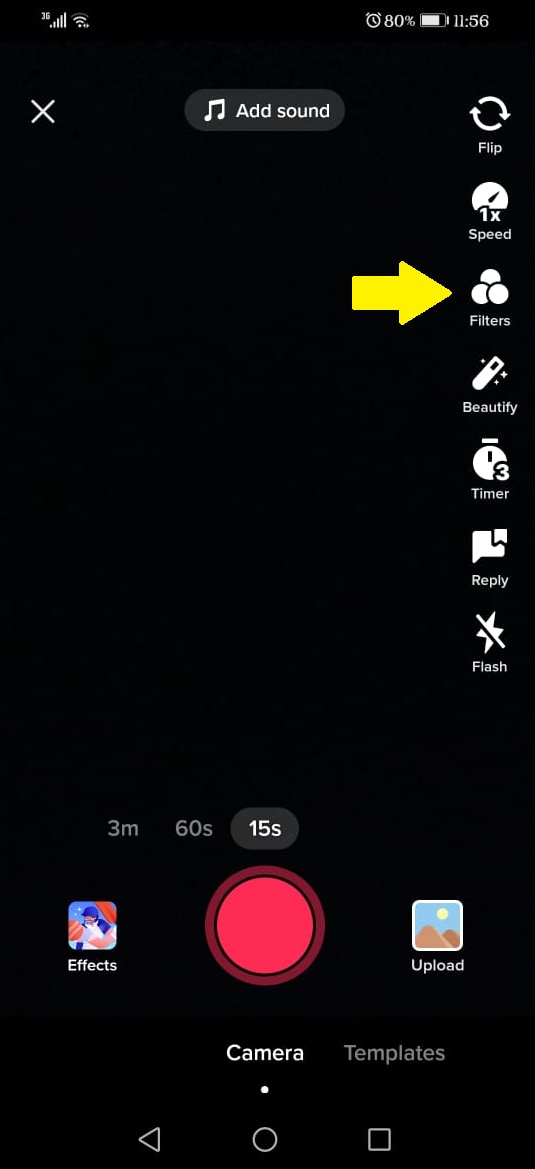
To add effects to your video, tap on “Effects” to open a gallery of built-in Tiktok effects. Select the effect you want to use.
Step 7
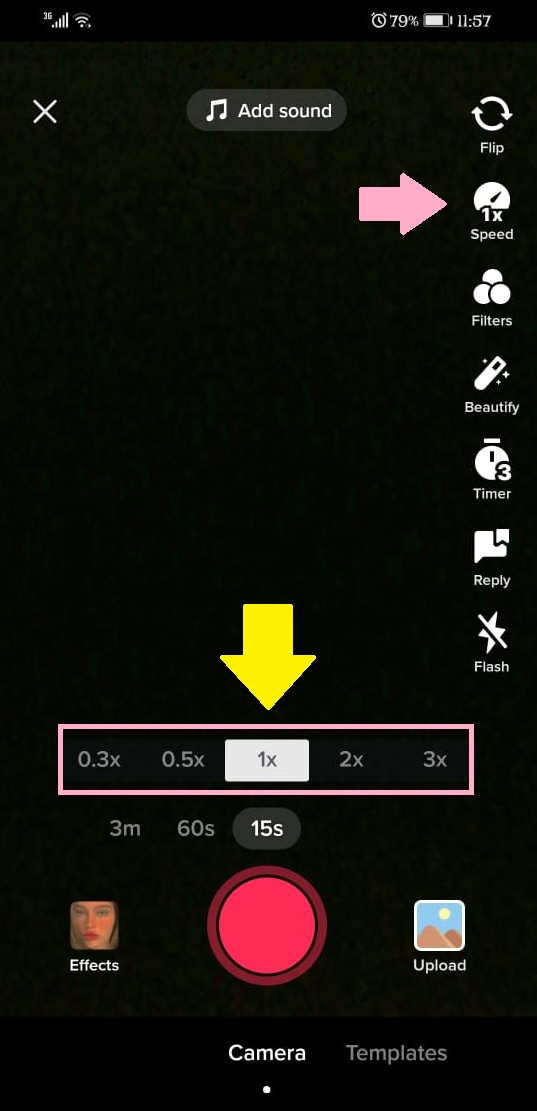
Now click on the round red button to start recording. Once you have recorded your video, you can edit it. Like, by clicking on the “Speed” option, you can set the speed of your video.
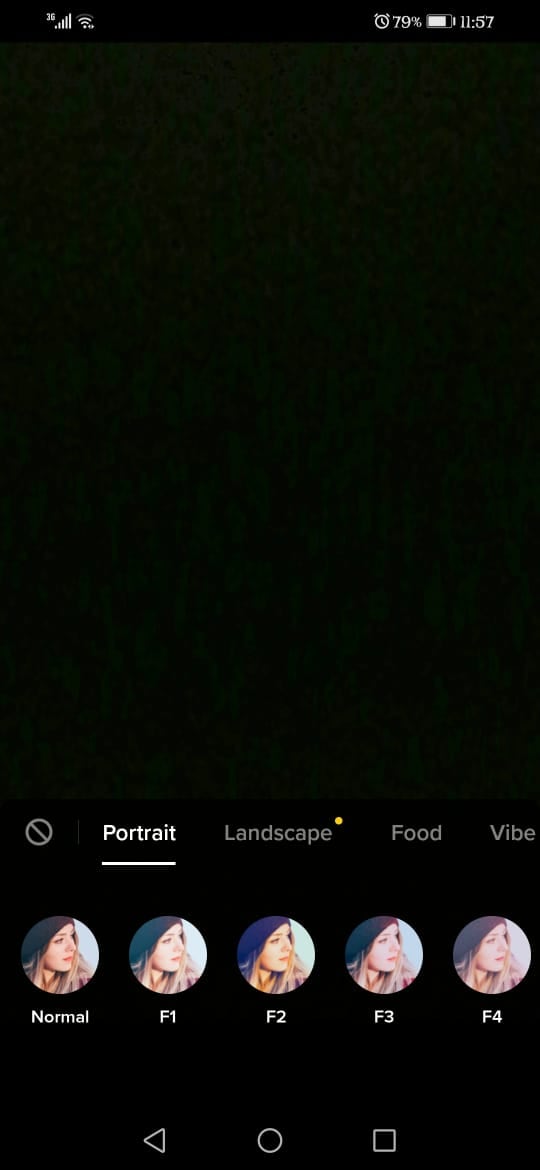
Similarly, by tapping on “Filters,” you can add different filters to your recorded video.
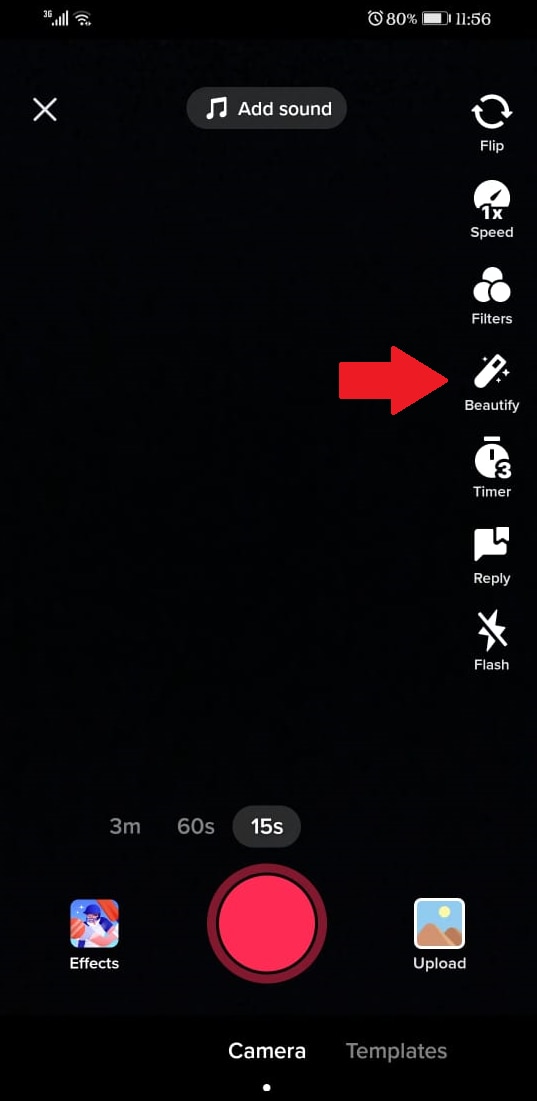
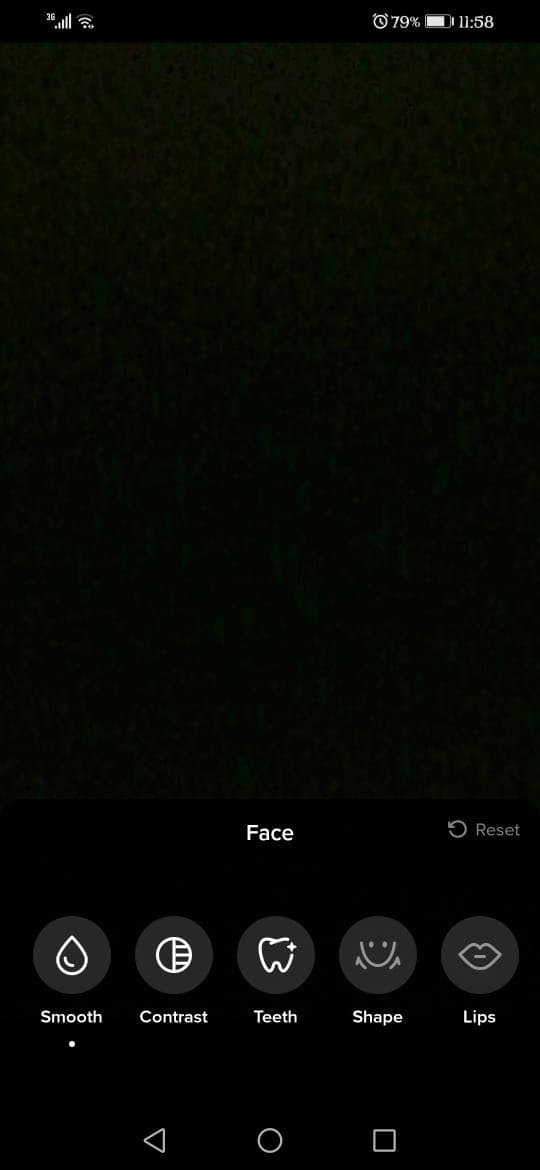
And, to fix any blemishes on your face or to smoothen the skin, you can tap on “Beautify” and do the magic!
Step 8
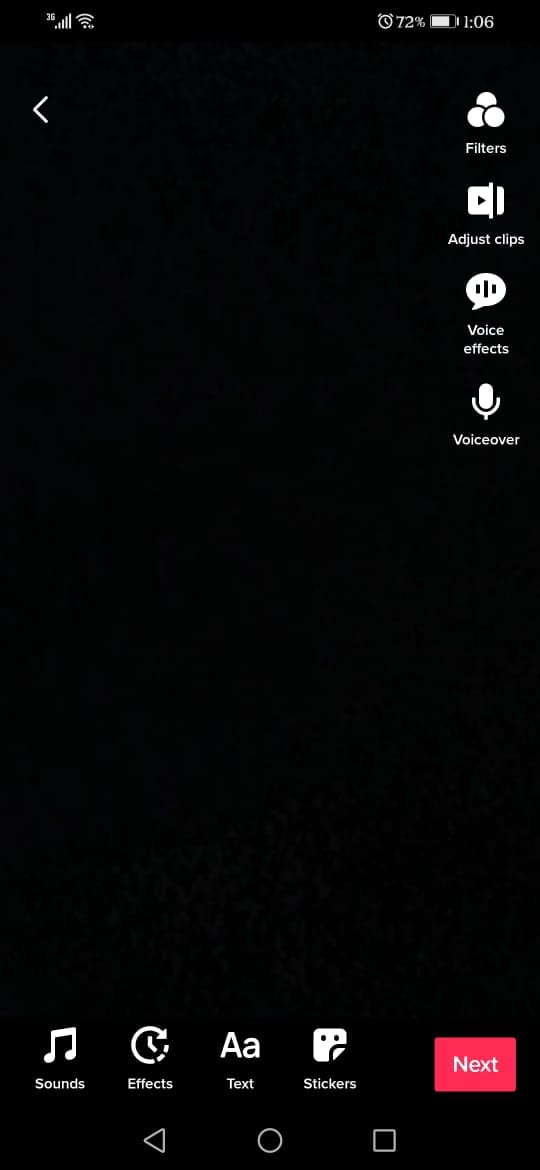
Done with all the edits? Tap the red “tick” option to proceed to the next part, where you can add text, stickers, voice effects, and adjust the clips. Click “Next” to move on to posting the video.

Step 9
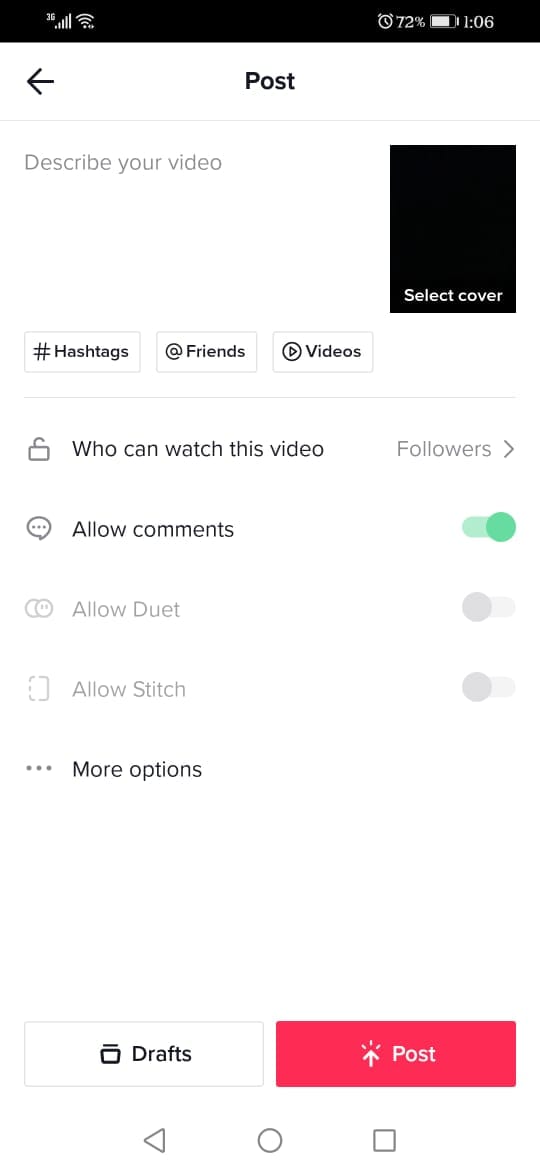
Before posting the video on Tiktok, you can add a description, hashtags, and tag friends in it. You can also adjust the settings of who can watch your video, who can comment, and if people can make duets.
Once all the settings have been finalized, click on “Post” to post the video to Tiktok.
And that’s how you create, edit, and post a Tiktok video on Android and iOS devices.
Conclusion
Tiktok videos are not only about following the trends; in fact, you can use them to create brand awareness, market your product or services, or engage with your audience in an effective way. However, the key is to make a video worth watching! And while Tiktok’s built-in editor has many tools, it comes with certain limitations.
If you want to make your video more exciting and different from the rest, you can always go for an external video editor, like Wondershare Filmora, and edit videos on your desktop. I hope our steps on how to create successful Tiktok videos on desktop, Android, and iPhone will come in handy and increase your Tiktok followers!
Step 2
Launch the tool, and click on the “+” sign to import the Tiktok video you want to edit.
Step 3
Once your video clip is successfully imported to the timeline, it’s time to get editing! Filmora offers many basic and advanced editing tools to give a professional touch to your Tiktok videos.
For example, you can:
- Add audio to your videos from a vast library of tracks for all occasions.
- Add titles and subtitles in different fonts and styles.
- Add unique transitions to make your videos enjoyable.
- Add various audio and visual effects to your videos.
- Add different elements in the video for a thrilling effect.
- Split the screen into several different shapes and styles.
Apart from this, you can also add the slo-mo effect and play the video backward for added fun.
Step 4
Once you have edited the Tiktok video to your heart’s content, you can preview it to see if any further changes are required. After that, you can export it to your Android or iOS device to upload directly from the Tiktok app.
And that’s how you edit a Tiktok video on a desktop.
Now, if you want to create successful Tiktok videos right from the palm of your hands, here is a tutorial for both Android and iPhone.
Create Successful Tiktok Videos on Android/iPhone
The steps to create an engaging Tiktok video using Android or iPhone are almost the same. So, follow the steps below to edit and record a Tiktok video on both devices:
Step 1
Download the Tiktok app from the Play Store for Android and App Store for iPhone.
Step 2
Launch the app and sign up using your phone number, Facebook or Gmail. If you already have an account, click on “Sign in” and enter the details.
Step 3
Tap on the “+” to record a video.
Step 4
Tap on “Add Sound” to add audio to your video. This will open a gallery of sounds available on Tiktok. Additionally, you can also click on “My Sound” to add audio from your device.
Step 5
You can select the duration of your video by tapping on the 3 timer options.
Step 6
To add effects to your video, tap on “Effects” to open a gallery of built-in Tiktok effects. Select the effect you want to use.
Step 7
Now click on the round red button to start recording. Once you have recorded your video, you can edit it. Like, by clicking on the “Speed” option, you can set the speed of your video.
Similarly, by tapping on “Filters,” you can add different filters to your recorded video.
And, to fix any blemishes on your face or to smoothen the skin, you can tap on “Beautify” and do the magic!
Step 8
Done with all the edits? Tap the red “tick” option to proceed to the next part, where you can add text, stickers, voice effects, and adjust the clips. Click “Next” to move on to posting the video.
Step 9
Before posting the video on Tiktok, you can add a description, hashtags, and tag friends in it. You can also adjust the settings of who can watch your video, who can comment, and if people can make duets.
Once all the settings have been finalized, click on “Post” to post the video to Tiktok.
And that’s how you create, edit, and post a Tiktok video on Android and iOS devices.
Conclusion
Tiktok videos are not only about following the trends; in fact, you can use them to create brand awareness, market your product or services, or engage with your audience in an effective way. However, the key is to make a video worth watching! And while Tiktok’s built-in editor has many tools, it comes with certain limitations.
If you want to make your video more exciting and different from the rest, you can always go for an external video editor, like Wondershare Filmora, and edit videos on your desktop. I hope our steps on how to create successful Tiktok videos on desktop, Android, and iPhone will come in handy and increase your Tiktok followers!
Also read:
- 2024 Approved Top TikTok Patterns You Can’t Miss This Year
- [New] How to Delete a TikTok Account Permanently, In 2024
- Crafting a Unique Identity with Creative TikTok PFPs
- 2024 Approved The Playlist TikTok's Hotspots for Rhythmic Flows and Beats
- How to Charm Your Way Into a Friend’s TikTok Show for 2024
- [New] Crafting Distinctive TikTok Profile Frames
- [Updated] Boost Your TikTok Video Speed Easy Methods Explored for 2024
- [New] 2024 Approved Insider Take on TikTok’s 15 Hottest Tracks
- [Updated] 2024 Approved Discovering New Dimensions TikTok's Viral Potential Through 2 Filmora Strategies
- [Updated] In 2024, Cutting-Edge Design Inspirations for Distinctive TikTok Presence
- 2024 Approved Wild Wonders The Ultimate List of Strange and Exciting TikTok Games
- [Updated] Culinary Crossroads Popular Food Recipes Intersected for 2024
- [Updated] 2024 Approved Computerized Creativity Unleashed Steps to Initiate a Live Show on TikTok
- 2024 Approved Giggly Guide Navigating the Top Laugh Tracks in TikTok
- [Updated] The Ultimate Guide to Creating a Powerful TikTok Advertising Strategy for 2024
- In 2024, Journey Into the Heart of TikTok's Anime A Convergence of Dance, Music & Imagery
- 2024 Approved Unraveling 15 Trendy TikTok Stunts Today
- [New] Revolutionary Bio Blueprint Essential Strategies for Maximum Viewership on TikTok-Filmora Platforms
- 2024 Approved Exclusive Methods for Apple-Free TikTok Video Downloads
- [New] Becoming an Active Participant in TikTok Lives for 2024
- [New] 2024 Approved Tips to Inject Oversized Characters Into TikToks
- How to Record a TikTok All About TikTok Camera | Filmora
- [New] Maximizing TikTok Promotion Strategies & Top Ad Success Stories for 2024
- [Updated] Unleash Your Inner Edgy with Easy TikTok Updates for 2024
- [New] Time-Saving Strategies for TikTok Watchers for 2024
- [New] Trusted Agencies for Safe Follower Additions for 2024
- Mastering Text in Visuals The Top 5 Tips for TikTok Captions
- 2024 Approved Ultimate Eats TikTok Food Masters
- [Updated] Best Video Editing on the Go for TikTok
- [New] Insider Take on TikTok’s 15 Hottest Tracks for 2024
- [New] Transform TikTok Videos with Our Select Best Font Tools for the Year '23 for 2024
- [Updated] Fostering Creativity for Impressive Mac-Produced TikTok Beginnings
- [Updated] Outrageous Odyssey Your Roadmap to the Funniest TikTok Challenges
- [New] Elevate Your Online Presence with These Top 30 Username Ideas
- In 2024, Who Are the Kings of TikTok Gameplay?
- [New] From Disjointed Elements to a Cohesive TikTok Narrative
- [Updated] Top 15 Emerging TikTok Patterns for 2024
- [Updated] 2024 Approved Essential Elements to Design a Victory-Winning TikTok Advertisement
- [Updated] Elevate Your TikTok Presence with Powerful Slow Motion Techniques
- Mastering TikTok Promotion Strategies & Top Ad Samples for 2024
- Instagrammable Vs. Trendy Will LikeBeat TikTok?
- [Updated] The Digital Darning How TikTok Transforms Traditional Stitching for 2024
- [New] 2024 Approved Unlock Innovative TikTok Edits with Leading Windows Tools
- Top 30 Must-Have TikTok Products On Amazon for 2024
- In 2024, Free Listen Explore Our Unlimited Sound Library
- In 2024, 5 Ways to Move Contacts From Tecno Camon 20 Pro 5G to iPhone (13/14/15) | Dr.fone
- The best electronic signature way to sign .uot file documents online
- Gmail Not Working on Samsung Galaxy A14 4G 7 Common Problems & Fixes | Dr.fone
- Oppo Reno 11 5G Stuck on Screen – Finding Solutions For Stuck on Boot | Dr.fone
- Ultimate 9 Hidden Media Extractors
- The Best Android Unlock Software For Oppo F23 5G Device Top 5 Picks to Remove Android Locks
- [New] 2024 Approved Banish the Automatic Post Proposals on Instagram
- New 10 Essential Movie Trailer Apps for Your iPhone or iPad for 2024
- How to Get and Use Pokemon Go Promo Codes On Honor Magic 5 Pro | Dr.fone
- In 2024, The Best iSpoofer Alternative to Try On Motorola Moto G04 | Dr.fone
- The Art of Decibel Decline Uncovering Sound Management with Audacity
- In 2024, How To Bypass Nokia 130 Music FRP In 3 Different Ways
- How To Change Your Apple ID Password On your Apple iPhone 14 Pro | Dr.fone
- Additional Tips About Sinnoh Stone For Itel P55+ | Dr.fone
- Updated 2024 Approved Best Side-by-Side Video Editing Apps for iOS and Android Devices
- Which is the Best Fake GPS Joystick App On Xiaomi 13 Ultra? | Dr.fone
- In 2024, Top 10 Fingerprint Lock Apps to Lock Your Samsung Galaxy M14 5G Phone
- How To Leave a Life360 Group On Vivo V27 Without Anyone Knowing? | Dr.fone
- Navigating FB Stories Downloads Top 5 Tips for All Devices for 2024
- 8 Solutions to Fix Find My Friends Location Not Available On Oppo Find X7 Ultra | Dr.fone
- [New] 2024 Approved Tweeting to WhatsApp Direct Video Distribution
- Title: "[Updated] 2024 Approved Mastering Media Mosaics for Maximum Impact on TikToks"
- Author: Stephen
- Created at : 2024-06-26 14:58:08
- Updated at : 2024-06-27 14:58:08
- Link: https://tiktok-video-recordings.techidaily.com/updated-2024-approved-mastering-media-mosaics-for-maximum-impact-on-tiktoks/
- License: This work is licensed under CC BY-NC-SA 4.0.
