
!["[Updated] 2024 Approved TikTop to MP4 Prime Video Conversion Tools"](https://www.lifewire.com/thmb/vNiduGzd38MaH6SQoi23lWSaGTw=/400x300/filters:no_upscale():max_bytes(150000):strip_icc()/GettyImages-122061346-f4d63be5cfde470e9b7192d89497b501.jpg)
"[Updated] 2024 Approved TikTop to MP4 Prime Video Conversion Tools"
TikTop to MP4: Prime Video Conversion Tools
Hovering through your TikTok For You page brings up an array of content to dive in. With a few of your finger swipes, you could find yourself seeing a confidence-boosting pep talk, going behind the fashion show behind the scenes, or assisting how to grow herbs in your kitchen.
With so much information to consume nowadays, it’s only natural that you might like to save a couple of TikTok content to watch at a later date and time, without even opening the TikTok app. In this guide, we’ll show you how to convert TikTok to MP4 via the best TikTok converters MP4 available.
In this article
01 Top 3 TikTok MP4 Converters in 2021
02 How to Convert TikTok Video to MP4 without Watermark?
03 How to Save TikTok without Watermark for Free?
Part 1: Top 3 TikTok MP4 Converters in 2021
1. ttdown.org
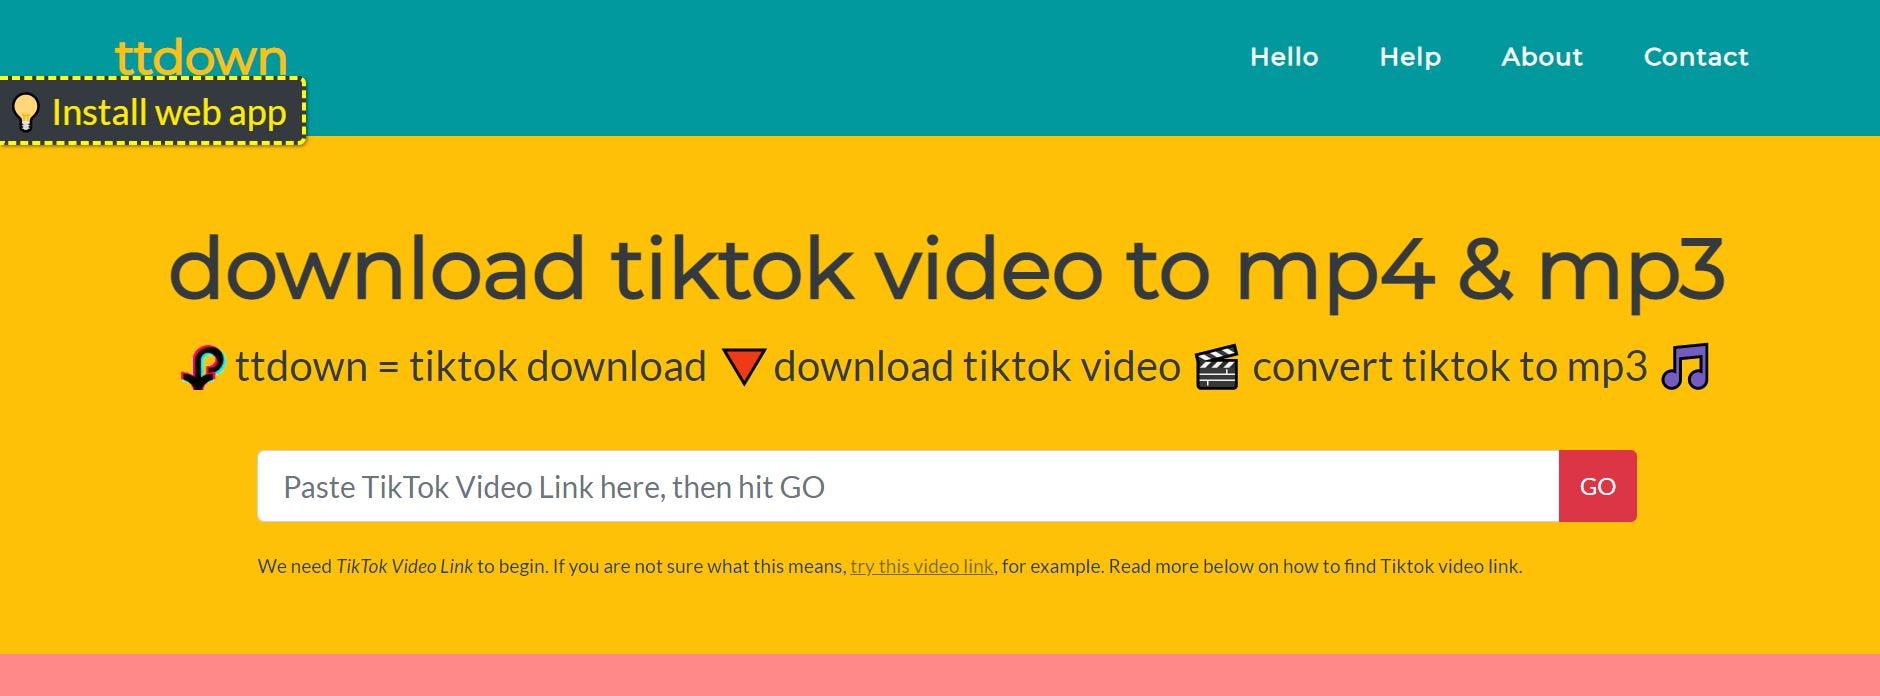
TTDown provides a colorful website to scroll through and learn about TikTok and a step-by-step tutorial on downloading TikTok MP4. In addition, TTDown brings you the most straightforward way to download TikTok MP4 videos by copy-pasting the video’s link on their website.
However, its Bookmarklet feature saves the users’ time from copy-pasting. They have provided their website link that you can drag into your browser’s bookmarks. Just hit the bookmark when you scroll through TikTok and wish to save a video.
Price: Free
2. Experts PHP
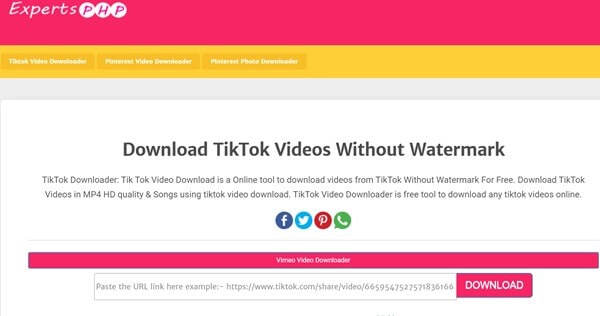
ExpertPHP TikTok converter MP4 lets you download TikTok files by pasting the file’s copied link to be downloaded into the text bar offered on the ExpertsPHP’s web page. It further enables us to download videos and images from platforms like Pinterest, TikTok, etc. Here, you can download videos freely without watermarks.
One downside of ExpertsPHP is that it does not provide other features, like converting videos into GIFs, as offered by its alternatives.
Price: Free
3. Qoob Clips
Qoob Clips lets us view and download unlimited TikTok and Instagram media files. You can even get access to the private accounts’ content through Qoob.
To proceed with the process, you are only required to install Qoob on your computer, enter your username, and begin viewing content downloaded automatically into your PC. Just by entering the username, you can even search for a private account’s content.
This MP4 TikTok downloader also lets you download unlimited highlights and stories. It further supports unlimited private accounts without displaying any ads.
Part 2: How to Convert TikTok Video to MP4 without Watermark?
Before proceeding further, it’s essential to consider whether any copyright infringement issues could arise from downloading a TikTok video. According to the Community Guidelines of TikTok, users cannot post, send, or share any content that violates someone else’s trademarks, copyrights, or intellectual property rights.
To prevent this, TikTok applies a watermark featuring both its account’s username and the logo that originally posted the content if someone downloads a TikTok video.
In other words, you have to ensure the watermark’s visibility or give full credit to the user in another way while reposting the user’s video on social media. And, this is where the job of the best TikTok converter MP4 comes in.
Cropping watermarks from your videos with Wondershare Filmora video editing software is a pretty straightforward process. You don’t need be a professional to finish these simple editing actions.
All you must do is choose a method that best suits your preferences and performs an easy action, though.
So, without any delay, let’s have a look at some editing techniques you can use to blur or crop watermarks from the downloaded videos of TikTok with Filmora.
Wondershare Filmora
Get started easily with Filmora’s powerful performance, intuitive interface, and countless effects!
Try It Free Try It Free Try It Free Learn More >

Note: the methods listed below won’t work perfectly if the watermark is in the middle of the screen. And you may need to subscribe to remove the watermark via Wondershare Filmora. In addition, you can fetch a special discount at Filmora Education Plan if you’re a student.
Method 1: Blurring the Watermark
The Filmora’s Mosaic feature will allow you to blur logos and all other on-screen graphics with just a few taps.
Hit the Effects tab at the top, select the Utility tab at left, and then hit the Mosaic option to preview the effect.
Click plus icon on the thumbnail on Mosaic or drag-and-drop it into the track above the video.
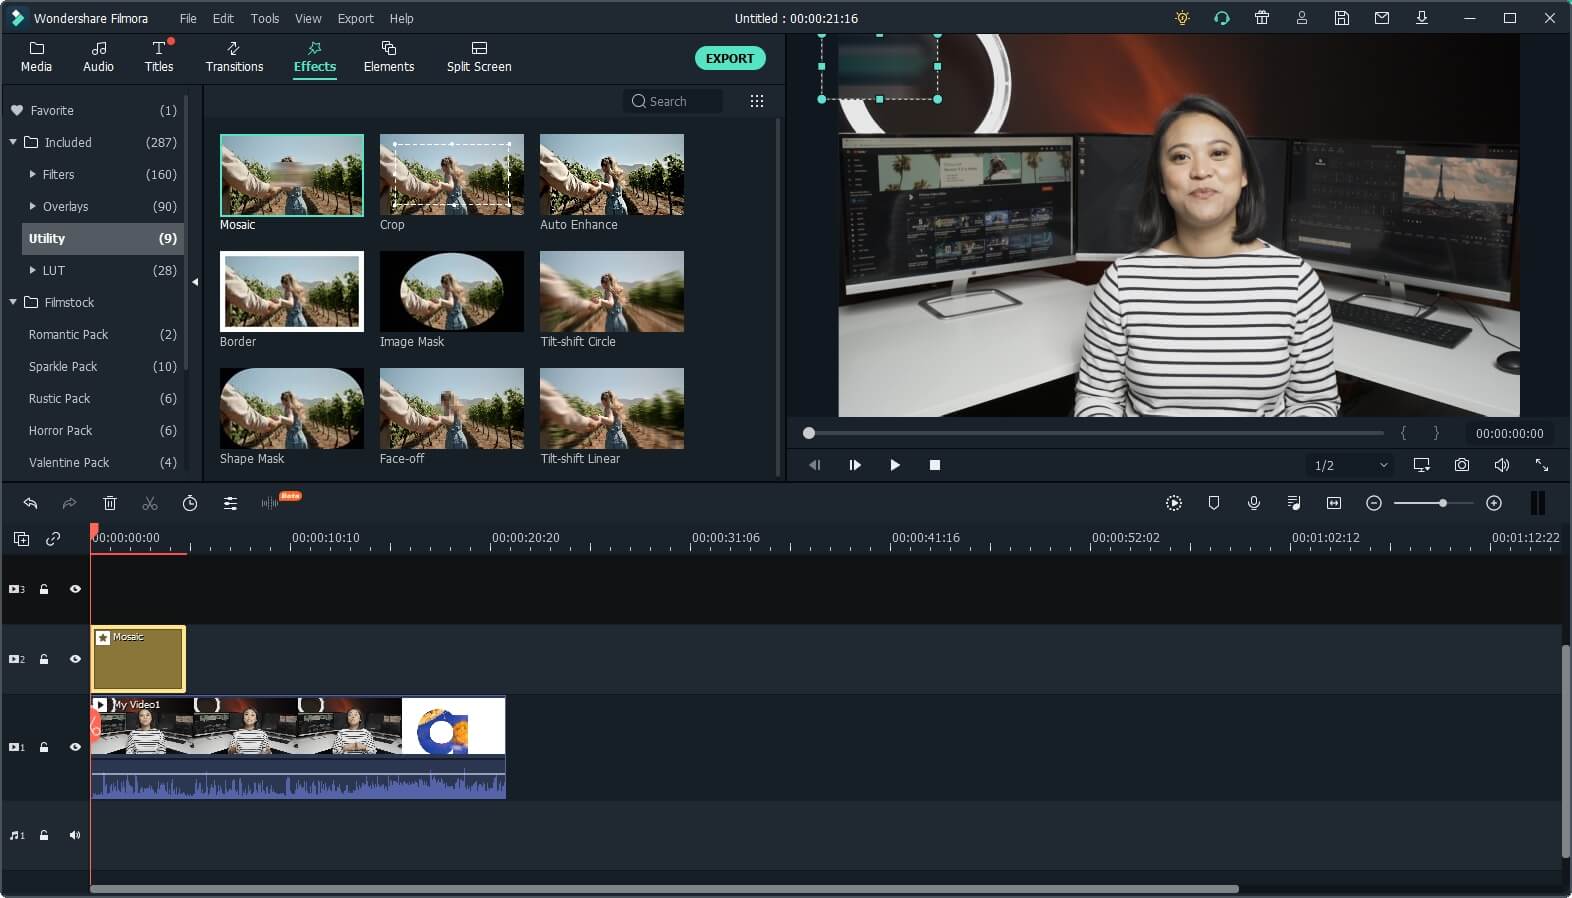
A mosaic square will appear after you apply it in the preview window by relocating it by simply dragging it to the preview window area or adjusting its size at the watermarked position.
If the downloaded video has more than one logo to hide, tapping the plus icon will introduce you to another mosaic square within the video
project.
In the timeline, double click those Mosaic effects; you can select Blur Amount and Type to adjust the shape and size of the mosaic. Hit the OK tab to apply the adjustment.

You can also consider using this Mosaic effect to blur other objects or even the face.
Method 2: Remove watermark by Cropping the video
This method will allow you to remove the watermark from your video entirely. Cropping the area where the watermark isn’t possible in any video editor, so if you select to crop the video, be prepared to lose a particular section of the picture.
Right-click the video and choose the Crop and Zoom option once the footage you wish to crop is on the video track in Filmora’s timeline.
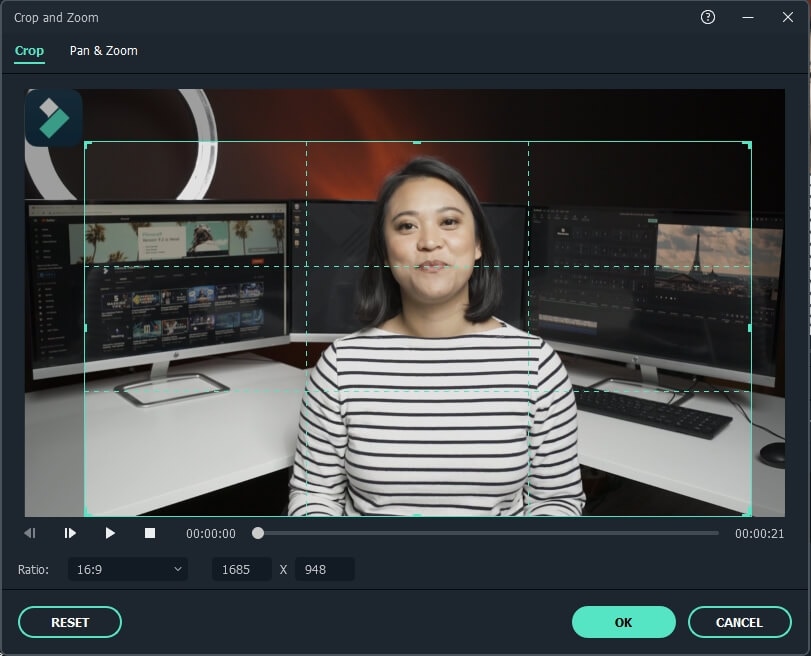
The crop window that enables you to use automatic aspect ratios or manually will appear on the screen. You can reposition the videos’ corners of the cropping rectangle from here by dragging it as much as essential to remove TikTok’s username watermark.
You can change the aspect ratios or keep them originally based on your needs. Hit the OK tab to apply the cropping effect, and you have successfully removed a watermark from your video.
So, it’s a worthy, reliable, and feature-rich TikTok watermark remover that you can easily use as the best TikTok MP4 converter.
Part 3: How to Save TikTok without Watermark for Free?
How to Save TikTok Without Watermark Online
When there is a need for the best TikTok video downloaders, you might get offers with various options. But the quantity of TikTok downloaders without watermarked videos is counted on the fingers of one hand.
We’ve founded SSSTikTok, an ideal online tool fit for the same.
We conducted the tutorial below on Windows 10’s Chrome browser, but it is almost the same on iOS, Android, and Mac.
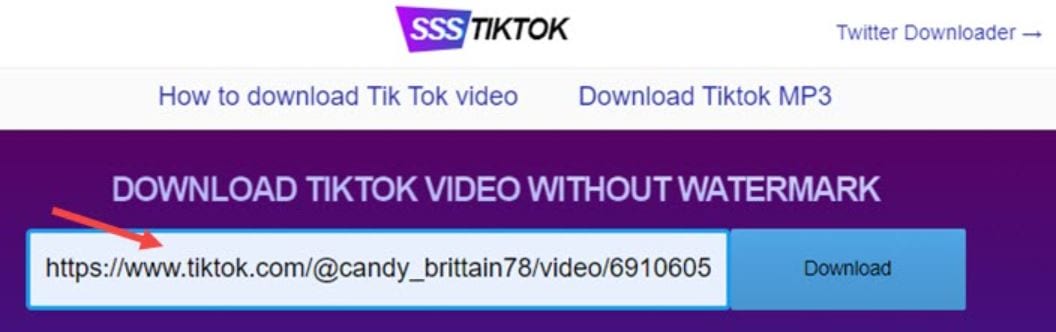
Step 1. Copy the TikTok video’s URL on the Pc or TikTok mobile app.
Step 2. Open the web browser, and visit the SSSTikTok official website. Paste the video link to the blank tab and select the download tab. And it will take only a few secs to analyze the URL.
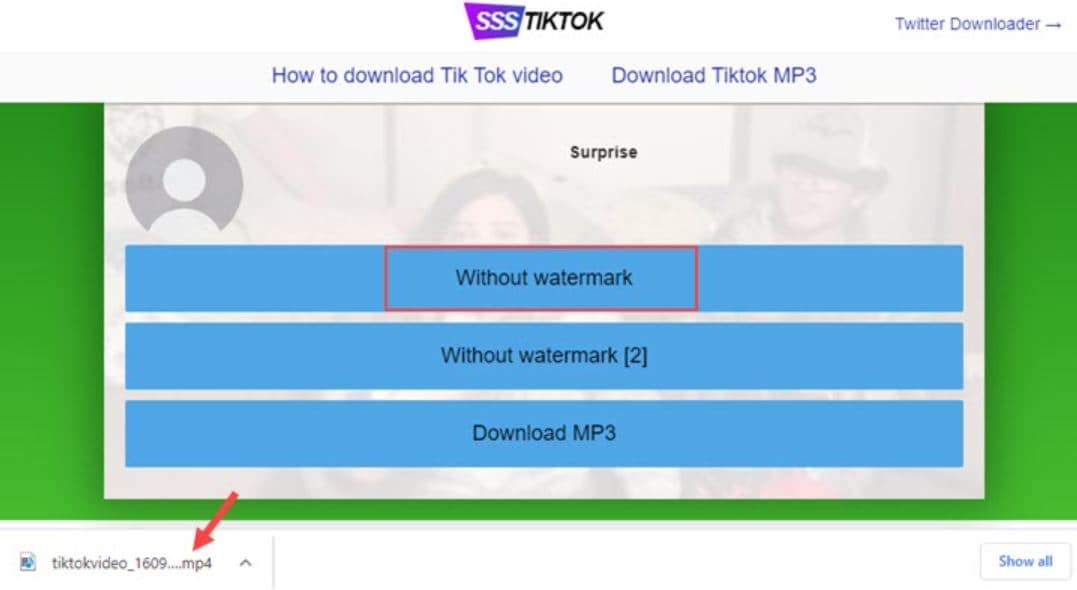
Step 3. Select the “Without Watermark“ option, and the video will be immediately get saved to the browser downloads folder.
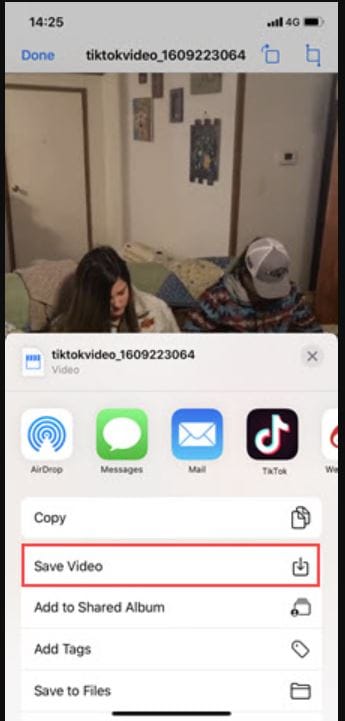
Tips for iPhone users: There’s one more step you should be aware of if you’re using this TikTok downloader. After downloading the video on iOS Safari, you can preview the video, hit the share icon, and select the “Save video “option.
Conclusion
Finally, we hope it won’t be that difficult to convert TikTok to MP4 via the best TikTok converters MP4 with the solution mentioned above. Ensure that you didn’t break the law whether you want to remove it with an online watermark remover or with a program for PC and Mac, or on iPhone or Android phones.
If you want to go for the straightforward and hassle-free option, check our video editing program Filmora and use it to blur or crop the watermarks of TikTok’s downloaded videos.
02 How to Convert TikTok Video to MP4 without Watermark?
03 How to Save TikTok without Watermark for Free?
Part 1: Top 3 TikTok MP4 Converters in 2021
1. ttdown.org
TTDown provides a colorful website to scroll through and learn about TikTok and a step-by-step tutorial on downloading TikTok MP4. In addition, TTDown brings you the most straightforward way to download TikTok MP4 videos by copy-pasting the video’s link on their website.
However, its Bookmarklet feature saves the users’ time from copy-pasting. They have provided their website link that you can drag into your browser’s bookmarks. Just hit the bookmark when you scroll through TikTok and wish to save a video.
Price: Free
2. Experts PHP
ExpertPHP TikTok converter MP4 lets you download TikTok files by pasting the file’s copied link to be downloaded into the text bar offered on the ExpertsPHP’s web page. It further enables us to download videos and images from platforms like Pinterest, TikTok, etc. Here, you can download videos freely without watermarks.
One downside of ExpertsPHP is that it does not provide other features, like converting videos into GIFs, as offered by its alternatives.
Price: Free
3. Qoob Clips
Qoob Clips lets us view and download unlimited TikTok and Instagram media files. You can even get access to the private accounts’ content through Qoob.
To proceed with the process, you are only required to install Qoob on your computer, enter your username, and begin viewing content downloaded automatically into your PC. Just by entering the username, you can even search for a private account’s content.
This MP4 TikTok downloader also lets you download unlimited highlights and stories. It further supports unlimited private accounts without displaying any ads.
Part 2: How to Convert TikTok Video to MP4 without Watermark?
Before proceeding further, it’s essential to consider whether any copyright infringement issues could arise from downloading a TikTok video. According to the Community Guidelines of TikTok, users cannot post, send, or share any content that violates someone else’s trademarks, copyrights, or intellectual property rights.
To prevent this, TikTok applies a watermark featuring both its account’s username and the logo that originally posted the content if someone downloads a TikTok video.
In other words, you have to ensure the watermark’s visibility or give full credit to the user in another way while reposting the user’s video on social media. And, this is where the job of the best TikTok converter MP4 comes in.
Cropping watermarks from your videos with Wondershare Filmora video editing software is a pretty straightforward process. You don’t need be a professional to finish these simple editing actions.
All you must do is choose a method that best suits your preferences and performs an easy action, though.
So, without any delay, let’s have a look at some editing techniques you can use to blur or crop watermarks from the downloaded videos of TikTok with Filmora.
Wondershare Filmora
Get started easily with Filmora’s powerful performance, intuitive interface, and countless effects!
Try It Free Try It Free Try It Free Learn More >
Note: the methods listed below won’t work perfectly if the watermark is in the middle of the screen. And you may need to subscribe to remove the watermark via Wondershare Filmora. In addition, you can fetch a special discount at Filmora Education Plan if you’re a student.
Method 1: Blurring the Watermark
The Filmora’s Mosaic feature will allow you to blur logos and all other on-screen graphics with just a few taps.
Hit the Effects tab at the top, select the Utility tab at left, and then hit the Mosaic option to preview the effect.
Click plus icon on the thumbnail on Mosaic or drag-and-drop it into the track above the video.
A mosaic square will appear after you apply it in the preview window by relocating it by simply dragging it to the preview window area or adjusting its size at the watermarked position.
If the downloaded video has more than one logo to hide, tapping the plus icon will introduce you to another mosaic square within the video
project.
In the timeline, double click those Mosaic effects; you can select Blur Amount and Type to adjust the shape and size of the mosaic. Hit the OK tab to apply the adjustment.
You can also consider using this Mosaic effect to blur other objects or even the face.
Method 2: Remove watermark by Cropping the video
This method will allow you to remove the watermark from your video entirely. Cropping the area where the watermark isn’t possible in any video editor, so if you select to crop the video, be prepared to lose a particular section of the picture.
Right-click the video and choose the Crop and Zoom option once the footage you wish to crop is on the video track in Filmora’s timeline.
The crop window that enables you to use automatic aspect ratios or manually will appear on the screen. You can reposition the videos’ corners of the cropping rectangle from here by dragging it as much as essential to remove TikTok’s username watermark.
You can change the aspect ratios or keep them originally based on your needs. Hit the OK tab to apply the cropping effect, and you have successfully removed a watermark from your video.
So, it’s a worthy, reliable, and feature-rich TikTok watermark remover that you can easily use as the best TikTok MP4 converter.
Part 3: How to Save TikTok without Watermark for Free?
How to Save TikTok Without Watermark Online
When there is a need for the best TikTok video downloaders, you might get offers with various options. But the quantity of TikTok downloaders without watermarked videos is counted on the fingers of one hand.
We’ve founded SSSTikTok, an ideal online tool fit for the same.
We conducted the tutorial below on Windows 10’s Chrome browser, but it is almost the same on iOS, Android, and Mac.
Step 1. Copy the TikTok video’s URL on the Pc or TikTok mobile app.
Step 2. Open the web browser, and visit the SSSTikTok official website. Paste the video link to the blank tab and select the download tab. And it will take only a few secs to analyze the URL.
Step 3. Select the “Without Watermark“ option, and the video will be immediately get saved to the browser downloads folder.
Tips for iPhone users: There’s one more step you should be aware of if you’re using this TikTok downloader. After downloading the video on iOS Safari, you can preview the video, hit the share icon, and select the “Save video “option.
Conclusion
Finally, we hope it won’t be that difficult to convert TikTok to MP4 via the best TikTok converters MP4 with the solution mentioned above. Ensure that you didn’t break the law whether you want to remove it with an online watermark remover or with a program for PC and Mac, or on iPhone or Android phones.
If you want to go for the straightforward and hassle-free option, check our video editing program Filmora and use it to blur or crop the watermarks of TikTok’s downloaded videos.
Navigating Social Media Imitation: How to Clone Yourself with Finesse on TikTok
How to Clone Yourself on TikTok

Shanoon Cox
Mar 27, 2024• Proven solutions
Every rising pop star needs music videos, but using professional video editing software may be too time-consuming if you want to quickly create a clone video you can share with your fans on TikTok.
Multiplying yourself in a video is a cool way of making sure that your video is going to get the kind of attention it deserves. The process of cloning yourself in a video is a simple one, but there are certain rules you have to follow while recording the footage that will help you avoid overlapping the figures you’re cloning. Here’s how you can make your first clone yourself video on TikTok.

Selecting the Song for your Clone Video
Before you start shooting the video you first need to select the song on TikTok you’re going to use in the video. Once you’ve found the perfect track simply record it and save it as a video to your camera roll. You can then import the video clip that contains the song into the Video Star app.
Here are 10 Popular TikTok Songs for you.

Using the Video Star App to Clone Yourself
1. Download Video Star App
Choosing a location, mounting your iPhone on a tripod, or picking the positions for each of your clones are all important steps you’ll need to take before you actually start recording. There are several apps that enable you to create clone videos easily, but in this article, we are going to show you how you can clone yourself with Video Star. The app can be downloaded from the App Store for free, but additional in-app purchases are necessary if you want to have access to all the power packs Video Star offers. You don’t have to record the video clips with this app since the iPhone’s native camera app is powerful enough to enable you to record high-quality footage.
2. Edit Multiple Video Clips
After you record all the positions for your next clone video with the iPhone’s native camera app, you should cut the video clips and keep only the parts where you are perfectly positioned, so your position in one clip doesn’t overlap with other positions. During the video recording process try to create as much separation between two positions in order to avoid any chance of overlapping. One of the best ways to achieve this is to shoot at a location that is spacious enough so you can make enough separation between two positions. Keep in mind that the maximum number of clips you can combine in the Video Star app is limited to just three, so if you want to have more than three clones in the shot you first have to piece together three clips, save them as a single file and then add more clips to the cloned video you created.
3. Level up Your Videos with Video Star
Video Star also enables you to shoot your videos from the app, and you can adjust the Countdown before the app starts recording or the Recording Speed. Make sure to enter the lowest Recording Speed value possible, because that way you’ll be recording like TikTok does on fast.
Tap the Record button, then select the Multiple options, and play the video that contains the song you previously selected. Once you reach the spot in the song where you want to introduce the clone simply tap Set, so the recording will stop at the designated point and you can move to another position. If at any point during recording you realize that your movements extend to your clone’s location, you can simply tap on the hamburger icon and select the Delete Last option.
To preview the video, you just have to tap on the Scissors icon, and the recorded video will automatically start playing. The Record New Clip in the Scissors menu lets you start from the beginning in case you’re not happy with the results or you can use this option to start recording the video with the second position of your clone.
When done, head back to the Scissors menu, and tap on the Multi-Layer Clip. This feature doesn’t come with the free version of the app, and you must purchase it in order to create a clone video. This action will enable you to select the back and front clips. After selecting the clips, the Mask Front menu will appear on the screen, choose the Shape option and use the hamburger icon on the right side of the screen to change the video’s shape to Rectangle. Drag the rectangle in the preview window so you can crop the first clip to match the demands of your video and press the Next icon to continue the video editing process.
Alternatively, you can use the Erase option to remove the unwanted parts of each video. You can find this option in the Mask Front or Mask Back menu, so just select it and use your finger to remove sections of the shot you don’t want to use.
The Add Effect menu will pop up on the screen so you can add different effects to your first video clip, and then repeat the entire process for the back clip. Once you’ve edited the second clip tap on the Create button to complete the process of making a multilayer clip. Tap Done to save the clip to your camera roll, and upload it to TikTok.
Conclusion
Cloning yourself in a video using the Video Star app is a simple process that can be mastered in a short period of time. The Video Star app lets you create as many clones of yourself as you want, so you just have to make sure that your video clips can be easily combined to feature two or more of your clones and have fun exploring the effects that can make your videos look even cooler. If you want to be a success on the TikTok platform, learning how to make clone videos is one of the best ways to do it, so choose your favorite songs and start producing clone yourself videos.
You can also use Wondershare Filmora to make a split-screen with ease. Check the tutorial below to figure out how to make a split-screen video to clone.


Shanoon Cox
Shanoon Cox is a writer and a lover of all things video.
Follow @Shanoon Cox
Shanoon Cox
Mar 27, 2024• Proven solutions
Every rising pop star needs music videos, but using professional video editing software may be too time-consuming if you want to quickly create a clone video you can share with your fans on TikTok.
Multiplying yourself in a video is a cool way of making sure that your video is going to get the kind of attention it deserves. The process of cloning yourself in a video is a simple one, but there are certain rules you have to follow while recording the footage that will help you avoid overlapping the figures you’re cloning. Here’s how you can make your first clone yourself video on TikTok.
Selecting the Song for your Clone Video
Before you start shooting the video you first need to select the song on TikTok you’re going to use in the video. Once you’ve found the perfect track simply record it and save it as a video to your camera roll. You can then import the video clip that contains the song into the Video Star app.
Here are 10 Popular TikTok Songs for you.
Using the Video Star App to Clone Yourself
1. Download Video Star App
Choosing a location, mounting your iPhone on a tripod, or picking the positions for each of your clones are all important steps you’ll need to take before you actually start recording. There are several apps that enable you to create clone videos easily, but in this article, we are going to show you how you can clone yourself with Video Star. The app can be downloaded from the App Store for free, but additional in-app purchases are necessary if you want to have access to all the power packs Video Star offers. You don’t have to record the video clips with this app since the iPhone’s native camera app is powerful enough to enable you to record high-quality footage.
2. Edit Multiple Video Clips
After you record all the positions for your next clone video with the iPhone’s native camera app, you should cut the video clips and keep only the parts where you are perfectly positioned, so your position in one clip doesn’t overlap with other positions. During the video recording process try to create as much separation between two positions in order to avoid any chance of overlapping. One of the best ways to achieve this is to shoot at a location that is spacious enough so you can make enough separation between two positions. Keep in mind that the maximum number of clips you can combine in the Video Star app is limited to just three, so if you want to have more than three clones in the shot you first have to piece together three clips, save them as a single file and then add more clips to the cloned video you created.
3. Level up Your Videos with Video Star
Video Star also enables you to shoot your videos from the app, and you can adjust the Countdown before the app starts recording or the Recording Speed. Make sure to enter the lowest Recording Speed value possible, because that way you’ll be recording like TikTok does on fast.
Tap the Record button, then select the Multiple options, and play the video that contains the song you previously selected. Once you reach the spot in the song where you want to introduce the clone simply tap Set, so the recording will stop at the designated point and you can move to another position. If at any point during recording you realize that your movements extend to your clone’s location, you can simply tap on the hamburger icon and select the Delete Last option.
To preview the video, you just have to tap on the Scissors icon, and the recorded video will automatically start playing. The Record New Clip in the Scissors menu lets you start from the beginning in case you’re not happy with the results or you can use this option to start recording the video with the second position of your clone.
When done, head back to the Scissors menu, and tap on the Multi-Layer Clip. This feature doesn’t come with the free version of the app, and you must purchase it in order to create a clone video. This action will enable you to select the back and front clips. After selecting the clips, the Mask Front menu will appear on the screen, choose the Shape option and use the hamburger icon on the right side of the screen to change the video’s shape to Rectangle. Drag the rectangle in the preview window so you can crop the first clip to match the demands of your video and press the Next icon to continue the video editing process.
Alternatively, you can use the Erase option to remove the unwanted parts of each video. You can find this option in the Mask Front or Mask Back menu, so just select it and use your finger to remove sections of the shot you don’t want to use.
The Add Effect menu will pop up on the screen so you can add different effects to your first video clip, and then repeat the entire process for the back clip. Once you’ve edited the second clip tap on the Create button to complete the process of making a multilayer clip. Tap Done to save the clip to your camera roll, and upload it to TikTok.
Conclusion
Cloning yourself in a video using the Video Star app is a simple process that can be mastered in a short period of time. The Video Star app lets you create as many clones of yourself as you want, so you just have to make sure that your video clips can be easily combined to feature two or more of your clones and have fun exploring the effects that can make your videos look even cooler. If you want to be a success on the TikTok platform, learning how to make clone videos is one of the best ways to do it, so choose your favorite songs and start producing clone yourself videos.
You can also use Wondershare Filmora to make a split-screen with ease. Check the tutorial below to figure out how to make a split-screen video to clone.
Shanoon Cox
Shanoon Cox is a writer and a lover of all things video.
Follow @Shanoon Cox
Also read:
- [Updated] The Best Tools for Scrutinizing Your TikTok Traffic Patterns
- [New] Unleashing Video Magic on TikTok with Pre-Made Designs for 2024
- Exceptional TikTok PFP Creations that Command Attention for 2024
- The Ultimate TikTok Live Jump A How-To Guide for 2024
- [New] Boosting Customer Engagement with Targeted TikTok Campaigns
- 2024 Approved Upset Timeline Trail on TikTok – Undo Recent Loadout
- Navigating the Realm of TikTok’s Anime Culture Rhythmic Dance and Sound Exploration for 2024
- [Updated] Make Your Mark on TikTok Top 30 Unique PFPs
- [New] In 2024, A Beginner’s Guide to Jujutsu Kaisen on TikTok
- [Updated] Unlocking Insights The Ultimate Guide to TikTok Metrics for 2024
- [New] 2024 Approved Mastering the Craft of Viral Social Media Marketing on TikTok
- [Updated] Enhance Your TikTok Videos with These 5 Top Text Tools in '23
- [Updated] 2024 Approved Top 15 Must-Read TikTok Favorites
- [Updated] The Ultimate Screen Cutting Companion
- Expert Guide to TikTok's Must-Have Elements
- [Updated] In 2024, Guide to the Premier TikTok Profit Estimators
- Mastering Live Participation Guesting on TikToks
- [New] Elevate Your TikTok Presence with Siri Speech Controls for 2024
- [Updated] 2024 Approved A Friendly Tour How To Join and Chill with Peers Live on TikTok
- [Updated] In 2024, How to Change Your TikTok Username - an Ultimate Guide
- [Updated] In 2024, Culinary Crossroads Popular Food Recipes Intersected
- In 2024, Updated Rankings Alternative Social Apps to TikTok
- The Filmmaker’s Formula for Unbeatable TikTok Reaction Content Using Filmora for 2024
- [Updated] Mastering Pre-Upload TikTok's Copyright Guidelines for 2024
- [New] In 2024, Triumph Over TikTok's Unseen Ban Barriers
- In 2024, 5 Things You Should Know When Using TikTok Web on Mac
- [New] Quick Route Downloading and Launching TikTok App in MacBook for 2024
- [New] Storing TikTok Content Simple Steps for Phones
- 2024 Approved Mastering Growth on TikTok Top 7 Must-Have Tools and Techniques
- Navigating TikTok Media on Chrome Devices Effortlessly for 2024
- [New] Top 10 Essential TikTok Analytics for Account Enhancement
- [Updated] In 2024, Prime Selections The Leading Software for Turning TikTok Into GIF
- In 2024, A Comprehensive Manual for Desktop-Made TikTok Hits
- [Updated] Understanding and Uphold Points in TikTok Copyright Law for 2024
- [Updated] In 2024, Explore the Best Free TikTok to MP3 Conversion Tools Online
- [New] In 2024, The Most Influential Quotes List to Make Your TikTok Videos Shine
- [Updated] Effortless iPhone Downloading TikTok Vids Without Markers
- M31 LUT (Teal and Orange LUT) Free Download for 2024
- New The Ultimate List Top 10 4K Video Converter Tools (Free & Paid) for 2024
- In 2024, How to Show Wi-Fi Password on Samsung Galaxy S23+
- In 2024, How to Track Apple iPhone XS Location without Installing Software? | Dr.fone
- New The Best Free MPEG Video Merging Solutions for 2024
- Elite No-Price Facebook Visual Storytelling Suite for 2024
- In 2024, 5 Ways To Teach You To Transfer Files from Vivo Y100i Power 5G to Other Android Devices Easily | Dr.fone
- How to Watch Facebook Videos on My Apple TV?
- Thinking About Changing Your Netflix Region Without a VPN On Motorola Moto G84 5G? | Dr.fone
- Everything You Need To Know About Unlocked iPhone 14
- In 2024, CatchEmAll Celebrate National Pokémon Day with Virtual Location On Tecno Pova 5 | Dr.fone
- Updated Best 10 Animated DP for WhatsApp
- 2024 Approved Mastering Social Media Enhancing Your Facebook Page Position
- [New] Twitter Video Downloader Download Twitter Videos to iPhone for 2024
- Add a Personal Touch Top Free Video Watermarking Apps for 2024
- The Best iSpoofer Alternative to Try On Tecno Spark Go (2024) | Dr.fone
- 2 Ways to Transfer Text Messages from Nokia XR21 to iPhone 15/14/13/12/11/X/8/ | Dr.fone
- In 2024, Expert Strategies for Managing Facebook Lives in Two Screens
- 2024 Approved The Ultimate Review Comparing Screen Recorders for Professionals
- Title: "[Updated] 2024 Approved TikTop to MP4 Prime Video Conversion Tools"
- Author: Stephen
- Created at : 2024-05-23 04:24:02
- Updated at : 2024-05-24 04:24:02
- Link: https://tiktok-video-recordings.techidaily.com/updated-2024-approved-tiktop-to-mp4-prime-video-conversion-tools/
- License: This work is licensed under CC BY-NC-SA 4.0.
