
!["[Updated] Cinematic Surprises The Most Impactful TikTok Editing Tools"](https://www.lifewire.com/thmb/qDgmIGv-MKnWSKLikR57Fui58lY=/400x300/filters:no_upscale():max_bytes(150000):strip_icc()/GettyImages-693170166-5a99f020c67335003717a070.jpg)
"[Updated] Cinematic Surprises The Most Impactful TikTok Editing Tools"
Cinematic Surprises: The Most Impactful TikTok Editing Tools
Versatile Video Editor - Wondershare Filmora
An easy yet powerful editor
Numerous effects to choose from
Detailed tutorials provided by official channel


TikTok is also known for its creative filters and effects. In fact, unlike Instagram, which offers a limited selection of filters and effects to test, TikTok has an extensive library of filters and effects to attempt.
TikTok filters alter the look and feel of your videos. You may, however, add stuff to your films using effects. You may entirely transform the look of your videos by applying TikTok filters. A green screen can transfer you to any location, change your hair color, transform yourself into an extraterrestrial, and much more.
Trending, New, Interactive, Editing, Beauty, Funny, and World are the best TikTok filter categories. Before you begin recording, you must first decide the effects you wish to utilize. So, this is the time if you haven’t tried either the G6 filter or the Dog Face effect yet. Continue reading to know more about the TikTok filter trend.
In this article
01 10 Best TikTok Filters You’d Love to Use
02 How to Make Use of Filters for TikTok by Filmora?
Part 1: 10 Best TikTok Filters You’d Love to Use
We will look at some of the top TikTok filters that make your video stand out from the crowd.
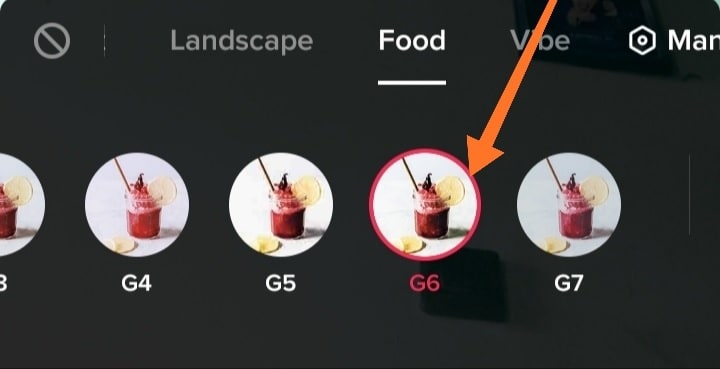
1.TikTok’s G6 filter
On TikTok, filters are identified by a single maker and number. While G6 is labeled a food-related filter, it’s become increasingly popular due to its bright, colorful, and slightly retro feel.
2.TikTok’s Anime Filter
When individuals uploaded their Snapchat videos to TikTok, the anime filter became quite popular. This filter transforms you into an animated character, but you’ll need to download Snapchat first and get an account if you don’t already have one.

3.TikTok’s Invisible filter
Another outcome of viral videos is TikTok’s Invisible filter. This one gives you the ability to become invisible, which is fantastic if you’ve ever wanted to try out that superpower.

4.TikTok’s Bling Effect
The Bling effect is another effect that is likely to appear on your For You page. This effect imitates the flash of a diamond being struck by the sun in different locations across the film.

5.TikTok’s Disney Effect
The Disney TikTok filter gives you a chance to experience what it’s like to be a Disney princess or prince. This effect transforms your face into a Disney-inspired cartoon character.
This filter, like the anime filter, is available on Snapchat. So make sure you’ve downloaded that app first.

6.TikTok Dog Face
The Dog Face filter is another amusing face to experiment on. You get dog ears, a nose, and even a tongue with this one. However, you must record another filter in Snapchat before publishing it to TikTok.

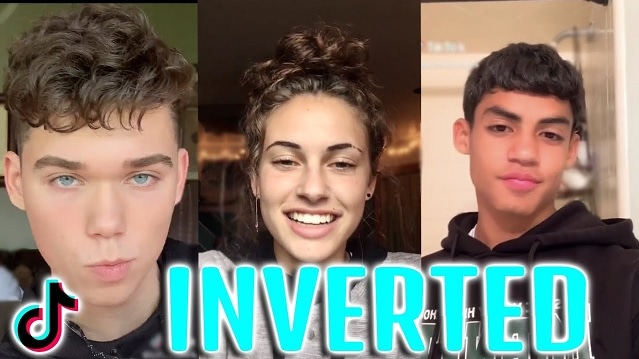
7.TikTok’s Inverted Filter
The Inverted filter is a little more divisive than the others. This filter flips any video you capture, and it’s famous for using the front-facing camera because it’s said to mimic how other people perceive you. So, what’s the big deal about it? On the other hand, the inverted filter has enraged some users, who don’t always appreciate their “true” reflection. However, the only way to see what all the fuss (or hysteria) is about is to give it a try.
8.TikTok’s Face Zoom effect
As the name suggests, the Face Zoom effect zooms-in on your face. Some people use it in group videos to see which face the filter lands on, while others use the same to compare how you look up close versus how you look from a distance.

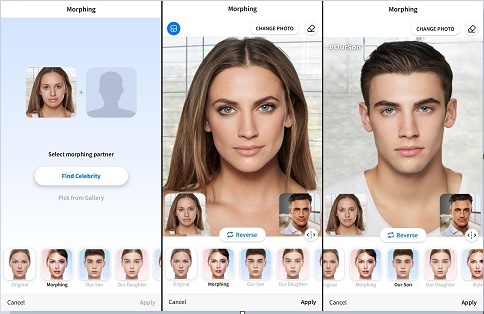
9.TikTok’s Face Morph
The Face Morph effect is another popular effect. This one lets you morph and transition between multiple images of someone else’s face. The effect may be under TikTok’s Templates area because it employs graphics rather than video.
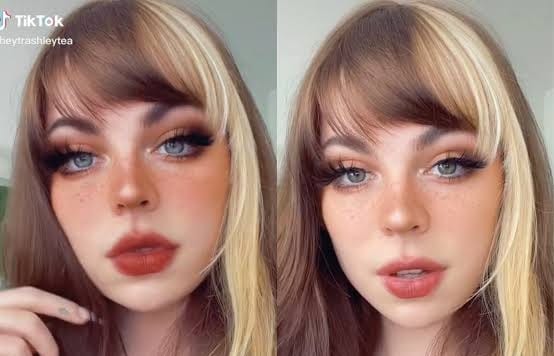
10.TikTok’s Beauty Filter
For obvious reasons, the Beauty filter is popular on TikTok. It improves your appearance by evening out skin tone, adding color, and improving overall appearance. It’s commonly useful in conjunction with other filters and effects.
Part 2: How to Make Use of Filters for TikTok by Filmora?
Wondershare’s Filmora video editor features the standard overlays, transitions, editing, and effects that we’ve come to expect from enthusiast-level video editors. It has a clean, minimalistic, and black interface that is user-friendly. If that wasn’t enough, we’re confident you’ll be thrilled to learn that the Filmora application can be valuable in a variety of ways to make TikTok filters.
You may further personalize the celebrities look alike filter and other TikTok filter trends, with numerous Filmora effects using all of the features we’ve mentioned thus far. Here’s how to do it:
Wondershare Filmora
Get started easily with Filmora’s powerful performance, intuitive interface, and countless effects!
Try It Free Try It Free Learn More >

Step 1: Launch Filmora and select video
Launch Filmora and click on the Import option that will select the video file you want to edit. Now, drag and drop the imported media file to the timeline panel.
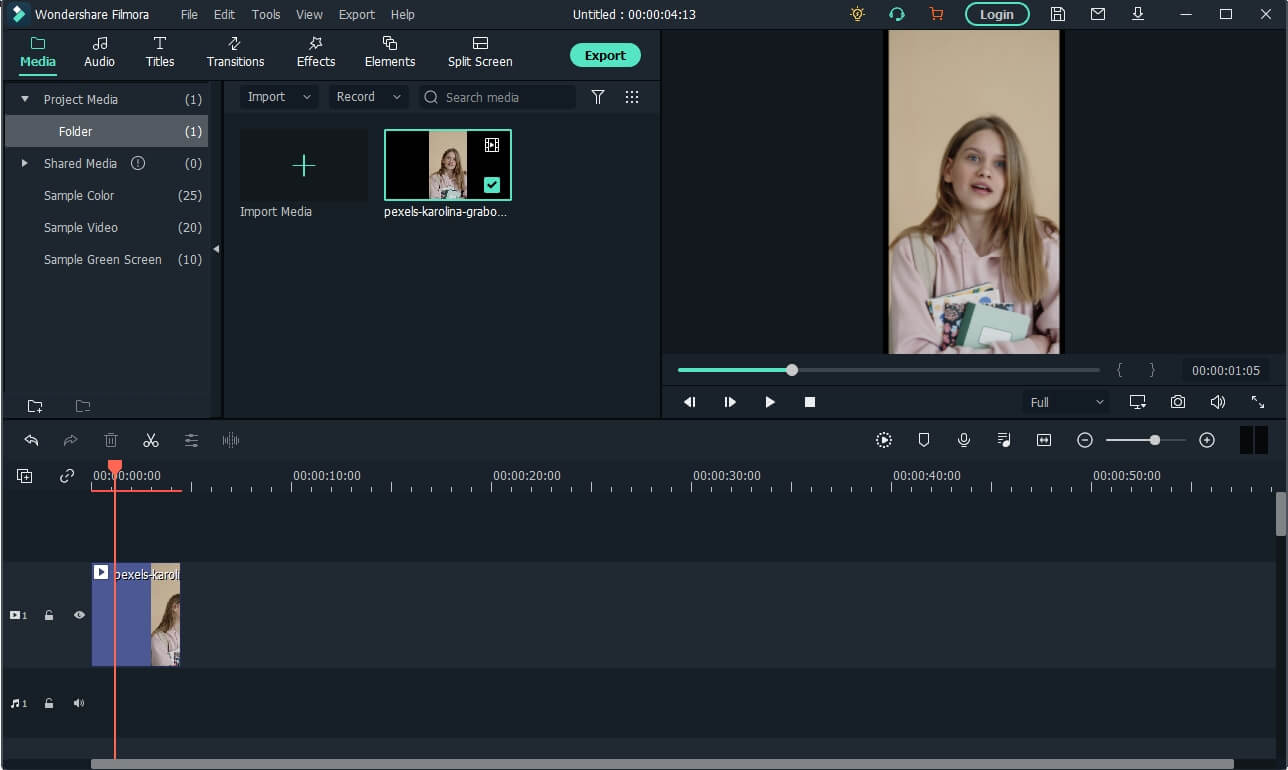
Step 2: Add effect on Filmora
Click on the effect options and select the AR sticker option to add effect. Type the TikTok filter you want on the search bar, then drag the effect to the portion of the video where you want it.
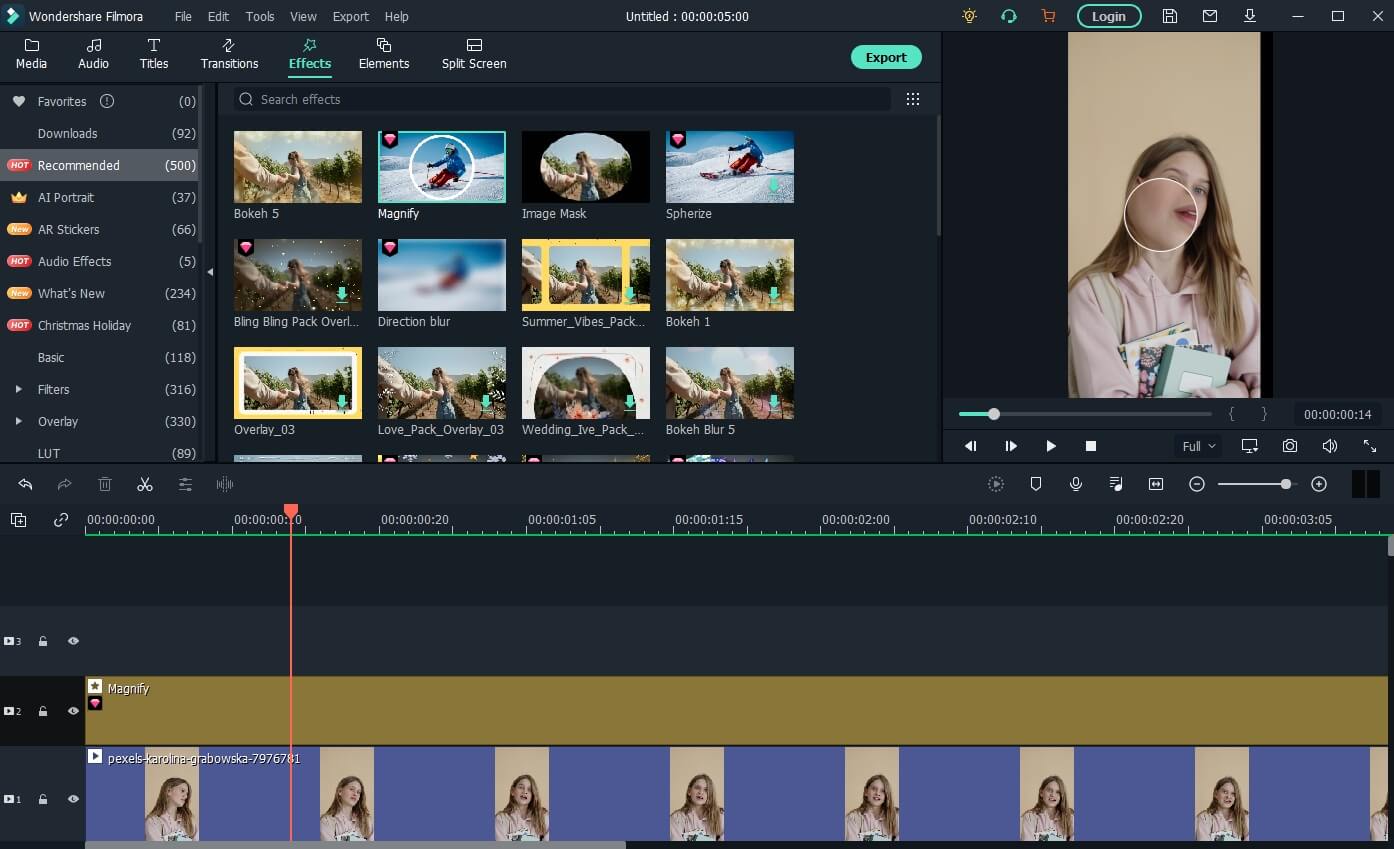
Step 3: Add effect with Filmora
Drag and Drop the video to video tracks 1 and 2 on Filmora. Then go to the effect tab, scroll down to the utility category, and place the image mask effect.
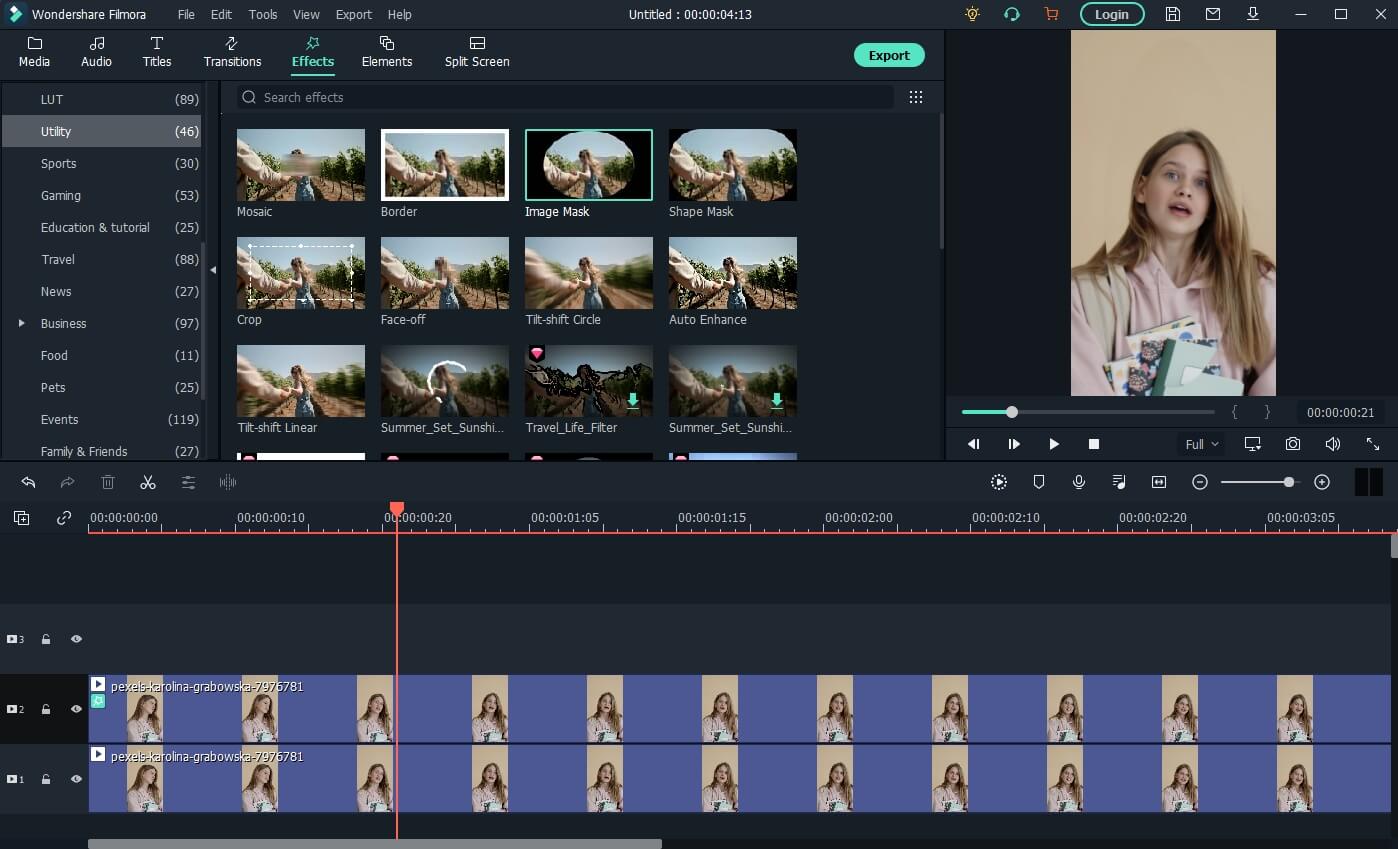
Step 4: Choose a Mask
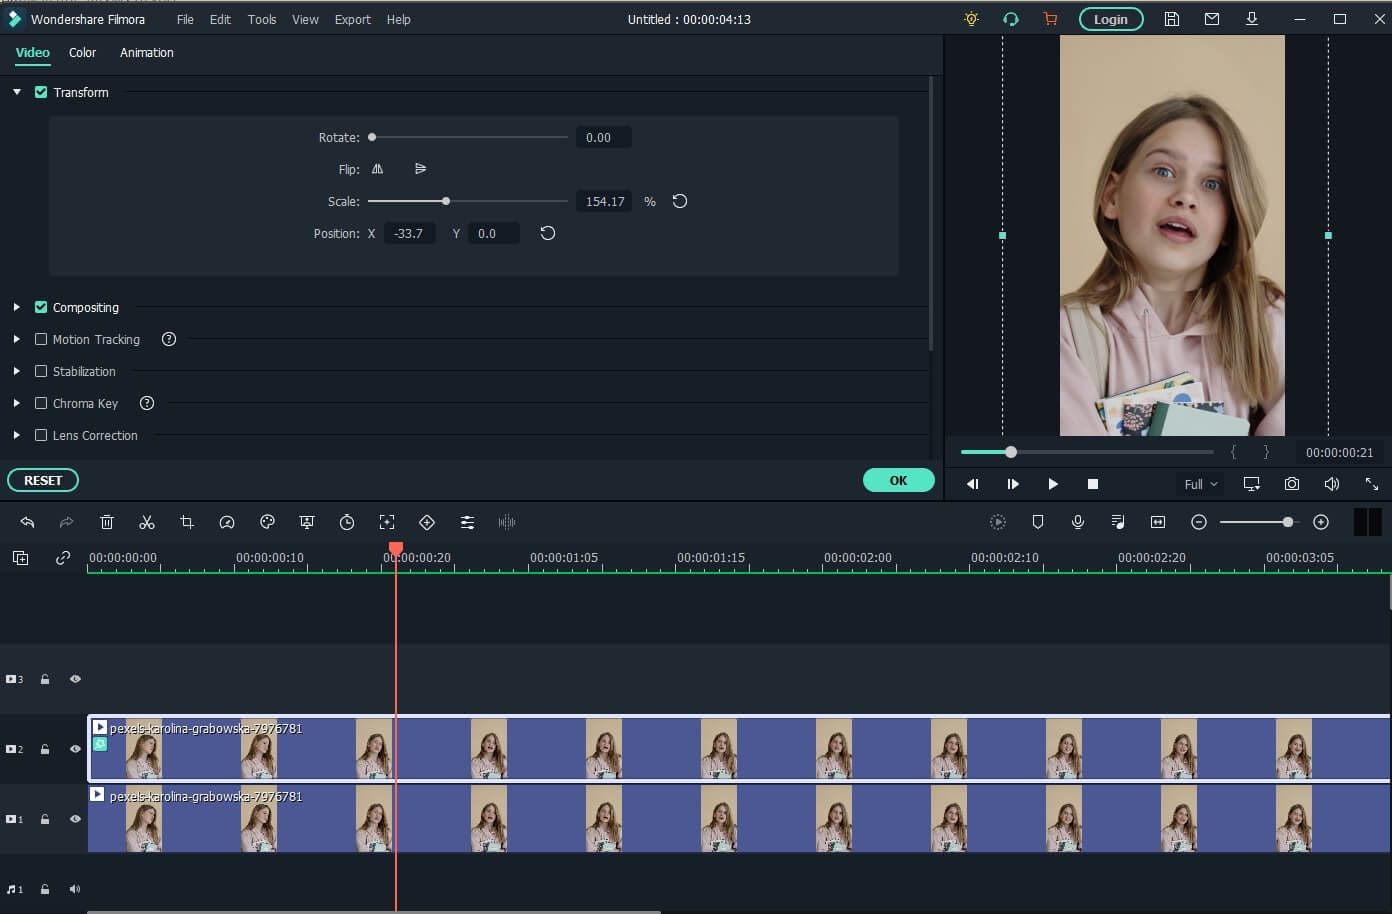
Double-click the video with the image mask. Then, please scroll down to the video effect field and choose a mask, adjusting its position and size to fit the video.
Now click on the video in track two and go to the “Transform” tab. Use the scaler slider to adjust the size of the video to fit the effect.
Conclusion
Filters and effects from TikTok can be applicable in a variety of ways. It’s all about enjoying a good time and putting your twist on TikTok videos that have gone viral. So, using our step-by-step tutorial, you may experiment with various filters on TikTok, such as the no beard filter TikTok. Now go ahead and experiment with these widespread effects and filters to see what kind of creative videos you can come up with.
TikTok is also known for its creative filters and effects. In fact, unlike Instagram, which offers a limited selection of filters and effects to test, TikTok has an extensive library of filters and effects to attempt.
TikTok filters alter the look and feel of your videos. You may, however, add stuff to your films using effects. You may entirely transform the look of your videos by applying TikTok filters. A green screen can transfer you to any location, change your hair color, transform yourself into an extraterrestrial, and much more.
Trending, New, Interactive, Editing, Beauty, Funny, and World are the best TikTok filter categories. Before you begin recording, you must first decide the effects you wish to utilize. So, this is the time if you haven’t tried either the G6 filter or the Dog Face effect yet. Continue reading to know more about the TikTok filter trend.
In this article
01 10 Best TikTok Filters You’d Love to Use
02 How to Make Use of Filters for TikTok by Filmora?
Part 1: 10 Best TikTok Filters You’d Love to Use
We will look at some of the top TikTok filters that make your video stand out from the crowd.
1.TikTok’s G6 filter
On TikTok, filters are identified by a single maker and number. While G6 is labeled a food-related filter, it’s become increasingly popular due to its bright, colorful, and slightly retro feel.
2.TikTok’s Anime Filter
When individuals uploaded their Snapchat videos to TikTok, the anime filter became quite popular. This filter transforms you into an animated character, but you’ll need to download Snapchat first and get an account if you don’t already have one.
3.TikTok’s Invisible filter
Another outcome of viral videos is TikTok’s Invisible filter. This one gives you the ability to become invisible, which is fantastic if you’ve ever wanted to try out that superpower.
4.TikTok’s Bling Effect
The Bling effect is another effect that is likely to appear on your For You page. This effect imitates the flash of a diamond being struck by the sun in different locations across the film.
5.TikTok’s Disney Effect
The Disney TikTok filter gives you a chance to experience what it’s like to be a Disney princess or prince. This effect transforms your face into a Disney-inspired cartoon character.
This filter, like the anime filter, is available on Snapchat. So make sure you’ve downloaded that app first.
6.TikTok Dog Face
The Dog Face filter is another amusing face to experiment on. You get dog ears, a nose, and even a tongue with this one. However, you must record another filter in Snapchat before publishing it to TikTok.
7.TikTok’s Inverted Filter
The Inverted filter is a little more divisive than the others. This filter flips any video you capture, and it’s famous for using the front-facing camera because it’s said to mimic how other people perceive you. So, what’s the big deal about it? On the other hand, the inverted filter has enraged some users, who don’t always appreciate their “true” reflection. However, the only way to see what all the fuss (or hysteria) is about is to give it a try.
8.TikTok’s Face Zoom effect
As the name suggests, the Face Zoom effect zooms-in on your face. Some people use it in group videos to see which face the filter lands on, while others use the same to compare how you look up close versus how you look from a distance.
9.TikTok’s Face Morph
The Face Morph effect is another popular effect. This one lets you morph and transition between multiple images of someone else’s face. The effect may be under TikTok’s Templates area because it employs graphics rather than video.
10.TikTok’s Beauty Filter
For obvious reasons, the Beauty filter is popular on TikTok. It improves your appearance by evening out skin tone, adding color, and improving overall appearance. It’s commonly useful in conjunction with other filters and effects.
Part 2: How to Make Use of Filters for TikTok by Filmora?
Wondershare’s Filmora video editor features the standard overlays, transitions, editing, and effects that we’ve come to expect from enthusiast-level video editors. It has a clean, minimalistic, and black interface that is user-friendly. If that wasn’t enough, we’re confident you’ll be thrilled to learn that the Filmora application can be valuable in a variety of ways to make TikTok filters.
You may further personalize the celebrities look alike filter and other TikTok filter trends, with numerous Filmora effects using all of the features we’ve mentioned thus far. Here’s how to do it:
Wondershare Filmora
Get started easily with Filmora’s powerful performance, intuitive interface, and countless effects!
Try It Free Try It Free Learn More >
Step 1: Launch Filmora and select video
Launch Filmora and click on the Import option that will select the video file you want to edit. Now, drag and drop the imported media file to the timeline panel.
Step 2: Add effect on Filmora
Click on the effect options and select the AR sticker option to add effect. Type the TikTok filter you want on the search bar, then drag the effect to the portion of the video where you want it.
Step 3: Add effect with Filmora
Drag and Drop the video to video tracks 1 and 2 on Filmora. Then go to the effect tab, scroll down to the utility category, and place the image mask effect.
Step 4: Choose a Mask
Double-click the video with the image mask. Then, please scroll down to the video effect field and choose a mask, adjusting its position and size to fit the video.
Now click on the video in track two and go to the “Transform” tab. Use the scaler slider to adjust the size of the video to fit the effect.
Conclusion
Filters and effects from TikTok can be applicable in a variety of ways. It’s all about enjoying a good time and putting your twist on TikTok videos that have gone viral. So, using our step-by-step tutorial, you may experiment with various filters on TikTok, such as the no beard filter TikTok. Now go ahead and experiment with these widespread effects and filters to see what kind of creative videos you can come up with.
How to Make TikTok Reaction Videos in 2 Proven Ways - Filmora
How to Make TikTok Reaction Videos Easily in 2 Ways

Shanoon Cox
Mar 27, 2024• Proven solutions
With all the videos of different moods and categories available on the platform, TikTok’s reaction is something that makes the footage more engaging. Available for both iOS and Android platforms, TikTok allows you to record, edit , and compile a video of up to 60 seconds, and apply a plethora of filters and animation effects to them along with adding relevant music to awe your audience.
Considering this, here you will learn how to make TikTok reaction videos with ease from within the app itself, and if that’s not enough, using one of the best and most efficient programs available in the market that can even allow you to add unique effects to the reactions you create.
- Part 1: How to Make React Videos on TikTok
- Part 2: How to Use Snap Filmora to Make TikTok Reaction Videos
Bonus: Create A More Attractive Video with Human Segmentation Effect
The human segmentation effect under AI Portrait allows you to isolate people from video background even without a green screen, and then you can composite it to make a reaction video easily. Watch the video tutorial below to find out more details.


Want to read the texts instead of watching videos? Check the complete guide to making a reaction video in 3 ways .
Part 1: How to React to a TikTok Video
After being equipped with all the worldly knowledge about TikTok reaction videos, you can follow the steps given below to learn how to react to the footage created by other people:
1. Tap Share and Record Your Reaction
Start TikTok, play the video you want to react on, tap the Share icon from the lower-right area, and tap the React option from the Share to menu. Tap Flip from the top-right corner of the Camera screen to switch between the front and rear camera as needed, optionally tap the Mic icon to disable or enable voice and system audio capture, drag and reposition React window according to the source footage, and tap the Record button from the bottom to start shooting your TikTok reaction. Wait while the source clip and your recording process are complete successfully before moving forward to the next step.

2. Apply Filters
Tap the Filters icon from the top-right corner, tap to pick a filter from those available at the bottom, and tap anywhere on the screen to accept the one you selected and to get back to the previous window.

3. Manage Audio
Tap the Mixer icon from the upper-right corner of the screen, drag the My Voice and Soundtrack Volume sliders to manage your voice recording and the internal audio respectively, and tap Done to save the changes once you’re through with the modifications. Back on the previous window, tap Next from the bottom-right corner.

4. Publish the Video
Tap the Who can view this video option to manage your reaction’s visibility settings (optional). Tap the Save to device toggle switch to prevent TikTok reaction from being stored on your mobile’s storage (optional). Next, tap the Post button from the bottom-right corner to publish the video to TikTok.

More creative tricks about TikTok video: Clone Yourself in TikTok
Part 2: How to Make Reaction Videos with Filmora
Even though you can make TikTok reaction videos using its own filters and audio mixing tools that work pretty well under ideal conditions, if you are a perfectionist and like precision in anything you do or create, you need a dedicated program that has been designed specifically for the purpose.
Although several such tools are available in the market and can be easily downloaded and used, the best among them is Filmora by Wondershare. Wondershare Filmora is an industry-standard production and post-production tool for both Mac and Windows PCs that the majority of users prefer over its competitors such as Adobe Premiere Pro, Final Cut Pro X, etc. This is because Filmora offers simple UI, is less resource-intensive, and is able to render the outputs significantly faster.
You can learn how to make TikTok reaction videos using Wondershare Filmora by following the steps given below:
Note: Before proceeding, make sure that you have already copied the source (and the reaction) video(s) from your smartphone to your computer.
1. Create New Project and Set Preferences
Start Wondershare Filmora on your Windows or Mac PC, go to File > New Project and click 9:16 (Portrait) from the submenu that appears.
Click Split Screen from the standard toolbar at the top, hover mouse to the screen type preset you want to use, click the + ( Add to Project ) icon that appears at the bottom-right corner of the thumbnail, and click OK from the bottom-right corner once the preset is added to the Timeline.

2. Import and Add Video(s) Preview/Timeline
Click the Media button from the standard toolbar, click anywhere inside the Media window at the upper-left corner, and when the Open box comes up, select and import the video file(s) you want to participate in the TikTok reaction. Alternatively, you can also click Record from below the standard toolbar, and choose any of the options to record your own video or voice right from within Wondershare Filmora itself.
Next, click and drag each of the imported videos to their corresponding screen sections in the Preview window in the upper-right area. Notice how the files are automatically added to the Timeline at the bottom.
3. Add Elements and Titles
Click Elements from the standard toolbar, hover mouse to the element you want to add to the reaction, click the + icon that appears at the center of the thumbnail, and reposition the element in the Timeline to match the duration with that of the reaction you are creating.

4. Export the Reaction

Click EXPORT from the top-middle section of the interface, go to the Local tab from the top of the Export box that appears next, select your preferred format from the left bar, optionally choose a destination folder from the right window, optionally click SETTINGS to fine-tune the output preferences as needed, and click EXPORT from the bottom-right corner to export the TikTok reaction. Or, you can save it in the settings perfect for iPhone or another device.
Below is a sample reaction video made with Filmora, you can do much better than that for your TikTok account:
Besides using Filmora to edit reaction videos with the split-screen presets, you can also use some other video editing software to create a reaction video . Filmora can empower your video creation with more creativity, watch the video below and download Filmora to try.
Conclusion
A TikTok reaction enables you to make the source videos more fun and entertaining. Luckily the app itself has a “React” button that helps you create TikTok reaction videos with merely a few simple taps. However, if you feel that the built-in options are not as robust as they should be, a third-party program like Wondershare Filmora is something you would definitely love to try your hands on as the software is not only easy to use, it is also lightweight, and doesn’t put any overhead on your computer hardware.
Shanoon Cox
Shanoon Cox is a writer and a lover of all things video.
Follow @Shanoon Cox
Shanoon Cox
Mar 27, 2024• Proven solutions
With all the videos of different moods and categories available on the platform, TikTok’s reaction is something that makes the footage more engaging. Available for both iOS and Android platforms, TikTok allows you to record, edit , and compile a video of up to 60 seconds, and apply a plethora of filters and animation effects to them along with adding relevant music to awe your audience.
Considering this, here you will learn how to make TikTok reaction videos with ease from within the app itself, and if that’s not enough, using one of the best and most efficient programs available in the market that can even allow you to add unique effects to the reactions you create.
- Part 1: How to Make React Videos on TikTok
- Part 2: How to Use Snap Filmora to Make TikTok Reaction Videos
Bonus: Create A More Attractive Video with Human Segmentation Effect
The human segmentation effect under AI Portrait allows you to isolate people from video background even without a green screen, and then you can composite it to make a reaction video easily. Watch the video tutorial below to find out more details.
Want to read the texts instead of watching videos? Check the complete guide to making a reaction video in 3 ways .
Part 1: How to React to a TikTok Video
After being equipped with all the worldly knowledge about TikTok reaction videos, you can follow the steps given below to learn how to react to the footage created by other people:
1. Tap Share and Record Your Reaction
Start TikTok, play the video you want to react on, tap the Share icon from the lower-right area, and tap the React option from the Share to menu. Tap Flip from the top-right corner of the Camera screen to switch between the front and rear camera as needed, optionally tap the Mic icon to disable or enable voice and system audio capture, drag and reposition React window according to the source footage, and tap the Record button from the bottom to start shooting your TikTok reaction. Wait while the source clip and your recording process are complete successfully before moving forward to the next step.
2. Apply Filters
Tap the Filters icon from the top-right corner, tap to pick a filter from those available at the bottom, and tap anywhere on the screen to accept the one you selected and to get back to the previous window.
3. Manage Audio
Tap the Mixer icon from the upper-right corner of the screen, drag the My Voice and Soundtrack Volume sliders to manage your voice recording and the internal audio respectively, and tap Done to save the changes once you’re through with the modifications. Back on the previous window, tap Next from the bottom-right corner.
4. Publish the Video
Tap the Who can view this video option to manage your reaction’s visibility settings (optional). Tap the Save to device toggle switch to prevent TikTok reaction from being stored on your mobile’s storage (optional). Next, tap the Post button from the bottom-right corner to publish the video to TikTok.
More creative tricks about TikTok video: Clone Yourself in TikTok
Part 2: How to Make Reaction Videos with Filmora
Even though you can make TikTok reaction videos using its own filters and audio mixing tools that work pretty well under ideal conditions, if you are a perfectionist and like precision in anything you do or create, you need a dedicated program that has been designed specifically for the purpose.
Although several such tools are available in the market and can be easily downloaded and used, the best among them is Filmora by Wondershare. Wondershare Filmora is an industry-standard production and post-production tool for both Mac and Windows PCs that the majority of users prefer over its competitors such as Adobe Premiere Pro, Final Cut Pro X, etc. This is because Filmora offers simple UI, is less resource-intensive, and is able to render the outputs significantly faster.
You can learn how to make TikTok reaction videos using Wondershare Filmora by following the steps given below:
Note: Before proceeding, make sure that you have already copied the source (and the reaction) video(s) from your smartphone to your computer.
1. Create New Project and Set Preferences
Start Wondershare Filmora on your Windows or Mac PC, go to File > New Project and click 9:16 (Portrait) from the submenu that appears.
Click Split Screen from the standard toolbar at the top, hover mouse to the screen type preset you want to use, click the + ( Add to Project ) icon that appears at the bottom-right corner of the thumbnail, and click OK from the bottom-right corner once the preset is added to the Timeline.
2. Import and Add Video(s) Preview/Timeline
Click the Media button from the standard toolbar, click anywhere inside the Media window at the upper-left corner, and when the Open box comes up, select and import the video file(s) you want to participate in the TikTok reaction. Alternatively, you can also click Record from below the standard toolbar, and choose any of the options to record your own video or voice right from within Wondershare Filmora itself.
Next, click and drag each of the imported videos to their corresponding screen sections in the Preview window in the upper-right area. Notice how the files are automatically added to the Timeline at the bottom.
3. Add Elements and Titles
Click Elements from the standard toolbar, hover mouse to the element you want to add to the reaction, click the + icon that appears at the center of the thumbnail, and reposition the element in the Timeline to match the duration with that of the reaction you are creating.
4. Export the Reaction
Click EXPORT from the top-middle section of the interface, go to the Local tab from the top of the Export box that appears next, select your preferred format from the left bar, optionally choose a destination folder from the right window, optionally click SETTINGS to fine-tune the output preferences as needed, and click EXPORT from the bottom-right corner to export the TikTok reaction. Or, you can save it in the settings perfect for iPhone or another device.
Below is a sample reaction video made with Filmora, you can do much better than that for your TikTok account:
Besides using Filmora to edit reaction videos with the split-screen presets, you can also use some other video editing software to create a reaction video . Filmora can empower your video creation with more creativity, watch the video below and download Filmora to try.
Conclusion
A TikTok reaction enables you to make the source videos more fun and entertaining. Luckily the app itself has a “React” button that helps you create TikTok reaction videos with merely a few simple taps. However, if you feel that the built-in options are not as robust as they should be, a third-party program like Wondershare Filmora is something you would definitely love to try your hands on as the software is not only easy to use, it is also lightweight, and doesn’t put any overhead on your computer hardware.
Shanoon Cox
Shanoon Cox is a writer and a lover of all things video.
Follow @Shanoon Cox
Also read:
- Unveiling the 10 Best TikTok Reaction Videos for 2024
- [Updated] 2024 Approved Top 10 Trending TikTok Tests Don't Miss Out
- In 2024, Transform Your TikTok Footage with Enlarged Characters
- [New] 2024 Approved Mastering the Art of Personalizing Your TikTok Image
- Command Attention with These Powerful 20 TikTok Caption Ideas for 2024
- [Updated] In 2024, Sound Sweep Clearing Background Buzz on Software
- How to Make Big Head Effect Video for TikTok? [3 Ways] for 2024
- [Updated] Exclusive Methods for Apple-Free TikTok Video Downloads for 2024
- [Updated] 2024 Approved Real-Time Music Sessions on Douyin
- [New] In 2024, Grab TikTok Videos Online for FREE
- [New] 2024 Approved Mastering TikTok Video Capture Comprehensive Guide
- [Updated] 2024 Approved Breathe New Life Into Your Frozen TikTok App
- [New] Hot Dishes From Hot TikTokers for 2024
- [Updated] Trustworthy TikTok Audience Growers for 2024
- [New] In 2024, Streamline Your TikTok Experience on Mac and Windows
- [Updated] 2024 Approved Ignite Creativity & Virality Top 50+ Inspirational Quotes for TikTok
- [New] Unleashing Potential Top 10 TikTok Data Analysis Tools
- [Updated] In 2024, Pro Tools 2021 Elevating Your TikTok Footage on Mac
- [New] 2024 Approved Rhythm Rising Top Easy Dances on TikTok
- Frenzy Fest The Ultimate List of Outrageous TikTok Games for 2024
- Capturing Slow Motions in TikTok Videos - Tips & Tricks for 2024
- In 2024, Perfect Plays in a Minute TikTok Templates for Stellar Videos
- Unveiling the Secrets of Skipping Content on TikTok for 2024
- [New] In 2024, Seamless Storytelling in TikTok Through Strategic Stitching
- [New] Standing Out on the TikTok Stage Unique PFP Concepts and Strategies for 2024
- [New] Achieve Financial Success on TikTok with These 8 Strategies
- [New] Unraveling the Meaning and Purpose of TikTok’s PFP for 2024
- In 2024, Unveiling Pro Slow Motion Filming Techniques for Stellar TikTok Videos
- In 2024, Tap Into the Quickest Way for Downloading Musical.ly Videos
- [New] 2024 Approved 30 Cutting-Edge TikTok Profile Photo Ideas
- [New] 2024 Approved Techniques for Effective Siri Voice Use in TikTok
- The Ultimate List of Top 10 TikTok Analytic Software for 2024
- Mirthful Memes & More The 20 Funniest TikTok Jokes for 2024
- Craftsmanship in a Snap TikTok's Stitch Guide for 2024
- [Updated] In 2024, Engaging TikTok Audiences How & Why Successful Advertising Works
- [New] Unleashing Social Potential Maximizing Business Impact with TikTok for 2024
- [Updated] Freely Collect TikTok Masterpieces - No Marks Included for 2024
- [New] 2024 Approved Perfect Pairings Combining Song and Scene in TikTok Vids
- [New] 2024 Approved Mastering Live Participation Stepping Into Others' TikTok Sessions
- In 2024, Cutting Down Ambient Audio in Sound Editing
- [Updated] Accidental Video Loadout on TikTok – Find Again, In 2024
- [New] 2024 Approved Social Media Titans Clash Which Platform Will Rise Above the Rest, Likes or TikTok?
- [Updated] From Novice to Viral Video Top 30 Anime Inspiration Ideas for 2024
- [Updated] 2024 Approved Rotating Reality in Visuals The Art of Spinning Images for Instagram Triumphs
- [Updated] 2024 Approved Pinnacle Playtime The Greatest Action-Adventure Game Lineup Ever!
- Updated Essential Free Guitar Tunes, Backdrops & Lyrics Websites Compilation for 2024
- Updated 2024 Approved Top Audio Mixing Tools A Comprehensive Assessment
- In 2024, 3 Effective Methods to Fake GPS location on Android For your Vivo Y100i | Dr.fone
- In 2024, How to Transfer Data from Motorola Moto G 5G (2023) to Samsung Phone | Dr.fone
- [New] TwitSnap Secure Effortless Methods for Downloading Tweets' Videos
- 3 Tactics to Grab Twitter GIFs on PC
- In 2024, Why Apple Account Disabled From your Apple iPhone 15 Plus? How to Fix
- How To Unlock Infinix Note 30 VIP Phone Without Password?
- In 2024, 7 Ways to Unlock a Locked Realme C51 Phone
- [Updated] Crafting Your Vocal Image for Instagram’s Dynamic Features
- Home Button Not Working on Realme 12 Pro 5G? Here Are Real Fixes | Dr.fone
- In 2024, Boost Cash Flow with These 5 Instagram Hacks
- The Easiest Methods to Hard Reset Vivo X Fold 2 | Dr.fone
- How to Transform Your WebCam Videos in Seconds
- The Aspect Ratio for LinkedIn Videos and Other Points Is Important to Consider While Creating These Videos. Here Is All that You Must Know About LinkedIn Videos
- [Updated] Yearly Top Tweets A Viewers' Paradise on Twitter for 2024
- Best Methods for Motorola G54 5G Wont Turn On | Dr.fone
- [Updated] Inaugural Vision Preservation Review & Alternate Suggestions for 2024
- In 2024, Top Online Lyric Video Creators Free and Paid Options
- In 2024, Easy Ways to Manage Your Huawei Nova Y71 Location Settings | Dr.fone
- [New] Convenient Ways to Document Game Sessions
- Updated Cloud Stop Motion Solutions Comparing Features, Pricing, and Alternatives for 2024
- In 2024, Guide on How To Remove Apple ID From Apple iPhone 6s
- [Updated] Direct Video Tweet Sharing Content Without Including Others' Tweets
- In 2024, 9 Mind-Blowing Tricks to Hatch Eggs in Pokemon Go Without Walking On Realme 11 Pro+ | Dr.fone
- New Social Media Sizing Made Easy A Comprehensive Aspect Ratio Guide for 2024
- 2024 Approved The Complete Minecraft Recording Blueprint for Mac Users
- [Updated] Mastering the Social Media Puzzle Decoding IG Data for Enhanced Campaigns for 2024
- Updated FCPX Survival Guide Overcoming Common Obstacles and Challenges for 2024
- New The Ultimate List Slow Motion Video Editing Solutions
- [Updated] In-Depth Look at Using Key Combos for Efficient Screen Recording in OS X for 2024
- Updated In 2024, Make Your Instagram Feed Pop with Stop Motion Animation
- New TwinSoundLink Bridging Gaps Between Auditory Elements in Premiere Pro Projects 2023 Overhaul for 2024
- 2024 Approved The Key to Rising ROI in Facebook's Animated Advertising Sector
- The Ultimate Guide to Get the Rare Candy on Pokemon Go Fire Red On Oppo A18 | Dr.fone
- 15 Best Strongest Pokémon To Use in Pokémon GO PvP Leagues For Realme C53 | Dr.fone
- Title: "[Updated] Cinematic Surprises The Most Impactful TikTok Editing Tools"
- Author: Stephen
- Created at : 2024-05-23 02:41:08
- Updated at : 2024-05-24 02:41:08
- Link: https://tiktok-video-recordings.techidaily.com/updated-cinematic-surprises-the-most-impactful-tiktok-editing-tools/
- License: This work is licensed under CC BY-NC-SA 4.0.
