
![[Updated] In 2024, Audit Your TikTok Impact with These 10 Tools](https://www.lifewire.com/thmb/47wKkXQv5N2sL0vmW5pGr3Xrtvk=/400x300/filters:no_upscale():max_bytes(150000):strip_icc()/NhonMa-aeb5c3c6d4a343b7a2900f469c0f8a74.png)
[Updated] In 2024, Audit Your TikTok Impact with These 10 Tools
Audit Your TikTok Impact with These 10 Tools
Versatile Video Editor - Wondershare Filmora
An easy yet powerful editor
Numerous effects to choose from
Convert horizontal videos to vertical versions seamlessly
Analytics is beneficial to determine or understand the performance of your videos. Social media is a powerful tool to get your message to the public. One of the youngest social media platforms is TikTok, proving to be a contender in the social media world. Not only did users around the world download TikTok but they use it. As a TikTok influencer, one of the first steps before launching a marketing campaign is to set goals and measure if you have ultimately reached your campaign goal. You will need TikTok viewer analytics tool.
This TikTok analytic tool will collect all the data you need to measure your success and help you modify your TikTok being so that it will be easier to reach your goal. This article will provide a guide on how to check TikTok analytics quickly.
In this article
01 What is TikTok Analytics Tool?
02 Top 10 Effective TikTok Analytics Tools
03 Bonus Tip - Make TikTok Videos with Ease
Part 1: What is TikTok Analytics Tool?
TikTok is music and video-sharing social media platform. At the same time, the TikTok follower analytic tool is a feature that allows you to measure your video viewers, followers, and other vital data that influence the popularity of your profile. The TikTok account analytic tool is vital for a successful TikTok marketing strategy and provides how to see TikTok analytics. Here are some of the critical benefits of these TikTok Analytics tools:

- TikTok analytics tool helps you to understand the performance of your TikTok content
- TikTok analytics tool allows you to identify the kind of content that your audience will love
- TikTok user analytics will enable you to know the best time to post on your TikTok account for maximum engagement
Part 2: Top 10 Effective TikTok Analytics Tools
Have you recently looked at your TikTok analytics? How many comments, likes, and shares do you have on your videos? What is your average engagement rate? Location of your TikTok followers watching your videos? If you don’t know the answers to this question, now is the time for you to start tracking your TikTok account analytics. This article will reveal ten effective tools on how to check analytics on TikTok:
1.Analisa
This analytic tool allows you to look at all aspects of campaign reporting and provides an easy-to-digest graph with all the needed information to knock out content strategy. It is one of the most comprehensive analytics tools with in-depth analysis of your competitors, influenza demographic authenticity, influenza optimization. With this two, you can search with a hashtag or profile name, and it can also be for Instagram. Choose any TikTok hashtag or account, and a detailed overview appears with key metrics presented at the top. Scroll down to get an in-depth analysis of the performance based on; Average Engagement, Average Likes, Comments per Post, most used hashtags, most used caption words, tags, mentions, etc. You may also export data to CSV or PDF for further research.

2.TikBuddy
This analytic tool offers a user-friendly and slick interface for a better TikTok social listening experience and provides a monitoring platform for influencers and agencies. This platform can check out the top hashtag TikTok influences every day and discover the content creator based on keywords and ratings. Marketers and agencies can easily track the process of videos and TikTok influencers in real-time and identify the most effective ads that are working.

3.TikLog
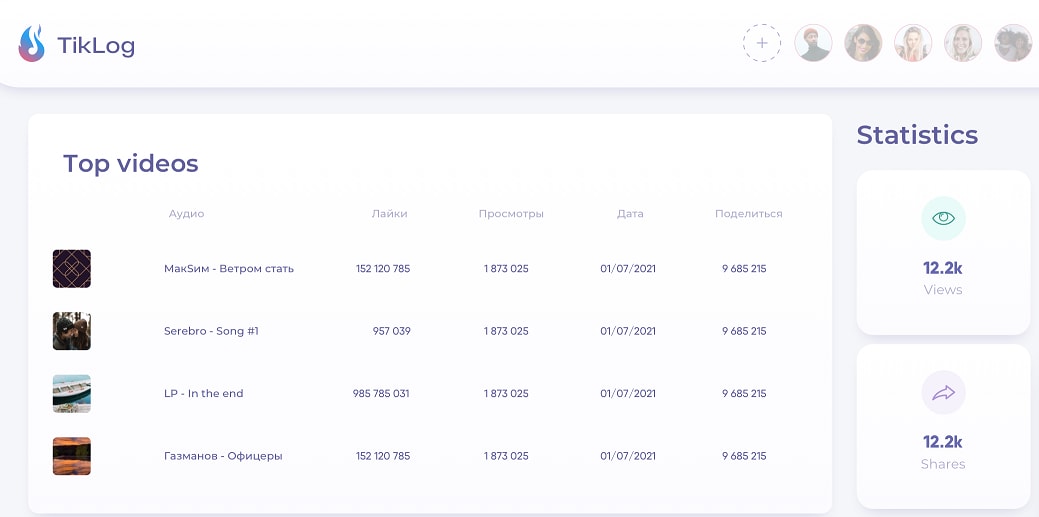
This is a new tool used for analyzing the TikTok account with the most impressive features and design, a fully-featured tool used by social media managers and any inspiring TikTok star. This TikTok interface has five tabs: analytics, trends, hashtag, comparison, and accounts.
- In the account tab, you can add a TikTok account and analyze it immediately or over any period. You can see statistics like likes, views, followers, etc. For the past 24 hours.
- In the analytics, you get a deeper insight into the account and see the video data working best with detailed statistics on comments, shares, views, and reactions. You may download a CSV file of all videos for further analysis.
- On the trends tab, you’ll get what is trending based on the country of the filter by views or video. Use the description to search and find niche topics that are trending so you can use them for your campaign.
- The hashtag tab allows you to track your favorite videos and get statistics.
- The comparison tab compares TikTok accounts for over 30 criteria and downloads multiple comparisons to CSV format for further investigation, or you can import into another software.
4.Exolyt
This is a TikTok analytic tool used by influencers, digital agencies, marketers, and social media managers. This tool will help you get insight on any account video or profile and build a campaign strategy based on your competitor or similar accounts’ success. This is a powerful tool with the nicest-looking user interfaces and a fast search button.
5.Pentos
This campaign monitoring tool allows users to use hashtags, songs, videos, and profiles to analyze their campaign strategy. One of the top significant disadvantages of this tool is the lack of real-time updates, which only refresh itself once a day.
6.Popsters
This is a tool used by influencers and social media managers to analyze captions, hashtags, and profiles on 12 different platforms and does not require registering to use. It offers free reports and basic statistics like comments, likes, and shares for the past year. It also allows you to learn what posts attract visitors and sort them by length, popularity, and engagement with access to six sections of the matrix that includes engagement rate per hour and day.
7.Melody Socials
This analytic tool is specifically for TikTok profiles used by agencies labels and top influencers to provide detailed reports in real-time. It allows you to use hashtags, filter by location, and find similar profiles.
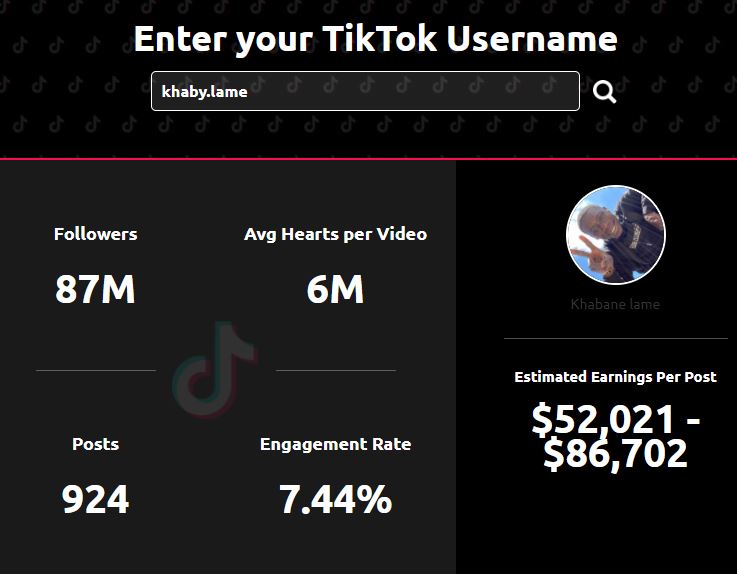
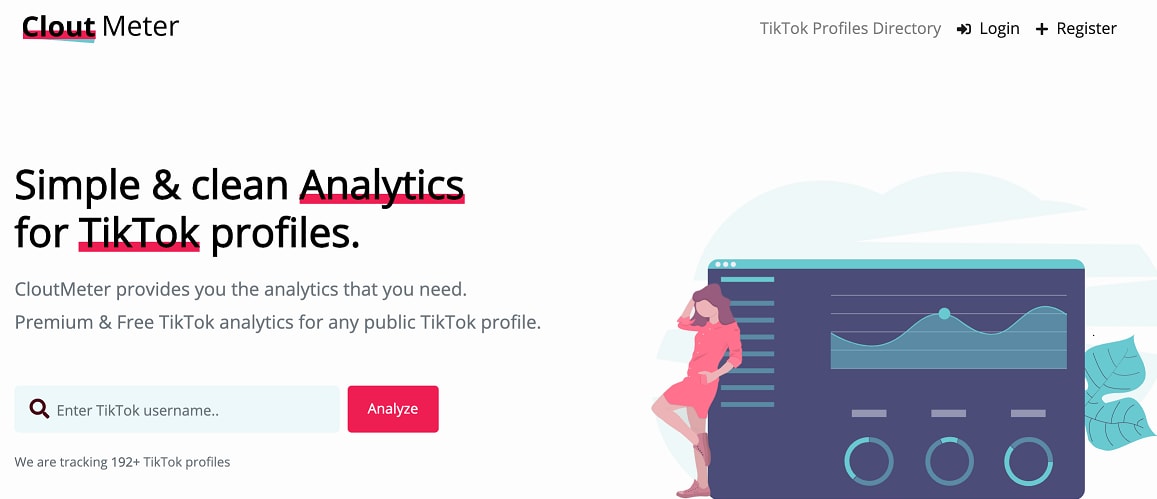
8.Clout Meter
This platform offers to analyzeTikTok profiles and offers growth statistics to identify the authenticity of the influencer. One of the basic features of this platform is that it provides day-to-day growth statistics on follower count, which is a great way to identify the authenticity of the profile.
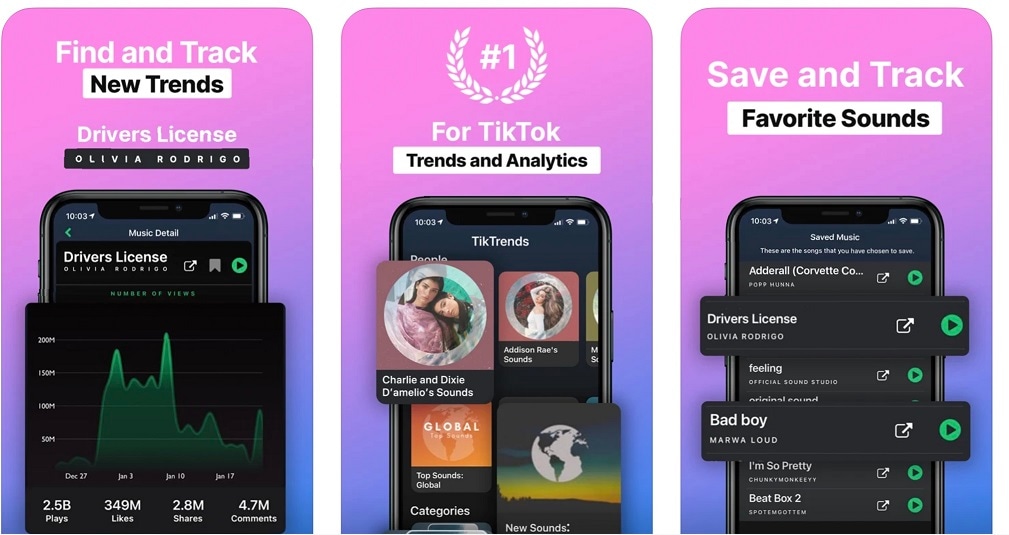
9.TrendTok
This mobile application analytics tool helps influencers identify, forecast, and track TikTok trends by category and location. Some key features include personalized trends suggestions, using AI to predict trends, and analytics on new, rising, and falling movements.
10.Quintly
It is a popular analytic tool among marketing agencies, social media managers, and brands that offer an easy-to-read dashboard to share with companies and clients. Critical features are automated reports, followers count, and over 400 metrics.
Part 3: Bonus Tip - Make TikTok Videos with Ease
You can create video directly on TikTok and use Filmora in editing TikTok video using its auto reframe feature that allows you to automatically convert horizontal videos into vertical videos.
Wondershare Filmora
Get started easily with Filmora’s powerful performance, intuitive interface, and countless effects!
Try It Free Try It Free Try It Free Learn More >

Here is how to create a new TikTok video so that you can track the TikTok video analytics using any of the tools listed in the article:
Step 1: Tap the + button located at the bottom of the screen.
Step 2: Use your device Library to Upload content or use the TikTok camera.
Step 3: Add Sounds, Effects, Filters, or other camera tools to the video.
Step 4: Start recording your video by pressing the Record button to record your content.
Step 5: Click the checkmark and make additional edits on the posting page.
Now, open Filmora and edit the video as per your requirement; using Autoframe, you can convert horizontal video into Vertical Video so that you would be able to share it on the TikTok account easily.
In addition, you can use Filmora for other editing purposes such as:
- You can trim, cut, add effects to videos
- Adjust the aspect ratio
- Split, speeding, reverse ordering
- Background, stickers, and a lot more.
Conclusion
TikTok is today the most popular social media platforms and will not disappear anytime soon. Therefore digital agencies, corporations, and small businesses must use this social media platform effectively to maximize the profitability of their business. This article breaks down how to see analytics on TikTok Using the best analytic tool to get conversions. The report also recommends Filmora edit TikTok videos quickly. Finally, the article also provides a guide on checking TikTok profile analytics.
Analytics is beneficial to determine or understand the performance of your videos. Social media is a powerful tool to get your message to the public. One of the youngest social media platforms is TikTok, proving to be a contender in the social media world. Not only did users around the world download TikTok but they use it. As a TikTok influencer, one of the first steps before launching a marketing campaign is to set goals and measure if you have ultimately reached your campaign goal. You will need TikTok viewer analytics tool.
This TikTok analytic tool will collect all the data you need to measure your success and help you modify your TikTok being so that it will be easier to reach your goal. This article will provide a guide on how to check TikTok analytics quickly.
In this article
01 What is TikTok Analytics Tool?
02 Top 10 Effective TikTok Analytics Tools
03 Bonus Tip - Make TikTok Videos with Ease
Part 1: What is TikTok Analytics Tool?
TikTok is music and video-sharing social media platform. At the same time, the TikTok follower analytic tool is a feature that allows you to measure your video viewers, followers, and other vital data that influence the popularity of your profile. The TikTok account analytic tool is vital for a successful TikTok marketing strategy and provides how to see TikTok analytics. Here are some of the critical benefits of these TikTok Analytics tools:
- TikTok analytics tool helps you to understand the performance of your TikTok content
- TikTok analytics tool allows you to identify the kind of content that your audience will love
- TikTok user analytics will enable you to know the best time to post on your TikTok account for maximum engagement
Part 2: Top 10 Effective TikTok Analytics Tools
Have you recently looked at your TikTok analytics? How many comments, likes, and shares do you have on your videos? What is your average engagement rate? Location of your TikTok followers watching your videos? If you don’t know the answers to this question, now is the time for you to start tracking your TikTok account analytics. This article will reveal ten effective tools on how to check analytics on TikTok:
1.Analisa
This analytic tool allows you to look at all aspects of campaign reporting and provides an easy-to-digest graph with all the needed information to knock out content strategy. It is one of the most comprehensive analytics tools with in-depth analysis of your competitors, influenza demographic authenticity, influenza optimization. With this two, you can search with a hashtag or profile name, and it can also be for Instagram. Choose any TikTok hashtag or account, and a detailed overview appears with key metrics presented at the top. Scroll down to get an in-depth analysis of the performance based on; Average Engagement, Average Likes, Comments per Post, most used hashtags, most used caption words, tags, mentions, etc. You may also export data to CSV or PDF for further research.
2.TikBuddy
This analytic tool offers a user-friendly and slick interface for a better TikTok social listening experience and provides a monitoring platform for influencers and agencies. This platform can check out the top hashtag TikTok influences every day and discover the content creator based on keywords and ratings. Marketers and agencies can easily track the process of videos and TikTok influencers in real-time and identify the most effective ads that are working.
3.TikLog
This is a new tool used for analyzing the TikTok account with the most impressive features and design, a fully-featured tool used by social media managers and any inspiring TikTok star. This TikTok interface has five tabs: analytics, trends, hashtag, comparison, and accounts.
- In the account tab, you can add a TikTok account and analyze it immediately or over any period. You can see statistics like likes, views, followers, etc. For the past 24 hours.
- In the analytics, you get a deeper insight into the account and see the video data working best with detailed statistics on comments, shares, views, and reactions. You may download a CSV file of all videos for further analysis.
- On the trends tab, you’ll get what is trending based on the country of the filter by views or video. Use the description to search and find niche topics that are trending so you can use them for your campaign.
- The hashtag tab allows you to track your favorite videos and get statistics.
- The comparison tab compares TikTok accounts for over 30 criteria and downloads multiple comparisons to CSV format for further investigation, or you can import into another software.
4.Exolyt
This is a TikTok analytic tool used by influencers, digital agencies, marketers, and social media managers. This tool will help you get insight on any account video or profile and build a campaign strategy based on your competitor or similar accounts’ success. This is a powerful tool with the nicest-looking user interfaces and a fast search button.
5.Pentos
This campaign monitoring tool allows users to use hashtags, songs, videos, and profiles to analyze their campaign strategy. One of the top significant disadvantages of this tool is the lack of real-time updates, which only refresh itself once a day.
6.Popsters
This is a tool used by influencers and social media managers to analyze captions, hashtags, and profiles on 12 different platforms and does not require registering to use. It offers free reports and basic statistics like comments, likes, and shares for the past year. It also allows you to learn what posts attract visitors and sort them by length, popularity, and engagement with access to six sections of the matrix that includes engagement rate per hour and day.
7.Melody Socials
This analytic tool is specifically for TikTok profiles used by agencies labels and top influencers to provide detailed reports in real-time. It allows you to use hashtags, filter by location, and find similar profiles.
8.Clout Meter
This platform offers to analyzeTikTok profiles and offers growth statistics to identify the authenticity of the influencer. One of the basic features of this platform is that it provides day-to-day growth statistics on follower count, which is a great way to identify the authenticity of the profile.
9.TrendTok
This mobile application analytics tool helps influencers identify, forecast, and track TikTok trends by category and location. Some key features include personalized trends suggestions, using AI to predict trends, and analytics on new, rising, and falling movements.
10.Quintly
It is a popular analytic tool among marketing agencies, social media managers, and brands that offer an easy-to-read dashboard to share with companies and clients. Critical features are automated reports, followers count, and over 400 metrics.
Part 3: Bonus Tip - Make TikTok Videos with Ease
You can create video directly on TikTok and use Filmora in editing TikTok video using its auto reframe feature that allows you to automatically convert horizontal videos into vertical videos.
Wondershare Filmora
Get started easily with Filmora’s powerful performance, intuitive interface, and countless effects!
Try It Free Try It Free Try It Free Learn More >
Here is how to create a new TikTok video so that you can track the TikTok video analytics using any of the tools listed in the article:
Step 1: Tap the + button located at the bottom of the screen.
Step 2: Use your device Library to Upload content or use the TikTok camera.
Step 3: Add Sounds, Effects, Filters, or other camera tools to the video.
Step 4: Start recording your video by pressing the Record button to record your content.
Step 5: Click the checkmark and make additional edits on the posting page.
Now, open Filmora and edit the video as per your requirement; using Autoframe, you can convert horizontal video into Vertical Video so that you would be able to share it on the TikTok account easily.
In addition, you can use Filmora for other editing purposes such as:
- You can trim, cut, add effects to videos
- Adjust the aspect ratio
- Split, speeding, reverse ordering
- Background, stickers, and a lot more.
Conclusion
TikTok is today the most popular social media platforms and will not disappear anytime soon. Therefore digital agencies, corporations, and small businesses must use this social media platform effectively to maximize the profitability of their business. This article breaks down how to see analytics on TikTok Using the best analytic tool to get conversions. The report also recommends Filmora edit TikTok videos quickly. Finally, the article also provides a guide on checking TikTok profile analytics.
Noise Reduction: How to Remove Background Noise in Audacity?
The most frequent request you’ll get from video makers is to eliminate irritating noises like rumbling or humming from an original clip. Almost all of the time, capturing high-quality audio during filming is challenging since the conversation is often hard to hear or is made unclear due to surrounding noises, such as the dreadful air conditioners or fans.
To get rid of all these awful noises, this Audacity Noise Reduction feature will serve you a significant purpose in removing unwanted background noise for your future videos. Without further ado, let’s get started!
In this article
01 Things You Need to Prepare for Background Noise Reduction
02 How to Remove Background Noise in Audacity?
03 Why is Audacity Noise Reduction Not Working?
04 How to Prevent Background Noise in Audio Recording?
05 How to Remove Background Noise in Filmora?
Part 1: Things You Need to Prepare for Background Noise Reduction
Here are few things that you need to consider before you apply the noise reduction to your clips:
1. Noise Sample
A decent sample of the noise you wish to eliminate is perhaps the most crucial aspect of the Audacity remove noise procedure.
This will be used by Audacity to understand the noise and build a noise profile. The noise recording should last for a fair amount of time and be devoid of any other noises.
2. Avoid Copy Pasting Tiny Noise Section in Your Spoken Phrases
When you have a tiny part of noise between your stated words on your audio, please don’t copy/paste it to make a more significant piece of sound for Audacity to examine.
You would not be supplying Audacity with any more information that will help it generate a decent noise profile. The noise profile is what enables Audacity to tell the difference between speech and noise.
3. Minimum 2048 Data Samples Required
To build a noise profile, the Noise Reduction function requires a minimum of 2048 sample data. An audio file with a sampling frequency of 44.1kHz is roughly five hundredths of a second.
Note that this is the minor sound level that Audacity needs to generate a noise profile; however, should you supply a larger sample of the noise, Audacity can typically perform a great job of producing a suitable noise profile. As a result, attempt to capture a few seconds of background noises wherever possible.
4. Establish Recording Level and Record “Silence”
Setting your audio volume and capturing some “quiet” prior to speaking is the best way to achieve this. Instead, when you’ve finished talking, keep your camera/recorder going for a few moments.
Don’t move or create any sounds while capturing the background noises, and keep an ear open for any other noises. You only need to capture the ambient noise for a few moments; two to five seconds will suffice.
Part 2: How to Remove Background Noise in Audacity on Windows and Mac?
Whether you are using Windows or macOS, we will show you a step-by-step process to achieve your results using both software in this part of Audacity remove background music guide.
Remove background noise in Audacity on Windows
Step 1: On your recording, select a few moments of sound. Any segment of noise that incorporates other noises should be avoided.

Step 2: From the Effect menu, select Noise Reduction.

Step 3: Select the Get Noise Profile option whenever the Noise Reduction effect screen appears.

Note: Choose whether to implement the noise removal to the entire waveforms or only a portion of it.
Step 4: To access the Noise Reduction effects window, go to Effects > Noise Reduction. Raise the level of noise reduction progressively while previewing the result.

Step 5: Head over to the File section to Export and Save the result. Audacity does not save sound clips when you select Save Project; instead, you must choose Export. Select the file type you want to store and the place wherever you can save it. Select Save after giving the File Name.

Remove background noise in Audacity on Mac
Step 1: Create a room tone-containing audio file. When you don’t have a separate track for room tone, use a recording with a few moments of quiet in it. Click-and-drag to select a segment with a few minutes of silence using the Selection Tool.

Step 2: Select Noise Reduction from the Effects tab. Select the Get Noise Profile tab in the new tab under Step 1. The screen will shut, and Audacity will take noise profile samples of the indicated area.

Step 3: Click-and-drag to select the whole file, which requires noise reduction with the Selection Tool. To re-open the function, go to the Effect tab and pick Noise Reduction. Make modifications to the following parameters under Step 2:
- Reduce and Residue
- Frequency Smoothing (bands)
- Sensitivity
- Noise Reduction

Step 4: To listen to how the chosen file will look with the selected parameters, select Preview. Re-adjust until you have a sound noise reduction with no interference. When you’re finished, select Reduce and click OK.
Part 3: Why is Audacity Noise Reduction Not Working?
It’s possible that the Noise Reduction function isn’t letting you mop up your recording since your audio isn’t appropriate for it. The disturbance must be continuous, not random or fluctuating, to work for Audacity’s Noise Reduction function.
For example, the Noise Reduction function will not assist if your audio was made in a busy environment with unique noises such as background chatter, random traffic noises, or in an exhibition space or museum. The Noise Reduction feature in Audacity isn’t meant to cope with that kind of distortion. You’ll need to alter your recording approach if you’re capturing voice in either of those situations.
Under the following situations, the Audacity Noise Reduction function might underperform.
- Particular noise in the background, including traffic or people.
- When the harmonics of the sound and voice are comparable.
- There is sound variance where there is fluctuation in the noise.
- The volume of the voice is comparable to or lower than that of the background noise.
- When the noise is irregular or changeable rather than continuous.
- The loudness is deafening.
- The sound is a single click or pop.
Part 4: How to Prevent Background Noise in Audio Recording?
Although Audacity allows eliminating noise very simply, it is still an additional level that takes time to refine your podcast production. These pointers can help you avoid the necessity for noise reduction and cut down on the amount of time you spend processing.
1. Reduce the Computer Fan Noise
Whenever computers become too heated, they can produce a lot of noise. You may limit the amount of software that runs and position your mic away from the keyboard to help lessen this impact and avoid the fan from coming on.
However, even if you observe all of these guidelines, undesired recording sounds may still appear in your program. Fortunately, contemporary software makes this problem quite simple to resolve.
2. Reduce the Gain and Get Close to the Mic
Reduce the gain (sensitivity of the microphone) and go nearer to it. Talking straight into the microphone won’t distort your audio if you reduce the gain, and that would assist your microphone in concentrating on scooping up your voice’s tone.
Bonus Tip: Set your recorder’s (or DAW’s) sensitivity such that your speech peaks between -12 and -10db.
3. Utilize a Versatile Microphone
Condenser and dynamic microphones are the two most common types of podcast microphones. Condenser microphones are significantly more sensitive instruments meant to take up average atmospheric noise, whereas dynamic microphones have a narrower frequency range, picking up fewer ambient noises.
4. Optimize Your Recording Environment
The most significant and most crucial aspect of your podcasts’ sound quality is where you capture it. To optimize your personal podcasting space, we recommend choosing a peaceful, compact area away from HVAC systems, vehicles, external hard drives, background sound, motors, and other distractions. You may also increase the tone of your room by using natural sound absorbents such as curtains, rugs, carpets, and sofas.
Part 5: How to Remove Background Noise in Filmora?
Although there is a lot of software available to eliminate ambient noise, we highly suggest Wondershare Filmora Video Editor to edit audio and video in one place.
In addition to the standard audio editing capabilities, the recently redesigned Filmora currently includes enhanced waveforms, volume Keyframing , peak metering, and audio transitions, giving you a better audio editing interface.
For Win 7 or later (64-bit)
For macOS 10.12 or later
Filmora Video Editor will quickly remove ambient sound from both sound/video. You may also remove the sound from the video with this simple video editor, use the Audio Equalizer or Audio Mixer functions to modify the audio further, and then Export and save the audio in an Mp3 file. Here are the detailed steps:
Step 1: In the Wondershare Filmora Timeline menu, Import your footage. Trim the footage after previewing it and deleting the sections you don’t want to retain.

Step 2: To eliminate the ambient noise immediately, double-click on the video file, and go to the Audio panel to select the Remove Background Noise option. You will find that the background noise is removed automatically.

Step 3: After checking the results, select Export to download the noise-reduced clip to your desktop or upload it immediately to YouTube or Vimeo.

Conclusion
Well, there you have it. In this Audacity Remove Background Noise guide, we have reviewed every possible method you can adopt to get rid of the unnecessary background noise in the Audacity. And if the desired results are still not achieved, we highly recommend using the Wondershare Filmora editing software. Not only will it help you remove the unwanted ambient noise, but it will also allow you to customize your audio or video file further.
02 How to Remove Background Noise in Audacity?
03 Why is Audacity Noise Reduction Not Working?
04 How to Prevent Background Noise in Audio Recording?
05 How to Remove Background Noise in Filmora?
Part 1: Things You Need to Prepare for Background Noise Reduction
Here are few things that you need to consider before you apply the noise reduction to your clips:
1. Noise Sample
A decent sample of the noise you wish to eliminate is perhaps the most crucial aspect of the Audacity remove noise procedure.
This will be used by Audacity to understand the noise and build a noise profile. The noise recording should last for a fair amount of time and be devoid of any other noises.
2. Avoid Copy Pasting Tiny Noise Section in Your Spoken Phrases
When you have a tiny part of noise between your stated words on your audio, please don’t copy/paste it to make a more significant piece of sound for Audacity to examine.
You would not be supplying Audacity with any more information that will help it generate a decent noise profile. The noise profile is what enables Audacity to tell the difference between speech and noise.
3. Minimum 2048 Data Samples Required
To build a noise profile, the Noise Reduction function requires a minimum of 2048 sample data. An audio file with a sampling frequency of 44.1kHz is roughly five hundredths of a second.
Note that this is the minor sound level that Audacity needs to generate a noise profile; however, should you supply a larger sample of the noise, Audacity can typically perform a great job of producing a suitable noise profile. As a result, attempt to capture a few seconds of background noises wherever possible.
4. Establish Recording Level and Record “Silence”
Setting your audio volume and capturing some “quiet” prior to speaking is the best way to achieve this. Instead, when you’ve finished talking, keep your camera/recorder going for a few moments.
Don’t move or create any sounds while capturing the background noises, and keep an ear open for any other noises. You only need to capture the ambient noise for a few moments; two to five seconds will suffice.
Part 2: How to Remove Background Noise in Audacity on Windows and Mac?
Whether you are using Windows or macOS, we will show you a step-by-step process to achieve your results using both software in this part of Audacity remove background music guide.
Remove background noise in Audacity on Windows
Step 1: On your recording, select a few moments of sound. Any segment of noise that incorporates other noises should be avoided.
Step 2: From the Effect menu, select Noise Reduction.
Step 3: Select the Get Noise Profile option whenever the Noise Reduction effect screen appears.
Note: Choose whether to implement the noise removal to the entire waveforms or only a portion of it.
Step 4: To access the Noise Reduction effects window, go to Effects > Noise Reduction. Raise the level of noise reduction progressively while previewing the result.
Step 5: Head over to the File section to Export and Save the result. Audacity does not save sound clips when you select Save Project; instead, you must choose Export. Select the file type you want to store and the place wherever you can save it. Select Save after giving the File Name.
Remove background noise in Audacity on Mac
Step 1: Create a room tone-containing audio file. When you don’t have a separate track for room tone, use a recording with a few moments of quiet in it. Click-and-drag to select a segment with a few minutes of silence using the Selection Tool.
Step 2: Select Noise Reduction from the Effects tab. Select the Get Noise Profile tab in the new tab under Step 1. The screen will shut, and Audacity will take noise profile samples of the indicated area.
Step 3: Click-and-drag to select the whole file, which requires noise reduction with the Selection Tool. To re-open the function, go to the Effect tab and pick Noise Reduction. Make modifications to the following parameters under Step 2:
- Reduce and Residue
- Frequency Smoothing (bands)
- Sensitivity
- Noise Reduction
Step 4: To listen to how the chosen file will look with the selected parameters, select Preview. Re-adjust until you have a sound noise reduction with no interference. When you’re finished, select Reduce and click OK.
Part 3: Why is Audacity Noise Reduction Not Working?
It’s possible that the Noise Reduction function isn’t letting you mop up your recording since your audio isn’t appropriate for it. The disturbance must be continuous, not random or fluctuating, to work for Audacity’s Noise Reduction function.
For example, the Noise Reduction function will not assist if your audio was made in a busy environment with unique noises such as background chatter, random traffic noises, or in an exhibition space or museum. The Noise Reduction feature in Audacity isn’t meant to cope with that kind of distortion. You’ll need to alter your recording approach if you’re capturing voice in either of those situations.
Under the following situations, the Audacity Noise Reduction function might underperform.
- Particular noise in the background, including traffic or people.
- When the harmonics of the sound and voice are comparable.
- There is sound variance where there is fluctuation in the noise.
- The volume of the voice is comparable to or lower than that of the background noise.
- When the noise is irregular or changeable rather than continuous.
- The loudness is deafening.
- The sound is a single click or pop.
Part 4: How to Prevent Background Noise in Audio Recording?
Although Audacity allows eliminating noise very simply, it is still an additional level that takes time to refine your podcast production. These pointers can help you avoid the necessity for noise reduction and cut down on the amount of time you spend processing.
1. Reduce the Computer Fan Noise
Whenever computers become too heated, they can produce a lot of noise. You may limit the amount of software that runs and position your mic away from the keyboard to help lessen this impact and avoid the fan from coming on.
However, even if you observe all of these guidelines, undesired recording sounds may still appear in your program. Fortunately, contemporary software makes this problem quite simple to resolve.
2. Reduce the Gain and Get Close to the Mic
Reduce the gain (sensitivity of the microphone) and go nearer to it. Talking straight into the microphone won’t distort your audio if you reduce the gain, and that would assist your microphone in concentrating on scooping up your voice’s tone.
Bonus Tip: Set your recorder’s (or DAW’s) sensitivity such that your speech peaks between -12 and -10db.
3. Utilize a Versatile Microphone
Condenser and dynamic microphones are the two most common types of podcast microphones. Condenser microphones are significantly more sensitive instruments meant to take up average atmospheric noise, whereas dynamic microphones have a narrower frequency range, picking up fewer ambient noises.
4. Optimize Your Recording Environment
The most significant and most crucial aspect of your podcasts’ sound quality is where you capture it. To optimize your personal podcasting space, we recommend choosing a peaceful, compact area away from HVAC systems, vehicles, external hard drives, background sound, motors, and other distractions. You may also increase the tone of your room by using natural sound absorbents such as curtains, rugs, carpets, and sofas.
Part 5: How to Remove Background Noise in Filmora?
Although there is a lot of software available to eliminate ambient noise, we highly suggest Wondershare Filmora Video Editor to edit audio and video in one place.
In addition to the standard audio editing capabilities, the recently redesigned Filmora currently includes enhanced waveforms, volume Keyframing , peak metering, and audio transitions, giving you a better audio editing interface.
For Win 7 or later (64-bit)
For macOS 10.12 or later
Filmora Video Editor will quickly remove ambient sound from both sound/video. You may also remove the sound from the video with this simple video editor, use the Audio Equalizer or Audio Mixer functions to modify the audio further, and then Export and save the audio in an Mp3 file. Here are the detailed steps:
Step 1: In the Wondershare Filmora Timeline menu, Import your footage. Trim the footage after previewing it and deleting the sections you don’t want to retain.
Step 2: To eliminate the ambient noise immediately, double-click on the video file, and go to the Audio panel to select the Remove Background Noise option. You will find that the background noise is removed automatically.
Step 3: After checking the results, select Export to download the noise-reduced clip to your desktop or upload it immediately to YouTube or Vimeo.
Conclusion
Well, there you have it. In this Audacity Remove Background Noise guide, we have reviewed every possible method you can adopt to get rid of the unnecessary background noise in the Audacity. And if the desired results are still not achieved, we highly recommend using the Wondershare Filmora editing software. Not only will it help you remove the unwanted ambient noise, but it will also allow you to customize your audio or video file further.
Also read:
- Popular Food Recipes From Different Countries
- The Ultimate Guide Turning TikTok Videos Into Popular Graphics
- [Updated] Top Tiktok Comedy Trends and Stars for 2024
- Explore the Power of Visuals Mastery over TikTok Video Backgrounds for 2024
- [New] In 2024, The Complete Visual Vocabulary of TikTok Emojis & Icons
- Best Identity Erasers Cleaning Phones and Tablet Content for 2024
- [New] In 2024, Enlarging Your Footage Techniques for Massive Headscapes on TikTok
- [New] A Layman’s Guide to Deciphering the Meaning of PFP in Social Media
- Navigating the Sea of Stars Standing Out in TikTok's World
- [Updated] Unveiling #Booktik's Must-Read Masterpieces A Reading Delight
- The Ultimate TikTok Recording Manual for 2024
- 2024 Approved Transformative Videography Revolutionary Mac Edits to Elevate TikTok Videos
- How to Go Live On TikTok On Computer for 2024
- [Updated] 2024 Approved TikTok Troubleshooting Quick Fix for Fails
- In 2024, Trending Laughs The Latest TikTok Humor Hits
- [New] A World of Eats Popular Global Food Delicacies
- [Updated] In 2024, Infuse Your TikTok with Popular Anime Themes & Styles
- [Updated] 2024 Approved Filmmaking Fundamentals for the Modern TikToker Quick, Effective Tips
- [Updated] In 2024, Mouthwatering Marvels Leading TikTok Kitchen Stars
- [Updated] Bite-Size Flavors Top Eating Moments on TikTok for 2024
- [New] 2024 Approved Epicurean Exploration The Top 15 Most Addictive Food Challenges From TikTok's Stars
- [Updated] In 2024, From Basic to Brilliant Elevating Your TikTok Profile
- 2024 Approved Discover the Ultimate Food Frenzy with These 15 Top-Rated TikTok Culinary Creations
- [Updated] In 2024, Elevate Your TikTok Presence Seamless Integration of Voiceovers
- [New] 2024 Approved Voice-in-Unison for the Digital Stage
- In 2024, Ultimate Booklist #TikBooks For Your Next Read
- In 2024, Top 15 Innovative TikTok Challenges Unveiled
- [New] The Latest Alternatives to TikTok That Are Making Waves
- [Updated] The Ultimate Guide to Success on Desktop for TikTok Videos
- 2024 Approved Bite-Sized Culinary Creations on TikTok
- [New] 2024 Approved Navigating the New Age of Content Creation TikTok's Money Potential
- Twirl & Relax The Ultimate List of Country Tunes on TikTok for 2024
- [New] Social Media's Literary Elite BookTok's Top 15 Recommendations
- [New] In 2024, Mastering TikTok Livestreams on Your Home Office Desktop
- [Updated] 2024 Approved Craft Engaging TikTok Audio A Step-by-Step Guide
- [New] In 2024, Integrating Siri Voice Techniques Into TikTok Sharing
- Streamlining Your TikTok Creation Process with Mac Edits for 2024
- In 2024, Clearing up TikTok Problems on Android & iPhone Quickly
- [New] Scripting the Final Push for Your TikTok Series
- [Updated] 2024 Approved Prospects of the Future Top 10 TikTok Game Creators
- [Updated] In 2024, Harnessing the Power of Speech on TikTok Platform
- [Updated] 2024 Approved Erase Background Noises with Ease Using Audacity Tools
- Catchy Tracks The 20 Top Rapping Beats You Can't Miss on TikTok
- In 2024, Transformative Ways to Document FaceTime Interactions
- Elegant Sound Sculpting An Overview of Leading Audio Editors Features, Perks & Pitfalls
- [New] 2024 Approved Visual Data Extractor
- In 2024, Easiest Guide How to Clone Honor X50 Phone? | Dr.fone
- [New] 2024 Approved QuickTweet Clip IPhone-Friendly Video Download Tool
- [Updated] Selecting the Perfect Screen Recorder for Educational Purposes
- [New] Unlocking Netflix's Secrets 6 Proven Techniques for Streamers on macOS for 2024
- In 2024, Discover Key Methods to Store Discord Livestream Videos Efficiently
- 2024 Approved Top Strategies Efficiently Saving Rocket League Matches
- [New] Streamline Your Workflow with These 5 OBS Editing Hacks for 2024
- Updated In 2024, The SFX Seekers Companion Navigating to 8 Exceptional Online Locations for Accessing Premium-Quality, No-Cost Audio Assets
- Updated 2024 Approved The Pathway to Accessing Peaceful Soundtracks Effortlessly
- New The Ultimate Guide to Titles in Final Cut Pro X 2023 Edition for 2024
- In 2024, 2 Methods to Cut Video in VLC on Windows
- New 2024 Approved Trim Videos Like a Pro 10 Free Online Editors 2023 Guide
- How to Change Google Play Location On Oppo Find X7 | Dr.fone
- [Updated] Exciting Online Cam Challenges
- [Updated] In 2024, Decoding the Purpose Why Does FB Use a Blue Icon?
- Updated In 2024, The AI Music Forerunners Crafting Harmonies for a New Era
- [Updated] 2024 Approved Navigating Through Instagram Video Hiccups
- Updated 2024 Approved Create Stunning Intros with These Top 10 PC Software
- [New] Clear Visuals Ahead Mastering Your Logitech Webcam's Capabilities for 2024
- Title: [Updated] In 2024, Audit Your TikTok Impact with These 10 Tools
- Author: Stephen
- Created at : 2024-05-23 03:32:38
- Updated at : 2024-05-24 03:32:38
- Link: https://tiktok-video-recordings.techidaily.com/updated-in-2024-audit-your-tiktok-impact-with-these-10-tools/
- License: This work is licensed under CC BY-NC-SA 4.0.
