
!["[Updated] Step Into Stardom Building Starry-Eyed TikTok Dances on MacOS for 2024"](https://www.lifewire.com/thmb/jgYC2LQD_DfpMsJmfadVTJNxl5c=/400x300/filters:no_upscale():max_bytes(150000):strip_icc()/Strong-AI-vs-Weak-AI-d04f84282874473da514a4e4ad8b8690.jpg)
"[Updated] Step Into Stardom Building Starry-Eyed TikTok Dances on MacOS for 2024"
Step Into Stardom: Building Starry-Eyed TikTok Dances on MacOS
How to make TikTok dance on Mac

Shanoon Cox
Oct 26, 2023• Proven solutions
TikTok is one of the most famous social media apps currently on social media. It has started to take the world by storm since the day it came out. With more than 1 billion downloads, around 700 million people use this app daily.
There are many things to do on Tiktok, such as imitating dialogues, viral videos, songs or you can even make your original video content. The famous forms of entertainment on this application are TikTok dances.
It started with Lil Nas X’s song Old Town Road, which introduced a dance challenge. The song didn’t gain much attention till it produced a dance routine on Tiktok. Since then, every now and then there is a new dance routine challenge on Tiktok which goes viral on almost all social media platforms.
You May Also Like: How to Make a Best Tiktok Intro Video on Mac?>>>
Special Effects That Can Make Your Tiktok Dance Routine Special
Tik Tok comes with various options of different effects on its own. Whenever you make a video on Tik Tok, you can easily add effects from the app after you are done recording. Nevertheless, there is always a limit to the number of effects offered by the app.
You can however add effects to your content via different applications. One of the best and most amazing video effects you can add to your videos is motion tracking. Motion tracking function allows any sticker or animation to follow your actions.
For that execution, you will need an external video editing app to edit your videos. Wondershare’s FilmoraX is recommended to be the best video editing software used for these purposes.
Motion Tracking Function With Wondershare FilmoraX


Using the motion tracking function is extremely easy. Here is how you do it:
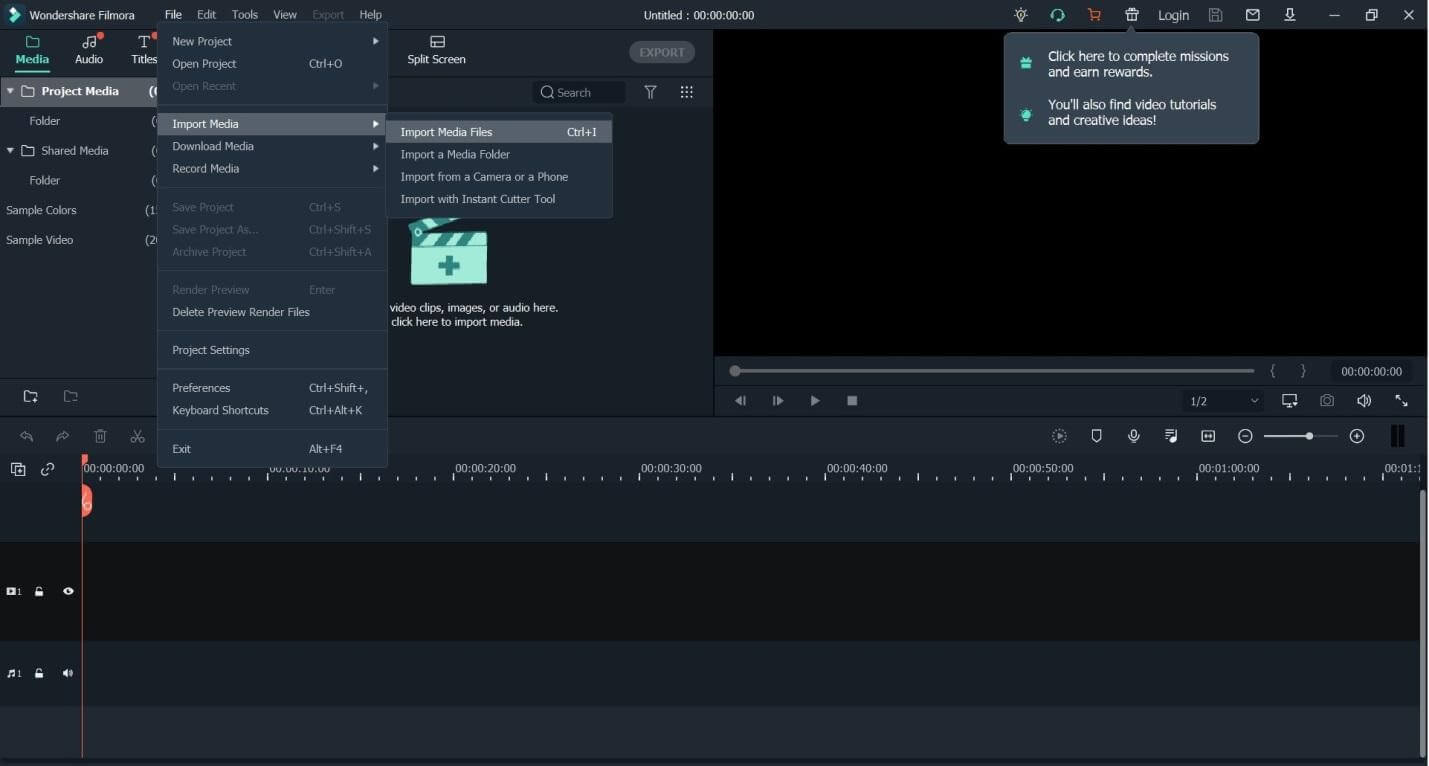
1.First, you select and open the Tik Tok dance video you want to use on FilmoraX and drag it into the timeline.
2.Now you will want to check that the main body of the subject is in the entire frame. If it is not, then you will need to cut and trim the video accordingly.
3.The next step is to start the motion tracking. For this, you will need to make sure that your play head is at the point from where you want to start your motion tracking. The tracking will only start wherever your play head is.

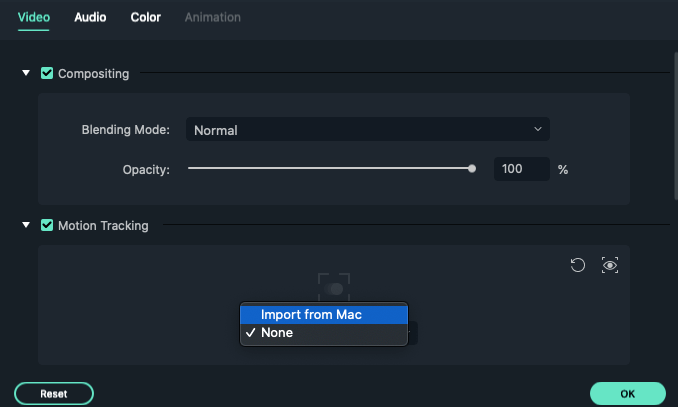
4.Once that is done, you can open the tool used for motion tracking from the timeline toolbar. You can also do it by double-clicking your clip to find the motion tracking function in the editing menu.
5.When you have done that, the motion tracking box will appear in the preview. Move and resize it according to the subject that you wish to track. Then, select the “render-effect” option so that Filmora can analyze the video.

6.Now you can add the object you want to have to follow the track. You can choose that from the title menu or add a new image from your Mac.
7.Once you choose your object, you simply need to drag that object to the track above your footage.
8.Next, you will need to place the object where you want it to be concerning the subject in the preview box. Make sure that you drag the edge of it on the timeline to match it with the timeline of your subject.
9.When it has been set up, you will need to double-click the footage you have added the tracking function to and go to the motion tracking menu.
10.The drop-down menu will show all the texts and images or animations available. Select the one you want to see.
11.Adjust the size of your object and voila!! You are done.
With these easy steps, you have managed to make a normal Tik Tok Dance challenge into a unique and zestful piece of art.
Other Visual Effects For Your Tik Tok Dance
Other than motion tracking several other effects can make your Tik Tok dance alluring and special. Here are some of them.
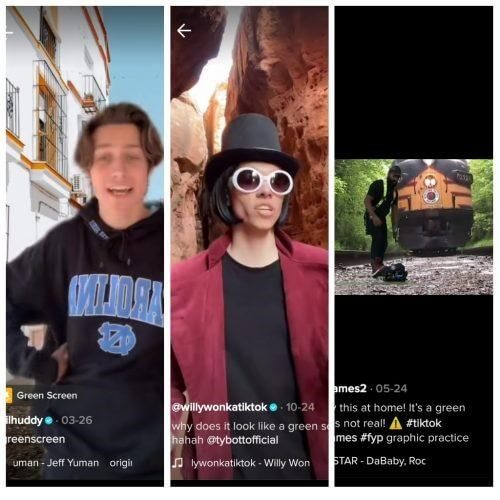
Green Screen for TikTok Dance
This is also one of the most famous effects that are used for the Tik Tok dance challenge. Green Screen in a built-in app effect that allows you to add any background to your current video. Tik Tok provides some default backgrounds to its users but you can also choose from your camera roll.
Disco effects for TikTok Dance
This is another one of the extremely fun built-in effects that allow you to add disco lights to your amazing Tik Tok dance.

Double Screen Effect for TikTok Dance
This effect allows you to have two screens at once. The brilliant thing about this effect is that you can perform different actions on both screens and also create an illusion of moving from one screen to another. This effect can help make some creative Tik Tok dance videos depending on your imagination.

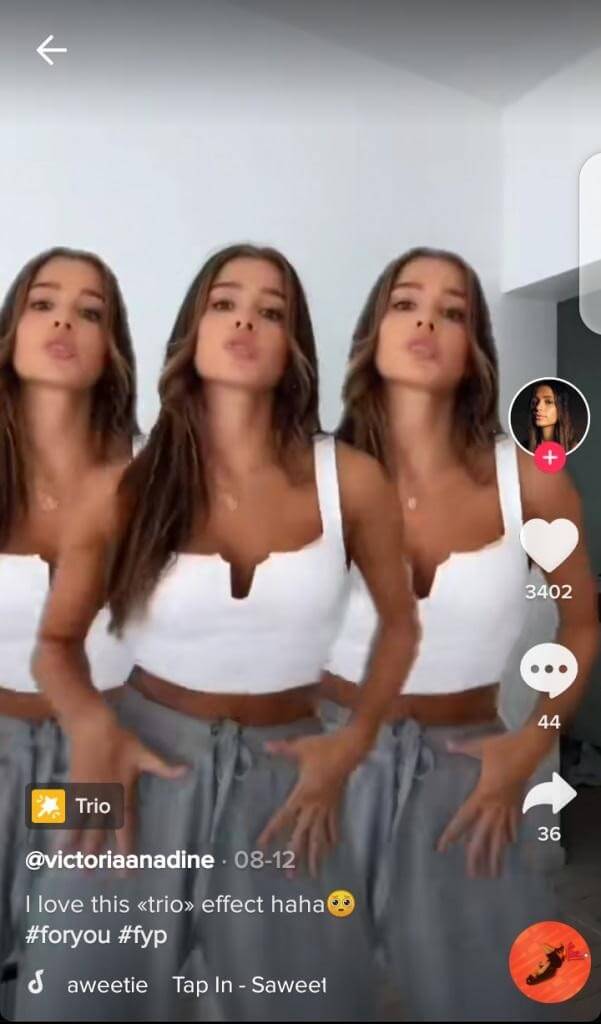
Trio Effect for TikTok Dance
This effect allows you to make two other clones of yourself. Now imagine three of you dancing together on some good choreography. Sounds sensational; doesn’t it? When using trio, both of your clones will be doing the same moves, you cannot assign different moves to your clones.
Conclusion
Tik Tok dance challenges have been going viral for a long time now because they are creative and amusing. They can be made much more entertaining by using different video effects.
The most mesmerizing effects can be added through the motion tracking function. It allows you to add objects and animations to your videos and make them extremely befuddling and stimulates one’s imagination.
Motion tracking not only adds objects but also helps stabilize the video. It also lets you add 3d objects in 2d footage and apply other effects and color grading techniques.
Apart from all that it will let you replace screens on different devices such as tablets, computers, and TV devices.
All of this can be achieved with just one top of the line video editing software that is Wondershare’s FilmoraX. So, start your challenges today with the tips and tricks provided and go viral, be famous.
Shanoon Cox
Shanoon Cox is a writer and a lover of all things video.
Follow @Shanoon Cox
Shanoon Cox
Oct 26, 2023• Proven solutions
TikTok is one of the most famous social media apps currently on social media. It has started to take the world by storm since the day it came out. With more than 1 billion downloads, around 700 million people use this app daily.
There are many things to do on Tiktok, such as imitating dialogues, viral videos, songs or you can even make your original video content. The famous forms of entertainment on this application are TikTok dances.
It started with Lil Nas X’s song Old Town Road, which introduced a dance challenge. The song didn’t gain much attention till it produced a dance routine on Tiktok. Since then, every now and then there is a new dance routine challenge on Tiktok which goes viral on almost all social media platforms.
You May Also Like: How to Make a Best Tiktok Intro Video on Mac?>>>
Special Effects That Can Make Your Tiktok Dance Routine Special
Tik Tok comes with various options of different effects on its own. Whenever you make a video on Tik Tok, you can easily add effects from the app after you are done recording. Nevertheless, there is always a limit to the number of effects offered by the app.
You can however add effects to your content via different applications. One of the best and most amazing video effects you can add to your videos is motion tracking. Motion tracking function allows any sticker or animation to follow your actions.
For that execution, you will need an external video editing app to edit your videos. Wondershare’s FilmoraX is recommended to be the best video editing software used for these purposes.
Motion Tracking Function With Wondershare FilmoraX
Using the motion tracking function is extremely easy. Here is how you do it:
1.First, you select and open the Tik Tok dance video you want to use on FilmoraX and drag it into the timeline.
2.Now you will want to check that the main body of the subject is in the entire frame. If it is not, then you will need to cut and trim the video accordingly.
3.The next step is to start the motion tracking. For this, you will need to make sure that your play head is at the point from where you want to start your motion tracking. The tracking will only start wherever your play head is.
4.Once that is done, you can open the tool used for motion tracking from the timeline toolbar. You can also do it by double-clicking your clip to find the motion tracking function in the editing menu.
5.When you have done that, the motion tracking box will appear in the preview. Move and resize it according to the subject that you wish to track. Then, select the “render-effect” option so that Filmora can analyze the video.
6.Now you can add the object you want to have to follow the track. You can choose that from the title menu or add a new image from your Mac.
7.Once you choose your object, you simply need to drag that object to the track above your footage.
8.Next, you will need to place the object where you want it to be concerning the subject in the preview box. Make sure that you drag the edge of it on the timeline to match it with the timeline of your subject.
9.When it has been set up, you will need to double-click the footage you have added the tracking function to and go to the motion tracking menu.
10.The drop-down menu will show all the texts and images or animations available. Select the one you want to see.
11.Adjust the size of your object and voila!! You are done.
With these easy steps, you have managed to make a normal Tik Tok Dance challenge into a unique and zestful piece of art.
Other Visual Effects For Your Tik Tok Dance
Other than motion tracking several other effects can make your Tik Tok dance alluring and special. Here are some of them.
Green Screen for TikTok Dance
This is also one of the most famous effects that are used for the Tik Tok dance challenge. Green Screen in a built-in app effect that allows you to add any background to your current video. Tik Tok provides some default backgrounds to its users but you can also choose from your camera roll.
Disco effects for TikTok Dance
This is another one of the extremely fun built-in effects that allow you to add disco lights to your amazing Tik Tok dance.
Double Screen Effect for TikTok Dance
This effect allows you to have two screens at once. The brilliant thing about this effect is that you can perform different actions on both screens and also create an illusion of moving from one screen to another. This effect can help make some creative Tik Tok dance videos depending on your imagination.
Trio Effect for TikTok Dance
This effect allows you to make two other clones of yourself. Now imagine three of you dancing together on some good choreography. Sounds sensational; doesn’t it? When using trio, both of your clones will be doing the same moves, you cannot assign different moves to your clones.
Conclusion
Tik Tok dance challenges have been going viral for a long time now because they are creative and amusing. They can be made much more entertaining by using different video effects.
The most mesmerizing effects can be added through the motion tracking function. It allows you to add objects and animations to your videos and make them extremely befuddling and stimulates one’s imagination.
Motion tracking not only adds objects but also helps stabilize the video. It also lets you add 3d objects in 2d footage and apply other effects and color grading techniques.
Apart from all that it will let you replace screens on different devices such as tablets, computers, and TV devices.
All of this can be achieved with just one top of the line video editing software that is Wondershare’s FilmoraX. So, start your challenges today with the tips and tricks provided and go viral, be famous.
Shanoon Cox
Shanoon Cox is a writer and a lover of all things video.
Follow @Shanoon Cox
Expert Edits at a Click – 2 Ways to Rule the World of TikTok Reactions with Filmora
How to Make TikTok Reaction Videos Easily in 2 Ways
Shanoon Cox
Mar 27, 2024• Proven solutions
With all the videos of different moods and categories available on the platform, TikTok’s reaction is something that makes the footage more engaging. Available for both iOS and Android platforms, TikTok allows you to record, edit , and compile a video of up to 60 seconds, and apply a plethora of filters and animation effects to them along with adding relevant music to awe your audience.
Considering this, here you will learn how to make TikTok reaction videos with ease from within the app itself, and if that’s not enough, using one of the best and most efficient programs available in the market that can even allow you to add unique effects to the reactions you create.
- Part 1: How to Make React Videos on TikTok
- Part 2: How to Use Snap Filmora to Make TikTok Reaction Videos
Bonus: Create A More Attractive Video with Human Segmentation Effect
The human segmentation effect under AI Portrait allows you to isolate people from video background even without a green screen, and then you can composite it to make a reaction video easily. Watch the video tutorial below to find out more details.
Want to read the texts instead of watching videos? Check the complete guide to making a reaction video in 3 ways .
Part 1: How to React to a TikTok Video
After being equipped with all the worldly knowledge about TikTok reaction videos, you can follow the steps given below to learn how to react to the footage created by other people:
1. Tap Share and Record Your Reaction
Start TikTok, play the video you want to react on, tap the Share icon from the lower-right area, and tap the React option from the Share to menu. Tap Flip from the top-right corner of the Camera screen to switch between the front and rear camera as needed, optionally tap the Mic icon to disable or enable voice and system audio capture, drag and reposition React window according to the source footage, and tap the Record button from the bottom to start shooting your TikTok reaction. Wait while the source clip and your recording process are complete successfully before moving forward to the next step.

2. Apply Filters
Tap the Filters icon from the top-right corner, tap to pick a filter from those available at the bottom, and tap anywhere on the screen to accept the one you selected and to get back to the previous window.

3. Manage Audio
Tap the Mixer icon from the upper-right corner of the screen, drag the My Voice and Soundtrack Volume sliders to manage your voice recording and the internal audio respectively, and tap Done to save the changes once you’re through with the modifications. Back on the previous window, tap Next from the bottom-right corner.

4. Publish the Video
Tap the Who can view this video option to manage your reaction’s visibility settings (optional). Tap the Save to device toggle switch to prevent TikTok reaction from being stored on your mobile’s storage (optional). Next, tap the Post button from the bottom-right corner to publish the video to TikTok.

More creative tricks about TikTok video: Clone Yourself in TikTok
Part 2: How to Make Reaction Videos with Filmora
Even though you can make TikTok reaction videos using its own filters and audio mixing tools that work pretty well under ideal conditions, if you are a perfectionist and like precision in anything you do or create, you need a dedicated program that has been designed specifically for the purpose.
Although several such tools are available in the market and can be easily downloaded and used, the best among them is Filmora by Wondershare. Wondershare Filmora is an industry-standard production and post-production tool for both Mac and Windows PCs that the majority of users prefer over its competitors such as Adobe Premiere Pro, Final Cut Pro X, etc. This is because Filmora offers simple UI, is less resource-intensive, and is able to render the outputs significantly faster.
You can learn how to make TikTok reaction videos using Wondershare Filmora by following the steps given below:
Note: Before proceeding, make sure that you have already copied the source (and the reaction) video(s) from your smartphone to your computer.
1. Create New Project and Set Preferences
Start Wondershare Filmora on your Windows or Mac PC, go to File > New Project and click 9:16 (Portrait) from the submenu that appears.
Click Split Screen from the standard toolbar at the top, hover mouse to the screen type preset you want to use, click the + ( Add to Project ) icon that appears at the bottom-right corner of the thumbnail, and click OK from the bottom-right corner once the preset is added to the Timeline.

2. Import and Add Video(s) Preview/Timeline
Click the Media button from the standard toolbar, click anywhere inside the Media window at the upper-left corner, and when the Open box comes up, select and import the video file(s) you want to participate in the TikTok reaction. Alternatively, you can also click Record from below the standard toolbar, and choose any of the options to record your own video or voice right from within Wondershare Filmora itself.
Next, click and drag each of the imported videos to their corresponding screen sections in the Preview window in the upper-right area. Notice how the files are automatically added to the Timeline at the bottom.
3. Add Elements and Titles
Click Elements from the standard toolbar, hover mouse to the element you want to add to the reaction, click the + icon that appears at the center of the thumbnail, and reposition the element in the Timeline to match the duration with that of the reaction you are creating.

4. Export the Reaction

Click EXPORT from the top-middle section of the interface, go to the Local tab from the top of the Export box that appears next, select your preferred format from the left bar, optionally choose a destination folder from the right window, optionally click SETTINGS to fine-tune the output preferences as needed, and click EXPORT from the bottom-right corner to export the TikTok reaction. Or, you can save it in the settings perfect for iPhone or another device.
Below is a sample reaction video made with Filmora, you can do much better than that for your TikTok account:
Besides using Filmora to edit reaction videos with the split-screen presets, you can also use some other video editing software to create a reaction video . Filmora can empower your video creation with more creativity, watch the video below and download Filmora to try.
Conclusion
A TikTok reaction enables you to make the source videos more fun and entertaining. Luckily the app itself has a “React” button that helps you create TikTok reaction videos with merely a few simple taps. However, if you feel that the built-in options are not as robust as they should be, a third-party program like Wondershare Filmora is something you would definitely love to try your hands on as the software is not only easy to use, it is also lightweight, and doesn’t put any overhead on your computer hardware.
Shanoon Cox
Shanoon Cox is a writer and a lover of all things video.
Follow @Shanoon Cox
Shanoon Cox
Mar 27, 2024• Proven solutions
With all the videos of different moods and categories available on the platform, TikTok’s reaction is something that makes the footage more engaging. Available for both iOS and Android platforms, TikTok allows you to record, edit , and compile a video of up to 60 seconds, and apply a plethora of filters and animation effects to them along with adding relevant music to awe your audience.
Considering this, here you will learn how to make TikTok reaction videos with ease from within the app itself, and if that’s not enough, using one of the best and most efficient programs available in the market that can even allow you to add unique effects to the reactions you create.
- Part 1: How to Make React Videos on TikTok
- Part 2: How to Use Snap Filmora to Make TikTok Reaction Videos
Bonus: Create A More Attractive Video with Human Segmentation Effect
The human segmentation effect under AI Portrait allows you to isolate people from video background even without a green screen, and then you can composite it to make a reaction video easily. Watch the video tutorial below to find out more details.
Want to read the texts instead of watching videos? Check the complete guide to making a reaction video in 3 ways .
Part 1: How to React to a TikTok Video
After being equipped with all the worldly knowledge about TikTok reaction videos, you can follow the steps given below to learn how to react to the footage created by other people:
1. Tap Share and Record Your Reaction
Start TikTok, play the video you want to react on, tap the Share icon from the lower-right area, and tap the React option from the Share to menu. Tap Flip from the top-right corner of the Camera screen to switch between the front and rear camera as needed, optionally tap the Mic icon to disable or enable voice and system audio capture, drag and reposition React window according to the source footage, and tap the Record button from the bottom to start shooting your TikTok reaction. Wait while the source clip and your recording process are complete successfully before moving forward to the next step.
2. Apply Filters
Tap the Filters icon from the top-right corner, tap to pick a filter from those available at the bottom, and tap anywhere on the screen to accept the one you selected and to get back to the previous window.
3. Manage Audio
Tap the Mixer icon from the upper-right corner of the screen, drag the My Voice and Soundtrack Volume sliders to manage your voice recording and the internal audio respectively, and tap Done to save the changes once you’re through with the modifications. Back on the previous window, tap Next from the bottom-right corner.
4. Publish the Video
Tap the Who can view this video option to manage your reaction’s visibility settings (optional). Tap the Save to device toggle switch to prevent TikTok reaction from being stored on your mobile’s storage (optional). Next, tap the Post button from the bottom-right corner to publish the video to TikTok.
More creative tricks about TikTok video: Clone Yourself in TikTok
Part 2: How to Make Reaction Videos with Filmora
Even though you can make TikTok reaction videos using its own filters and audio mixing tools that work pretty well under ideal conditions, if you are a perfectionist and like precision in anything you do or create, you need a dedicated program that has been designed specifically for the purpose.
Although several such tools are available in the market and can be easily downloaded and used, the best among them is Filmora by Wondershare. Wondershare Filmora is an industry-standard production and post-production tool for both Mac and Windows PCs that the majority of users prefer over its competitors such as Adobe Premiere Pro, Final Cut Pro X, etc. This is because Filmora offers simple UI, is less resource-intensive, and is able to render the outputs significantly faster.
You can learn how to make TikTok reaction videos using Wondershare Filmora by following the steps given below:
Note: Before proceeding, make sure that you have already copied the source (and the reaction) video(s) from your smartphone to your computer.
1. Create New Project and Set Preferences
Start Wondershare Filmora on your Windows or Mac PC, go to File > New Project and click 9:16 (Portrait) from the submenu that appears.
Click Split Screen from the standard toolbar at the top, hover mouse to the screen type preset you want to use, click the + ( Add to Project ) icon that appears at the bottom-right corner of the thumbnail, and click OK from the bottom-right corner once the preset is added to the Timeline.
2. Import and Add Video(s) Preview/Timeline
Click the Media button from the standard toolbar, click anywhere inside the Media window at the upper-left corner, and when the Open box comes up, select and import the video file(s) you want to participate in the TikTok reaction. Alternatively, you can also click Record from below the standard toolbar, and choose any of the options to record your own video or voice right from within Wondershare Filmora itself.
Next, click and drag each of the imported videos to their corresponding screen sections in the Preview window in the upper-right area. Notice how the files are automatically added to the Timeline at the bottom.
3. Add Elements and Titles
Click Elements from the standard toolbar, hover mouse to the element you want to add to the reaction, click the + icon that appears at the center of the thumbnail, and reposition the element in the Timeline to match the duration with that of the reaction you are creating.
4. Export the Reaction
Click EXPORT from the top-middle section of the interface, go to the Local tab from the top of the Export box that appears next, select your preferred format from the left bar, optionally choose a destination folder from the right window, optionally click SETTINGS to fine-tune the output preferences as needed, and click EXPORT from the bottom-right corner to export the TikTok reaction. Or, you can save it in the settings perfect for iPhone or another device.
Below is a sample reaction video made with Filmora, you can do much better than that for your TikTok account:
Besides using Filmora to edit reaction videos with the split-screen presets, you can also use some other video editing software to create a reaction video . Filmora can empower your video creation with more creativity, watch the video below and download Filmora to try.
Conclusion
A TikTok reaction enables you to make the source videos more fun and entertaining. Luckily the app itself has a “React” button that helps you create TikTok reaction videos with merely a few simple taps. However, if you feel that the built-in options are not as robust as they should be, a third-party program like Wondershare Filmora is something you would definitely love to try your hands on as the software is not only easy to use, it is also lightweight, and doesn’t put any overhead on your computer hardware.
Shanoon Cox
Shanoon Cox is a writer and a lover of all things video.
Follow @Shanoon Cox
Also read:
- [New] How to Pinpoint the Perfect Tag for Your Personalized TikTok Stream
- [Updated] 2024 Approved Moving the Crowd Discover Trending, Simple TikTok Beats
- Crafting a Unique Identity with Creative TikTok PFPs for 2024
- Inject Personality Into Snaps on Snapchat Through Voice Customization
- [New] Best 5 TikTok Fonts Generator of 2023 to Gain More Views
- Boosting Views on TikTok The Year's Most Influential Font Generator for 2024
- Crafting Memorable Moments Leading Tools for TikTok Video to GIF Transformation
- [Updated] In 2024, Building a Unique Presence When Overshadowed by Influencers
- [New] In 2024, Unveiling the Secrets of Skipping Content on TikTok
- Top 5 Applications Efficiently Turning TikTok Into a GIF for 2024
- Bite-Sized Global Cuisines on TikTok
- [Updated] Elite 10 TikTok Visual Effects That Turn Up the Heat
- [New] 2024 Approved Make a Mark with Rapid, Impactful TikTok Photo Tricks
- [Updated] 2024 Approved Optimized Processes for Effective Live Streaming on Computer
- Discovering an Original TikTok Identifier Code for 2024
- [New] 2024 Approved Unveiling the Ultimate Top 10 TikTok Gaming Squad
- [Updated] Mastering TikTok Crafting Video Content with Background Melodies for 2024
- In 2024, Audacity's Silence Secret Eliminating Rests of Noise
- [New] Revolutionary Bio Blueprint Essential Strategies for Maximum Viewership on TikTok-Filmora Platforms for 2024
- [Updated] In 2024, Sync the Beat Unleashing Your Inner Dancer with TikTok and Mac
- [Updated] In 2024, The Allure of TikTok Animation, Songs, Dances & Laughter
- Stand Out with Style The Best Creative Filters on TikTok for 2024
- [Updated] In 2024, Expert Advice for Achieving Larger Head Effects in TikTok VFX
- [New] 2024 Approved A Complete Breakdown of What PFP Means on TikTok
- [Updated] In 2024, Epic Eats Escapades #TopTiktokFoodies
- [New] Pro Tips for Precise and Popular TikTok Reactions in Filmora for 2024
- Installing TikTok Your Path to Joyful MacBook Experience
- Snap's Boomerangs Mastering & Tips
- 2024 Approved Maximize Social Media Impact TikTok's Top Data Analysis Resources
- [New] Increase Your Social Media Reach with These Top 30 TikTok Nicknames for 2024
- [New] 2024 Approved 7 Best TikTok Emojis and How to Discover TikTok Secret Emojis
- Gain More Traction on TikTok A Compendium of Unique Username Concepts for 2024
- In 2024, Refining Your TikTok End Screen Elements
- In 2024, Instant Tunes Live Streaming on BigoLive
- In 2024, Top Techniques for Captivating TikTok Audien Written by [Your Name]
- The Ultimate Guide to Voiceovers in TikTok Amplifying Your Presence
- [Updated] International Eats Iconic Recipes for the Palate
- [New] In 2024, Top 10 High-Quality TikFilters Transforming Feeds
- [Updated] Step Into Fame Crafting an Authentic TikTok Duplicate for 2024
- 2024 Approved Weaving a Story in Your TikTok Closing Moment
- Leveraging NVIDIA Tools for Screen Capture
- New Watermark-Free Video Editing 7 Free Trimmer Options for 2024
- [New] Perfecting OBS Broadcasts for Facebook Audience
- Updated 2024 Approved The Art of Gamers Vocal Disguise Selecting the Ultimate Toolkit
- 2024 Approved Best Eco-Savvy Movie Capture Tools Usage Methods
- In 2024, Why Apple Account Disabled From your Apple iPhone SE (2022)? How to Fix
- [New] In 2024, Highest-Rated Video Call Software (Not Zoom) for PCs & Phones
- In 2024, Top Spots for Accessing Avian Audio Files
- New Ultimate Guide on Magic Effects Video Making
- What is Fake GPS Location Pro and Is It Good On Honor 90 Lite? | Dr.fone
- [New] 2024 Approved Mastering InstaClips Crafting Effective Video Promotions
- In 2024, 10 Fake GPS Location Apps on Android Of your Tecno Pova 6 Pro 5G | Dr.fone
- [New] Instagram Highlights Download Methods and Creating Tips for 2024
- Updated 2024 Approved How to Cut Videos on Mac without Using FFmpeg?
- [Updated] In 2024, Ultimate Checklist Streamlining and Maximizing Screencast Quality with Mobizen
- New Strategies for Decelerating Melodic Speed Without Altering Tonal Frequency
- How to Make the Most of Your iPhone XR Lock Screen with Notifications?
- [Updated] The Ultimate Guide to Discord Live Broadcasts
- Compelling Top 10 PC Cameras for Recording for 2024
- [New] In 2024, EpicCollab Unify Instagram Videos on Devices
- In 2024, Digital Self-Portrait Designing Your Animated Profile
- [Updated] 2024 Approved Accelerate Your Retro Play with Best Ps2 Android Emulators
- Updated In 2024, The Best Boxing Streaming Websites for the Latest Match Coverage
- Discovering the Prime Stardew Modifications for Perfection for 2024
- Can Life360 Track You When Your Sony Xperia 5 V is off? | Dr.fone
- Updated Top 10 Music Tracker You Cant Ignore
- [New] The Leading 15 Android Virtual Machines for Your Devices
- In 2024, 3 Effective Methods to Fake GPS location on Android For your Honor X9b | Dr.fone
- How to Fake Snapchat Location on Samsung Galaxy A23 5G | Dr.fone
- Top 10 Open-Source Recording Programs, Reviewed for 2024
- [New] 2024 Approved The Great Live Showdown OBS vs Twitch Studio
- Title: "[Updated] Step Into Stardom Building Starry-Eyed TikTok Dances on MacOS for 2024"
- Author: Stephen
- Created at : 2024-05-23 04:14:41
- Updated at : 2024-05-24 04:14:41
- Link: https://tiktok-video-recordings.techidaily.com/updated-step-into-stardom-building-starry-eyed-tiktok-dances-on-macos-for-2024/
- License: This work is licensed under CC BY-NC-SA 4.0.
